VOLTA is a mature stealer implant with an optional AI-integration layer. After stealing credentials, sessions, and cryptocurrency wallets, VOLTA sends a structured evidence bundle to an LLM to rank the victim’s assets by monetization value.If a model refuses to perform the target assessment, VOLTA fails over to a three-model chain, implying a direct engineering effort and expectation of hitting model guardrails. This stealer is self-deleting, and there is no attacker-owned infrastructure. The no
VOLTA is a mature stealer implant with an optional AI-integration layer. After stealing credentials, sessions, and cryptocurrency wallets, VOLTA sends a structured evidence bundle to an LLM to rank the victim’s assets by monetization value.
If a model refuses to perform the target assessment, VOLTA fails over to a three-model chain, implying a direct engineering effort and expectation of hitting model guardrails.
This stealer is self-deleting, and there is no attacker-owned infrastructure. The novelty in the AI-integration is that it is not supporting a traditional malware capability but working as an intelligence analyst on behalf of the operator.
There is a new idea in the cybercrime world — cast a wide net, steal everything, and let AI sort out the specifics. A new malware self-named “VOLTA-AUTODOXER,” surfaced through the CAIRN research effort, is a self-deleting Windows infostealer that augments its post-theft workflow with an LLM-powered victim-profiling stage.
After harvesting the standard stealer haul, including browser passwords; cookies; payment cards; cryptocurrency wallet seed phrases; Discord, Telegram, Steam, and Roblox sessions; Microsoft OAuth tokens; SSH and cloud-provider keys; Wi-Fi profiles; and screenshots, VOLTA builds a structured evidence bundle about the person behind the machine. This bundle contains geolocation and home address, employer and employer domain, inferred birth year, card last-4 digits, Slack workspaces, document authorship metadata, iPhone backup indicators, and a live Roblox account valuation. It then uses stolen session access to enrich that bundle further: searching the victim's Gmail for purchase receipts to corroborate a home address, pulling UberEats and DoorDash order history, and enriching Discord accounts via the stolen token.
The bundle is serialized and POSTed to OpenRouter under a system prompt that instructs the model to act as "a forensic intelligence analyst drafting a target assessment." The required output includes a section titled “WHAT THEY'RE WORTH” with valuables ranked by monetization with a low/medium/high tier, and a section on “THEIR OPSEC” containing an assessment of the victim's security posture and password hygiene. The model is the operator's triage analyst; it turns a raw credential log into a prioritized and citation-backed dossier of the victim and their monetizable assets.
Figure 1. The VOLTA-AUTODOXER workflow.
The AI configuration: “Go deep, not wide... Be blunt, specific, accurate.”
VOLTA uses a multi-model architecture to fall back resiliently if it hits a model’s refusal, checking each response for phrases like “I can’t” or “I’m not able,” before passing on to a chain of up to three models.
Endpoint
https[:]//openrouter[.]ai/api/v1/chat/completions
Default model
anthropic/claude-opus-4.6
Fallback chain
moonshotai/kimi-k2 → google/gemini-2.5-flash
Temperature
0.2 — deterministic, consistent output
Request format
Hand-assembled JSON; no SDK; User-Agent Mozilla/5.0
Figure 2. Hardcoded model selection.Figure 3. Failover model selection to kimi-k2, and then gemini-2.5-flash.
Model temperate controls the randomness and predictability of LLM-generated text. The low hardcoded temperature value (0.2) suggests the attacker is emphasizing accuracy and consistency. The malware also employs a chain of cascading models in the event of failures. This multi-model architecture suggests that the operator is anticipating encountering refusals, with the fallback pivoting to a few, smaller, and more permissive models.
The system prompt directly reveals the operator’s use case: Produce a concise analytical assessment of the victim’s suitability as a target, backed by an auditable trail of citations.
Figure 4. VOLTA's raw system prompt.
The prompt also asks for something out of the ordinary, but that agents excel at: making connections between sparse and disparate data. For example, encouraging connections like the victim’s names, addresses, or universities to patterns in their passwords. In this case, the model isn't being asked to find data; rather, it’s being asked to stretch the data and make useful inferences that extend the value of what has been scraped.
Stealer capabilities
VOLTA’s capabilities are directly aligned with the records produced in modern digital life, and well beyond basic credential theft. In a single pass, the stealer can extract browser credentials, cookies, and saved payment cards across Chromium-based browsers. It hits Firefox and Thunderbird, Outlook profiles, Slack workspaces, Steam and Battle.net sessions, Discord tokens, Telegram sessions, Roblox accounts, and SSH and cloud-provider config files (gcloud, OpenVPN, Hide.me). VOLTA doesn’t just copy cryptocurrency wallets, but runs an embedded cracker against the vault inline, writing the result to a WALLET VAULTS CRACKED line in its own report.
Every saved Wi-Fi password on the machine is pulled via a direct call to WlanGetProfileList and dumped to plaintext.
Figure 5. VOLTA dumps plaintext passwords for every saved Wi-Fi network on the host.Figure 6. The organized collection targets.
What really sets VOLTA apart from commodity stealers is what comes after the initial collection. There is a live enrichment pass that leverages stolen sessions to deep dive the victim’s data. For example, using the victim's own authenticated Gmail tokens, it queries their inbox for receipts from Amazon, DoorDash, Uber Eats, Grubhub, Walmart, and PayPal, then review those receipts to establish a confirmed home address. Stolen Uber Eats and DoorDash sessions are called directly for order history. The Discord token is re-used to enrich the victim's account profile. Roblox inventory is valued via a live “Rolimons[.]com” lookup.
Figure 7. That’s right: Your Uber Eats history is now a potential liability.
After the collection and enrichment stages are complete, the data is assembled and structured locally in a file called “Identity_Report.txt”. This file is serialized into a bundle as JSON and POSTed to OpenRouter along with the system prompt. The returned payload is received as “AI_Analysis.txt”. Both files exfil together in “volta_dox.zip”.
Figure 8. VOLTA’s exfil can happen in three stages: 1) after the stealer runs (“volta_log.zip”), 2) after the AI call (“volta_dox.zip”), (3) if the network enrichment produces anything (“volta_doxnet.zip”).
The inference round-trip happens entirely through the victim's own network connection, on their own machine, before the result is exfiltrated.
Deployment model
Instead of hardcoding its Telegram channel, API keys, and settings directly into the code (which is likely what someone writing a tool for personal use would do) VOLTA uses a template with six swappable slots, filled in at build time.
This suggests it’s a builder model: The author sells access, the customer provides their values, and the builder compiles a custom binary for each order. The credentials in those slots are encrypted, but not in a meaningful way. The key is SHA-256 of two constants sitting in the same binary, but it's presumably there because customers expect their API keys not to be sitting in plaintext, not because it provides real protection. Anyone who reverses the file can recover them.
If VOLTA is indeed a commoditized malware, then the AI dossier capability isn't something the author invented for their own operations. It is a feature which enables a customer of any level of sophistication to point it at victims and start receiving ranked target assessments in their Telegram inbox.
All the observed endpoints for this malware are third-party controlled. There is no actor-owned infrastructure.
Countermeasures
Much of the token-stealing capability of VOLTA relies on techniques to bypass App-Bound Encryption (ABE) in Chrome. An application control policy that restricts which processes may launch Chrome with --headless would block the ABE decryption path entirely. At minimum, you can also alert when Chrome is launched with --headless from any process not in a known developer. Best practices for storing credentials in hardware backed stores also apply.
In the event of compromise, the main executable may have deleted itself, but users should attempt to preserve the “APPDATA%\volta_debug.txt” file. This is a timestamped harvest log and contains a record of exactly what was collected and whether the LLM call succeeded. Revoke any potentially compromised tokens and change passwords. For cryptocurrency wallets, if the seed phrase was in plaintext on disk, treat the wallet as fully compromised and migrate funds to a new wallet with a seed generated on an air-gapped device.
Conclusions
VOLTA is a mature stealer with a late-stage AI layer added for one purpose: relieving the operator of analytical work. The axis of AI improvement here is not speed or scale but effort displacement; the same logic visible in CLOSEDQUORUM, though applied to a different phase. These implants reflect the same underlying logic: Identify the step that requires the most sustained human attention and replace it with a model call. The question for defenders is not whether this pattern will appear elsewhere, but which phase it touches next.
Figure 9. End-to-end VOLTA workflow.
The second trend to watch is the anticipation of hitting model refusals, and the approaches to building in resiliency. In this case, it includes a fallback chain from Claude to Kimi to Gemini and the ability to run without the LLM stage altogether if no key is present. As AI integration in malware matures, refusal resilience may become a standard design requirement.
The open question underlying both trends is whether effort displacement in crimeware changes the landscape in a meaningful way: lowering the operational floor, raising the ceiling on scale, or both. Cybercrime operations have always been opportunistic, and the sophistication bar has always been lower than assumed, but there is a difference between a wide net and a wide net that sorts itself.
Cisco Talos has identified UAT-11473, a highly sophisticated advanced persistent threat (APT) actor, who exploited CVE-2026-20127, an authentication bypass vulnerability in Cisco SD-WAN Catalyst Controller instances to bypass authentication and gain unauthorized access to affected systems.UAT-11473 then installed a custom malware framework we track as “KeyDrift” consisting of multiple components geared towards collecting sensitive keying information, acting as backdoors and intermediate command-
Cisco Talos has identified UAT-11473, a highly sophisticated advanced persistent threat (APT) actor, who exploited CVE-2026-20127, an authentication bypass vulnerability in Cisco SD-WAN Catalyst Controller instances to bypass authentication and gain unauthorized access to affected systems.
UAT-11473 then installed a custom malware framework we track as “KeyDrift” consisting of multiple components geared towards collecting sensitive keying information, acting as backdoors and intermediate command-and-control (C2) hosts.
Observed targeting spans across space and satellite services, defense and aerospace technology, and policy research.
KeyDrift is a custom malware framework that is designed to operate in Cisco SD-WAN controller environments. Talos assesses with high confidence that the framework is designed to provide long-term persistent access and automated exfiltration of sensitive keying material. KeyDrift operates inside SD-WAN control-plane processes and is capable of intercepting decrypted control traffic, extracting control-session metadata and data-plane keying material, and staging or transmitting the collected material using encrypted records.
The framework's primary component is PolyFlame, a memory-resident module deployed through modified runit service paths. PolyFlame is injected into legitimate running vdaemon processes, and it can also masquerade as a packed “aaamgrd” loader variant. Once resident, PolyFlame interposes socket, DTLS, and runtime-linker behavior through functions such as recvfrom, sendto, getpeername, dlopen, dlsym, mprotect, and “/proc/%d/maps” parsing. This gives KeyDrift access to SD-WAN control-plane traffic from inside legitimate controller daemon execution rather than through a conventional endpoint beacon.
LittleFilch, another component of the KeyDrift framework, provides the collection and exfiltration capability identified in the framework. The module hooks “SSL_read” inside vdaemon, inspects decrypted control-plane buffers, extracts keying material for a list of predefined edge nodes, and stages the data locally in encrypted format for exfiltration.
Talos assesses with high confidence that KeyDrift's intended operational purpose is Cisco SD-WAN control-plane collection: persistent controller residence, in-band traffic access, key-material extraction from decrypted control messages, and encrypted staging or exfiltration of the recovered material. Observed variations of the KeyDrift modules and deployment mechanisms suggest active development of the framework’s capabilities.
KeyDrift analysis
KeyDrift uses Cisco SD-WAN runit service paths as its primary execution anchor. In the PolyFlame sshd deployment, the actor modifies the service run script, remounts /rootfs.rw executable, launches a malicious script “conf_sshd” in the background, and then starts the legitimate sshd service. The loader script enumerates running vdaemon PIDs, records them in “/tmp/system-vdaemon”, and invokes the injector component “rsshd” to inject PolyFlame (“libdssl.so”) into each process.
Recovered conf_sshd logic uses the same control flow across reviewed samples:
Figure 1. conf_sshd control flow logic.
Runit launchers
The observed sshd runit launcher preserves normal Cisco SD-WAN sshd startup logic while adding two malicious lines before service execution, which remount “/rootfs.rw” executable and background execution of conf_sshd, which then drives rsshd injection into vdaemon.
Figure 2. conf_sshd execution logic.
The recovered aaamgr runit launcher from an affected vBond appliance uses a parallel service-wrapper pattern, but it executes the packed aaamgrd PolyFlame loader directly. The deletion of the writable-overlay PAM configurations for sshd and login before remounting “/rootfs.rw” executable if part of the legitimate script, along with the invocation of the aaamgrd daemon via Python:
Figure 3. aamgrd daemon launch.
PolyFlame
PolyFlame is the primary operational module in the KeyDrift framework. PolyFlame operates at the socket and DTLS control-plane layer. PolyFlame serves two primary purposes:
Command execution via a TinyShell-styled backdoor
Intermediate C2 that can forward commands to and from the C2 to other peers
PolyFlame is primarily injected into the vdaemon process, providing operational obfuscation and access to all in-process state: DTLS session keys, vEdge topology, OMP routes, and policy tables. No hardcoded IPv4 addresses, binding ports, callback domains, URLs, host headers, or polling interval were recovered from the analyzed PolyFlame samples. PolyFlame is designed for in-band control or tasking over Cisco SD-WAN control-plane traffic rather than a conventional fixed external beacon.
This implant is meant to serve as a hook of the recvfrom() API call. The original recvfrom is replaced by a malicious subroutine in the vdaemon process. When recvfrom is called in the vdaemon process, the malicious subroutine will first execute the real/legitimate recvfrom() API to obtain the C2 IP address info for communicating with it in the future.
PolyFlame’s time check
The recvd data from the C2 consists of the MD5 value of a specific DATE. PolyFlame will calculate the local time on the device in format “%Y-%m-%d" and calculate its MD5 hash. If the MD5 calculated by the device does not match with the one sent by the C2, the implant will stop further execution. Otherwise, the implant then uses an “administrative code” from the C2 and performs an action.
PolyFlame’s tasking
PolyFlame contains an administrative mode that processes the admin code sent by the C2, that defines operations — it's one of the first flags checked in the backdoor:
Code = 1: Generate random bytes and send to C2. This is likely a check-in beacon or heartbeat for the C2.
Code = 2: Set implant type to backdoor (TinyShell) or intermediate C2.
Code = 3: Set up the command handler for the intermediate C2.
Any other code value: Check the implant type flag currently set. Based on the implant type flag, either send the accompanying data to TinyShell or the intermediate C2 component for processing.
PolyFlame’s command execution
PolyFlame contains a backdoor that matches the capabilities of TinyShell: file read, file write, and arbitrary command execution, but not interactive shell. This backdoor component’s implementation is quite similar to TinyShell, but the command codes differ. PolyFlame handles the following command codes:
Code = 0x100: Execute command using “/bin/sh -c <command>”
Code = 0x200: Write file to disk.
Code = 0x300: Read file from disk and send to the C2.
PolyFlame as an intermediate C2 component
The intermediate C2 component is a one-to-many handler (somewhat like a one-to-many multiplexer) — meaning the implant can connect to only one C2 but can connect to many peers who can be served by the intermediate C2 component. Similar to the TinyShell-backdoor component, the intermediate C2 component also accepts and processes specific command codes from the C2:
Code = 0x403: Create a thread to connect to the specified peer IP. Make a new connection and keep socket alive until specified.
Code = 0x404: Send data recvd from the C2 to a connected peer.
Code = 0x405: Remove a peer from the list of active connections.
Code = 0x407: Send a response recvd from a peer, back to the C2.
Code = 0x408: Set a specific value in memory.
PolyFlame variant: aaamgrd
Talos has observed a distinct PolyFlame variant that masquerades as the aaamgr service. The legitimate Cisco aaamgr component is a Python package; it does not normally appear as a compiled ELF runit service. This PolyFlame variant is executed by a malicious runit service under “/etc/sv/aaamgr/” with aaamgrd and a modified run launcher.
aaamgrd is a statically linked ELF64 executable with no section headers, a single RWE loader segment, and an RC4-encrypted embedded ELF payload. The loader uses direct syscalls including ptrace, fork, wait4, kill, tgkill, mmap, and mprotect. It performs an anti-debug check by deobfuscating /proc/%d/status and TracerPid: and exits if a tracer is present.
The observed staging sequence was:
Figure 4. PolyFlame staging sequence.
Note that in addition to the implant execution staging, there are also indications of timestomping.
LittleFilch: libcommon.so TLS interception module
LittleFilch is a control-session interception module positioned to collect data-plane keying material from control sessions visible to the injected vSmart process.
LittleFilch installs an SSL_read hook inside vdaemon. The hook calls the original SSL_read, then processes returned buffers only when the returned size is greater than 0x18F, the first decrypted byte is 0x07, and three marker patterns are checked for presence. These marker bytes are followed by the actual artifacts that LittleFilch aims to record:
Marker bytes
Parsed field
Length
Notes
40 03 06
Public IP
4 bytes
vEdge
public / transport IP
40 0C 04
Peer
system-IP
4 bytes
vEdge OMP
system-IP
05 01 0C
06 40
Binary
key field
32 (0x20)
bytes
Assessed
OMP-distributed AES-256 IPsec data-plane key material
LittleFilch records the extracted keying material and RSA-encrypts it before writing the output to “/var/tmp/vdaemon.bin”. It can then send the encrypted content over UDP in a DTLS 1.2 application-data style record.
Figure 5. Keying material recording format used by LittleFilch.
LittleFilch expects its configuration file — located at “/var/tmp/vdaemon.conf” — to contain two host port lines: one local bind IP/port and one remote destination IP/port. It deletes “/var/tmp/vdaemon.conf” after reading it. Talos has not been able to recover the “vdaemon.conf” file.
Following the identification of UAT-11473 activity, Talos strongly recommends that organizations monitor their systems for indicators of post-compromise activity. Should any signs of unauthorized activity be detected, organizations should immediately activate their incident response frameworks. Contact the Cisco Technical Assistance Center (TAC) for support by initiating a TAC request.
Coverage
Snort SIDs are already available for CVE-2026-20127: 65938, 65958.
Snort SIDs for the malicious artifacts illustrated in this blog:
Cisco Talos is aware of eight compromised intermediate certificates belonging to the intermediate certificate authority, eMudhra. Rather than possessing the mandatory 384 bits of pseudo-random security, several private keys evaluated single-digit and double-digit integers. This misconfiguration allows an attacker with the private key of any of the compromised intermediate CAs to impersonate any website or service. Six of the TLS certificates, trusted by Chrome, Mozilla, and Apple have been block
Cisco Talos is aware of eight compromised intermediate certificates belonging to the intermediate certificate authority, eMudhra. Rather than possessing the mandatory 384 bits of pseudo-random security, several private keys evaluated single-digit and double-digit integers. This misconfiguration allows an attacker with the private key of any of the compromised intermediate CAs to impersonate any website or service. Six of the TLS certificates, trusted by Chrome, Mozilla, and Apple have been blocked by these vendors already. Two other certificates, used for codesigning by Microsoft, have also been blocked. Talos expects there will be additional patches available across a variety of technologies as software applications work to remediate the certificates’ exposure.
Following the disclosure, eMudhra has revoked the compromised certificates and stopped issuing new certificates under its G3 root.
Compromise details
The cause of this issue, originated during an April 30, 2025 key generation activity conducted by eMudhra under its emSign Root TLS CA - G3 and cross-signed Comodo AAA Certificate Services. During a key generation ceremony for 24 subordinate CAs, a flaw in eMudhra’s key generation process created a second set of weak P-384 keys during a wrap/unwrap step. Those keys were mistakenly used for eight intermediate CA certificates. This flaw took the encryption from 384 bytes of entropy down to 3 – 8, making recovering the private keys trivial. The following are the impacted certificates, as illustrated in Mozilla’s bug report:
EM EV TLS CA - G3B (eMudhra BV), CCADB A012304
SHA-256 E7568FE6E12331F4FD7DE61DA4C7559D0F8EB192A218D4741A3BA75184333838
serial c7c41efe92d825f05eae841a4a82c1, issuer emSign Root TLS CA - G3

EM OV TLS CA - G3B (eMudhra BV), CCADB A012308
SHA-256 98B896625C0C230ADEEC3EB2CF6AAD5001ECF9156A68644E82374CE5833BC25B
serial 6cada367fb1c100088120ea202d568, issuer emSign Root TLS CA - G3

EM DV TLS CA - G3B (eMudhra BV), CCADB A012302
SHA-256 42C4ACCD12C4F59597925E1A08A7A90102608543809308D50EC427E118BA1493
serial a4aee678f23362b4c0e460b772f214, issuer emSign Root TLS CA - G3

EM EV TLS CA - G3C (eMudhra Inc), CCADB A012296
SHA-256 432EC25F0D28DE9006D97BF752F17BBB2CD41F669933FCB072D9A1148D0261F3
serial 8009928a64107601af05fa2f19f109, issuer emSign Root TLS CA - G3

EM OV TLS CA - G3C (eMudhra Inc), CCADB A012300
SHA-256 CB6E15165AC802E9B3F993F16C25D41F4E81C21EBDE71AE1B012AC00BF9C7C3F
serial 296926c227a3a1526392b19482a504, issuer emSign Root TLS CA - G3

EM DV TLS CA - G3C (eMudhra Inc), CCADB A012294
SHA-256 0164D7CEAE5BB909C272AF151FF44B1177AE9B47D9424B94F1D9558C30934D19
serial 588b2e3c2bb8cda13e1a1209254321, issuer emSign Root TLS CA - G3

EM OV CS CA - G3B (eMudhra BV), CCADB A012306
SHA-256 9E39DE2881273ACC225A149C72BA3E0F51424963669AB633EE1DC7DF5DB067B4
serial 7818933f8f85b4619a2b35fba83d0a, issuer emSign Root CS CA - G3

EM OV CS CA - G3C (eMudhra Inc), CCADB A012298
SHA-256 4B2460A466F95FD40113BCDCCA2CEB29B3B093921DE45474DA7DF48874C630B1
serial 544b7f922c31ae220a4a922916f6e6, issuer emSign Root CS CA - G3
CVE-2026-111943
Unlike languages that defer entirely to external dynamic system libraries (like OpenSSL), the Go programming runtime implements its own X.509 chain verification engine in the standard library (crypto/x509). While Go usually queries platform certificates, several platforms or static container environments rely on embedded or legacy root certificate pools where certificate revocations are ignored.
To eliminate exploitation across the entire cloud-native ecosystem including Docker, Kubernetes, Terraform, and Prometheus, the Go team designated the compromised certificates as a vulnerability, CVE-2026-111943, and released Go versions 1.27.3 and 1.26.10.
The fixed versions filter out chains containingthe SHA-256 hashes of the SubjectPublicKeyInfo (SPKI) for all eight compromised eMudhra intermediate certificates.
Impact
These compromised certificates could allow adversaries to impersonate servers and intercept or modify traffic. The impact of their exposure is far more than just web browsers. Other programs that check for TLS certificates might still be impacted since they may not check revocation lists. One clear example is related to virtual private networks (VPNs); these technologies will likely require software updates to mitigate the issue. Based on this guidance, Talos strongly recommends users update software using and handling TLS certificates as fixes become available.
Talos is actively monitoring the impact of these compromised certificates and has not seen any malicious incidents involving them in the wild yet (as of October 21, 2026 14:00 UTC / 10:00 a.m. ET).
Significance of this breach
Public key infrastructure relies on trust being delegated through certificate chains: root CAs authorize intermediate CAs, which can issue certificates within the scope of their authority. An attacker who obtains an intermediate CA’s private key may be able to issue fraudulent certificates that clients accept, subject to the intermediate certificate’s constraints and each client’s validation controls. In this incident, six compromised intermediates were for TLS and two were for code signing.
For TLS, an attacker able to intercept or redirect a connection could use a fraudulent certificate to impersonate a server and potentially read or modify traffic if the client still trusts the affected key and no applicable protection blocks it. Protections such as revocation, key distrust, certificate transparency enforcement, and certificate pinning can prevent or expose such an attack. Browser vendors have blocked the affected TLS keys, but other applications may rely on separate trust stores or validation paths:
Enterprise infrastructure and VPNs
Organizations should assess TLS-using software and appliances, including proxies, reverse load balancers, VPN clients, and gateways. Exposure depends on the certificate chain being validated and the trust store and revocation behavior in use. A stale or separately managed trust store may need an application, operating-system, firmware, or trust-bundle update; verify the required action for each product.
Software supply chains and CI/CD
Build runners and package managers may be exposed if they fetch content over TLS while still trusting an affected key and an attacker can intercept the connection. A fraudulent TLS certificate could enable registry impersonation, but it would not by itself bypass separate package integrity checks, such as lockfile hashes, checksums, signatures, or provenance controls. Assess the actual package-manager configuration and dependency path.
Industrial IoT and embedded systems
Review devices that use bundled or independently managed CA stores, especially where certificate revocation or trust-store updates may be limited. Some devices may require a vendor update or compensating control, but the necessary action depends on each device’s validation and update mechanisms.
Talos recommends updating affected software and trust stores as vendor fixes become available.
Coverage
The following SNORT® SIDs provide coverage for this threat: 67363 - 67374.
Talos would like to highlight the efforts of Chris Morrison for providing emergency coverage and mitigations for this threat.
Update 10/22: Added section detailing observations of in the wild exploitation and associated IOCs.Cisco Talos is tracking the disclosure of two unauthenticated remote code execution (RCE) flaws in PHP core, dubbed “php2shell”, triggered by a plain HTTP request and exploitable before any application code runs, affecting every PHP build since 5.4. Based on the entities involved in the disclosure, artificial intelligence and associated technologies played a key role in the discovery of these vulne
Update 10/22: Added section detailing observations of in the wild exploitation and associated IOCs.
Cisco Talos is tracking the disclosure of two unauthenticated remote code execution (RCE) flaws in PHP core, dubbed “php2shell”, triggered by a plain HTTP request and exploitable before any application code runs, affecting every PHP build since 5.4. Based on the entities involved in the disclosure, artificial intelligence and associated technologies played a key role in the discovery of these vulnerabilities — yet another example of how these technologies are forcing change across the landscape, most notably on patching processes for organizations because of the wave of vulnerabilities being disclosed.
Cisco customers are covered with the Cisco Talos Network Intrusion Prevention (SNORT®) signatures 67359, 67360, and 67375. These rules are also available in the Community Ruleset for open-source customers. Splunk Enterprise Security customers have an Enterprise Security Content Update with detections available. Please refer to the following recommendations, detection, and coverage guidance for more information.
Details
CVE-2026-109618 and CVE-2026-109619 are both critical vulnerabilities with a CVSS v4.0 score of 9.2.
CVE-2026-109618 occurs when out-of-memory handling interrupts PHP while internal request data is only partially initialized. Request cleanup may then treat invalid data as valid.
CVE-2026-109619 occurs when a stale internal state is reused after its backing memory has already been freed, before normal initialization resets it.
Impact
The potential blast radius is enormous and extends across the PHP ecosystem. The vulnerability sits in PHP core, so applications running affected versions — including WordPress, Drupal, Magento, Shopware, WooCommerce, and Laravel, plus PHP sites hosted through cPanel or Plesk — may be exposed. Note that many older branches will no longer receive fixes, so customers are urged to upgrade to a supported version as soon as possible.
Talos regularly investigates threat actor exploitation of vulnerabilities. State-sponsored and affiliated threat actors, as well as ransomware and other financially motivated groups, all employ tactics to exploit RCE. Talos assesses that all industries running PHP applications are at risk for exploitation if systems remain unpatched.
PHP 8.1 and older are end of life (EOL), and PHP 8.2 security support ends Dec. 31, 2026. Talos’ initial estimates based on open-source intelligence show a significant corpus of PHP systems that will not receive a patch (~50%). If your organization is running PHP 8.1 or older, Talos very strongly advises immediate update to PHP 8.2 or later. There is no patch for PHP 8.1 or older.
Talos is actively monitoring the impact of these CVEs and has not seen them being exploited in the wild yet (as of October 21, 2026 14:00 UTC/10:00 a.m. ET).
Observed Exploitation
Cisco Talos began observing exploitation attempts within hours of the vulnerabilities’ disclosure. So far, most of the activity is scanning, along with some uncoordinated attempts to deliver various payloads. This is expected: scanning or basic exploitation with public proof-of-concept (PoC) code takes far less effort than integrating a vulnerability into an actor’s own tooling. We expect exploitation volume to grow in the coming days, and campaigns to become more sophisticated and coordinated as more capable groups finish updating their tooling and begin deploying it.
Recommendations and detection guidance
Talos strongly recommends all PHP users to upgrade to the available fixed releases. There are no intermediate or temporary controls that provide comprehensive protection; however, PHP advises that the following measure may reduce exposure to specific attack paths:
Set memory_limit=-1, preferably in a way applications can't override, such as php_admin_value in the FPM pool or Apache configuration, and check that no pool, directory or application setting puts a finite limit back. This removes the controllable PHP memory limit failure, but an underlying allocation failure can still reach the vulnerable path.
Set a low post_max_size. For applications that don't require file uploads, set post_max_size = 8M. If file uploads are necessary, set post_max_size = 32M. Keep upload_max_filesize below post_max_size. Consider enforcing limits at the web server or proxy level for decoded request size, input field count, multipart part count, header count, and nesting depth. These limits must also cover requests without a usable Content-Length.
Use a container or cgroup limit as an availability boundary, preferably with a policy that kills only the affected worker. Do not substitute RLIMIT_AS or RLIMIT_DATA, as these can cause the vulnerable allocation failure.
Set session.upload_progress.enabled=0 and restart every worker. Use php.ini, an FPM pool, or server configuration that applies before request parsing. Do not rely on ini_set() or FPM .user.ini. This blocks the confirmed session paths but not other variants.
On PHP 8.5, set fatal_error_backtraces=0 and restart every worker. This blocks the confirmed fatal backtrace path only.
Remove invalid or deprecated settings applied per request that emit diagnostics before initialization. Hiding diagnostics with error_reporting, display_errors, or @ does not help.
Fix attacker-reachable fatal errors and execution timeouts, including failures in callbacks, upload or import processing, and cleanup.
This is another vulnerability that owes its discovery to AI and its associated technologies. As we move through 2026, the wave of vulnerabilities and related patches is building. Talos advises organizations to work on a triaged process for prioritizing vulnerabilities with a specific focus on public-facing systems and vulnerabilities that are under active exploitation. The glaring need to prioritize vulnerabilities along with a streamlined process for rolling out patching strongly indicates that the historic trend of “baking in” patches before deployment is not going to survive the AI era.
The true impact of this vulnerability will take time to evaluate. These types of vulnerabilities that impact core technologies tend to cascade into other platforms and applications as they evaluate impact and provide associated patching, harkening back to the waves of exploitation that we saw after Log4J.
Coverage
SNORT® SIDs covering these vulnerabilities for subscribers: 67359, 67360, 67375. Free community rules are live through our Community Ruleset.
Splunk has released an Enterprise Security Content Update (ESCU) related to the ongoing PHP2Shell activity with additional detections. Splunk Enterprise Security customers are urged to download and apply.
Talos would like to highlight the efforts of Ankur Tyagi, Dalton Schaadt, Brandon Stultz, and Matt Killion for providing emergency coverage and mitigations for these threats.
In this video, Talos’ Nick Biasini explains what the vulnerabilities allow adversaries to do, how to assess your exposure, and what defenders should prioritize.
This research was conducted jointly with Julian-Ferdinand Vögele of Recorded Future’s Insikt Group. Details of the joint research and presentation are available here.Cisco Talos identified UAT-6275 (TAG-193 by Recorded Future) activity targeting government organizations across the Commonwealth of Independent States (CIS). Recovered artifacts show additional interest in water resources and energy. This focus is consistent with intelligence collection and may reflect the regional effects of the Ru
This research was conducted jointly with Julian-Ferdinand Vögele of Recorded Future’s Insikt Group. Details of the joint research and presentation are available here.
Cisco Talos identified UAT-6275 (TAG-193 by Recorded Future) activity targeting government organizations across the Commonwealth of Independent States (CIS). Recovered artifacts show additional interest in water resources and energy. This focus is consistent with intelligence collection and may reflect the regional effects of the Russia–Ukraine war.
In activity observed from June 2025 through August 2026, Talos identified four infection-chain types that use macro-enabled documents, PS2EXE downloaders, GitHub-hosted PowerShell, and a crafted WinRAR archive exploiting CVE-2025-8088. The recovered payloads include several custom reverse shells that provide interactive remote access.
Three publicly accessible staging directories and GitHub repository history exposed payload builds, tool inventories, and changes to command-and-control (C2) infrastructure. These operational security lapses gave us direct visibility into the group's recent activity.
The files recovered from the exposed infrastructure suggest preparation for post-compromise operations and potential activity against Linux hosts and internet-facing appliances.
Talos assesses with medium confidence that UAT-6275 has a Kazakhstan nexus, based on infrastructure access, language artifacts, sample submissions, working hours analysis, and regional targeting interests.
Background
Cisco Talos and Recorded Future Insikt Group jointly investigated UAT-6275 activity targeting government organizations across the Commonwealth of Independent States (CIS). The investigation uncovered three publicly accessible staging directories and a previously unreported GitHub repository used to host malicious scripts and payloads. These exposed assets provided visibility into the threat actor's malware development, infrastructure changes and preparations for additional intrusion activity.
Talos tracks this activity as UAT-6275, while Recorded Future tracks it as TAG-193. It overlaps with Silent Lynx (first reported by Seqrite) and sits within a broader set of campaigns connected to YoroTrooper, which we first reported in 2023.Subsequent research on Tomiris (Kaspersky), ShadowSilk (Group-IB), Cavalry Werewolf (BI.ZONE), and Hydra Saiga (VMRay) identified overlapping indicators across these reported clusters. We assess that UAT-6275 and YoroTrooper likely belong to the same broader activity cluster. However, we continue to track them separately because we have not observed direct indicator or toolset overlap between the two.
UAT-6275's targeting is concentrated in Central Asia and the wider CIS region. Across the reviewed campaigns, observed victims and lure themes span nine countries: Kazakhstan, Kyrgyzstan, Tajikistan, Turkmenistan, Uzbekistan, Armenia, Azerbaijan, Russia, and Belarus.
Figure 1. Regional targeting.
Government and diplomatic affairs
UAT-6275 targets government institutions responsible for diplomacy, economic development, agriculture, and environmental management. These organizations hold information that can inform bilateral negotiations, economic planning, and regional security decisions.
Our network flow analysis identified activity involving a Tajik government entity shortly after treaty discussions with Kazakhstan in March 2026 and a Belarusian government entity ahead of a bilateral meeting in April. This timing may indicate an interest in regional diplomatic developments.
The decoy documents we recovered also suggest an interest in diplomatic relations, international trade, and aviation. Examples include a diplomatic letter addressed to Armenia’s Ministry of Foreign Affairs.
Figure 2. Lure document masquerading as a Russian diplomatic congratulatory letter to the Armenian Ministry of Foreign Affairs.
Water security and resource management
The group’s interest in regional resources spans environmental management and energy. Talos observed activity involving an Armenian government entity responsible for environmental matters and Uzbekistan’s Smart Forestry initiative, consistent with earlier reporting on Silent Lynx targeting water resource organizations across Central Asia.
Energy-themed decoys included a cooperation proposal between Turkmenistan’s state oil company, Turkmennebit, and Russia’s Orsk Oil Refinery, used in an August 2025 sample. The refinery supplies petroleum products to Kazakhstan and later shut down after a Ukrainian drone strike in August 2026, with repairs expected to take up to six months. These ties suggest a possible intelligence interest in regional fuel supplies and the war’s implications for Kazakhstan’s energy security.
Figure 3. Decoy impersonating Turkmennebit and proposing cooperation with Orsk Oil Refinery management.
Campaign timeline
Since Seqrite first reported Silent Lynx in January 2025, we have identified at least eight campaigns across the region through May 2026. These include malware delivery targeting Russia, Turkmenistan, and Uzbekistan; a credential-harvesting site impersonating Azerbaijan’s State Agency for Public Service; and lures referencing the China–Central Asia Summit and Russian energy infrastructure. In 2026, we also observed activity involving government entities in Tajikistan, Armenia, and Belarus, as well as Uzbekistan’s Smart Forestry initiative in May.
Figure 4. Campaign timeline.
Infrastructure and malware delivery
Talos identified three publicly accessible staging directories containing malware and tools of UAT-6275. One sample led to the previously unreported GitHub repository, where the group hosted PowerShell scripts and payloads. Its commit history allowed us to track infrastructure changes and malware development.
The group relies on lightweight reverse shells, including Chvost, Laplas, and PickleShell, to issue commands on compromised systems.
We also recovered Linux-compatible tooling and a publicly available proof-of-concept exploit for FortiWeb CVE-2025-25257 from UAT-6275 infrastructure. These findings suggest interest in expanding the group’s operational capabilities.
Four infection chains
UAT-6275 used malicious documents, executable downloaders, and shortcuts to deliver malware, and later incorporated a WinRAR exploit. Talos categorized the recovered samples into four infection chains, A – D, based on how they retrieve and execute their payloads.
Figure 5. First observations of four UAT-6275 infection chains, June 2025 – April 2026.
The first Chain A samples, observed in June 2025, used macro-enabled Word documents to download and execute a second-stage binary. In July 2025, we observed Chain B downloaders built with PS2EXE, a tool that packages PowerShell scripts as standalone Windows executables. These downloaders retrieved reverse-shell payloads and created scheduled tasks for persistence.
We first observed Chain C in October 2025. A malicious shortcut launches PowerShell to retrieve and execute a GitHub-hosted script that provides remote shell access. Later samples also downloaded PickleShell and placed it in the Windows Startup folder for persistence.
Figure 6. Chain C retrieves a GitHub-hosted PowerShell script; later samples also deploy PickleShell to the Startup folder.
In April 2026, we identified a RAR archive that exploited CVE-2025-8088 in WinRAR to place PickleShell in the Windows Startup folder (Chain D). The payload runs at the next user sign-in. This was the first vulnerability exploit we observed in UAT-6275’s malware delivery.
Figure 7. Chain D exploits CVE-2025-8088 to place PickleShell in the Windows Startup folder for execution at the next sign-in.
Kazakhstan nexus assessment
Talos assesses with medium confidence that UAT-6275 has a Kazakhstan nexus. Supporting evidence includes Russian-language artifacts, apparent malware-testing submissions from Kazakhstan shortly after compilation, and operator activity consistent with UTC+5 working hours.
Figure 8. Timing of 77 GitHub commits in UTC+3 and UTC+5, with 09:00–18:00 local working hours shaded.
Looking ahead
UAT-6275’s sustained activity and adoption of new delivery techniques suggest the group will continue pursuing access to government organizations across Central Asia and the CIS. Its interest in environmental agencies, economic ministries, and energy infrastructure reflects the intelligence value of regional diplomacy and resource management.
Defenders in these sectors should monitor unexpected PowerShell activity and payload downloads from public services such as GitHub, alongside scheduled tasks and Startup-folder changes. Keeping archive utilities patched can help reduce exposure to the exploit-assisted delivery observed in this campaign.
Executive summary
In April 2026, we at Kaspersky’s Global Emergency Response Team (GERT) responded to a security incident at a manufacturing organization in the Middle East. The threat actor obtained domain admin-equivalent control of the organization’s Active Directory environment and authored a malicious Group Policy Object (GPO) named PAYLOAD, linking it at the domain root. Through that single object, the actor delivered ransom notes, hijacked the desktop wallpaper and lock screen, enforced a
In April 2026, we at Kaspersky’s Global Emergency Response Team (GERT) responded to a security incident at a manufacturing organization in the Middle East. The threat actor obtained domain admin-equivalent control of the organization’s Active Directory environment and authored a malicious Group Policy Object (GPO) named PAYLOAD, linking it at the domain root. Through that single object, the actor delivered ransom notes, hijacked the desktop wallpaper and lock screen, enforced a logon banner, and disabled the local administrator account across every domain-joined Windows workstation — all without dropping a ransomware binary or encrypting any data. The only ransomware we found in this incident was PAYLOAD sample targeting ESXi on Linux servers. Besides that, data exfiltration was observed originating from the file servers and several additional systems, and was later published on the dark web.
Living-off-the-land abuse of trusted AD infrastructure. Group Policy is a signed, allowlisted, SYSTEM-privileged distribution channel that the majority of endpoint detection and response tools is designed not to inspect. By delivering impact through GPO rather than through malware, the actor sidestepped the entire file- and process-based detection stack.
Encryptionless extortion. Industry telemetry shows extortion-only incidents grow significantly year-on-year. PAYLOAD fits this model; the leverage is operational disruption and the threat of escalation rather than cryptographic denial of data.
We confirmed that no files were encrypted on Windows machines, no malicious binaries were resident on disk, no endpoint persistence was established, and no malicious processes were running at the time of analysis. The entire attack lived inside Active Directory itself. The defensive implication is stark: an organization whose detection strategy depends on catching a ransomware executable would have seen nothing until the first endpoint rebooted and the ransom wallpaper appeared.
In this article, we will describe the GPO attack chain and provide operational advice on how to detect such threats, including detailed remediation recommendations.
Group Policy as an attack surface
Attacks through group policies are nothing new. They can inflict significant, domain-wide damage with multiple malicious capabilities. A Group Policy Object (GPO) is essentially a combination of a Group Policy Container (GPC) in Active Directory and a Group Policy Template (GPT) in SYSVOL. The Group Policy scope depends on whether the GPC is linked to the directory tree at the domain, site, or organization unit (OU) level. A link at the domain root means the policy applies to every computer and user object beneath it. Thus, a GPO compromised at the domain root can affect all in-scope domain users and computers, potentially granting an attacker complete control over the corporate network. What makes GPO abuse even more dangerous is that group policies are processed in a trusted, high-privilege environment, ensuring persistence because endpoint cleanup is not enough to remove them.
We have already discussed GPO architecture and ways it can be compromised in greater detail in an earlier blog post. Other public threat intelligence has also repeatedly documented this technique in ransomware operations. Microsoft observed Ryuk operators distributing ransomware through Group Policy, SYSVOL startup items, and PsExec. LockBit affiliates have been documented modifying SYSVOL Group Policy files, including ScheduledTasks.xml, to support ransomware execution and propagation. BlackCat/ALPHV operators have also abused GPOs to create scheduled tasks and deploy ransomware.
Another notable example of GPO abuse is PAYLOAD ransomware, which weaponizes GPO Preferences and policy settings for pure impact rather than as a launcher for an encryptor. Let’s take a closer look at this attack, which is detailed further below.
Attack timeline
During the April 2026 investigation, we managed to reconstruct the attack timeline as outlined below:
Date
Event
11 April
Initial access. Threat actor authenticates to the FortiGate SSL VPN using a valid but compromised domain credential.
13 April
GPO authored. Malicious GPO, PAYLOAD ({C897F2C7-C2AC-4E6F-BF48-58036FF29E79}) created and linked at the domain root, configuring ransom notes, wallpaper, lock screen, logon banner, and administrator account disablement.
13 April
SYSVOL staging. The payload.jpg and hello.txt files written to \\DC.THECOMPANY.local\sysvol\THECOMPANY.local\.
13 April
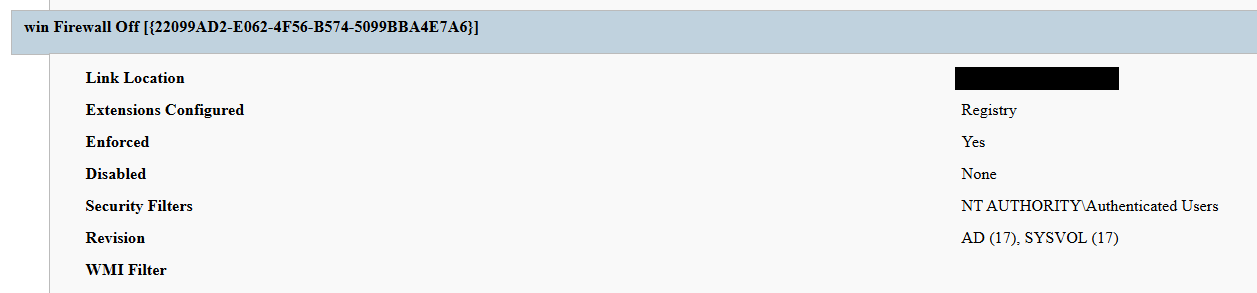
Second GPO. GPO named win Firewall Off ({22099AD2-E062-4F56-B574-5099BBA4E7A6}) linked at the domain root, disabling Windows Firewall on all profiles.
13 April
Dormancy. GPO cached on endpoints but computer configuration not yet applied — no endpoint had rebooted since the policy update.
13 April
Data exfiltration. Data exfiltration was observed originating from the file servers and several additional systems.
14 April
Detonation. Most of the endpoints begin rebooting; computer configuration policies apply. Ransom wallpaper, logon banner, and notes appear. Operational disruption begins.
15 April
Response. Kaspersky GERT engaged. Forensic triage of affected workstations and the domain controller initiated.
16 April
Assessment. GERT confirms no file encryption, no resident malware, no endpoint persistence.
Next, we will discuss each of these stages in more detail and share the findings from our incident response activities.
Incident overview
Initial access
The entry vector was a compromised valid account (MITRE ATT&CK T1078) used to authenticate through the organization’s FortiGate SSL VPN — an external remote service (T1133). Insufficient logging on the FortiGate appliance prevented us from reconstructing how the credential was originally compromised.
Three hypotheses were considered plausible in the context of the attack, in no particular order:
Password spraying or credential stuffing against the SSL VPN portal.
Phishing-led credential harvesting.
Purchase of pre-compromised credentials from an initial access broker (IAB).
Once on the internal network, the actor operated with the compromised security principal’s privileges. Because the account was able to create and link a GPO at the domain root, it held either domain admin privileges or a delegated equivalent (e.g., membership of Group Policy Creator Owners combined with link rights on the domain object).
FortiGate SSL VPN authentication logs and ESXi/virtualization privilege escalation logs were insufficient to reconstruct the lateral movement and privilege escalation chain between initial VPN access and the GPO write privilege level. The most common real-world routes to GPO control — DCSync, Kerberoasting of privileged service accounts, and Pass-the-Hash/Pass-the-Ticket — could not be confirmed or ruled out.
Execution
Rather than deploying an encryptor, the actor abused the victim’s Active Directory policy infrastructure, resulting in malicious GPOs being configured and linked at the domain root to deliver the observed impact across domain-joined systems. The two GPOs below constitute the entire offensive toolkit observed.
The PAYLOAD GPO
We performed a Resultant Set of Policy (RSOP) analysis, which helped us list all policy settings on the affected workstations. From these results, we reconstructed the following changes delivered by PAYLOAD:
Drop SYSVOL\hello.txt to the desktop and root directories C:\ and D:\ as a read-only README-payload.txt by tampering with the “Group Policy Files” client-side extension (CSE).
Modify the HKLM\SOFTWARE\Microsoft\Windows\CurrentVersion\Policies\System\ registry key, changing the legalnoticecaption value to "Welcome to Payload!" and the legalnoticetext to the ransom note text through the “Group Policy Registry” CSE.
Set payload.jpg located in the targeted domain controller’s SYSVOL as the lock screen image by altering the personalization policy, and as the wallpaper by altering the desktop policy at the user level.
Revoke administrator rights for the administrator account (locking the account) by editing the Security Settings CSE in the GptTmpl.inf file.
Settings changed by PAYLOAD GPO
This activity was enabled entirely through a legitimate group policy mechanism, meaning there is no malware code for security solutions to look for because the malicious logic is contained within the policy configuration.
The win Firewall Off GPO
A second domain-root-linked GPO, named “win Firewall Off”, disabled Windows Firewall across the domain, private and public profiles on all endpoints (T1562.004). Deployed independently of PAYLOAD, this object degraded host defenses and ensured the actor retained unimpeded network reach to endpoints for any follow-on activity.
Settings changed by win Firewall Off GPO
The one-day delay detonation
The most forensically instructive detail is the one-day gap between GPO creation (13 April) and visible impact (14 April). Analysis of Master File Table (MFT) timestamps and the Group Policy History registry key confirmed the policy was written to SYSVOL and cached on endpoints on 13 April. However, computer configuration settings (wallpaper and lock screen machine policy, security settings, firewall disabling) only apply upon reboot or policy refresh — and no endpoint had rebooted in the interim. The attack therefore remained dormant in the GPO cache for one day before detonating en masse when machines were restarted in accordance with standard procedures.
We have to point out here that this delayed policy application is characteristic of GPO-based operations and has two potential consequences for defenders. Firstly, it may grant the actor a quiet window for exfiltration, persistence, or further staging between weaponization and impact. Secondly, it can be used to sever the temporal link between the cause (a GPO-creation event in the directory log) and the effect (mass user-visible disruption occurring at a later time), complicating timeline reconstruction unless directory service auditing is in place.
Forensic findings
Initial incident response engagement revealed a number of findings associated with the attack that we share below.
No file encryption
A full review of the MFT on affected workstations found no files bearing a .payload extension characteristic to PAYLOAD ransomware and no evidence of bulk renaming or encryption I/O patterns. The attackers’ objectives were operational disruption and extortion via visual impact and access denial.
No endpoint persistence
All standard persistence locations were clean:
Scheduled tasks — no malicious tasks
Run/RunOnce keys — clean
Startup folders (user and system) — clean
Services — no malicious service installed
WMI event subscriptions — none
Boot sector/MBR — unmodified
The attack’s persistence mechanism is the GPO link itself on the domain controller, with no endpoint-resident component.
No active malicious processes
Live process and memory analysis revealed no injected threads, process hollowing or anomalous outbound connections.
Registry timeline analysis
Group Policy History, Shadow and State registry keys on the workstation recorded the application of PAYLOAD on 13 April:
HKLM\…\Group Policy\History\{35378EAC-683F-11D2-A89A-00C04FBBCFA2}\1
HKLM\…\Group Policy\Shadow\{827D319E-6EAC-11D2-A4EA-00C04F79F83A}\0
HKLM\…\Group Policy\State\Machine\GPO-List\7
HKCU\…\Group Policy\History\{7150F9BF-48AD-4da4-A49C-29EF4A8369BA}\1
HKCU\…\Group Policy\State\S-1-5-21-…\Loopback-GPO-List\5
The presence of the “Loopback-GPO-List” entry indicates the GPO was processed in loopback mode, ensuring the user configuration (wallpaper) applied regardless of which user logged on to the machine.
SYSVOL artifacts
Two files were staged on the domain controller’s SYSVOL share and served to endpoints through the Files Group Policy Preference CSE:
payload.jpg — the ransom image used for both wallpaper and lock screen.
hello.txt — the ransom note, distributed to desktops and drive roots as README-payload.txt.
Detection engineering
Because no malicious binary or process exists, the detection logic should focus on the directory service and SYSVOL indicators. Below are the highest-value telemetry sources for identifying the described malicious activity.
Directory service change auditing (DS Access)
Enable Advanced Audit Policy → DS Access → Audit Directory Service Changes on all domain controllers and set up alerts for the following events:
Event ID
Meaning
Hunt focus
5137
A directory service object was created
The account that created new groupPolicyContainer objects must be an authorized GPO administrator
5136
A directory service object was modified
Changes to gPLink on the domain root or sensitive organizational units; changes to gPCMachineExtensionNames/gPCUserExtensionNames/gPCFileSysPath/versionNumber for all GPOs
5141
A directory service object was deleted
GPO deletions (relevant for tamper detection and remediation assessment)
A gPLink modification at the domain root by a non-standard account is one of the most telling indicators of this attack class.
SYSVOL file integrity monitoring
Monitor \\DC.THECOMPANY.local\sysvol\THECOMPANY.local\Policies\ for unexpected files, particularly image files, text files, scripts, ScheduledTasks.xml, and modified registry.pol/GptTmpl.inf files that were created by sources other than legitimate replication.
Endpoint policy application telemetry
On endpoints, GPO application is logged in the Group Policy Operational log (Microsoft-Windows-GroupPolicy/Operational) and reflected in the History and Shadow registry keys shown above. A sudden domain-wide change to the applied policy set is a strong post-detonation signal.
Missing 5136 events
If the contents of a GPO’s SYSVOL change without a corresponding 5136 event, this can indicate direct SYSVOL/template editing (e.g., via open-source tools such as PowerView or SharpGPOAbuse) that bypasses the normal Group Policy Management Console (GPMC) modification path. While we recommend treating the absence of expected audit events as suspicious, it should be noted that this can be caused by misconfigured auditing.
Anti-forensics and recovery-inhibition capabilities
Confirmed PAYLOAD family capabilities
The Windows endpoint attack described in this report was implemented through malicious Group Policy Objects and did not involve a recovered ransomware executable, resident endpoint malware, confirmed file encryption or active malicious processes at the time of the forensic examination. However, PAYLOAD cryptomalware for Windows does exist, and other sources, including public analysis of its samples, reveal further malicious capabilities of this ransomware that could be used by security teams to enrich detection logic and security policies.
The behaviors documented in this section must therefore be interpreted as family-level capabilities identified through the public reverse engineering of PAYLOAD ransomware samples. They were not confirmed as having executed during the GPO-based incident unless corresponding evidence was identified in the host, memory, process, event-log, or hypervisor.
Windows Event Log clearing
Public reverse engineering of the PAYLOAD Windows variant reveals an optional event log clearing capability (T1685.005, formerly T1070.001). The ransomware dynamically resolves Windows Event Log APIs, enumerates available event log channels, and clears individual channels.
Implementation artifacts include:
Runtime loading of wevtapi.dll
EvtOpenChannelEnum
EvtNextChannelPath
EvtClearLog
Enumeration of Security, System, Application, and PowerShell logs, and operational channels
A command-line option controlling whether log clearing is performed
Clearing event logs reduces the availability of records related to process execution, authentication, PowerShell, service control, and system changes. However, it does not necessarily remove events that were already forwarded to a SIEM, Windows Event Collector, EDR backend, or protected log archive.
Forensic indicators
Windows Security Event ID 1102
Event logging shutdown or failure events
Sudden reductions in event record identifiers
Multiple event channels restarting from low record numbers
Gaps between endpoint and centrally forwarded telemetry
Execution of utilities or APIs associated with log management
Direct access to EVTX files (Windows Event Log files) under the Windows event log directory
We should note that these indicators can’t be interpreted on their own. For instance, Event ID 1102 should be correlated with a number of aggravating factors, such as:
Event ID 4688 or Sysmon Event ID 1 for process creation
Event ID 4624 for the associated administrative logon
EDR process trees
PowerShell operational logging
Windows Event Forwarding records
Privileged access management activity
At the same time, the absence of Event ID 1102 does not prove that log clearing did not occur. Direct deletion, truncation, service impairment, or an incomplete audit configuration may produce different evidence.
Security process and service termination
PAYLOAD analysis reveals that the Windows ransomware variant contains logic that targets security processes and services (T1685 and T1489). This capability is intended to stop security products, backup software, database services, and applications that may lock files targeted for encryption.
Process and service termination serves several objectives:
Reduce endpoint detection and response visibility.
Release file handles so data can be modified.
Interrupt backup and recovery services.
Prevent databases and enterprise applications from protecting active data.
Reduce interference with encryption operations.
Forensic indicators
Security agent services changing from running to stopped
Event ID 7036 service state changes
Event ID 7040 service start type changes
Event ID 4688 or Sysmon Event ID 1 for service control utilities
Sysmon Event ID 5 for terminated processes
EDR health degradation affecting many endpoints
Repeated termination attempts against security or backup processes
Execution of dedicated process killing utilities
VSS deletion, backup and recovery suppression
Public PAYLOAD sample analysis reports the deletion of Windows Volume Shadow Copies before encryption (T1490). This behavior removes local restore points and reduces the victim’s ability to recover files without external backups.
Recovery inhibition is broader than VSS deletion and may include multiple other malicious techniques, including the following:
Deleting shadow copies, backup catalogs, and hypervisor snapshots
Disabling recovery services
Modifying boot recovery settings
Compromising backup management platforms
Deleting or encrypting backup repositories
In the PAYLOAD Windows sample that is proven to perform encryption, VSS deletion is confirmed to have taken place before encryption. A broader compromise of the backup platform was not established in the investigated incident.
Forensic indicators
Execution of shadow copy management utilities
Backup catalog deletion attempts
Recovery configuration changes
Backup service termination
Mass snapshot deletions
Backup administrator logons outside normal maintenance windows
Backup retention or immutability changes
Backup jobs failing immediately before disruptive activity
Ecosystem-relevant ransomware techniques
Above, we discussed the techniques specific to PAYLOAD ransomware. In this section, we’ll review other common ransomware techniques, such as BYOVD abuse and ESXi policy weakening, that remain relevant risks in the ransomware ecosystem. However, these techniques should not be attributed to this incident without supporting driver load, process, memory, ESXi, vCenter, or backup platform telemetry. We describe these techniques below as they may prove useful in other ransomware-related forensic investigations.
The examples used in this section are therefore ecosystem-relevant: they are commonly observed in ransomware operations but not conclusively attributed to the analyzed PAYLOAD samples.
ETW suppression and in-memory patching
Event Tracing for Windows (ETW) is a kernel-supported tracing architecture used by Windows components, diagnostic utilities, security products, and endpoint monitoring systems.
Although we didn’t encounter this technique in our case, some ransomware families can patch ETW-related functions inside the ransomware process (T1685, formerly T1562.001). The reported routine changes the memory protection of code pages, overwrites the beginning of selected ETW functions so they return without producing events, restores the original protection, and refreshes the instruction cache.
Reported target functions include EtwEventWrite, EtwEventWriteFull, EtwEventWriteTransfer, and EtwRegister.
This modification applies to the process-local mapping of ntdll.dll. It does not disable ETW globally across Windows, but it can reduce the telemetry generated by the modified process.
Forensic indicators
Writable or recently modified executable pages within ntdll.dll
Memory protection changes affecting ETW function addresses
In-memory code differing from the corresponding clean DLL on disk
EDR memory tampering alerts
Unexpected calls to memory protection APIs followed by telemetry silence
Process execution visible in network or filesystem telemetry but absent from expected ETW-derived sources
Inconsistent telemetry between EDR, Sysmon, Windows Event Logs, and network monitoring
It should be noted that telemetry gaps are not conclusive evidence of ETW patching. Other factors include agent upgrades, network outages, endpoint shutdowns, SIEM ingestion failures, collector backpressure, and filtering or licensing changes.
Memory acquisition is the strongest validation source when process-local ETW patching is suspected.
Vulnerable signed driver abuse, BYOVD
Bring Your Own Vulnerable Driver (BYOVD) involves introducing or abusing a legitimately signed but vulnerable kernel driver (T1068 and T1685). The attacker exploits the driver’s exposed functionality to gain kernel-level capabilities, modify protected memory, terminate security processes, remove security callbacks, or bypass operating system security controls.
BYOVD is highly relevant to contemporary ransomware operations. However, the reviewed public PAYLOAD analyses do not provide sufficient evidence to conclude that BYOVD is an intrinsic PAYLOAD capability.
It should therefore be presented as an ecosystem-relevant technique rather than a confirmed PAYLOAD feature.
Forensic indicators
Unexpected .sys files written to user-writable or temporary directories
New kernel driver services
Sysmon Event ID 6
Driver hashes matching Microsoft or community vulnerable driver blocklists
Invalid, revoked, expired, or unusual driver signatures
Driver load followed by EDR termination
New privileged processes immediately following driver loading
Code Integrity or Defender alerts
Service creation events referencing driver files
ESXi security policy weakening
Ransomware operators are increasingly targeting ESXi and vCenter because compromising the virtualization layer provides access to many business-critical virtual machines.
Public research typically describes operators performing the following activities (T1685, T1490 and T1489):
Enabling SSH on ESXi hosts
Changing root passwords
Disabling execInstalledOnly
Modifying lockdown mode exceptions
Stopping virtual machines
Deleting snapshots and backups
Changing host firewall policies
Copying custom ransomware binaries to hypervisors
On the target organization’s Linux servers we saw an ESXi PAYLOAD variant, which makes this behavior operationally relevant. Nevertheless, the reviewed evidence does not indicate that PAYLOAD operators used any of these policy-weakening actions in the investigated incident.
Forensic indicators
Unexpected ESXi SSH enablement
Changes to execInstalledOnly
Secure Boot enforcement changes
Lockdown mode configuration changes
Root password changes
New or unusual administrator accounts
Bulk VM shutdown activity
Bulk snapshot deletion
New binaries in datastore or temporary paths
vCenter tasks originating from unexpected accounts or systems
Missing or disabled remote syslog forwarding
Remediation
To contain the described threat and limit possible damage, several remediation steps should be taken. Below, we recommend a four-phase remediation approach for containing this threat and restoring the affected environment.
Phase 1 — domain controller actions (to be performed first)
When dealing with PAYLOAD GPO, the first priority of the remediation plan should be to remove the source GPOs. Until this is done, endpoint cleanup is ineffective because the next policy refresh re-infects cleaned machines.
The immediate domain controller actions to be taken are:
Delete PAYLOAD GPO. Remove {C897F2C7-C2AC-4E6F-BF48-58036FF29E79} via GPMC.
Delete or revert win Firewall Off GPO. Remove {22099AD2-E062-4F56-B574-5099BBA4E7A6}.
Clean SYSVOL. Delete jpg and hello.txt from \\DC.THECOMPANY.local\sysvol\THECOMPANY.local\.
Rotate credentials. Reset the compromised account; audit all privileged accounts and group memberships for unauthorized changes; rotate krbtgt twice if domain admin compromise is confirmed.
Force refresh. Perform gpupdate /force across endpoints after deletion; re-enable local administrator and firewall via clean policy.
Phase 2 — Active Directory and GPO hardening
Adopt the AD tiered administration model and confine domain admins to Tier 0 with no interactive logon to workstations and member servers.
Separate GPO creation from GPO linking rights, and grant both only to a dedicated, audited administrator role.
Enable GPO change auditing (Event IDs 5136, 5137, 5141) and forward to a SIEM.
Monitor SYSVOL with file integrity tooling.
Phase 3 — credential and access hardening
Enforce phishing-resistant MFA on all VPN and remote access entry points.
Deploy Windows LAPS to generate unique, rotated local administrator passwords.
PAYLOAD demonstrates a maturing tactic of turning the victim’s own trusted infrastructure into a weapon. By weaponizing Group Policy, the actor achieved a domain-wide impact without a single malicious binary on any endpoint, evaded file- and process-based detection entirely, and caused organization-wide disruption within seconds of the first reboot.
The absence of encryption is the most strategically significant finding and is consistent with the 2026 trend toward encryptionless extortion. At Kaspersky GERT, we assess with moderate confidence that the missing encryption reflects one of two scenarios: (1) a deliberate decision to stay below the irreversible data destruction threshold while preserving the option of a follow-on encryption phase, or (2) an operation interrupted before full execution.
The absence of encrypted files must not be mistaken for the absence of a serious compromise — the most critical impact lies in the actor gaining domain admin-level control. This incident proves that a threat actor with domain admin access and a working knowledge of group policy internals can inflict domain-wide disruption equivalent to a ransomware attack without writing a single malicious file to any endpoint.
Detection strategies anchored solely in file- or process-based indicators are blind to this attack class. Effective controls include directory service change auditing, SYSVOL integrity monitoring, and privileged access governance, which allow for GPO protection.
Detection by Kaspersky solutions
Kaspersky security solutions effectively detect the described malicious activity at various stages of the attack. Possible detection scenarios are listed below.
To protect organizations that use our Kaspersky SIEM system, we have prepared a package of correlation rules designed to help detect this type of malicious activity. The rules are now available for customers to download from the SIEM repository; the package name is: [OOTB] Group policy hijacked: PAYLOAD ransomware – ENG.
The “Group policy hijacked: PAYLOAD ransomware” package contains rules that detect suspicious file creation or modification in the SYSVOL shared folder on a domain controller, as well as changes to critical attributes and settings of domain group policies. Some rules may require adjustment if they trigger in response to legitimate activity, such as synchronization between domain controllers or the configuration of a new group policy.
To ensure the detection rules function correctly, verify that events from Windows systems are being received in full, including events with the following identifiers: Sysmon: 11, Security — 4663, 5136, 4657.
We also recommend applying the following rules available in the repository to detect all attack stages.
Detection of Windows Event Log clearing to cover up traces of an attack: R050_03_Windows Event Log was cleared
Detection of suspicious access to the LSASS process, which may indicate attempts to dump credentials: R262_Suspicious access to the LSASS process
Detection of the Volume Shadow Copy service being started, which is used to create shadow copies before deleting them: R231_20_Running the Volume Shadow Copy service
Detection of shadow copy deletion: R321_Shadow copy deletion
Detection of Windows Defender disablement: R076_01_Windows Defender Antivirus was disabled
Detection of attempts to disable or modify the system firewall: R240_03_Disabling system firewall via the registry
Detection of a service installation from a non-system folder, which may indicate malware persistence techniques: R281_01_Installation of a service from a non-system folder
For the rules in this list to function correctly, it is necessary to configure Security event auditing for event IDs 4663, 5136, 4657, 7036, and 1102.
In addition to the SIEM system, when audit settings are configured correctly, the process of creating, modifying, and deleting GPOs generates a large number of characteristic artifacts on the domain controller, enabling Kaspersky Endpoint Detection and Response Expert to promptly alert the user to anomalies in the infrastructure.
The creation of a new GPO is covered by the gpo_creation rule, which triggers in response to the corresponding event in the infrastructure. Changes to existing policies are detected by the following rules:
The setting_the_gpcfilesyspath_attribute rule detects the use of the gPCFileSysPath attribute of a Group Policy Object, which specifies the path to the GPO’s contents in SYSVOL.
In the next major version update of Kaspersky EDR Expert, a new event type, GPO, will be introduced, allowing users to track changes to Group Policy Objects.
For information security officers, GPO events will serve as an additional source of context when investigating activity in Active Directory and will help detect changes that could affect the configuration, access rights, and security of endpoints before a potentially malicious policy is deployed.
MITRE ATT&CK mapping
Tactic
Technique
Observed behavior
Initial Access
T1078 — Valid Accounts
Compromised domain credential used for VPN authentication
Initial Access
T1133 — External Remote Services
FortiGate SSL VPN used as entry point
Privilege Escalation
T1078.002 — Domain Accounts
Account held domain-level GPO create/link rights
Privilege Escalation/Defense Impairment
T1484.001 — Group Policy Modification
Malicious PAYLOAD GPO created and linked at domain root; re-applies on every refresh/reboot; uses trusted channel to evade EDR
Defense Impairment
T1686 — Disable or Modify System Firewall
win Firewall Off GPO disables Windows Firewall on all profiles
Impact
T1491.001 — Internal Defacement
Wallpaper and lock screen replaced with ransom image
Impact
T1531 — Account Access Removal
Local Administrator account disabled via GPO Security Settings
Collection
T1005 — Data from Local System
Data exfiltration was observed originating from the file servers
Command and Control
T1071 — Application Layer Protocol
No live C2 confirmed; delivery achieved entirely via GPO
Indicators of compromise
GPOs
PAYLOAD ransomware GPO: {C897F2C7-C2AC-4E6F-BF48-58036FF29E79}
win Firewall Off GPO: {22099AD2-E062-4F56-B574-5099BBA4E7A6}
File names and MD5 hashes
payload.jpg: Ransom wallpaper and lock screen image (SYSVOL)
hello.txt: Ransom note source (SYSVOL)
README-payload.txt: Ransom note dropped to desktops and drive roots
killer.exe (0108656A3E1ADE6CA4F21B084F5E1208): process killer tool
kill.exe (BEA5E267F24D7DA59F6821BFFDBFF293): process killer tool
Over the past year, our Global Emergency Response Team (GERT) has investigated several incidents involving the NightEagle group (also tracked as APT-Q-95). This group has been active since at least 2023 and originally focused on organizations in Asia. We have now identified attacks by the group targeting businesses in Russia. This post examines both known and new tools NightEagle used in its latest campaign.
Initial access
In most incidents, the attackers used compromised valid credentials to ga
Over the past year, our Global Emergency Response Team (GERT) has investigated several incidents involving the NightEagle group (also tracked as APT-Q-95). This group has been active since at least 2023 and originally focused on organizations in Asia. We have now identified attacks by the group targeting businesses in Russia. This post examines both known and new tools NightEagle used in its latest campaign.
Initial access
In most incidents, the attackers used compromised valid credentials to gain access to corporate VPNs. VPN connections originated from IP addresses in the Russian segment linked to Cloudflare WARP tunnels, as well as from IP addresses associated with European virtual infrastructure providers.
GhostContainer on Microsoft Exchange
Both during the initial access stage and as the attack progressed, the attackers deployed the GhostContainer backdoor on Microsoft Exchange servers. It incorporates components from several open-source projects, including the Neo-reGeorg tunnel, an exploit for the CVE-2020-0688 vulnerability, and the GhostWebShell class from the ysoserial utility. All of these components are publicly available on GitHub.
We were unable to determine the exact method the attackers used to deliver the backdoor to Microsoft Exchange servers. We believe with a high degree of confidence that they applied a technique already familiar to us: extracting the cryptographic keys used by Microsoft Exchange from the ASP.NET configuration, overwriting the VIEWSTATE framework parameter, and injecting a payload into it, which then launched the GhostContainer backdoor in memory.
The backdoor is a .NET assembly containing three classes that implement its core functionality:
Stub: processes C2 commands delivered to the infected system through the x-owa-urlpostdata headers and evades detection by the Antimalware Scan Interface (AMSI) and Windows Event Log mechanisms by overwriting addresses in amsi.dll and ntdll.dll.
App_Web_843e75cf5b63: accepts the fakePath and fakePageName parameters and creates virtual paths that redirect requests to the App_Web_8c9b251fb5b3 class.
App_Web_8c9b251fb5b3: implements network traffic redirection (proxying) and socket forwarding functionality.
Kaspersky products detect the GhostContainer backdoor as Trojan.MSIL.GhostContainer.gen.
GhostContainer samples identified by the Similarity technology from Kaspersky Threat Analysis
Traffic redirection
Once the attackers gain sufficient privileges during an attack, they leverage RDP to move laterally within the internal network segment. To do this, they download and run tools for tunneling and redirecting network traffic.
The attackers used GitHub repositories to host their archived tools. The names of the repositories and archives were disguised to look legitimate:
One of the repositories used for storing network tools
The files contained within the archives were also given names mimicking known legitimate software, though unrelated to the archive names:
adobe_32.exe;
AdobeSync.exe;
trueconf.exe;
1cbroker.exe;
1c-office-plugin.exe;
trueconf-broker.exe.
Across the incidents we investigated, we found two tools that the attackers combined for traffic tunneling.
Microsoft dev tunnels
This is a legitimate Microsoft mechanism that allows local web services to be published for internet access on *.*.devtunnels.ms domains. The attackers used this tunneling capability to expose port 3389 (RDP) on the compromised system.
Execution graph of adobe_32.exe in Kaspersky Research Sandbox
rdp2tcp
This is a publicly available tool for tunneling TCP traffic over an established RDP connection. It includes a server component that runs on the target system and a client component that runs on the attacker’s side.
When virtual channels are opened and closed, corresponding events with IDs 132 (channel opened) and 148 (channel closed) are logged in the Microsoft-Windows-RemoteDesktopServices-RdpCoreTS/Operational.evtx Windows log. These events contain the names of the channels (such as XPSRD, cliprdr, Microsoft::Windows::RDS::DisplayControl, and others) used by the RemoteFX module, which extends the capabilities of the RDP protocol.
When the rdp2tcp tool is used, events with IDs 132 and 148 will contain the channel name rdp2tcp or other random alphanumeric combinations chosen by the attackers.
Creation event for a channel named rdp2tcp (server component startup)
The combination of Microsoft dev tunnels and rdp2tcp allows the attackers to maintain network access by using legitimate services without opening additional suspicious ports.
The attackers also used the atexec utility from the Impacket toolkit to create scheduled tasks on target systems. These tasks enabled network port forwarding through standard Windows functionality:
To obtain elevated privileges and move laterally through the network, NightEagle exploited various vulnerabilities in Active Directory. The attackers used previously established tunnels to connect to internal infrastructure systems.
In one incident, they exploited a well-known RDP implementation vulnerability, CVE-2019-0708 (BlueKeep). They used the vulnerable mechanism to create a local account on the system and add it to the Administrators and Remote Desktop Users groups.
Contents of a system memory dump showing artifacts of the CVE-2019-0708 exploit
The attackers also requested Kerberos tickets with a non-standard combination of flags (Forwardable, Proxiable, Renewable) and attempted to replicate the Domain-Password object from the Active Directory database to impersonate the domain controller (a technique known as DCSync) after obtaining an account with sufficient privileges.
Through these methods, the attackers establish persistence in the infrastructure, obtain password hashes for domain accounts, use long-lived Kerberos tickets to gain legitimate access to target resources, and ultimately compromise domain controllers and the victim’s entire Active Directory infrastructure.
Takeaways
To expand the geographic scope of its targets, NightEagle is updating its methods and adopting new techniques for persistence and lateral movement. Despite the group’s efforts to stay hidden, timely detection of anomalies combined with a comprehensive approach to infrastructure protection can significantly hinder the attackers from achieving their goals. Since the attackers rely on known legitimate tools and infrastructure vulnerabilities, well-configured monitoring can help detect NightEagle’s presence on the network.
Detection by Kaspersky solutions
Kaspersky solutions reliably identify the malicious activity described above at various stages of the attack. We showed examples above of how Kaspersky Threat Analysis detects samples of the GhostContainer backdoor and the tunneling utility. This toolkit also includes the analytical solution Kaspersky Threat Attribution Engine (KTAE), which helps SOC analysts and incident responders determine which APT groups malware can be attributed to. The solution uses a proprietary comparison method that measures the similarity between analyzed samples of suspicious files and known malicious samples in Kaspersky’s collection.
The backdoor we discovered showed similarity to previously analyzed GhostContainer samples and a connection to the NightEagle APT group:
Backdoor analysis with KTAE
However, detection scenarios for this kind of attacks are not limited to file analysis. Deploying a backdoor on a target host produces numerous characteristic artifacts, which allow Kaspersky Endpoint Detection and Response Expert to alert users to anomalies in the infrastructure in a timely manner.
This malicious activity is detected by the following rules, available in the repository:
Initial detection of the malicious signature occurs through the generic_ransomware_related_detection rule, based on EPP module events
Note The August 2026 Dark Web Issue Trend Report summarizes Major Issues that occurred on the deep web and dark web. The report notes that, due to the nature of its sources, it may contain some information whose accuracy cannot be fully verified. Major Issue After the RaidForums domain was suspended, a new domain was […]
Note The August 2026 Dark Web Issue Trend Report summarizes Major Issues that occurred on the deep web and dark web. The report notes that, due to the nature of its sources, it may contain some information whose accuracy cannot be fully verified. Major Issue After the RaidForums domain was suspended, a new domain was […]
Cisco Talos is actively tracking the exploitation of two vulnerabilities in Cisco’s Secure Firewall Management Center (FMC) Software. First, CVE-2026-20079 is an authentication bypass vulnerability in unpatched instances of Cisco’s Secure FMC Software, which allows an unauthenticated, remote attacker to bypass authentications and execute scripts on impacted devices to obtain root access to the underlying operating system. Second, CVE-2026-20316 is a vulnerability that allows a remote attacker to
Cisco Talos is actively tracking the exploitation of two vulnerabilities in Cisco’s Secure Firewall Management Center (FMC) Software. First, CVE-2026-20079 is an authentication bypass vulnerability in unpatched instances of Cisco’s Secure FMC Software, which allows an unauthenticated, remote attacker to bypass authentications and execute scripts on impacted devices to obtain root access to the underlying operating system. Second, CVE-2026-20316 is a vulnerability that allows a remote attacker to log in using a low-privileged account.
CVE-2026-20079 is a critical vulnerability with a CVSS score of 10.0. Customers are strongly advised to follow Cisco’s guidance provided in the security advisory and apply the security patches previously made available.
CVE-2026-20316 has a CVSS score of 5.3, however it can be used with other Cisco Secure FMC vulnerabilities to elevate privileges.
Due to Talos identifying in the wild abuse of these CVE’s, customers are strongly advised to apply hotfixes for affected software versions already released by Cisco for CVE-2026-20079 and CVE-2026-20316. A comprehensive hardening release consisting of these hotfixes along with other internally discovered vulnerabilities will be released next week (Week of September 14th).
Talos’ analysis illustrates three clusters of post-compromise activity on FMC instances associated with state-sponsored and crimeware threat actors, as described below. The first cluster which we track as UAT-12197, involves the exploitation of CVE-2026-20079, leading to the deployment of web shells, a Java Archive (JAR)-based command executor, and credential exfiltration.
The second intrusion cluster, which we attribute to UAT-11823, consisted of the exploitation of CVE-2026-20079 and CVE-2026-20316, leading to the deployment of a Netcat-based reverse shell and proxy tooling, ultimately leading to the deployment of a variant of the Cyclops Blink malware, previously attributed to the Russian APT Sandworm by the United States and United Kingdom.
Talos is further disclosing a third cluster of malicious activity on an FMC instance, attributed to UAT-11988, who we assess with high confidence is a ransomware operator. The preliminary stages of the attack entailed the threat actor gaining access to the system via static credentials (CVE-2026-20316) and then abusing legitimate built-in FMC tooling in living-off-the-land (LOTL) fashion to conduct extensive reconnaissance of the victim’s environment, deploy tunneling tools to maintain network access, harvest credentials, and build a target list of endpoints to encrypt/lock. Subsequent actions and tactics, techniques, and procedures (TTPs) the threat actor used in the victim’s environment were consistent with those of Qilin ransomware affiliates.
Note: Talos would like to acknowledge and thank Avit for their contributions towards investigating Cluster #3 - UAT-11988.
Cluster #1: UAT-12197
This cluster of activity involved the successful exploitation of CVE-2026-20079 and the subsequent placement of a malicious web shell in the CSM Tomcat webroot directory. The web shell is JSP-based and Base64 decodes a parameter labelled “F6C1F0E7”, consisting of the class name to load in the JAVA process:
The web shell was used to place a malicious JAR file in the same directory. The threat actors used the JAR file (named “cmd[.]jar”) to query the compromised systems’ internal databases to obtain user authentication data and credentials:
The JAR file is basically a command executor that obtains the command to be executed from its command line and executes it using /bin/sh -c <command>.
Cluster #2: UAT-11823
Talos attributes this cluster of activity to UAT-11823, an advanced persistent threat (APT) actor, with high confidence. UAT-11823 overlaps in tooling with the Sandworm APT actor. The threat actor obtained initial access to compromised systems by either exploiting CVE-2026-20079 or via static credentials. After obtaining access, UAT-11823 subsequently updated the “license.tmp” file on disk (using Makeself) with a malicious copy to establish a Netcat-based reverse shell to their own command-and-control (C2) server:
This license file essentially acted as a Makeself package that was then executed via the installation process (as root) by the “package_info[.]pl” utility:
This mechanism of deploying malicious package files is likely an indicator of the exploitation of CVE-2026-20316, a vulnerability that allows a remote attacker to log in using a low-privileged account. Talos assesses with high confidence that the attackers exploited CVE-2026-20079 and CVE-2026-20316.
Configuration exfiltration
UAT-11823 also deployed two bash scripts to harvest managed-device configurations. The configurations collected were staged into archives for subsequent exfiltration.
Modular ELF implant: Cyclops Blink
The threat actors downloaded a modular ELF implant from one of their Netcat C2 servers. The ELF-based implant is Cyclops Blink, a malware family previously attributed to Sandworm, a Russian APT actor. This variant of Cyclops Blink consists of the following capabilities:
Establish persistence scripts in /etc/init.d/ that execute the implant
DNS over HTTPS (DoH) IP resolution
File administration including downloads and uploads
Credential harvesting
Arbitrary file and command execution on the compromised system
Network scanning and discovery
Packet sniffing (with option filters)
Cluster #3: UAT-11988, a Qilin ransomware operator
A third cluster of activity entailed a ransomware operator (tracked as UAT-11988) logging into an FMC device with static credentials (CVE-2026-20316), performing extensive reconnaissance, domain enumerations, credential theft, and building a list of target endpoints within the compromised organization for encryption.
The threat actor also staged a SOCKS proxy and reverse-SSH tunnel to forward ports from internal hosts back to their own infrastructure.
Once all these preliminary actions were completed, the operator began conducting additional probes within the compromised network, deploying antivirus (AV) killers and ultimately the Qilin ransomware family.
Instrumenting operations via package_info.pl
After successfully accessing the device, the threat actor abused the legitimate utility “package_info.pl” to execute an attacker-crafted malicious “license[.]tmp” file with root privileges. The malicious file consisted of commands to run on the system to conduct extensive reconnaissance in the victim organization’s environment:
Host names, IP addresses, directory listings
Active Directory (AD) service-accounts credentials, MySQL account credentials
Domain account information exfiltration
Computer object lists
Hostname to IP mappings spanning domain controllers, ADFS, exchanges, file servers, database servers, etc.
All the information collected was staged into already accessible files on the FMC server and was exfiltrated by the threat actor using HTTP GET requests.
Tunneling into the compromised organization
Once extensive reconnaissance was completed, the threat actor attempted to establish persistent network access into the victim organization using a Python SOCKS5 proxy (socks5.py) and a reverse-SSH tunnel from the FMC back to the attacker’s own remote host. The following ports were forwarded: LDPA (389), LDAPS (636), Kerberos (88), SMB (445), NETBIOS (135), and WinRM (5985).
Pre-ransomware actions and ransomware deployment
The threat actor conducted extensive probing of endpoints in the victim’s environment, deployed open-source tooling such as impacket, Invoke-TheHash, and custom-made AV killers — all followed by the deployment of the Qilin ransomware on selected endpoints.
Recommendations and detection guidance
Due to Talos identifying in the wild abuse of these CVE’s, customers are strongly advised to apply hotfixes for affected software versions already released by Cisco for CVE-2026-20079 and CVE-2026-20316. A comprehensive hardening release consisting of these hotfixes along with other internally discovered vulnerabilities will be released next week (Week of September 16th). Nonetheless, given the in the wild abuse we strongly recommend that customers apply the referenced hotfixes as soon as possible, pending the hardening release.
Customer support is also available by initiating a TAC request.
Snort SIDs for CVE-2026-20079: 66075 – 66080.
Snort SIDs for CVE-2026-20316: 66883.
Snort SIDs for the malware: 66960, 66961.
Indicators of compromise
IOCs for these threat clusters are also available on our GitHub repository here.
This technical analysis report was prepared as part of the joint cybersecurity advisory titled “Advisory on Cyberattacks Targeting Korean Citizens and Businesses by State-Sponsored Hacking Groups” issued by the Republic of Korea’s National Intelligence Service (NIS), National Police Agency (NPA), Korea Internet & Security Agency (KISA), and Financial Security Institute (FSI). OverView AhnLab SEcurity […]
This technical analysis report was prepared as part of the joint cybersecurity advisory titled “Advisory on Cyberattacks Targeting Korean Citizens and Businesses by State-Sponsored Hacking Groups” issued by the Republic of Korea’s National Intelligence Service (NIS), National Police Agency (NPA), Korea Internet & Security Agency (KISA), and Financial Security Institute (FSI). OverView AhnLab SEcurity […]
To reduce traffic incidents, all new cars sold in the EU must now include driver-monitoring technology, including Driver Drowsiness and Attention Warning (DDAW) systems and, on newer vehicles, Advanced Driver Distraction Warning (ADDW) systems.
Similar requirements are expected in the US, where the National Highway Traffic Safety Administration (NHTSA) has been directed to develop rules requiring advanced impaired driving prevention technology in new passenger vehicles.
The EU requirement
To reduce traffic incidents, all new cars sold in the EU must now include driver-monitoring technology, including Driver Drowsiness and Attention Warning (DDAW) systems and, on newer vehicles, Advanced Driver Distraction Warning (ADDW) systems.
Similar requirements are expected in the US, where the National Highway Traffic Safety Administration (NHTSA) has been directed to develop rules requiring advanced impaired driving prevention technology in new passenger vehicles.
While camera-based systems are widely expected, the law does not specify exactly how manufacturers must implement the technology. Many current systems use infrared cameras to monitor the driver’s face and eyes for signs of drowsiness, distraction, or possible impairment.
Privacy experts raised alarms and they are not alone. Mandated driver‑monitoring tech in new cars raises a set of privacy, security, and civil‑liberties objections.
Always‑on biometric surveillance in private space. Infrared cameras and other sensors can continuously track eye movement, pupil dilation and drowsiness patterns, effectively turning your car into a space where biometric assessment is constantly being assessed.
Unclear data flows and potential sharing with insurers. While the law does not explicitly mandate external data sharing, manufacturers could potentially upload biometric data to corporate servers. Critics have also raised concerns that it could eventually be shared with insurance companies to adjust premiums based on driving behavior. It’s not like that hasn’t happened before.
Higher vehicle costs. The added cost of $100 to $500 per vehicle is likely to be passed on to consumers already dealing with inflated car prices, not the insurance companies that could benefit from fewer accidents and lower pay-outs.
Reliability and false positives. Automakers are concerned about technical readiness and false positives that could strand drivers if the system incorrectly decides they’re impaired. Experts worry that poorly tuned models could misclassify fatigue, disability‑related eye/face patterns, or even momentary distraction as impairment, leading to denial or limitation of vehicle operation.
Scope changes through software updates. These systems will be integrated into broader automotive software stacks and may be receive over-the-air updates, potentially expanding their monitoring capabilities after purchase.
Other experts have questioned whether the technology was was ready for widespread deployment, including in NHTSA’s 2023 report to congress.
Even Mothers Against Drunk Driving (MADD) warns that:
“The vehicle technology standard must protect driver privacy and should not make consumers vulnerable to privacy invasions or allow the collection, storage or use of their data for commercial or malicious purposes.”
What you can do
Besides adjusting when you buy a new car, there are some things consumers can do:
When shopping, look for manufacturer privacy documentation specifying that driver‑monitoring data is processed locally, not stored long‑term, and not shared with third parties except where strictly necessary for safety.
Ask the dealer how long biometric data is retained, whether it leaves the car, and whether you can disable cloud connectivity for these features while keeping basic safety functions.
Where possible, disable optional driver-scoring, eco‑driving, or usage‑based insurance features that piggyback on the same sensor data.
When given the choice, choose the strictest privacy settings you can legally use.
In some countries and states, privacy laws give you the right to know what data is collected, request its deletion, and opt out of certain types of data sharing.
Be cautious about opt‑in programs that promise discounts or perks in exchange for sharing detailed driver‑monitoring data with insurers or employers.
Browse like no one’s watching.
Malwarebytes Privacy VPN encrypts your connection and never logs what you do, so the next story you read doesn’t have to feel personal. Try it free →
ASEC Blog publishes Ransom & Dark Web Issues Week 1, July 2026. Settra cliams data leak at Korean industrial firm’s foreign affiliate The Gentlemen launches ransomware attacks against Spanish defense, aerospace, and IT service firms DragonForce claims data theft targeting a South Korean smart factory and digital twin company
ASEC Blog publishes Ransom & Dark Web Issues Week 1, July 2026. Settra cliams data leak at Korean industrial firm’s foreign affiliate The Gentlemen launches ransomware attacks against Spanish defense, aerospace, and IT service firms DragonForce claims data theft targeting a South Korean smart factory and digital twin company
Unit 42 analyzes AD CS exploitation through template misconfigurations and shadow credential misuse while offering behavioral detection for defenders.
The post Inside AD CS Escalation: Unpacking Advanced Misuse Techniques and Tools appeared first on Unit 42.
Recently, Microsoft changed the way the Entra Connect Connect Sync agent authenticates to Entra ID. These changes affect attacker tradecraft, as we can no longer export the sync account credentials; however, attackers can still take advantage of an Entra Connect sync account compromise and gain new opportunities that arise from the changes.How It Used To WorkPrior to the change, an “AAD Connector” account would be created upon Entra Connect sync install. Upon creation, a randomized password woul
Prior to the change, an “AAD Connector” account would be created upon Entra Connect sync install. Upon creation, a randomized password would be generated and set for the connector account. The AAD Connector account was a user principal that would be assigned a special sync role, and it would authenticate just like any old user. You may have seen these before; they look like this:
In this instance, ENTRACONNECT is the hostname on which the agent is running. There are a wide variety of attack paths that can stem from compromising this account, so it is a very advantageous target for attackers.
Old Attacker Tradecraft
Thanks to AADInternals, it was simple to obtain the sync password of the AAD Connector Account used to import and export data from Entra ID. Some decryption steps are documented here, but that mostly focuses on the on-premises accounts. If you are an AADInternals user, you would need to impersonate the context of the Entra Connect sync account and run the command:
Get-AADIntSyncCredentials
And that’s it! You could use your creds to do all sorts of sync mischief. Under the hood, the ADSync service account would connect to a SQL database where it would obtain a key to decrypt an “AAD configuration” blob. The plaintext password of the AAD Connector Account (Connects to Entra ID) would be in that blob. If an attacker got privileged access to a host running Entra Connect Sync, they could obtain this plaintext password and authenticate off-host, conditional access policies (CAPs) permitting. The theft of such a credential would have a huge impact on any organization, so I presume that Microsoft moved over to an application registration to reduce such a risk.
The Client Credentials Flow
If you are new to Entra ID, you can read how the Client Credentials flow works here. In a nutshell, an application registration can authenticate as itself utilizing the app roles assigned to it. To authenticate and obtain access tokens, it needs credentials provisioned to it. These credential types aren’t exclusive, and an application can have multiple. They can be in the form of:
Secrets (plaintext password)
Certificates
Federated Credentials
If the application uses a certificate, it will sign an attestation when authenticating to obtain an access token. Here is an example:
POST /{tenant}/oauth2/v2.0/token HTTP/1.1               // Line breaks for clarity
Host: login.microsoftonline.com:443
Content-Type: application/x-www-form-urlencoded

scope=https%3A%2F%2Fgraph.microsoft.com%2F.default
&client_id=11112222-bbbb-3333-cccc-4444dddd5555
&client_assertion_type=urn%3Aietf%3Aparams%3Aoauth%3Aclient-assertion-type%3Ajwt-bearer
&client_assertion=eyJhbGciOiJSUzI1NiIsIng1dCI6Imd4OHRHeXN5amNScUtqRlBuZDdSRnd2d1pJMCJ9.eyJ{a lot of characters here}M8U3bSUKKJDEg
&grant_type=client_credentials
How It Works Now
The new Entra Connect Sync agent moved from a “user” centric authentication mechanism to an app registration, which uses the client credentials flow. Since app registrations support certificate authentication, a self-signed certificate is generated on install and saved in the NGC Crypto Provider store. The installer will use the login information you provided (which must be a Global Administrator or Hybrid Identity Administrator) to create a new application registration with the self-signed certificate as an authentication certificate. Once Entra Connect sync completes installation, an application will exist in Entra ID that looks like this:
And the configured app roles:
New Tradecraft
In a perfect world, an attacker could no longer dump plaintext credentials (because there are none) and the private key that corresponds to the certificate is sitting on a TPM. It would appear that any AD Connector account abuses must be performed on-host from here on out, forcing an attacker to persist on a Tier Zero asset. If there is no TPM support, we may be able to export the certificate private key, but I don’t want to rely on that. To the red teamer, it may seem all is lost–but fret not; there is still hope.
After examining the .NET assemblies provided in the new release, it appeared that a graph token of a Global Administrator or Hybrid Identity Administrator was not required to add a new key to the application registration.
This came off as strange because the application was not provisioned with either Application.ReadWrite.All or Application.ReadWrite.OwnedBy. Let’s take a look at the decompiled code in Microsoft.Azure.ActiveDirectory.AdsyncManagement.Server:
if (!string.IsNullOrEmpty(graphToken))
{
    httpClient.DefaultRequestHeaders.Authorization = new AuthenticationHeaderValue("Bearer", graphToken);
    string text2;
    if (!ServicePrincipalHelper.CheckUserRole(azureInstanceName, httpClient, out text2))
    {
        Tracer.TraceError(text2, Array.Empty<object>());
        throw new AccessDeniedException(text2);
    }
}
else
{
    azureAuthenticationProvider = AzureAuthenticationProviderFactory.CreateAzureAuthenticationProvider(aadCredential.UserName, aadCredential.Password, InteractionMode.Desktop);
    string text4;
    string text3 = azureAuthenticationProvider.AcquireServiceToken(AzureService.MSGraph, out text4, false);
    if (string.IsNullOrEmpty(text3))
    {
        Tracer.TraceError("ServicePrincipalHelper: Failed to acquire an access token for graph. {0}", new object[]
        {
            text4
        });
        throw new AccessDeniedException(text4);
    }
    httpClient.DefaultRequestHeaders.Authorization = new AuthenticationHeaderValue("Bearer", text3);
    azureInstanceName = azureAuthenticationProvider.AzureInstanceName;
}
That whole else block is handling the case for when a graph token (presumably that of a Global Administrator or Hybrid Identity Administrator) is not provided. How interesting!
The aadCredential username and password is a bit misleading, as it’s actually holding the UUID of the application registration and the sha256 hash of the existing certificate, as this function call shows:
So what we need is the cert hash of the existing certificate credential and the ability to load it into our AzureAuthenticationProviderFactory. Once we do, we can use that certificate to do two things:
Obtain a graph token to make the addKey API call
Obtain a proof of possession (POP) assertion proving that we are currently in possession of the private key
Further down in the function, the following code executes if no graph token is provided:
public KeyCredentialModel AddKey(Guid appId, KeyCredentialModel keyCredential, string proof) { if (appId == Guid.Empty) { throw new ArgumentException("appId"); } if (keyCredential == null) { throw new ArgumentNullException("keyCredential"); } if (string.IsNullOrEmpty(proof)) { throw new ArgumentNullException("proof"); } string requestUri = string.Format(this.graphEndpoint + "/v1.0/applications(appId='{0}')/addKey", appId); string passwordCredential = null; string content = JsonConvert.SerializeObject(new { keyCredential, proof, passwordCredential }, ODataResponse.JsonSettings.Value); KeyCredentialModel result; using (HttpRequestMessage httpRequestMessage = new HttpRequestMessage(HttpMethod.Post, requestUri) { Content = new StringContent(content, Encoding.UTF8, "application/json") }) { using (HttpResponseMessage httpResponseMessage = base.SendRequest(httpRequestMessage)) { result = JsonConvert.DeserializeObject<KeyCredentialModel>(httpResponseMessage.Content.ReadAsStringAsync().GetAwaiter().GetResult()); } } return result; }
We now know what is needed to add a new key. As an attacker, we can generate a new private key, build a certificate, obtain a POP token, and register it with the application registration. This provides us persistent, off-host, access to the application registration. To do this, we can build out a .NET assembly that performs the necessary steps in the context of the ADSync account.
Proof of Concept
Our goal is to prove that we can still persist our access to a compromised AAD connector account, even if a TPM protects the private key. We can accomplish this by generating our own certificate and adding it to the service principal.
First, we need to obtain an access token and a signed POP assertion. We can do this with the certificate that is installed on the host and can be performed by running this program here:
Our graph token looks like this:
And the POP assertion looks like this:
According to the documentation here, this should be enough to add credentials to our application registration, given that we have at least Application.ReadWrite.OwnedBy.
However, our application does not have any required app roles!
How can this be? Well, if you are an astute reader, or simply have an attention span past the first paragraph of Graph documentation, you’ll see this banger on the addKeys page:
As it turns out, if you have access to an existing key, you can just add your own with no permissions needed!
How have I missed this?!
Mystery solved, and our path is clear for how we can persist our access to the AAD connector account off-host.
If we run our AddKey binary (posted here) with just our access token and POP assertion, you can see that we successfully added our key.
And the updated key is reflected here:
Red team crisis averted; we can keep our sync tradecraft, albeit a bit more “detectable”. Also, as a general takeaway, the ability to sign POP assertions equals the ability for any application to add new certificates to itself, which is pretty cool.
New Opportunities
Here is a list of users who could compromise the sync account previously:
Previously, a privileged auth administrator or higher could change the password of the Sync account; however, since the sync agent would no longer successfully authenticate, it would break the functionality of the sync agent. This left only Global Administrator and Hybrid Identity Administrator as viable attack paths for a red teamer. Let’s look at the new pseudo-graph:
This update presents an attacker with the opportunity to add credentials without interrupting the normal day-to-day flow of the sync agent. In addition, it is far more common to have principals assigned the Application/Cloud Application administrator, making the attack surface larger for sync attacks. While tradecraft may have shifted for on-premises attackers, the Entra ID attack surface has expanded. In addition, Conditional Access typically doesn’t affect service principals, so the likelihood of being able to use these credentials off-target is significantly higher. Ultimately, this is a cleaner yet more abuse-prone implementation.
Detections
Here is the good news. Detecting a new credential on an Application Registration is easy and a dead giveaway that something interesting is happening. Since the normal flow of UpdateADSyncApplicationKey removes the old key, the existence of more than one certificate on the Entra Connect application registration is a good indication that something is amiss. Should an attacker choose to be stealthy and actually replace the certificate that the Entra Connect Sync agent uses, then there are still detections for credential manipulation on an application registration. Here is a KQL query that surfaced all of my key additions:
AuditLogs
| where ActivityDisplayName has_any ("Add service principal credentials", "Update application", "Add key credential")
| where TargetResources[0].type =~ "Application"
| extend AppName = tostring(TargetResources[0].displayName)
| extend ChangedProps = TargetResources[0].modifiedProperties
| extend Initiator = tostring(InitiatedBy.user.displayName)
| project TimeGenerated, AppName, ActivityDisplayName, Initiator, ChangedProps
| where ChangedProps has_any ("keyCredentials", "passwordCredentials")
Takeaways
This is a brand-new update for Entra Connect Sync, so I don’t expect to see it in the wild for some time. I’m not quite sure I’m sold on the ability for an application to “roll its own keys”, as the documentation states. If access to a key is equivalent to the ability to produce more keys, then what’s the point of an expiration date?
NTLM relay attacks have been around for a long time. While many security practitioners think NTLM relay is a solved problem, or at least a not-so-severe one, it is, in fact, alive and kicking and arguably worse than ever before. Relay attacks are the easiest way to compromise domain-joined hosts nowadays, paving a path for lateral movement and privilege escalation.NTLM relay attacks are more complicated than many people realize. There are a lot of moving parts that operators have to track using
NTLM relay attacks have been around for a long time. While many security practitioners think NTLM relay is a solved problem, or at least a not-so-severe one, it is, in fact, alive and kicking and arguably worse than ever before. Relay attacks are the easiest way to compromise domain-joined hosts nowadays, paving a path for lateral movement and privilege escalation.
NTLM relay attacks are more complicated than many people realize. There are a lot of moving parts that operators have to track using different tools, but we have recently introduced NTLM relay edges into BloodHound to help you keep on thinking in graphs with new edges that represent coercion and relay attacks against domain-joined computers, originating from Authenticated Users and leading into the computer that could be compromised via SMB, LDAP/LDAPS, and ADCS ESC8. Each of these edges is composed of different components and prerequisites, but they all follow the same “Zero to Hero” pattern from Authenticated Users to the would-be compromised computer.
While there are many great resources on this old attack, I wanted to consolidate everything you need to know about NTLM into a single post, allowing it to be as long as needed, and I hope everyone will be able to learn something new.
Once Upon a Time
NTLM is a legacy authentication protocol that Microsoft introduced in 1993 as the successor to LAN Manager. NTLM literally stands for New Technology LAN Manager, a name that didn’t age well. While Kerberos is the preferred authentication protocol in Active Directory environments (and beyond), NTLM is still widely used whenever Kerberos isn’t viable or, more commonly, when NTLM usage is hard-coded.
NTLM Fundamentals
My favorite research area is authentication protocols, and over the years, I’ve noticed that every authentication protocol is designed to thwart one or two primary threats. For NTLM, I believe it is replay attacks. Not relay attacks (obviously, given the title), but replay attacks, where an attacker intercepts a valid authentication exchange and replays the packets/messages later to impersonate the victim. NTLM prevents such attacks using a challenge-response exchange: the server generates a random challenge, and the client produces a cryptographic response that proves possession of the client’s credentials.
The NTLM authentication exchange involves a three-message exchange:
The Negotiate (type 1) message is sent from the client to the server to initiate authentication and negotiate session capabilities, such as a session key exchange and signing (more on those later), through a set of flags indicating the client’s supported/preferred security attributes for the session.
The Challenge (type 2) message is sent from the server to the client. It contains a corresponding set of flags indicating the server’s supported/preferred session capabilities and an 8-byte randomly generated nonce, known as the server challenge.
The Authenticate (type 3) message is sent from the client to the server. It contains a set of flags indicating the determined session capabilities based on the client’s and server’s preferences and a cryptographically generated response to the server challenge. There are two major NTLM response generation algorithm versions: NTLMv1 and NTLMv2.
The server then validates the response to authenticate the client. Local accounts are validated against the NT hashes stored in the local SAM, and domain accounts are sent to a domain controller for validation via the Netlogon protocol.
NTLMv1
NTLMv1 is the original response algorithm. It was developed in 1993, in the unfortunate days when DES was the standard encryption algorithm, so that’s what Microsoft used to generate the response, as described in the diagram below:
As shown above, the client’s password is transformed into an NT hash, which is the MD4 hash of the Unicode-encoded password, to be used as the DES encryption key. However, there was a little hiccup: the NT hash was 16 bytes, while the effective DES key length was 7 bytes. Microsoft came up with a creative solution — split the NT hash into three keys: the first seven bytes, the following seven bytes, and the last two bytes padded with zeros. Each of these keys encrypts the server challenge three times independently, and the ciphertexts are concatenated to produce a 24-byte-long response.
NTLMv1 is Bad
NTLMv1 turned out to be a bad idea for three main reasons:
First, DES encryption is… not great, as it can be cracked relatively easily.
Second, the response isn’t “salted”, meaning that the same password and server-challenge combination always produces the same response, making it susceptible to rainbow table attacks.
Third, combining the two previous reasons makes one of my all-time favorite attacks, discovered by Moxie Marlinspike and David Hulton. They managed to recover the raw NT hash by cracking each of the three ciphertexts individually, using rainbow tables and custom hardware. Why should we care about the NT hash? After all, it’s not a password, right? We’ll discuss the infamous Pass the Hash attack soon.
“NTLM2” Precedes NTLMv2
Just for completeness, I’ll mention “NTLM2”, also known as “NTLM2 Session Response” or “NTLMv1 with Enhanced Session Security”. This interim version between NTLMv1 and NTLMv2 introduced an 8-byte client-generated nonce, known as the client challenge. The client challenge was concatenated with the server challenge, and then the combined value was MD5-hashed and, finally, DES-encrypted as in NTLMv1. This enhancement ensured every response was unique and thwarted rainbow table attacks. However, the algorithm is still fundamentally flawed, and the NT hash can be recovered with modern GPUs within less than 24 hours, on average, at a cost of about $30.
NTLM2 is just a distraction, though. Feel free to forget you ever read the paragraph above.
NTLMv2
Shortly after, still in the ’90s, Microsoft released NTLMv2, replacing DES encryption with HMAC-MD5, as described below. This algorithm is still in use today.
The NT hash is used as the key to generate an HMAC of the client’s domain name and username. It is called the “NT One Way Function v2” or NTOWFv2. The NTOWFv2 HMAC value is then used as the key to generate another HMAC, this time of the server challenge, along with additional information, such as a random client challenge and a timestamp to thwart rainbow table attacks, and additional session attributes, which we will discuss later. This HMAC value is the NT Proof String or NTProofStr. Many people mistakenly think that the NTProofStr is the NTLMv2 response, but it is only part of it. All the additional information used to generate the NTProofStr is also included in the NTLMv2 response to allow the server to generate the same HMAC and validate the client’s response.
LM Compatibility Level
Every Windows host acts as both a server, when someone authenticates to it, and a client, when it authenticates to another host. A single registry value controls both the server and client NTLM version support, located at HKLM\System\CurrentControlSet\Control\Lsa\LmCompatibilityLevel. It allows enabling/disabling NTLMv1 and NTLMv2 for the entire host as a server and as a client, as described in the table below:
When a client authenticates to a member server using a domain account, the server sends the response to a DC for validation. Therefore, the DC’s LmCompatibilityLevel is the one that determines whether NTLMv1 is accepted or not. Note that different DCs can technically have different configurations. However, it is very uncommon to see DCs with LmCompatibilityLevel set to 5 (I’ve never seen that outside of lab environments), so it’s safe to assume the DC will support both NTLMv1 and NTLMv2, as a server, for domain accounts.
It is not uncommon to see DCs with a lower LmCompatibilityLevel. I believe the reason is that some sysadmins mistakenly think that a lower LmCompatibilityLevel is required to support NTLMv1 clients in the domain, while, in fact, they just enable NTLMv1 on the DCs as clients, which can have dire consequences, as we will explain soon.
Looking at the table above, we can make a few observations:
As a client, a Windows host can have either NTLMv1 or NTLMv2 enabled but not both.
As a server, a Windows host will likely enable both NTLMv1 and NTLMv2.
If a Windows host enables NTLMv1 as a client, it must also enable it as a server.
A Windows host doesn’t have to enable NTLMv1 as a client to enable it as a server.
Additional settings allow restricting or auditing outgoing or incoming NTLM authentication or requiring session security settings, but we won’t elaborate on those.
Password Cracking is a Problem
There are different tools for capturing NTLM responses for cracking. Responder is the most well-known and widely used tool, but Inveigh and Farmer deserve an honorable mention, too.
An attacker can potentially crack a captured NTLM exchange, whether it’s NTLMv1 or NTLMv2, to recover the password if it is not sufficiently strong. In the case of NTLMv1, the NT hash can always be recovered, and it can be abused in a couple of ways. If it is a computer/service account, the attacker can forge an RC4-encrypted Kerberos silver ticket and impersonate a privileged account to the host or the service. The NT hash can also be used for NTLM authentication, without cracking the cleartext password, through the infamous Pass the Hash attack.
Pass the Hash
When taking a closer look at the NTLMv1 and NTLMv2 flows, you may notice that, technically, we don’t need the cleartext password to produce a valid NTLM response. If we skip the first step in the flow, the NT hash is all we need.
Who Needs to Crack Passwords Anyway?
The real problem with NTLM is relay attacks. An attacker can simply relay the NTLM messages between a client and server, back and forth, until the server establishes a session for the client, allowing the attacker to perform any operation the client could perform on the server. For clarity, we will refer to the client as the “victim” and the server as the “target”.
Relay attacks allow authenticating as the victim to the target without spending time and resources on password cracking and without depending on weak passwords.
Not an Opportunistic Attack
Some defenders belittle relay attacks because they seem to be somewhat opportunistic. However, relay attacks can be executed with intention and precision when combined with authentication coercion attacks.
Generally, the mechanics of computer account authentication coercion and user account authentication coercion are different.
Computer Account Authentication Coercion
Computer account authentication coercion typically involves an RPC call to a vulnerable function on a remote host (the relay victim). Specifically, we’d try to call a function that would attempt to access an arbitrary path we can control. Then, when the remote service attempts to access the specified path, we’d require authentication and kick off a relay attack. The remote service would authenticate as the relay victim computer account if the service runs as SYSTEM or NETWORK SERVICE and if it doesn’t impersonate a different context before attempting to access the resource.
The two most notable computer authentication coercion primitives are the Printer Bug and PetitPotam. The Printer Bug abuses the function RpcRemoteFindFirstPrinterChangeNotification[Ex] in the Print Spooler service, which establishes a connection to an arbitrary path to send notifications about print object status changes. PetitPotam abuses several functions in the Encrypting File System (EFS) service, such as EfsRpcOpenFileRaw, which opens a file in an arbitrary path for backup/restore. These techniques result in an immediate authentication attempt from the victim computer account without user interaction.
Authenticated Users are permitted to trigger these computer account authentication coercion attack primitives, allowing almost anyone to initiate the relay attack.
User Account Authentication Coercion
User account authentication coercion is more complicated and, in some cases, somewhat opportunistic. The classic user account authentication coercion primitives involve planting a reference to an external resource in a document, email, or even a web page. When the victim renders the document, the client attempts to load the resource, sometimes without their knowledge or consent, and initiates an authentication attempt with the user’s credentials. These primitives require one to three clicks and can be sent directly to the victim or strategically planted in a high-traffic shared folder or website for a watering hole attack.
Dominic Chell highlighted a more sophisticated, well-known approach that abuses Windows Shell. Windows Shell is the operating system’s user interface. It has extensions and handlers that enrich the user experience, for example, by generating thumbnails/previews or customizing icons. Specially crafted files can manipulate these mechanisms to access arbitrary paths as soon as the operating system “sees” them, without any user interaction. The most common way to abuse it is to pass to the icon handler a reference to an attacker-controlled path, which would result in a user authentication attempt as soon as the user browses the folder in which the file is located, even if the user doesn’t even click or highlight the file. The most notable file types that support this kind of manipulation are:
Windows Search Connectors (.searchConnector-ms)
URL files (.url)
Windows Shortcuts (.lnk)
Windows Library Files (.library-ms)
For example, the following URL file would try to load its icon from the path \\attackerhost\icons\url.icon from the user’s security context, so it authenticates with the user’s credentials.
Attackers can drop these files in strategic file shares, such as high-traffic file shares or those frequently used by privileged users, and then kick off a relay attack as soon as an authentication attempt comes through.
Credential Abuse Without Lateral Movement
Traditionally, when attackers gain admin access to a host with an interesting logged-on user, they would move laterally to that host and then attempt one of many credential abuse techniques to impersonate the user and continue maneuvering toward their objectives. However, as EDRs and other endpoint security solutions improve, the detection risk of lateral movement and credential abuse TTPs increases.
Instead, attackers can reduce the detection risk by accessing the remote file system via an administrative share, such as C$, and dropping an authentication coercion file on the logged-on user’s desktop. The moment the file is dropped, Windows Shell starts processing it, and an authentication attempt to the attacker-controlled host is initiated. It works even if the file is hidden, the workstation is locked, or the RDP session is disconnected. More specifically, it works as long as explorer.exe runs in a suitable security context, meaning it is associated with a logon session with credentials cached in the MSV1_0 authentication package.
The attacker can try to crack the NTLM response to recover the password or establish a session on a target server by relaying it.
Taking Over 445
In case you missed it, it is possible to bind a listener to port 445 on Windows hosts without loading a driver, loading a module into LSASS, or requiring a reboot of the Windows machine, as Nick Powers discovered last year.
Too Good to Be True?
So far, NTLM relay attacks may seem very powerful and somewhat simple. However, over the years, Microsoft introduced several mitigations to complicate things.
Session Security
NTLM supports signing (integrity) and sealing (encryption/confidentiality) to secure the session. It is achieved by exchanging a session key in the NTLM Authenticate message. The client generates a session key and RC4-encrypts it using a key generated, in part, from the client’s NT hash. A common misunderstanding is that when signing is negotiated, NTLM relay attacks fail to establish a session (authenticate). However, even with signing, authentication is successful. The problem is that the attacker can’t recover the session key without possessing either the victim’s NT hash or the target’s credentials. But if the attacker possessed either of them, there would be no need for relaying anyway. Therefore, if the target indeed requires all the subsequent messages in the session to be signed with the session key, the attacker would not be able to use the session. Luckily for the attackers, not all servers implement such a requirement, as we will see soon.
The screenshot below shows a portion of a typical NTLM Authenticate message in which a session key is exchanged and signing is negotiated.
The premise of an NTLM relay attack is a man-in-the-middle position. Therefore, the attacker’s obvious next step should be tampering with this Authenticate message in flight to remove the session key and reset the Negotiate Key Exchange and Negotiate Sign flags, pretending the victim never negotiated those.
Message Integrity Code (MIC)
Microsoft anticipated such attempts and introduced an integrity check to the NTLM messages. An HMAC is added to the Authenticate message to protect all three NTLM messages with the session key. The server validates the MIC upon receiving the message, and if a single bit in any of the three NTLM messages is flipped, authentication fails.
Drop the MIC?
The MIC is a later addition to the NTLM protocol. Windows XP and Windows Server 2003 and older, as well as some 3rd party platforms, don’t support it. So, can’t the attacker drop the MIC and pretend the client never added it?
Microsoft anticipated that, too, and added an attribute to the NTLMv2 response indicating the MIC’s presence.
Therefore, an attacker would have to remove/reset that attribute before removing the MIC, but because this attribute is part of the NTLMv2 response, changing it would invalidate the NTProofStr, and authentication would fail.
Those of you who are paying attention should realize that NTLMv1 does not incorporate any additional information into the NTLMv1 response, meaning that NTLMv1 is always susceptible to MIC removal and tampering with the Negotiate flags and the session key.
A Blast From the Past
In 2019, Yaron Zinar and Marina Simakov discovered a couple of vulnerabilities in the NTLM implementation, allowing attackers to Drop the MIC even in NTLMv2. However, we will not delve into those because Microsoft released patches, and it is extremely rare to encounter Windows hosts affected by these vulnerabilities nowadays.
Channel Binding
Channel binding, also commonly referred to as Extended Protection for Authentication (EPA), is a mechanism that prevents man-in-the-middle attacks by incorporating a token from the secure channel (TLS), that is, the server certificate hash, into the NTLM Authenticate message. The server can compare the channel binding token to its own certificate hash and reject the authentication attempt if there is a mismatch. Any service running over TLS, such as HTTPS and LDAPS, can support channel binding.
Just like session security and the MIC, channel binding is not mandatory, but it is part of the NTLMv2 response, and therefore, it is protected by the NTProofStr, so the attacker can’t remove it and pretend it was never there. However, NTLMv1 does not support channel binding.
Backward Compatibility
All these mitigations are later additions to the protocol, so some older or 3rd party platforms may not support them. Therefore, they may not be required by the target server. The server behavior depends on its configuration, whether it is configured to support or even require session security or channel binding, and whether it is designed or implemented to honor the session capabilities negotiated in the NTLM exchange. Given that this is just about the midpoint of this post, you can assume it is not uncommon for targets not to require or enforce these mitigations.
Protected Users
Microsoft introduced the Protected Users security group in the Windows Server 2012R2 functional level to mitigate several attacks that can lead to credential material theft. Members of this group are not permitted to perform NTLM, and hosts running Windows Server 2012R2/Windows 8.1 or later do not cache the NT hash in LSA memory. These protections and others may have usability issues, so only privileged/sensitive accounts should be added to this group. Unfortunately, this group is too often left empty.
Not Too Good to Be True
Given everything discussed above, what are the conditions for relay attacks?
A relay attack should be viable if the target does not support these mitigations by design/implementation or configuration (disabled) or the target supports these mitigations (enabled) but does not require them, and one of the following applies:
The victim does not negotiate session security and channel binding
The victim’s session negotiation is unprotected (NTLMv1)
The target implementation ignores the negotiated capabilities
Relaying is only half the story, though. A successful relay satisfies authentication and establishes a session. However, authorization, meaning what the attacker can do afterward, depends on the victim’s permissions.
Targeting SMB
The first and simplest scenario we introduced into BloodHound is relaying NTLM to SMB. SMB servers don’t support channel binding with NTLM, and they negotiate signing at the SMB protocol level, outside the NTLM exchange, meaning that even if the victim negotiates signing in the NTLM Authenticate message, the target will disregard it and only consider what’s negotiated in the SMB headers, which the attacker can control. To be clear, configuring SMB clients to require SMB signing does not affect NTLM relay attacks.
Below is an excerpt from a typical SMB2 negotiate response message with SMB signing enabled but not required. The server is vulnerable to relay attacks if the signing required bit is not set.
Domain controllers starting with Windows Server 2008 and all Windows hosts starting with Windows Server 2025 and Windows 11 require SMB signing by default. In practice, it means that nowadays, most Windows hosts out there, especially Windows servers, don’t require SMB signing by default. Unfortunately, many organizations don’t change these defaults for the unjustified fear of backward compatibility or a myth about performance impact.
Introducing the CoerceAndRelayNTLMToSMB Edge
The new CoerceAndRelayNTLMToSMB edge is the simplest of the new NTLM relay edges. The edge always comes out of the Authenticated Users node and leads into the target computer node. It represents a combination of computer account authentication coercion against the relay victim and an NTLM relay attack against the relay target.
Collection
SharpHound collects all the required information as follows:
SMB signing status collection does not require authentication. It is collected from the relay target by actively establishing a connection with the host over SMB and parsing the SMB negotiation response messages.
Local admin rights are collected from the relay target. They can be collected from the host directly over RPC, which may or may not require admin rights, depending on the OS version and configuration, or from the DC via GPO analysis.
Outgoing NTLM restriction is collected from the relay victim via WMI or Remote Registry, which requires admin rights.
Edge Creation
BloodHound creates the edge if the following criteria are met:
SMB signing on the target computer is not required — this is the relay target. The edge will not be created if the SMB signing status is not collected/ingested into BloodHound.
At least one computer account in the environment has local admin access to the target computer — this is the relay victim.
There is no outgoing NTLM restriction on the victim host. In BloodHound Community Edition, if this data wasn’t collected/ingested, it will be assumed to be false (not restricted), as per the default configuration. In BloodHound Enterprise, this assumption is not made, and the edge will not be created.
If the domain functional level is Windows Server 2012R2, the relay victim must not be a member of the Protected Users group.
The edge is always created from Authenticated Users to the computer node representing the relay target.
Expanding the Coercion Targets accordion lists the relay victims, and expanding the Composition view shows a visual representation.
Abuse
An attacker can traverse this edge to gain access to the C$ or ADMIN$ share on the relay target, dump LSA secrets from Remote Registry, including the computer account password, or move laterally via the Service Control Manager.
A very common scenario captured by this new edge is SCCM TAKEOVER 2, coercing authentication from the SCCM site server and relaying it to the SCCM database server to take over the entire hierarchy.
SMB-Specific Limitations
The CoerceAndRelayNTLMToSMB edge only covers scenarios in which a computer (victim) has admin access to another computer (target) that does not require SMB signing. It doesn’t cover user accounts as the relay victim, and it doesn’t cover access to resources that a relay victim might be able to access via SMB without admin rights, such as non-administrative file shares.
Other limitations that apply to all new NTLM relay edges will be discussed later.
Targeting ADCS (ESC8)
The new CoerceAndRelayNTLMToADCS edge is much more complicated than relaying to SMB because certificate abuse has a lot of requirements. However, the relaying logic is still relatively simple. Relaying to ADCS web enrollment allows obtaining a certificate for the relay victim and using it for authentication to impersonate the victim. This is the infamous ADCS ESC8 that Will Schroeder and Lee Chagolla-Christensen disclosed in their Certified Pre-Owned white paper.
The ADCS Certificate Authority Web Enrollment endpoint and Certificate Enrollment Web Service run on IIS. IIS does not support session security, but it does support Extended Protection for Authentication (EPA), also known as channel binding. EPA is supported over HTTPS, but not HTTP because HTTP has no secure channel to bind. So, if web enrollment is available over HTTP or over HTTPS with EPA disabled, then relay is viable. This is the default configuration on Windows Server 2022 and older, but no longer the default on Windows Server 2025. Note that it applies to any site served on IIS with NTLM authentication, not just ADCS web enrollment.
As mentioned, relaying is all about authentication. Once authenticated, the attacker can do whatever the relay victim is permitted to do. This attack is viable only if the relay victim is permitted to enroll a client authentication certificate (requires EKUs that allow performing Kerberos PKINIT authentication or Schannel authentication to LDAP) and the CA is trusted by the domain controller and added to the domain’s NTAuthCertificates. Jonas Bülow Knudsen explains these requirements in detail in this blog post.
Introducing the CoerceAndRelayNTLMToADCS Edge
The new CoerceAndRelayNTLMToADCS edge comes out of the Authenticated Users node and leads into the victim computer node, unlike CoerceAndRelayNTLMToSMB, which leads into the relay target computer node. The reason for the difference is that the attack compromises the relay victim rather than the relay target.
Collection
SharpHound collects all the required information as follows:
Connect to the ADCS enrollment endpoints and attempt to perform NTLM authentication with and without EPA to determine if it’s enabled, required, or disabled. This can be collected without admin access.
All the ADCS certificate enrollment requirements are collected via LDAP, as done for all existing ADCS edges. This can be collected without admin access.
Outgoing NTLM restriction is collected from the relay victim via WMI or Remote Registry, which requires admin rights.
Edge Creation
BloodHound creates the edge if the following criteria are met:
The relay victim is a computer permitted to enroll a certificate with a template that meets the requirements listed below. The relay victim must have the enroll permission on the enterprise CA and the certificate template.
The certificate template has (1) EKUs that enable PKINIT/Schannel authentication, (2) manager approval disabled, and (3) no authorized signatures required.
The enterprise CA is trusted for NT authentication, and its certificate chain is trusted by the domain controller.
The enterprise CA published the certificate template.
The enterprise CA that published the certificate has a web enrollment endpoint available over HTTP or HTTPS with EPA disabled.
There is no outgoing NTLM restriction on the victim host. In BloodHound Community Edition, if this data wasn’t collected/ingested, it will be assumed to be false (not restricted), as per the default configuration. In BloodHound Enterprise, this assumption is not made, and the edge will not be created.
If the domain functional level is Windows Server 2012R2, the relay victim must not be a member of the Protected Users group.
The edge is always created from Authenticated Users to the computer node representing the relay victim.
Expanding the composition view shows all the components involved, including the certificate template and enterprise CA to target.
Abuse
After enrolling a certificate, the attacker can perform PKINIT authentication as the computer account using Rubeus to obtain a Kerberos Ticket Granting Ticket (TGT) and even the NT hash for the computer account through the UnPAC the Hash attack. With these, the attacker can compromise the relay victim host via S4U2Self abuse or a silver ticket, or use the TGT or the NT hash to access any resource that the computer account is permitted to access.
If the CA is susceptible to relay attacks, all the computers that can enroll a suitable certificate are exposed. Note that the default “Machine” certificate template meets the above criteria and exposes all the computers in the domain.
ADCS-Specific Limitations
The CoerceAndRelayNTLMToADCS edge only covers scenarios in which a computer (victim) can enroll a domain authentication certificate and the certificate authority web enrollment (target) that is vulnerable to relay attacks. It doesn’t cover user accounts as the relay victim, and it does not cover certificate templates incompatible with domain authentication.
Other limitations that apply to all new NTLM relay edges will be discussed later.
Targeting LDAP or LDAPS
The new CoerceAndRelayNTLMToLDAP and CoerceAndRelayNTLMToLDAPS edges are by far more complicated to abuse. Unlike SMB and IIS, LDAP servers are implemented to require the capabilities negotiated with the client in the NTLM exchange, meaning that if the client negotiates session security with signing, the LDAP server will require all the subsequent messages in the session to be signed with the session key.
Computer account authentication coercion can trigger authentication from the SMB client, but the SMB client always negotiates session security with signing in the NTLM Authenticate message, so SMB can’t be relayed to LDAP. The exception to this rule is clients that have NTLMv1 enabled because, in NTLMv1, the MIC can be dropped, and the Negotiate Sign flag can be reset.
But that’s not a dead end. Some authentication coercion primitives, including the Printer Bug and PetitPotam, accept WebDAV paths simply by adding the at sign followed by a port number to the hostname, e.g., “\\attackerhost@80\icons\url.icon”.
WebDAV is encapsulated in HTTP messages sent by the Web Client service, which doesn’t negotiate signing and is, therefore, compatible with relaying to LDAP. However, by default, the Web Client would only authenticate to targets in the Intranet Zone, as per the default Internet Settings.
Getting in the (Intranet) Zone
HTTP clients in Windows should call the MapUrlToZoneEx2 function to determine which zone a given URL belongs to. The function determines that a URL maps to the Intranet Zone based on the following rules:
Direct Mapping: URLs manually added to the Intranet Zone
The PlainHostName Rule (aka “The Dot Rule”): If the URL’s hostname does not contain any dots
Fixed Proxy List Bypass: Sites added to the fixed proxy bypass list
WPAD Proxy Script: URLs for which the proxy script returns “DIRECT”
If you use the host’s “shortname” (the hostname portion of the FQDN, e.g., hostname.contoso.local) or NetBIOS name, the underlying name resolution mechanisms will resolve the name to an IP address, even though the URL is “dot-less”, because DNS automatically appends a suffix based on the client’s DNS search list, which is typically configured via DHCP or GPO.
But how can we get DNS resolution for our attacker-controlled host?
Bring Your Own DNS Record
By default, Active Directory Integrated DNS allows all Authenticated Users to create DNS records via LDAP or Dynamic DNS (DDNS), as discussed in this blog post by Kevin Robertson, and can be done with his tools Powermad and Sharpmad.
WebDAV Is a Hit or Miss
Authentication coercion can trigger WebDAV traffic only if the Web Client service is installed on the host, which it is by default on Windows desktops but requires the Desktop Experience or the WebDAV Redirector feature on Windows servers. Even if it is installed, it also needs to be running, which is not the default on desktops. Most user account authentication coercion primitives will automagically trigger the Web Client service to start. However, computer accounts are more tricky. While most computer account authentication coercion primitives support WebDAV paths, they will not start the Web Client service. Therefore, when we target computer accounts, which is what we do here, we are limited to computers that currently have the Web Client service already running.
When the Web Client service starts, it opens a named pipe called DAV RPC SERVICE, so we can determine whether it is running remotely without admin rights.
One important thing to note is that when the Web Client service runs, it affects all processes running on the host in any context, not just the user who started it. Therefore, if we trigger the service to start via user account authentication coercion, for example, by dropping an authentication coercion file into a high-traffic shared folder, any user that browses the share potentially exposes the host they logged in on to NTLM relay to LDAP.
LDAP Relay Mitigations
LDAP servers support mitigating relay attacks with LDAP signing and LDAP channel binding. Each can be configured individually, and both must be enforced to prevent relay attacks. If either one isn’t, there is a bypass:
If LDAP signing is required and LDAP channel binding is disabled, the attacker can relay to LDAPS instead of LDAP, and because LDAPS encapsulates the traffic in a TLS channel, the domain controller considers the signing requirement to be met.
If LDAP channel binding is enforced and LDAP signing is disabled, the attacker can relay to LDAP with StartTLS, as discussed in this blog post, because the TLS channel is established only post-authentication.
These settings are DC-level settings, not domain-level settings, meaning that you may find different domain controllers with different configurations in the same environment.
Up until Windows Server 2025, domain controllers did not enforce these by default, and given that most organizations have not yet changed both of these settings, at this time, most domain controllers out there are vulnerable to NTLM relay attacks. However, as of Windows Server 2025, domain controllers enforce encryption (sealing) via session security on LDAP SASL bind by default, and with that new configuration, relaying to LDAP or LDAPS is no longer viable. But at this time, domain controllers running on Windows Server 2025 are still few and far between.
Note that enabling LDAP client signing does not mitigate relay attacks, as we’re not abusing LDAP clients; we are abusing web clients.
Viability Criteria
All things considered, relaying to LDAP is viable under the following conditions.
For the relay target, there is at least one domain controller that:
Is running on Windows Server 2022 or older and does not require LDAP signing or LDAPS turned on without channel binding.
Is running on Windows Server 2025 with LDAP signing explicitly disabled.
For the relay victim, the computer must either have the Web Client installed and running or have NTLMv1 enabled.
I Successfully Relayed to LDAP. Now What?
As I reiterated several times, relaying gets you through the authentication step. What you can do with the session afterward depends on the permission of the relay victim. A successful relay to LDAP would allow you to perform any action that the relay victim is permitted to perform in Active Directory, with one caveat — password change/reset must happen over an encrypted channel, so that action is possible only when relaying to LDAPS.
In this scenario, we coerce and relay a computer account to LDAP or LDAPS. In this case, it is very unlikely that the relay victim, a computer account, would have high privileges in the domain. However, computers are allowed to change some attributes of their own computer account, including:
msDS-AllowedToActOnBehalfOfOtherIdentity, which would allow taking over the host via Resource-Based Constrained Delegation (RBCD), as explained in detail in this post.
msDS-KeyCredentialLink, which would allow taking over the host via the Shadow Credentials attack, as explained in detail in this post. Note that a computer account is permitted to add a new value to the msDS-KeyCredentialLink attribute as a validated write, only if there isn’t an existing key credential already present. However, even if there is already a key credential present, the computer account is allowed to delete it and then add a new one, which would require relaying twice: once for deletion and a second time for the Shadow Credentials attack.
Introducing the CoerceAndRelayNTLMToLDAP and CoerceAndRelayNTLMToLDAPS Edges
The new CoerceAndRelayNTLMToLDAP and CoerceAndRelayNTLMToLDAPS edges come out of the Authenticated Users node and lead into the victim computer node, just like the CoerceAndRelayNTLMToADCS edge, because here, too, the attack compromises the relay victim rather than the relay target.
Collection
SharpHound collects all the required information as follows:
Connect to the domain controllers via LDAP and LDAPS and attempt to perform NTLM authentication with and without signing and channel binding to determine if they’re enabled, required, or disabled. This can be collected without admin access.
Connect to the relay victim via SMB to check whether the DAV RPC SERVICE named pipe is open. This can be collected without admin access.
Outgoing NTLM restriction is collected from the relay victim via WMI or Remote Registry, which requires admin rights.
Edge Creation
BloodHound creates the CoerceAndRelayNTLMToLDAP edge if the following criteria are met:
There is at least one domain controller running on Windows 2022 or older, and LDAP signing is not required.
The relay victim has the Web Client service running.
There is no outgoing NTLM restriction on the victim host. In BloodHound Community Edition, if this data wasn’t collected/ingested, it will be assumed to be false (not restricted), as per the default configuration. In BloodHound Enterprise, this assumption is not made, and the edge will not be created.
BloodHound creates the CoerceAndRelayNTLMToLDAPS edge if the following criteria are met:
There is at least one domain controller running on Windows 2022 or older, and LDAPS is available without channel binding required.
The relay victim has the Web Client service running.
There is no outgoing NTLM restriction on the victim host. In BloodHound Community Edition, if this data wasn’t collected/ingested, it will be assumed to be false (not restricted), as per the default configuration. In BloodHound Enterprise, this assumption is not made, and the edge will not be created.
If the domain functional level is Windows Server 2012R2, the relay victim must not be a member of the Protected Users group.
The edge is always created from Authenticated Users to the computer node representing the relay victim.
Expanding the Relay Targets section in the information panel lists all the affected domain controllers that can be targeted.
Abuse
As mentioned above, following a successful relay, the relay victim can configure RBCD or Shadow Credentials against its own computer account to compromise the host. In addition to that, if the computer account happens to have any abusable permissions in Active Directory, those will be viable as well, with the caveat that the ForcePasswordChange edge (password reset) is only abusable via LDAPS and not via LDAP.
In the real world, it is very common to find domain-joined workstations with the Web Client running, and domain controllers are very rarely configured to require both LDAP signing and channel binding or run on Windows Server 2025, so this is a very rel(a)yable way to compromise domain-joined hosts. It is even more common to abuse this technique for local privilege escalation on domain-joined workstations due to the ease of turning the Web Client service on and coercing authentication from SYSTEM as a low-privileged user.
LDAP-Specific Limitations
You may have noticed that BloodHound currently doesn’t take NTLMv1 into consideration for edge creation.
Another important limitation to note is that the CoerceAndRelayNTLMToLDAP and CoerceAndRelayNTLMToLDAPS edges are created based on the current Web Client service status, but it is very dynamic. The fact that the service was not running on a host during collection does not mean it will remain that way and that the host is not exposed.
General Limitations
So far, we have mentioned some limitations affecting specific edge types. There are also limitations affecting all the new NTLM relay edges:
Only computer account authentication coercion scenarios are considered. User authentication coercion is out of scope at this time.
Only coercion scenarios are considered. Opportunistic relay attacks, i.e., waiting for a suitable relay victim to authenticate to an attacker-controlled host, such as authenticated vulnerability scanners, are out of scope.
Firewalls or sorts and network restrictions are out of scope and not taken into consideration for these new relay edges, just as they were not taken into consideration for any of the previous BloodHound edges.
We also make a general assumption that computer account authentication coercion can be triggered by Authenticated Users, as explained earlier.
Future Work
We plan to introduce additional relay edges in the future. We already have relay to MS SQL and WinRM on our roadmap. We are always open to suggestions if you have additional ideas/requests.
NTLM Abuse Strategy
Let’s take everything covered in this post and put together an NTLM abuse strategy.
First, let’s make some observations and assumptions:
NTLM challenge-response capture is less noisy than NTLM relay, but cracking depends on the strength of the password.
User authentication coercion can trigger the Web Client service to start, but computer authentication coercion can’t.
Scanning for hosts with the Web Client service running can be noisy. Similarly, collecting session information is noisy or even impossible without local admin rights.
NTLM relay attacks should be precise on red team operations. The “Spray and Pray” approach should be avoided.
Given the above, I propose the following approach:
At the beginning of an op/assessment, cast a wide net for user authentication coercion through watering hole attacks on high-traffic file shares or web pages. Try to coerce and capture both WebDAV and SMB traffic if you can. SMB is sometimes more likely to succeed, but this is your opportunity to start the Web Client service on every affected client.
As you capture NTLM responses, keep track of where users authenticate from — it tells you where they have a session. It is, in a way, passive session collection.
Attempt to crack passwords of interesting accounts that can help you escalate privileges or achieve your objectives. Don’t waste your GPU on meaningless accounts.
If you identify an interesting user but can’t crack the password, it’s time to relay.
Target the computer on which the user was active and compromise it via relay to ADCS (ESC8) or via relay to LDAP/LDAPS (RBCD or Shadow Credentials).
Once you gain admin access to the host, you can potentially avoid the risk involved in lateral movement and credential abuse by placing an authentication coercion file on the user’s desktop via the C$ share and relaying the NTLM exchange to the target resource.
What is Microsoft Doing About It?
Microsoft has been making efforts to mitigate these attacks. As I mentioned, relaying to LDAP is no longer possible against domain controllers running Windows Server 2025, and all Windows 11 and Windows Server 2025 hosts now require SMB signing by default. It’s a good start.
Microsoft has been working on a much more significant initiative to deprecate NTLM altogether. They’ve identified the following reasons why Windows hosts still use NTLM and have started working on solutions:
Until recently, the only option for local account authentication was NTLM. Microsoft is in the process of rolling out a “local KDC” to support Kerberos authentication for local accounts.
When clients don’t have a line of sight to a domain controller, they can’t obtain Kerberos tickets and have to fall back to NTLM. Microsoft is in the process of rolling out IAKERB, which will turn every Windows host into a Kerberos proxy.
Kerberos authentication requires mapping the resource that the client is trying to access to a service account. This is done through service principal names (SPN). SPNs usually use hostnames rather than IP addresses, so when a client attempts to access a resource by IP address, Kerberos authentication typically fails. However, as of Windows Server 2016, SPNs support SPNs with IP addresses.
Most NTLM usage is a result of software hard-coded to call the NTLM authentication package instead of the Negotiate package, which wraps Kerberos and NTLM and negotiates the most suitable option. Microsoft has been working on fixing these hard-coded issues in its own software, and, rumor has it, they have also been working with 3rd parties to fix their code.
Microsoft intends to have NTLM disabled by default (not completely removed), which means that even when the day finally comes, we will likely still find organizations that turn it back on, just as we still find hosts with NTLMv1 enabled. Last I heard, Microsoft had plans to have it done by 2028, but I believe they are already behind schedule, and, if history has taught us anything, we should expect it will take much longer than that.
Kerberos is NOT the Solution
For many years, people thought that Kerberos was not susceptible to relay attacks because it is based on tickets, and every ticket is issued to a specific service, so you can’t relay it to arbitrary targets. But that’s no longer the case. As James Forshaw discovered and Andrea Pierini weaponized, there are authentication coercion primitives that allow the attacker to control the service name for which the relay victim obtains a Kerberos ticket. These coercion primitives negotiate session security with signing, so they can’t be relayed to LDAP/LDAPS. However, they are compatible with relaying to SMB and ADCS.
Therefore, disabling NTLM is not the solution. Ensuring all servers enforce signing and channel binding is the right way to mitigate relay attacks.
We may add Kerberos relay edges to BloodHound in the future. Until then, you can be confident that whenever you see CoerceAndRelayNTLMToADCS or CoerceAndRelayNTLMToSMB edges, you can relay either NTLM or Kerberos.
Why Are We Releasing It Now?
There are many misconceptions about the problem and the solution for the NTLM relay problems. The new edges we introduced into BloodHound will hopefully bring clarity and put it in the spotlight, helping organizations prioritize one of the most significant yet underestimated risks affecting Active Directory environments.
Better Remediation Strategies
The remediation guidance for NTLM relay attacks is often “enforce everything, everywhere”, which is not very practical in a large environment that requires backward compatibility. However, BloodHound now helps defenders see what’s actually viable in their environments and prioritize high-impact/exposure targets. BloodHound has a set of pre-built cypher queries that can get you started with that.
Conclusion
NTLM relay attacks are far from dead. In fact, they’re often easier to execute and more effective than many security practitioners realize. This old technique remains one of the paths of least resistance in modern Active Directory environments, routinely enabling trivial pivots to high-value targets. The introduction of NTLM relay edges in BloodHound has made identifying and visualizing these attack paths remarkably simple: with just a few clicks, an operator can see how Authenticated Users can relay their way from zero to hero. In other words, BloodHound now depicts, with clear, intuitive edges, what once required stitching together information from multiple tools, showing defenders the real risks they face while allowing attackers to, once again, think in graphs.
Getting Started with BHE — Part 2Contextualizing Tier ZeroTL;DRAn accurately defined Tier Zero provides an accurate depiction of Attack Path Findings in your BHE tenant.Different principals (groups, GPOs, OUs, etc.) have different implications when Tier Zero is defined — understanding these will help reduce confusion around why something is showing up as Tier Zero.Welcome to round two of the Getting Started with BloodHound Enterprise series. Today’s focus will be on understanding and contextuali
An accurately defined Tier Zero provides an accurate depiction of Attack Path Findings in your BHE tenant.
Different principals (groups, GPOs, OUs, etc.) have different implications when Tier Zero is defined — understanding these will help reduce confusion around why something is showing up as Tier Zero.
Welcome to round two of the Getting Started with BloodHound Enterprise series. Today’s focus will be on understanding and contextualizing Tier Zero and ensuring that we have an accurate depiction of the Attack Paths that exist in your BloodHound Enterprise (BHE) tenant.
I started the last blog with a problem statement meant to align our focus, and I’ll include another one today. In this case, that would look something like:
“Have we identified (and configured) Tier Zero in our environment so that we have an accurate depiction of the Attack Paths that are increasing risk in our environment?”
In order to make progress here, we need to define and understand what it means when we’re talking about Tier Zero. You may have a unique definition for your organization which may require some additional due diligence, however our definition here at SpecterOps is:
“Tier Zero is a set of assets in control of enterprise identities and their security dependencies”
Where:
Control: A relationship that can contribute to compromising the controlled asset or impact its operability
Security dependency: A component whose security impacts another component’s security [1]
Out of the box, BHE comes with some default Tier Zero options [2] that will always be marked as a Tier Zero object for each domain collected, including:
The Domain head object
AdminSDHolder object
Built-in Administrator account
Domain Admins
Domain Controllers
Schema Admins
Enterprise Admins
Key Admins
Enterprise Key Admins
Administrators
Not listed here are:
Users and Computers that are members of these groups, however they inherit Tier Zero classification from the Groups they share the “MemberOf” relationship with:
T0 Inheritance via Group Membership
Organizational Units (OUs) and Containers that contain these Tier Zero objects, though they are assigned Tier Zero based on containing Tier Zero objects as indicated below:
T0 Inheritance via “Contains” Relationship
Group Policy Objects (GPOs) that apply to these objects, though these are automatically marked as Tier Zero objects when they apply to a separate Tier Zero object:
T0 Inheritance via “GPLink” Relationship
What is not included in the default definition are groups like Account Operators (among several others). This is a group that, in your domain(s), may or may not be empty, and may or may not contain your helpdesk which generally opens wide your Tier Zero unnecessarily. There are also accounts like the MSOL account, responsible for Azure synchronization; your Privileged Access Workstations (PAWs); Password Managers (which have the ability to change the password on Tier Zero principals); and so on. These often become evident after the first collection when you may see a handful of principals that “shouldn’t be there” because there is a known relationship that is 100% valid (which you will generally know based on additional context you may have as a member of your organization). These are your “custom” Tier Zero objects that didn’t get wrapped up in BHE’s initial default definition. We do, of course, have additional documentation for these [3,4,5,6,7,8,9,10].
These custom additions will need to be manually added to Tier Zero in one of a couple different ways:
Tagging Tier Zero from the Explore Page
The first is through the Explore page, where you can search for individual objects and add them by right-clicking the object and selecting “Add to Tier Zero.” Similarly, if you select the “Explore” option for a Finding on the Attack Paths page, that will take you to this same Explore page where you can similarly add the object to Tier Zero. See below:
Exploring an Attack Path Finding to Add the Principal to Tier ZeroAdding the Attack Path Finding Principal to Tier Zero via the Explore Page
Either of these methods are a bit piecemeal and not the fastest ways to modify Tier Zero, but they are a good way to inspect and validate your Tier Zero additions during this process. Don’t fear, though, there’s a faster way to add objects to Tier Zero.
The second option is through the Group Management page which takes you to an overview of your Tier Zero:
Add or Remove Members (from Tier Zero) on the Group Management PageSpecify Members for Bulk Add on the Group Management Page
With this option, you can specify several names to add to Tier Zero and do a bulk add of any principals. Be aware that the changes that will take place, as noted above, include:
Groups that are added will cause members (computers, groups, users) to be added to Tier Zero
If the principal being added to Tier Zero is in an OU that is non-Tier Zero, the OU will be added to Tier Zero
If the principal being added to Tier Zero has GPOs that apply to it that are non-Tier Zero, these will be marked as Tier Zero
An important note to make about either of these options is that neither is necessarily the “right” or the “wrong” way, and both get you to the same end state. Generally, I find that the former (adding via “Explore”) is best suited when inspecting individual Findings on the Attack Paths page, as these may merit additional analysis before adding the object to Tier Zero. On the other hand, the “Group Management” page is great when you have a series of objects you want to add and don’t require additional inspection of anything before adding them to your Tier Zero definition. Basically, if you’re looking for a batch of updates that you want to add at one time, “Group Management” is the best way to go.
New Tier Zero additions will also cause new Findings to appear where non-Tier Zero principals have permissions against these newly-added Tier Zero principals. But this is good — this is what we’re looking for.
And that’s the next step — custom-tagged Tier Zero assets. When this is complete, you’ll have a clearer picture of what the Attack Paths and valid Findings actually are. In some cases, this may point to a couple of groups with very extensive permissions, or you might find a swath of misconfigurations that you did not realize existed buried deep in your AD structure.
What does this look like in practice? Here’s an example of what your BHE tenant might look like before you’ve added any context (red indicates an Attack Path Finding in BHE, for clarity):
Contextualizing Tier Zero — “Default” View
Here we have a “default” Tier Zero object (Domain Admins) and four Findings under the “Generic All” Attack Path. If we expand this out, to see full exposure, it might look like this (black lines depict relationships):
Contextualizing Tier Zero — Exposure View
Here we can see that there’s only one Tier Zero principal (Domain Admins), with four Attack Paths, but an exposure count of nine (count of non-Tier Zero principals). Again, this is after default collection with no additional contextualization except that we’re visualizing exposure in a simplified scenario.
But you might look at one of those and say, “Hey, Group: A is a Tier Zero object, too.” So we add it to Tier Zero and then we see the following:
Contextualizing Tier Zero — Defined Tier Zero View
Now we have two Tier Zero principals:
Domain Admins
Group: A
We also have eight Attack Paths:
Three Tier One principals with GenericAll over Domain Admins
Five Tier One principals with GenericWrite over Group: A
We would also see a slight change in Exposure because one of the nine principals that would previously contribute to our count has been added to Tier Zero. Exposure here has decreased to eight.
Now we have a better picture of what the Findings are in our environment, which allows us to better understand what needs attention, what needs to be mitigated, and what’s potentially leading to unnecessary exposure to Tier Zero. This is because we’ve taken the time to define Tier Zero for our organization.
Contextualizing your Tier Zero definition is important because otherwise your Findings will not accurately represent tiering violations, which is one of the first things you need to be able to see within BHE. This is what the Attack Path page shows you, and part of the reason it can be so valuable for organizations is that it summarizes pathways that cause exposure risks to your critical assets.
Once we have all that figured out, we’ll run into either of the following outcomes with no change in exposure:
Larger Tier Zero definition, decrease in Findings
Larger Tier Zero definition, increase in Findings
Objectively speaking, neither of these is better or worse than the other based on the change in Findings. Either is better than the previous state of visibility because it represents a more accurate view of your domain and the true Attack Paths that require your attention.
If we don’t figure this out, nothing changes and when we open up BHE we’re going to see an inaccurate depiction of what we actually care about. Again, that’s pathways (Attack Paths) that cause exposure risks to your critical assets (Tier Zero).
Join me again next time for Part 3, where we’ll work on identifying sources of exposure using Cypher queries.
[10] — “Defining the Undefined: What is Tier Zero, Pt IV,” by Martin Christensen, Lee Chagolla-Christensen, and Jonas Bülow Knudsen: https://www.youtube.com/watch?v=lLpCPBJIFkQ
Getting Started with BHE — Part 1Understanding Collection, Permissions, and Visibility of Your EnvironmentTL;DRAttack Path visibility is dependent upon scope of collection; complete collection is dependent upon appropriate permissions.Your collection strategy benefits from tiering just like your domain(s).IntroductionWelcome to my series on Getting Started with BloodHound Enterprise! This series comes after having had several discussions with customers about internal requirements for starting co
Understanding Collection, Permissions, and Visibility of Your Environment
TL;DR
Attack Path visibility is dependent upon scope of collection; complete collection is dependent upon appropriate permissions.
Your collection strategy benefits from tiering just like your domain(s).
Introduction
Welcome to my series on Getting Started with BloodHound Enterprise! This series comes after having had several discussions with customers about internal requirements for starting collection and I wanted to be able to provide something moving forward that reads more like a blog/conversation that’s easy to digest. That said, this doesn’t mean it’s irrelevant to the BloodHound Community Edition (BHCE) users, and there will still be components of information that are valuable for users on both the Enterprise and Community Edition sides. This series will focus more on users who are interested in gaining maximum visibility of their environments, defining Tier Zero, and understanding how to identify potential sources of exposure.
So, if you’ve got your BloodHound Enterprise (BHE) tenant up and running and are asking yourself “What now? Where do I start when it comes to BHE?” this series will give you actionable next steps and useful context for maximizing your BHE tenant.
Active Directory — Collecting with SharpHound
It may be obvious, but the first two things that need to be addressed are Collection and Permissions. These are necessary because you can’t see anything without collection, and collection is ultimately contingent upon the permissions you’re willing to grant your collector, which in this case discussion will be SharpHound (Active Directory). In other words, with greater permission comes greater visibility. Uncle Ben never said that to Peter Parker in Spider-Man, but he would have if they had been working on a SharpHound install.
More directly, talking about collection and permissions here will help address the following problem statement. If this resonates with you, you’re in the right place:
Are we positioned to collect the data required to accurately depict objective exposure risks that result in Attack Paths in our environment?
Collection and associated permissions include:
Active Directory Structure Data: Authenticated User group membership
Certificate Services: Authenticated User group membership
Local Group Membership: local Administrator on domain-joined systems
Sessions (logons): local Administrator on domain-joined systems
Domain Controller Registry: Administrator on domain controller(s)
Certificate Authority Registry: Administrator on enterprise CA(s)
The first (AD structure data) is the baseline requirement for BHE functionality; the others provide valuable context for understanding exposure risks that require additional data beyond what can be pulled from a domain controller via LDAP queries. Note that the second, Certificate Services, can be collected with the same basic privileges that AD structure data can be collected.
But what does this all mean practically? Depending on what your domain looks like it could be the difference between seeing 5% exposure and 95% exposure. I often deal with a lot of kickback on this series of requirements, but this is the tradeoff required for adequate visibility, accurate attack path mapping, and inherent risk associated with the relationships and configurations that exist in your AD environment.
If you do not have all of this collection, you’re going to miss some important information:
Where do ADCS attack paths exist that enable domain takeover?
Where do logon sessions exist that facilitate credential theft resulting in privilege escalation or lateral movement?
Where are tiering violations occurring because of bad practices with admins logging into systems at a lower tier?
This leads into a secondary discussion, which is often asked in the form of “How many resources do I need to get this data into BHE?”
In some cases, SharpHound and AzureHound can both be run on the same server. However it depends on how much is being collected and how you break up the schedule for your collectors. If you have a large environment with 100,000 users and you try collecting both AD and Azure environments at the same time, you’re probably going to run into some issues.
This next discussion will focus specifically on SharpHound, and for proper, hardened collection of SharpHound, I would recommend as many collectors as you have Tiers. I’ll use the standard three-tier model here:
A Tier Zero collector collects everything at the Tier Zero level, which easily accounts for the first requirement, but also allows visibility of all the others (at Tier Zero). You can run your AD structure data, Certificate Services, CA/DC registries, and Tier Zero group and session collection here. This is the primary visibility you want.
A Tier One collector should only need to collect group and session information at Tier One.
A Tier Two collector should only need to collect group and session information at Tier Two.
Here’s a visualization to depict what this might look like:
Tiered SharpHound Deployment
I do recommend following this tiering structure as much as possible, as this scoping of collection can help mitigate unnecessary exposure as a result of cross-tiered collection. While I do see variants of this where SharpHound is either Tier Zero or Tier One and collects from every tier, a tiered collection structure is the safest route forward for collection.
I also recommend following our hardening guidance for the SharpHound service account, which we list here [1]. This includes using a group managed service account (gMSA) for the SharpHound service account, rather than a regular AD user account. Additionally, adding this account to the Protected User group will limit the ability for Kerberos delegation and authentication relaying attacks.
Whichever path you choose here, understand that the privileges you give to the collector will align with the visibility you have of your environment. If you’re content with only seeing direct permissions based on Access Control Entries (ACEs), AD structure data will be sufficient. But if you want group and session collection, and if you would like to have full visibility of ADCS attack paths — you will need additional collection.
For more information on Data Collection and Permissions, check out our documentation here [2].
And that’s it for now! Come back later for our next topic, which will focus on what to do after you’ve got collection up and running and you’re ready to start working on cleaning things up: Contextualizing Tier Zero.
TL;DR: SCCM forest discovery accounts can be decrypted including accounts used for managing untrusted forests. If the site server is a managed client, service account credentials can be decrypted via the Administration Service API.IntroductionWhile Duane Michael, Chris Thompson, and I were originally working on the Misconfiguration Manager project, one of the tasks I took on was to create every possible account in the service and see how many of them could be discovered and extracted. Nearly all
TL;DR: SCCM forest discovery accounts can be decrypted including accounts used for managing untrusted forests. If the site server is a managed client, service account credentials can be decrypted via the Administration Service API.
Introduction
While Duane Michael, Chris Thompson, and I were originally working on the Misconfiguration Manager project, one of the tasks I took on was to create every possible account in the service and see how many of them could be discovered and extracted. Nearly all of those credentials, at least in a standard deployment, can be recovered using the techniques in CRED-5 that Benjamin Delpy and Adam Chester originally shared. There were accounts though that couldn’t be decrypted the same way and were stored in the SC_UserAccount table in a completely different format.
SCCM provides a number of discovery methods for identifying clients including Active Directory (AD) user and system discovery, network discovery, heartbeat, and forest discovery. Unlike the others that identify users and computers that may need to be managed, the forest discovery’s role is to identify locations that can be added as boundaries for client management by querying the local and trusted forests. The default for this discovery method is to use the site server’s machine account as it is already a member of the forest. However, another option is for administrators to manually add a forest and set credentials for a forest discovery account. This can be even more useful when managing untrusted forests.
Over the last few years of researching and attacking SCCM, the most common issue I’ve observed is that the various service accounts are configured with excessive permissions. I suspect the same is true for forest discovery accounts as well and are likely high value; especially when the objective is to move laterally where no direct path exists between forests. Naturally, I wanted to decrypt them.
Decryption
While manually forcing a forest discovery, I checked the modules loaded in the smsexec.exe service, which handles the bulk of processing tasks executed from the management console, and found a pretty descriptive .NET assembly: ActiveDirectoryForestDiscoveryAgent.dll.
Loading the assembly into dnSpy, the RunDiscovery method kicks off the discovery process. The method starts by first ensuring a database connection exists then generates a list of forests to target for discovery from the SCCM database. Once the list is built, ConnectToForest is called to query the database for each forest’s associated discovery account username.
If one exists, that username is passed to the GetCredentialsWrapper utility method, which is a wrapper for the native GetUserCredentials function imported from the ADForestDisc.dll to acquire the account’s password. The verbose logger shows that whatever is returned from GetCredentialsWrapper should be “successfully obtained credentials…” which is a good sign.
Looking at the ADForestDisc.dll in Ghidra, the GetUserCredentials function ensures a username is set then passes the username to GetGlobalUserAccount before returning the account’s password. The error handling logging message that states “failed to get account information from site control file for the discovery user” is a clue to where the credential material is stored.
According to Microsoft, the site control file (SCF) “…defines the settings for a specific site” and is stored in the SCCM site database. Two control files exist at any given time: the “actual” SCF for current site settings and the “delta” SCF for staged changes to update site settings. To perform any modifications to the site programmatically, an administrative user must establish a session handle on the file, commit the changes, then release the handle. This is necessary to prevent multiple users trying to modify site settings and creating conflicts. Admin users have likely experienced this working in the Configuration Manager console when trying to modify settings while another user has the same window open. If not properly handled, duplicate entries or even entire duplicate SCFs can occur, which can brick SCCM (ask me how I know).
Admins can use the Get-CMHierarcySetting PowerShell cmdlet to view the site’s current settings and, by expanding the Props embedded property, find entries for GlobalAccounts; including the account information being queried by the GetGlobalUserAccount function. This is promising as the first eight bytes of the blob stored in Value2 matches how Adam described other credential blobs are stored in the database.
Continuing with the basesvr!GetGlobalUserAccount function is where things get interesting and we start to get some insight into the decryption flow and where the credential is stored.
The function loads then recovers an encrypted session key blob from the site definition file for the target user with CSCItem_Property::GetCopyFromArray
Decrypts the session key blob with the CServerAccount::Decrypt function
Calls CSCItem_UserAccount::GetPassword to retrieve the encrypted password for the user account
The password is finally decrypted with the CServerAccount:DecrptEx function
Quick observation of the CServerAccount::Decrypt function reveals it’s the equivalent of what has already been shared for decrypting credentials in CRED-5, which makes sense considering the session key’s blob format.
To validate this, we can use the script Chris recently shared to decrypt the blob and recover the session key.
Now, to get the encrypted password, the baseobj.dll!GetPassword function just did not decompile well when imported to Ghidra.
Instead, I attached a debugger to the smsexec.exe process and set a breakpoint on the GetPassword symbol imported from baseobj.dll and kicked off a forest discovery.
Once the breakpoint is hit, the global user account and session key blob are visible in the memory dump. This lines up with what we’ve worked out so far in the decryption flow and are now trying to get the encrypted password value.
Step over the break point a bit and eventually land on a call to CServerAccount:DecryptEX and see the same encrypted password value from the SC_UserAccount table shown at the beginning of the blog along with the session key in the registers. And, after the call to DecryptEx is returned, the password for the account is visible.
Looking into the DecryptEx function, the bulk of it is just prepping the session key and encrypted password data formats for a call to another function to return the decrypted value.
The final function performs multiple steps to finally decrypt the password. It:
Establishes cryptographic service provider context; it initially tries to reuse an existing key container and, if it doesn’t, it creates one
Formats the session key for CryptImportKey. This is actually pretty cool and is a nice trick by the devs to reformat the session key. The CreatePrivateExponentOneKey function “encrypts” the session key with a private exponent value of 1 which mathematically checks out but does nothing to encrypt the session key. What it is doing, though, is basically encoding it into SIMPLEBLOB format for session key transport that CryptImportKey expects for session keys
Imports the formatted key
Allocates memory space for the decrypted password
Calls CryptDecrypt to decrypt the password with the session key
I originally set out to rewrite the native code to decrypt the string, but recalled seeing another decryption method (Microsoft.ConfigurationManager.CommonBase.EncryptionUtilities.DecryptWithGeneratedSessionKey) when I was recreating Adam’s work with CRED-5.
This made it pretty easy to create a wrapper around this method to decrypt the forest discovery password.
# Load the DLL Add-Type -Path "C:\Program Files\Microsoft Configuration Manager\bin\X64\microsoft.configurationmanager.commonbase.dll"
function Invoke-DecryptEx { [CmdletBinding()] param ( [Parameter(Mandatory = $true, Position = 0)] [string]$sessionKey,
[Parameter(Mandatory = $true, Position = 1)] [string]$encryptedPwd )
While reading documentation on untrusted forest deployment, I came across an interesting requirement for site system installation that provides another opportunity to recover forest credentials. To support untrusted forest deployment, admins must configure an account in the target domain to use for site installation. The account must have local admin permissions on the host and will be used for all future connections to the site system.
Site system installation accounts are stored the same way most other credentials are in the database and can be decrypted with the various methods from CRED-5.
Finally, while exploring all these various credential blobs, I discovered essentially every encrypted credential in SCCM can be recovered via the Administration Service API. Previously, I summarized the SCCM site control file (SCF) and how administrators can review it with PowerShell. It’s also visible from the API via the /wmi/SMS_SCI_SiteDefintion endpoint.
The SC_UserAccount table from the site database has an equivalent endpoint at /wmi/SMS_SCI_Reserved.
I don’t believe this is an exhaustive list yet but this discovery, in combination with the PowerShell decryption methods, can make credential recovery trivial. If the site server’s host system is a managed client, operators can leverage SCCMHunter’s admin module to recover and decrypt credentials stored in SCCM.
As a demo credential blobs from the SC_UserAccount table can be extracted with the get_creds command.
You can use the decrypt command to decrypt the blobs. The target environment will either need script approval disabled or you’ll need a secondary set of approver credentials since the decrypt function uses scripting under the hood. Again, the site server must be a managed client for this to work.
Defensive Considerations
While more credentials are available for abuse following hierarchy takeover, there really isn’t anything new here that warrants new defensive techniques. The defensive recommendations for CRED-5 are applicable here. In particular, the recommendations in PREVENT-10 to enforce the principle of least privilege for service accounts. Additionally, many of the accounts I’ve seen from previous assessments had an account name of “not configured”.
This happens when an account was being used for an action, in this case forest discovery, and then removed from that service. My conclusion here is admins may incorrectly believe removing the account from the service deletes the account. Organizations should review accounts found in the \Administration\Overview\Security\Accounts panel and remove them if they’re no longer in use.
Final Thoughts
I recognize that, if SCCM is managing an untrusted forest, there are likely clients running on devices from that forest and those can be leveraged for the same or greater lateral movement. I personally like to have as many credentials as possible and believe the credentials shown here may be extremely valuable.
Soon after this blog is published, we plan to update Misconfiguration Manager with these techniques to ensure they’re available to attackers and defenders. We have many more updates to make, which we’ll be publishing at a later date.
Come hang out with us in the #sccm channel on the BloodHound Slack. It’s been cool to see other members of the industry develop SCCM tradecraft and we discuss much of that conversation there.
TL;DR:Refreshed user interface with a new vertical navigation layout for improved user experience.General Availability of “Improved Analysis Algorithm” that provides more accurate risk scoring for findings across your environment.Enhancements to the Posture page, including a new “Attack Paths” metric and increased visibility into your Attack Path security posture.Release highlights focus on helping security teams better visualize, assess, and remediate identity-based Attack Paths.General Availab
Refreshed user interface with a new vertical navigation layout for improved user experience.
General Availability of “Improved Analysis Algorithm” that provides more accurate risk scoring for findings across your environment.
Enhancements to the Posture page, including a new “Attack Paths” metric and increased visibility into your Attack Path security posture.
Release highlights focus on helping security teams better visualize, assess, and remediate identity-based Attack Paths.
General Availability of Improved Analysis Algorithm and Security Posture Management Improvements
The BloodHound team previewed several concepts in the last couple of releases that made it easier for customers to visualize Attack Paths and show improvements in identity risk reduction over time.
This week’s release of BloodHound v7.0 includes significant enhancements focused on improving user experience and Attack Path risk assessment. Thanks to the feedback from customers and community, we are excited to showcase these enhancements together!
Fresh User Experience
In v7.0, the look and feel of BloodHound Enterprise (BHE) and BloodHound Community Edition (BHCE) have been given a noticeable refresh! With the goal of improving the user experience, the navigation pane has been moved to a vertical format.
New vertical navigation pane for BHE and BHCE.
When users hover over the icons the menu bar appears. This new open layout enhances the user experience, especially for users of ultra-wide monitors.
Improved Analysis Algorithm
In the BHE v7.0 release we are excited to announce the General Availability (GA) of Improved Analysis Algorithm. This was made available as Early Access in BHE v6.3 and enabled customers to get a risk assessment of the Attack Paths in their environment through:
· Enhanced risk scoring — Improved risk scoring by utilizing Impact and Exposure measurements that analyzes the blast radius of an object.
· Granular risk measurement — assessing the risk of every finding so you can pinpoint where to prioritize your efforts.
· Hybrid Attack Path risk analysis — Quantifying Attack Path risk associated with moving between Active Directory (AD) and Entra ID environments.
The Improved Analysis Algorithm leverages Exposure and Impact for risk scoring.
The Improved Analysis Algorithm has been refined to provide a more accurate measurement of risk scoring for findings across BloodHound, including measuring the risk generated from hybrid paths, resulting in a more precise Attack Path risk assessment of your environment.
Example: Impact signifies the granular risk measurement and risk score of the above Attack Path.
Posture Page Update
The Posture page was also re-worked in BHE v6.3. With this release, it now provides improved visibility into resolved Attack Paths and additional metrics to track remediation over time. The new, intuitive format is more ideal for board-level reporting. Building on that foundation, the following enhancements have been added in BHE v7.0:
· Attack Paths metric
· Viewing all environments by type
· Increased visibility of findings
Attack Paths Metric
Security teams and CISOs are primarily focused on their organization’s security risk posture. However, with the onslaught of threats, cutting through the noise to focus on what matters most and tracking remediation progress is challenging for blue teams.
The addition of Attack Paths gives practitioners a representative metric that starts to address this challenge by providing a read out on risk assessments and tracking remediation efforts on what matters most. The Attack Paths metric measures the risk highlighted by the combination of all findings within an environment. For most of our findings, which are focused on Tier Zero, the Exposure is used, indicating how many principals (user or computer account) can gain access through any path to the Tier Zero object identified. For other findings, such as Kerberoastable assets, or control by large default groups, we use the Impact, that is how many principals can be controlled by the given asset once compromised.
Attack Paths Metric provides a summary on risk assessment and remediation progress.
Viewing all environments by type
Most organizations have multiple environments, whether from separation of duties such as development or production, expansion through mergers and acquisitions, or migrations into hybrid environments, it’s common for customers to have multiple AD domains or Azure tenants which can create identity risk. These organizations need visibility across all their environments from one place to centralize risk measurement and reporting.
BHE v7.0 makes this easier by providing your security teams with holistic visibility into the Attack Path security posture across all your environments at once on a per-type basis. This view summarizes the Attack Paths, Findings, and Tier Zero Objects metrics across multiple environments, and shows them all in one place for quick review of the progress your teams have made.
Visibility of all environments by type.
Increased visibility of findings
SecOps teams often struggle to provide their leadership with effective board-level reporting. Risk reporting is either too abstract or dives deep into the data, making it difficult to utilize. When it comes to Attack Path risk assessments, it is critical to have a clear before and after snapshot as well as visibility into the intermediate findings along the remediation journey.
Prior to BHE v7.0, the Posture page provided a high-level summary of initial findings and resolutions, which was a useful baseline. In BHE v7.0, we’ve improved this reporting with granular visibility between initial findings to resolution path including any intermediate findings. This enables practitioners to provide a more meaningful summary on the risk and remediation progress for board-level reporting.
Visibility of findings.
Improved CSV export functionality
The ability to export data and easily share and sync with other tools, systems and teams is essential in today’s complex cybersecurity ecosystem.
For example, security teams can now ingest Attack Path findings into their SIEM/SOAR platforms. This helps automate incident threat response workflows and streamline security tasks. Additionally, the Attack Path data can be leveraged by incident response, threat hunting, vulnerability management and other security teams and systems.
The CSV export functionality on the Attack Paths page was improved to make the exported fields consistent across findings, added the new Exposure/Impact measurements where appropriate, and added human-readable column headers when the CSV is exported out of the UI.
Improved CSV export functionality.
Summary
BloodHound v7.0 packs a lot of capabilities that enable security teams to better assess and prioritize risks, track remediation efforts, and ultimately strengthen their security posture. All BloodHound users can find expanded details on these updates in our release notes or by contacting your Technical Account Manager.
Our team is excited to showcase the latest enhancements and share what’s coming down the line for BloodHound at our upcoming SO-CON event in the Washington, DC area from March 31 — April 1, 2025. We look forward to seeing you there!
Now that we know how to add credentials to an on-premises user, lets pose a question:“Given access to a sync account in Domain A, can we add credentials to a user in another domain within the same Entra tenant?”This is a bit of a tall order assuming we have very few privileges in Entra itself. Remember from Part 1 that the only thing we can sync down, by default, is the msDS-KeyCredentialLink property. In order to understand how to take advantage of this, we need to learn some more fundamentals
Now that we know how to add credentials to an on-premises user, lets pose a question:
“Given access to a sync account in Domain A, can we add credentials to a user in another domain within the same Entra tenant?”
This is a bit of a tall order assuming we have very few privileges in Entra itself. Remember from Part 1 that the only thing we can sync down, by default, is the msDS-KeyCredentialLink property. In order to understand how to take advantage of this, we need to learn some more fundamentals of the Entra sync engine and how the rules work:
Rule Intro
We have yet to look at a concrete rule, so let’s look at the first rule defined in the Rules Editor.
Note that the direction is not shown here, but I am showing the inbound rules in the sync rules editor. The direction is in the XML definition. The “Connected System” is the connector space that the source object is coming from (in this case, hybrid.hotnops.com). Since the AD object is a user, the connector space object is “user” and the user representation in the metaverse is called a “person”. The link type of “Provision” is saying “create a metaverse object if one does not exist yet”. In sum, this rule is telling the sync engine to create a metaverse object for any user in the connector space. Remember the connector is responsible for enumerating LDAP and populating all AD users into the connector space.
Next, the scoping filter sets which objects are to be provisioned. We can see here that if the connector space object has a property of isCriticalSystemObject not set to “true” AND adminDescription doesn’t start with “User_”, then the object will be provisioned. Remember that the object still exists in connector space, even though it won’t be projected into the metaverse.
Next, we get to the “join” rules which are critical to understand. The join rules are the logic that creates the links between the metaverse objects, and the connector space objects, resulting in concrete MSSQL relationships. In this case, the rule is saying that the ms-DS-ConsistencyGuid on the connector space object needs to match the sourceAnchorBinary on the metaverse object. If the ms-DS-ConsistencyGuid property doesn’t exist, the objectGUID is used. It’s also important to remember that joins happen for both inbound (from a connector space into the metaverse) and outbound (from the metaverse into the connector space) attribute flows.
Lastly, the transformations list which target object properties need to be mutated. Note that the language for these transformations is effectively VBA. In this case, two properties will be set on the metaverse person:
cloudFiltered — This will be important later. This is a rather large rule that describes a list of string patterns, such as if the sAMAccountName starts with “krbtgt_” or “AAD_”, etc. If “true”, then a property called cloudFiltered will be set to “true” on the metaverse object.
sourceAnchorBinary — Remember this from the join rule? In this rule, the sourceAnchorBinary is set on the metaverse object to match either the ms-DS-ConsistencyGuid or the objectId.
We have now walked through a full provisioning rule but note that most rules do not provision anything; rather, they are joined to existing objects and certain transformations are projected into the metaverse.
So far, we have described the flow into the metaverse, so how does a property flow out? Let’s take a look at the two rules we care about. First, let’s look at how users are provisioned in Entra:
The “Link Type” is “Provision”, meaning that a new object will be created in the Entra connector space. The Entra connector (Sync Agent), will use that object creation to trigger a new user creation in Entra.
This part is really important. If we look at the filter, objects are only provisioned to the Entra connector space if all of these conditions are met. Remember that some of our privileged accounts, such as the “MSOL” account, “krbtgt”, and “AAD_” account names are set to be cloud filtered. That means that they are projected into the metaverse, but the Entra user provisioning is simply being blocked by the sync engine.
Last rule, I promise. Let’s look at how Entra users are joined to on-premises users:
This is saying that if an Entra user with a source anchor matches a metaverse object with the same source anchor, they will be tied together.
Do you see it?
There are partially linked objects in the metaverse, and we can trigger a link by creating a new user with the matching sourceAnchor.
In simple terms, CloudFiltered objects are prevented from being provisioned only!AKA Outbound Filtering. If we can provision the Entra user ourselves, we can complete the inbound join rule and take over the user account in another domain, as long as the MSOL account can write their msDS-KeyCredentialLink property.
And chaining this together, because we can control the user password and creation from the compromised sync account in Domain A, we can then add the WHFB credentials discussed in the part one of this blog series and add credentials to a potentially privileged user.
Before we continue, this attack has some important caveats:
The MSOL account used for attribute flows has write permissions at the “Users” OU level by default. If a user account has inheritance disabled, then MSOL will not be able to write to it and this attack will not affect the account.
Walkthough
Enough talking; let’s do a walkthrough. In this scenario, we have a tenant (hotnops.com) with two on-premises domains: federated.hotnops.comand hybrid.hotnops.com. As an attacker, we have fully compromised federated.honops.comand have an unprivileged Beacon in hybrid.hotnops.com. We will take advantage of the compromised Entra Connect Sync account in federated.honops.com to take over hybrid.hotnops.com.
If you want a full walkthrough with all the command line minutae, the video is here:
Step 1
From the Beacon in hybrid.hotnops.com, we need to identify an account we’d like to take over and identify the sourceAnchor that we need.
To do this, we want to find partially synced metaverse objects. For the sake of this walkthrough, we can run dsquery:
With those results, we want to look for any account that matches our “CloudFiltered” rule, which is defined here. In our case, there is an account named “AAD_cb48101f-7fc5–4d40-ac6c-09b22d42a3ed”. These are older connector accounts installed with AAD Connect Sync. If you identify an account that may be cloud filtered, you will need the corresponding ObjectID associated with the account that is in the dsquery results. In our case, the object ID is
0A08E28B-5D21–4960-A25A-F724F1E96155
Since the ObjectId is used as the sourceAnchor, we want to create a new Entra user with that sourceAnchor so it will link to our targeted “AAD_” account. In order to convert the UUID to a sourceAnchor, we simply need to convert the UUID to a binary blob where each section is little endian. I have a script to do it here, but there are probably easier ways.
We now want to use our Sync Account in federated.hotnops.comto create a new user with that sourceAnchor so that it will create a link to our target user in hybrid.hotnops.com. We can do that by obtaining credentials for the ADSync account and using the provisioning API. You’ll need to obtain an access token for the ADSync account, which I demonstrate in the video linked above. Once you have your token, you’ll need to use AADInternals to create the account.
At this point, we have achieved Step 1. We have a new user in Entra with a matching sourceAnchor, and now we need to wait up to 30 minutes (by default) for the target domain to run an Entra Connect sync, at which time the Entra user and the on-premises target “AAD_cb48101f-7fc5–4d40-ac6c-09b22d42a3ed” link together.
Step 2
Once the user is created, add an msDS-KeyCredentialLink to the newly created Entra user as documented in the first blog post in this series.
Step 3: Profit
Once the Entra Connect sync agent on hybrid.hotnops.comruns the next sync, it will use the join rule “In from AAD — User Join” to link the Entra user to the metaverse object associated with the on-premises “AAD_cb48101f-7fc5–4d40-ac6c-09b22d42a3ed” account.
From here, we will use our Beacon in hybrid.hotnops.comand methods documented in the Shadow Credentials blog to elevate privileges.
As a result of registering a Windows Hello For Business (WHFB) key on your created Entra user, you will have a key called “winhello.key”. In order to use it with Rubeus, we need to format it as a PFX file. The steps are below:
Congratulations! Your Beacon process now has a token for your targeted account.
Prevention
Identify All Partially Synced Users
For our purposes, a partially synced user is one that has an object in the on-premises connector space, a projection in the metaverse, but not an object in the Entra connector space. The reason why these exist, as mentioned earlier, is due to outbound filtering. In order to determine which users are partially synced, we can query all the objects in the metaverse and connector spaces and see which ones don’t have an object in the Entra connector space. The script to do that is here and here is an example output:
Identify All Privileged Users Inheriting Permissions From the Users OU
When Entra Connect is installed, an Active Directory Domain Services (AD DS) Connector account is created in the naming scheme of “MSOL_<random garbage>”. This account is responsible for syncing hashes (yes, it has DCSync privileges) and reading/writing properties on users to support the attribute flows. As a result of this, the MSOL account is given write all over all users in the “Users” OU.
That means this attack can affect any user that inherits their discretionary access control lists (DACLs) from the Users OU (which is pretty much all users). This is generally true of any Sync attack; however, something I learned during this research is that users added to sensitive privileged groups such as Domain Administrators will automatically have their inheritance disabled. Even when I re-enable it, some script comes along and disables it again. This led me to this technet article which claims that any AD group marked “protected” will routinely get a template DACL applied to them located at CN=AdminSDHolder,CN=System,DC=hybrid,DC=hotnops,DC=com.
So which users are “protected”?
Any user that has the adminCount property set to “1”. (Edit: Thanks to Clément Notin (@cnotin) for pointing out that the adminCount is the result of AD evaluating such criteria, not the source. More details here) Ultimately, as long as the target’s msDS-KeyCredentialLink attribute is writable by the MSOL account AND it is partially synced, then it is susceptible to this attack. I provided a powershell cmdlet to list all users that inherit their DACLs from the Users OU:
Detection
Detection of this misconfiguration/attack may be difficult but there are some solid signals that something is off. If any users in the Entra connector space have a metaverse projection with a “cloudFiltered” attribute set to “true”, then something is wrong. You can use the powershell cmdlet here to check for those users. While this doesn’t detect all hijackable metaverse objects, it does cover the most obvious case of cloudFiltered users.

 Entrar