Recently, Microsoft changed the way the Entra Connect Connect Sync agent authenticates to Entra ID. These changes affect attacker tradecraft, as we can no longer export the sync account credentials; however, attackers can still take advantage of an Entra Connect sync account compromise and gain new opportunities that arise from the changes.How It Used To WorkPrior to the change, an “AAD Connector” account would be created upon Entra Connect sync install. Upon creation, a randomized password woul
Prior to the change, an “AAD Connector” account would be created upon Entra Connect sync install. Upon creation, a randomized password would be generated and set for the connector account. The AAD Connector account was a user principal that would be assigned a special sync role, and it would authenticate just like any old user. You may have seen these before; they look like this:
In this instance, ENTRACONNECT is the hostname on which the agent is running. There are a wide variety of attack paths that can stem from compromising this account, so it is a very advantageous target for attackers.
Old Attacker Tradecraft
Thanks to AADInternals, it was simple to obtain the sync password of the AAD Connector Account used to import and export data from Entra ID. Some decryption steps are documented here, but that mostly focuses on the on-premises accounts. If you are an AADInternals user, you would need to impersonate the context of the Entra Connect sync account and run the command:
Get-AADIntSyncCredentials
And that’s it! You could use your creds to do all sorts of sync mischief. Under the hood, the ADSync service account would connect to a SQL database where it would obtain a key to decrypt an “AAD configuration” blob. The plaintext password of the AAD Connector Account (Connects to Entra ID) would be in that blob. If an attacker got privileged access to a host running Entra Connect Sync, they could obtain this plaintext password and authenticate off-host, conditional access policies (CAPs) permitting. The theft of such a credential would have a huge impact on any organization, so I presume that Microsoft moved over to an application registration to reduce such a risk.
The Client Credentials Flow
If you are new to Entra ID, you can read how the Client Credentials flow works here. In a nutshell, an application registration can authenticate as itself utilizing the app roles assigned to it. To authenticate and obtain access tokens, it needs credentials provisioned to it. These credential types aren’t exclusive, and an application can have multiple. They can be in the form of:
Secrets (plaintext password)
Certificates
Federated Credentials
If the application uses a certificate, it will sign an attestation when authenticating to obtain an access token. Here is an example:
POST /{tenant}/oauth2/v2.0/token HTTP/1.1               // Line breaks for clarity
Host: login.microsoftonline.com:443
Content-Type: application/x-www-form-urlencoded

scope=https%3A%2F%2Fgraph.microsoft.com%2F.default
&client_id=11112222-bbbb-3333-cccc-4444dddd5555
&client_assertion_type=urn%3Aietf%3Aparams%3Aoauth%3Aclient-assertion-type%3Ajwt-bearer
&client_assertion=eyJhbGciOiJSUzI1NiIsIng1dCI6Imd4OHRHeXN5amNScUtqRlBuZDdSRnd2d1pJMCJ9.eyJ{a lot of characters here}M8U3bSUKKJDEg
&grant_type=client_credentials
How It Works Now
The new Entra Connect Sync agent moved from a “user” centric authentication mechanism to an app registration, which uses the client credentials flow. Since app registrations support certificate authentication, a self-signed certificate is generated on install and saved in the NGC Crypto Provider store. The installer will use the login information you provided (which must be a Global Administrator or Hybrid Identity Administrator) to create a new application registration with the self-signed certificate as an authentication certificate. Once Entra Connect sync completes installation, an application will exist in Entra ID that looks like this:
And the configured app roles:
New Tradecraft
In a perfect world, an attacker could no longer dump plaintext credentials (because there are none) and the private key that corresponds to the certificate is sitting on a TPM. It would appear that any AD Connector account abuses must be performed on-host from here on out, forcing an attacker to persist on a Tier Zero asset. If there is no TPM support, we may be able to export the certificate private key, but I don’t want to rely on that. To the red teamer, it may seem all is lost–but fret not; there is still hope.
After examining the .NET assemblies provided in the new release, it appeared that a graph token of a Global Administrator or Hybrid Identity Administrator was not required to add a new key to the application registration.
This came off as strange because the application was not provisioned with either Application.ReadWrite.All or Application.ReadWrite.OwnedBy. Let’s take a look at the decompiled code in Microsoft.Azure.ActiveDirectory.AdsyncManagement.Server:
if (!string.IsNullOrEmpty(graphToken))
{
    httpClient.DefaultRequestHeaders.Authorization = new AuthenticationHeaderValue("Bearer", graphToken);
    string text2;
    if (!ServicePrincipalHelper.CheckUserRole(azureInstanceName, httpClient, out text2))
    {
        Tracer.TraceError(text2, Array.Empty<object>());
        throw new AccessDeniedException(text2);
    }
}
else
{
    azureAuthenticationProvider = AzureAuthenticationProviderFactory.CreateAzureAuthenticationProvider(aadCredential.UserName, aadCredential.Password, InteractionMode.Desktop);
    string text4;
    string text3 = azureAuthenticationProvider.AcquireServiceToken(AzureService.MSGraph, out text4, false);
    if (string.IsNullOrEmpty(text3))
    {
        Tracer.TraceError("ServicePrincipalHelper: Failed to acquire an access token for graph. {0}", new object[]
        {
            text4
        });
        throw new AccessDeniedException(text4);
    }
    httpClient.DefaultRequestHeaders.Authorization = new AuthenticationHeaderValue("Bearer", text3);
    azureInstanceName = azureAuthenticationProvider.AzureInstanceName;
}
That whole else block is handling the case for when a graph token (presumably that of a Global Administrator or Hybrid Identity Administrator) is not provided. How interesting!
The aadCredential username and password is a bit misleading, as it’s actually holding the UUID of the application registration and the sha256 hash of the existing certificate, as this function call shows:
So what we need is the cert hash of the existing certificate credential and the ability to load it into our AzureAuthenticationProviderFactory. Once we do, we can use that certificate to do two things:
Obtain a graph token to make the addKey API call
Obtain a proof of possession (POP) assertion proving that we are currently in possession of the private key
Further down in the function, the following code executes if no graph token is provided:
public KeyCredentialModel AddKey(Guid appId, KeyCredentialModel keyCredential, string proof) { if (appId == Guid.Empty) { throw new ArgumentException("appId"); } if (keyCredential == null) { throw new ArgumentNullException("keyCredential"); } if (string.IsNullOrEmpty(proof)) { throw new ArgumentNullException("proof"); } string requestUri = string.Format(this.graphEndpoint + "/v1.0/applications(appId='{0}')/addKey", appId); string passwordCredential = null; string content = JsonConvert.SerializeObject(new { keyCredential, proof, passwordCredential }, ODataResponse.JsonSettings.Value); KeyCredentialModel result; using (HttpRequestMessage httpRequestMessage = new HttpRequestMessage(HttpMethod.Post, requestUri) { Content = new StringContent(content, Encoding.UTF8, "application/json") }) { using (HttpResponseMessage httpResponseMessage = base.SendRequest(httpRequestMessage)) { result = JsonConvert.DeserializeObject<KeyCredentialModel>(httpResponseMessage.Content.ReadAsStringAsync().GetAwaiter().GetResult()); } } return result; }
We now know what is needed to add a new key. As an attacker, we can generate a new private key, build a certificate, obtain a POP token, and register it with the application registration. This provides us persistent, off-host, access to the application registration. To do this, we can build out a .NET assembly that performs the necessary steps in the context of the ADSync account.
Proof of Concept
Our goal is to prove that we can still persist our access to a compromised AAD connector account, even if a TPM protects the private key. We can accomplish this by generating our own certificate and adding it to the service principal.
First, we need to obtain an access token and a signed POP assertion. We can do this with the certificate that is installed on the host and can be performed by running this program here:
Our graph token looks like this:
And the POP assertion looks like this:
According to the documentation here, this should be enough to add credentials to our application registration, given that we have at least Application.ReadWrite.OwnedBy.
However, our application does not have any required app roles!
How can this be? Well, if you are an astute reader, or simply have an attention span past the first paragraph of Graph documentation, you’ll see this banger on the addKeys page:
As it turns out, if you have access to an existing key, you can just add your own with no permissions needed!
How have I missed this?!
Mystery solved, and our path is clear for how we can persist our access to the AAD connector account off-host.
If we run our AddKey binary (posted here) with just our access token and POP assertion, you can see that we successfully added our key.
And the updated key is reflected here:
Red team crisis averted; we can keep our sync tradecraft, albeit a bit more “detectable”. Also, as a general takeaway, the ability to sign POP assertions equals the ability for any application to add new certificates to itself, which is pretty cool.
New Opportunities
Here is a list of users who could compromise the sync account previously:
Previously, a privileged auth administrator or higher could change the password of the Sync account; however, since the sync agent would no longer successfully authenticate, it would break the functionality of the sync agent. This left only Global Administrator and Hybrid Identity Administrator as viable attack paths for a red teamer. Let’s look at the new pseudo-graph:
This update presents an attacker with the opportunity to add credentials without interrupting the normal day-to-day flow of the sync agent. In addition, it is far more common to have principals assigned the Application/Cloud Application administrator, making the attack surface larger for sync attacks. While tradecraft may have shifted for on-premises attackers, the Entra ID attack surface has expanded. In addition, Conditional Access typically doesn’t affect service principals, so the likelihood of being able to use these credentials off-target is significantly higher. Ultimately, this is a cleaner yet more abuse-prone implementation.
Detections
Here is the good news. Detecting a new credential on an Application Registration is easy and a dead giveaway that something interesting is happening. Since the normal flow of UpdateADSyncApplicationKey removes the old key, the existence of more than one certificate on the Entra Connect application registration is a good indication that something is amiss. Should an attacker choose to be stealthy and actually replace the certificate that the Entra Connect Sync agent uses, then there are still detections for credential manipulation on an application registration. Here is a KQL query that surfaced all of my key additions:
AuditLogs
| where ActivityDisplayName has_any ("Add service principal credentials", "Update application", "Add key credential")
| where TargetResources[0].type =~ "Application"
| extend AppName = tostring(TargetResources[0].displayName)
| extend ChangedProps = TargetResources[0].modifiedProperties
| extend Initiator = tostring(InitiatedBy.user.displayName)
| project TimeGenerated, AppName, ActivityDisplayName, Initiator, ChangedProps
| where ChangedProps has_any ("keyCredentials", "passwordCredentials")
Takeaways
This is a brand-new update for Entra Connect Sync, so I don’t expect to see it in the wild for some time. I’m not quite sure I’m sold on the ability for an application to “roll its own keys”, as the documentation states. If access to a key is equivalent to the ability to produce more keys, then what’s the point of an expiration date?
In the final post of this series, I’ll discuss what to do after your latest exam attempt to get the most value out of your OSCP journey.DISCLAIMER:All opinions expressed in this article are solely my own. I have reviewed the content to ensure compliance with OffSec’s copyright policies and agreements. I have not been sponsored or incentivized in any way to recommend or oppose any resources mentioned in this article.IntroductionThroughout this series, I’ve shared practical advice for PEN-200: Pen
In the final post of this series, I’ll discuss what to do after your latest exam attempt to get the most value out of your OSCP journey.
DISCLAIMER:
All opinions expressed in this article are solely my own. I have reviewed the content to ensure compliance with OffSec’s copyright policies and agreements. I have not been sponsored or incentivized in any way to recommend or oppose any resources mentioned in this article.
Introduction
Throughout this series, I’ve shared practical advice for PEN-200: Penetration Testing with Kali Linux students seeking to maximize the professional, educational, and financial value of pursuing the Offensive Security Certified Professional (OSCP) certification. So far, I’ve focused on four distinct phases of “the OSCP journey”: 1) pre-enrollment preparation, 2) the course material, 3) the lab networks, and 4) the exam. In this final post, I’ll discuss how students can leverage their most recent exam experience to learn from their mistakes and increase their chances of passing the exam on subsequent attempts. I’ll also share guidance for newly certified OSCP professionals on how to continue their cybersecurity journey with purpose and direction.
“To finish the moment, to find the journey’s end in every step of the road, to live the greatest number of good hours, is wisdom.” — Ralph Waldo Emerson
What you do after each OSCP exam attempt carries both short- and long-term implications for your professional success. Here are the three takeaways from this post:
Pass or fail, every student should conduct a thorough retrospective of their last exam attempt to determine what went well, where to focus future study efforts, and what productivity sinks to eliminate
For students still trying to pass the exam, connecting with others can inspire new strategies, uncover useful training resources, and impart valuable insight; certified professionals can also use this network for career support and guidance
The final piece of advice in this series is simply to reflect on your OSCP journey so far and decide what you want to pursue next, whether that’s further self-guided study, a new certification, or a job transition
Conduct an Exam Attempt Retrospective
After your OSCP exam—whether you passed or not—the most valuable thing you can do is pause and unpack what actually happened. For students still pursuing the certification, the benefit is clear: increasing the odds of passing the next attempt. However, even newly certified professionals can gain valuable insight by identifying areas for improvement or exam-day “bottlenecks” that hindered productivity. In this section, I propose a structured retrospective methodology, defined here as a deliberate and reflective review of your performance with the goal of identifying what worked, what failed, and what to improve. You can think of it as a technical postmortem of your latest exam attempt.
It took me three attempts to pass the OSCP exam. In my first attempt, I performed well on the standalone machine set but struggled with lateral movement and privilege escalation in the Active Directory (AD) set. I assumed my only obstacle was a lack of familiarity with AD attack vectors, so I rewrote my notes for the appropriate PEN-200 modules and practiced more with AD network exercises. Had I conducted an exam retrospective, however, I would have uncovered several other weaknesses in my approach:
An underdeveloped external reconnaissance methodology
Poor tradecraft documentation
Suboptimal time management
My second attempt resulted in an even poorer performance (I exfiltrated only a single flag) despite being better informed on AD internals. Needless to say, I was shocked and profoundly disappointed.
After pulling myself out of that slump, I mulled over my latest attempt and used the lessons I’d learned to perform significantly better on my third and final try. With that success in mind, I revisited my retrospective process and refined it for this blog series. The workflow is illustrated in the swimlane flowchart diagram below:
The first, and arguably most important, phase of the exam retrospective is data gathering. The quantity, quality, and accuracy of the data you collect at this stage largely determines the retrospective’s value. By the end of this phase, you should have two core outputs that will inform the next stages of analysis:
Timeline: Reconstruct your exam attempt as accurately as possible by capturing timestamps of your actions; break down each event by challenge set, machine, attack stage (e.g., reconnaissance, privilege escalation, lateral movement), and report status
Machine Breakdown: Review your notes to identify the observable technologies on each of the six exam machines; note the services discovered, attacks or procedures attempted, tools used, and where you stopped along each attack path
After completing the data gathering phase, take a two-pronged approach to the analysis phase:
Identify operational hurdles that ate into your 24-hour testing window and hampered productivity using the exam timeline
Use the machine breakdowns to identify which technologies, tools, or attack stages hindered your exam performance
The goal in both cases is to enumerate deficiencies you can address later in the reconstruction phase. During reconstruction, you will build on your findings by 1) creating a targeted study plan, 2) reorganizing your notes, reference guides, or report templates, and 3) refining your testing methodology and time management strategy.
Start by analyzing your exam timeline and using your observations to guide improvements in your preparation:
1. Did one challenge set (i.e., the AD or independent challenges) take significantly longer than the other or remain incomplete?
This could signal a technical knowledge gap in areas like AD enumeration, Windows/Linux exploitation, or web application testing. If so, adjust your study plan to focus deliberately on these topics before your next attempt. Platforms like Hack The Box (HTB) allow you to filter machines by technology, operating systems (OS), or attack type; making it easier to target weak areas and reinforce essential skills.
2. Did missing or incomplete notes, fragmented reference guides, or disorganized report templates cause you to lose time?
If you struggled to retrieve commands or documentation under pressure, it’s time to streamline your tradecraft resources. Consolidate your notes, build out your reference guides, and prep your report templates in advance to minimize exam-day friction.
3. Did you fall into time sinks or go down rabbit holes that led nowhere?
Reflect on how your methodology might have contributed to wasted time. Consider introducing more automation, pruning redundant steps, or adopting a timeboxing approach like the Pomodoro Technique to improve your efficiency.
In the second step of the analysis phase, use the exam machine breakdowns you created earlier to answer the following questions and develop action items:
1. Did you fail to exploit or enumerate any technologies or services?
Use these insights to shape a focused study plan. Again, utilize platforms like HTB and prioritize practical training resources to dictate your informed study approach.
2. Did you discover a vulnerability but fail to exploit it due to tool issues or syntax errors?
Explore alternative tools that better align with your workflow and update your reference guide with accurate syntax and usage examples. Link entries in your reference guide for given exploitation techniques to examples of HTB or OffSec lab machines where you successfully executed those techniques. Aim to maintain at least two tools for each post-exploitation task: one that runs from your Kali Linux box and another that you can execute on a compromised host (e.g., a PowerShell script or .NET assembly). Apply the same principle to external recon tasks. Keeping your toolkit diverse and your notes accurate can save critical time under pressure.
3. Did specific attack stages (e.g., external reconnaissance, privilege escalation, credential harvesting) not return actionable results or break down?
Revisit and revise your methodology. Resources like HackTricks and Swissky’s cheatsheets can help close knowledge gaps. Add checkboxes or mind maps to your processes for common services (e.g., FTP, SMB, and HTTP) to ensure thorough and repeatable enumeration. Apply the same structured approach to post-exploitation workflows for both Windows and Linux targets. Test your updated methodology against easy-to-medium HTB machines to validate your changes before the next attempt.
By the end of both analyses, you should have a concrete plan to address the weaknesses exposed during the retrospective. If you’re still preparing for the OSCP—or simply want to gauge your progress—allocate time to retest your skills and methodology after completing your action items. If you followed my advice from the third post of this series and haven’t yet completed one of the three PEN-200 lab networks that simulate the exam environment, now’s the time. Treat the lab network as your control environment and your new score as the dependent variable: the measurable outcome of your adjusted approach. Once you’re satisfied with the results, reschedule your next OSCP exam attempt.
By following this approach, PEN-200 students will be better prepared for future OSCP exam attempts and better equipped to continue their self-guided education after earning the certification. This methodology can be applied as an iterative feedback loop across multiple attempts, helping to identify skill gaps and drive continuous improvement. As long as students maintain a positive attitude and a genuine interest in self-discovery, they can expect steady progress in both exam performance and testing confidence.
Network With Industry Professionals and Fellow Students
Throughout the OSCP study process, it’s easy to become hyperfocused and socially isolated. In doing so, students often miss out on one of the PEN-200’s greatest strengths: its expansive network of peers, mentors, and potential professional contacts. Whether you’ve already earned your OSCP or are still working through the exam process, connecting with others can transform the solitary grind of preparation into a collaborative, enriching journey and accelerate your professional aspirations.
As a current PEN-200 student, networking offers opportunities to learn, share, and stay motivated. After I failed my second attempt, I reached out to a friend enrolled in PEN-300: Advanced Evasion Techniques and Breaching Defenses and asked if I could shadow him while we both worked on HTB Pro Labs. During those sessions, we swapped enumeration checklists, shared our favorite tools, and discussed our approaches to exam retrospectives. Other students can benefit from networking by finding accountability partners, joining study groups, discovering new exploitation strategies, and staying emotionally grounded throughout this challenging process.
NOTE:
One of my favorite takeaways from shadowing mock penetration tests was learning how to speed up directory brute-force enumeration on Windows Internet Information Services (IIS) web servers. Because Windows hosts are case-insensitive—unlike UNIX-like systems—you can significantly reduce redundancy and improve performance by using tools like gobuster or dirsearch with a wordlist limited to lowercase or uppercase entries. This is just one example of how collaborating with other OffSec students or ethical hackers can inspire new testing strategies and accelerate your learning process.
For newly certified OSCP holders, networking takes on renewed importance. Earning the certification opens doors to job opportunities, interviews, and professional conversations that weren’t accessible before—but you can’t expect to walk through them without making connections first. Talking with people who are deeply embedded in the industry also provides insights that static courses can’t realistically capture like real-time knowledge about evolving roles, industry or specific company expectations, and career path requirements that wax and wane with industry trends. Networking also helps you plan the next phase of your self-guided education—whether that means expanding on PEN-200 concepts, charting your own course by exploring new cybersecurity domains, building a home lab, or other ideas I’ll cover later in the post. Conversations with those who’ve already moved beyond PEN-200 can help you set clear goals, avoid common pitfalls, and stay aligned with the rapidly evolving demands of the offensive security industry.
The most obvious networking platform for PEN-200 students is the official OffSec Discord server, but many other communities are worth exploring:
OffSec Office Hours: The OffSec Discord hosts weekly livestreams on Fridays where an instructor walks through an OffSec Proving Grounds machine; these sessions are a great way to stay sharp and engage with other OSCP-hopefuls
Reddit: The r/oscp subredditfocuses specifically on OSCP-related content, though the quality and tone of posts can vary (it is Reddit, after all)
Content Creators: Figures like IppSec, The Cyber Mentor, and Tib3rius regularly produce livestreams and educational material, maintaining active online communities where you can connect with like-minded learners
LinkedIn: Many OffSec students use LinkedIn to showcase their OSCP certification, share their learning journeys, comment on others’ milestones, and build professional relationships
In-Person Events: Local meetups such as OWASP Local Chapters, Security BSides events, or regional DEF CON Groups are great places to find a supportive community, sharpen your skills, define a new career path, and potentially meet future travel partners for a trip to the world-famous DEF CON conference in Las Vegas
Whether you’re newly certified or still grinding to earn the OSCP, don’t neglect the networking opportunities this journey presents. As a current student, sharing tips and hurdles keeps you technically informed and motivated. As a newly minted OSCP, connecting with career mentors and peers reinforces your knowledge and expands your professional circle. By engaging in Discord servers, study group meetups, or LinkedIn discussions, you gain real-time insights, accountability, and a support network that lasts well beyond the exam. No matter where you are in the OSCP journey, investing time in these communities accelerates your learning and lays the groundwork for long-term success in offensive security.
Ask Yourself, “What’s Next?”
I would like to take a moment to personally congratulate everyone reading this who has recently passed the OSCP exam. You’ve likely invested months—if not years—into earning this credential, amassing a solid foundation of experience and knowledge along the way. Ask yourself: What did you enjoy most? What would you prefer to avoid in the future? These reflections can guide your next challenge, the skills you want to sharpen, and your broader career direction. To close out this series, I’d like to explore those possibilities and highlight how they can enhance your professional profile.
First things first: take a break. Seriously. You’ve reached an impressive milestone and while it’s tempting to dive immediately into the next pursuit, give yourself time to rest and decompress. If possible, take a vacation (or at least a few days off) to recover from the intensity of exam prep.
Before deciding what’s next, update your resume to include your OSCP certification and prepare for the job hunt. If you’re entering the cybersecurity job market, I highly recommend the Infosec Job Hunting w/ BanjoCrashland YouTube playlist. It covers everything from finding job postings and writing resumes to networking and interview preparation. Many of the techniques discussed in this series involve open-source intelligence (OSINT) gathering techniques, which can double as skill development for future offensive roles. The creator, Jason Blanchard of Black Hills Information Security, also hosts a weekly Twitch stream, Job Hunt Like a Hacker, which expands on these lessons with real-time advice and feedback. While I haven’t attended the stream personally, at least 278 people (as of this writing) credit Blanchard and his content for helping them successfully pivot into cybersecurity—an endorsement of both his insight and the supportive community he’s fostered.
Many OSCP holders choose to write a public reflection on Medium, LinkedIn, or a personal blog platform. If you do the same, structure it like a retrospective: document what went well, what didn’t, how you studied, and what you would change in hindsight. Avoid spoilers, walkthroughs, or anything that could violate OffSec Terms and Conditions. A well-written reflection not only inspires other PEN-200 students but can also serve as a networking tool, a technical writing sample, and a resume booster. Take your time writing it and ensure it’s something you’re proud to attach your name to.
This whole series has focused on one cybersecurity certification (the OSCP) and briefly mentioned a few others. In spite of that, I recommend caution before making another certification your next professional goal. As I said in the first post of this series, it’s important to view all certifications through a critical lens. The certification industry is, ultimately, a business and students should remain conscious of marketing narratives that inflate their importance or imply that earning one guarantees employment in your field of choice. Rather than chasing credentials to bypass every human resources (HR) filter—a Sisyphean task, in my opinion—focus instead on crafting a narrative of steady, deliberate growth in your ethical hacking journey. That narrative can include certifications, but it could also highlight personal projects, practical experience, and self-guided exploration. In short, learn to wield certifications like a scalpel rather than a claymore while also peppering your journey with cost-effective resume boosters.
PEN-200 offers valuable lessons, but it’s still an entry-level certification and only scratches the surface of many cybersecurity topics. If you want to build on its concepts at a higher level, consider the following:
Web Applications
While PEN-200 introduces core techniques like SQL injection (SQLi) and cross-site scripting (XSS), the web app security field itself spans hundreds of server-side and client-side vectors, subtle edge cases, and novel exploitation methods that researchers are constantly discovering. PortSwigger Academy is my favorite free platform for advancing these skills, as it offers comprehensive written material and interactive labs.
As mentioned in the third post of this series, technical reporting may be the most transferable skill from the PEN-200 into real-world engagements. Refer back to the included resources in that article and set time aside to improve this area.
Red Teaming
While red teaming overlaps significantly with penetration testing, it emphasizes different skills such as persistence, command and control, and exfiltration. Explore techniques relative to these domains and learn how to adapt each PEN-200 post-exploitation technique to blend with legitimate network traffic, enhancing stealth.
NOTE:
The differences between penetration testing and red teaming are often subtle and vary between organizations. Understanding these nuances is crucial when entering the job market, as mismatched expectations can hinder a successful career pivot. My favorite explanation comes from JUMPSEC, which notes that penetration testing aims to uncover as many flaws as possible, while red teaming focuses on achieving specific objectives to demonstrate real-world impact. Red teaming also places greater emphasis on operational security (OPSEC) evasion and threat actor emulation.
There are even more offensive security topics not covered in PEN-200 that may interest you:
Maldev Academy and SEKTOR7 Institute come highly recommended throughout the industry. The skills these courses help you develop are essential to advanced post-exploitation, red teaming, and custom implant engineering.
I wrote this series for PEN-200 students whose goal is to pivot into the offensive security consulting industry; however, that is only one demographic of the PEN-200 student body. Many students pursuing the OSCP are considering (or already employed in) fields tangential to penetration testing and red teaming. If you’re more aligned with adjacent fields like reverse engineering, development, security, and operations (DevSecOps), security operations center (SOC), or detection engineering, there are valuable resources for those too:
I highly recommend the corporate training program Secure Code Warrior or the more affordable Hacksplainingplatform for individuals looking to improve their secure development skills.
SOC
SOC analysts are often on the front lines of incident detection and response. Utilize online training platforms like CyberDefendersor TryHackMe, both of which offer learning paths for SOC levels 1–3. Radiant Security has a helpful explanation of the differences between these tiers.
Detection Engineering
Now that you understand how many fundamental attacks work, flip the perspective by learning how to detect malicious behavior, craft alerts, and better understand attacker tradecraft. Budget-conscious learners can start with Practical Threat Detection Engineering from packtand its accompanying code repository, while Applied Network Defense offers a well-regarded catalog for those seeking deeper coverage.
As with all commercial training options, consider whether the return on investment (ROI) justifies enrollment.
Lastly, consider how you might participate in or give back to the information security community. If you live in or near a city, look for volunteer opportunities as a technical coach for underrepresented communities (e.g., older citizens, non-native English speakers, or individuals with physical or cognitive disabilities) or as a volunteer network engineer for nonprofit organizations. Consider volunteering at a local public school to talk about careers in cybersecurity and what drew you to ethical hacking. Manydiversity-focused nonprofit organizations and affinity groups in cybersecurity offer valuable resources like career mentorship, CTF events, digital privacy training, and financial sponsorship for professional development. Notable examples include Women in Cybersecurity (WiCyS), Blacks in Cybersecurity (BIC), Latinas in Cyber (LAIC), Secure Diversity, and Minorities in Cybersecurity (MiC). Getting involved with these groups can expand your network, strengthen your resume, and allow you to give back to the community in meaningful ways.
Earning the OSCP is an extraordinary accomplishment, but it’s just one checkpoint in a much longer and more worthwhile journey. Whether you continue with more certifications, lab projects, or community involvement, remember to stay curious, humble, and ethical. Make your next steps intentional, and remember: as with the OSCP, the process itself should be as rewarding as the prize.
Conclusion
It’s been a privilege to write this series and I’m grateful to my colleagues and friends for their valuable feedback and ongoing support. As always, I welcome your questions, constructive critiques, or additional advice for current and future PEN-200 students in the comments.
A practical guide to maximizing the short- and long-term benefits of your upcoming OSCP exam attempt(s).DISCLAIMER:All opinions expressed in this article are solely my own. I have reviewed the content to ensure compliance with OffSec’s copyright policies and agreements. I have not been sponsored or incentivized in any way to recommend or oppose any resources mentioned in this article.IntroductionIn the last post in this series, I discussed a few proactive steps students should take throughout th
A practical guide to maximizing the short- and long-term benefits of your upcoming OSCP exam attempt(s).
DISCLAIMER:
All opinions expressed in this article are solely my own. I have reviewed the content to ensure compliance with OffSec’s copyright policies and agreements. I have not been sponsored or incentivized in any way to recommend or oppose any resources mentioned in this article.
“You may be disappointed if you fail, but you are doomed if you don’t try.” — Beverly Sills
Congratulations—you’re now ready to take the OSCP exam! Despite being the shortest of the five phases in the “OSCP journey”, there are still important steps you can take to ensure you’re getting your money’s worth. Here are three key takeaways for all future exam-takers:
The OSCP exam is designed to mimic a black-box penetration test, but due to the nature of standardized testing, it inevitably falls short of being a perfect replica of a real-world engagement; while this is completely reasonable, it helps to be prepared to speak to these nuances in future job interviews and not to confuse exam-specific tactics with best practices in the field
Certification exams—for better or worse—play a role in many offensive security consulting careers, so it’s best to set a precedent for sustainable and practical test-taking behavior by developing realistic, ethical, and repeatable exam-day practices and using them during your OSCP attempt(s)
Follow OffSec’s exam-day instructions to the letter, as even minor deviations could invalidate months (or years) of work toward the OSCP and may disqualify you from future OffSec certifications
Understand the Differences Between the OSCP Exam and Real-World Practice
While the OSCP exam certainly tests your offensive security knowledge, it’s important to understand what the exam is and isn’t. OffSec has gone to great lengths to make the OSCP a realistic simulation of a black-box penetration test; however, to ensure fair grading and timely results, it comes with inherent limitations. By recognizing these gaps ahead of time, students can better interpret their exam experience, set realistic expectations for future consulting roles, better articulate their skills in interviews, and avoid drawing the wrong conclusions about what the certification does (or doesn’t) prove to a technical recruiter.
While not an exhaustive list, here are the differences I consider the most significant to keep in mind:
Team Collaboration: Although the OSCP exam is a solo endeavor, operators seldom work alone in real-world engagements; exceptions may exist for engagements with extremely limited scope or niche objectives, but most involve at least two consultants
Client Interaction: During the exam, your only contact is with the OSCP proctor(s); in a real engagement, you should expect to interact with business managers, engineers, security operations center (SOC) employees, and a designated point of contact (POC) throughout the lifecycle of a client-consultant relationship
Scope Definition and Rules of Engagement (ROE): While the Exam Restrictions in the exam guide could be interpreted as a partial ROE, real-world assessments include far more comprehensive documentation and legal implications for its violations; consultants may also be involved in negotiating the scope of upcoming engagements
Engagement Objectives and Metrics: The objective of the OSCP exam is to gain initial and elevated access to as many systems as possible; in contrast, real-world assessments—especially red team exercises—may involve more targeted objectives, like exfiltrating dummy data, compromising specific users or systems, bypassing defenses, or demonstrating how vulnerabilities are tied to business impact
Operating with Due Caution: Whereas the OSCP exam gives candidates near-total freedom within the simulated network (aside from a few restricted attacks and tools), real-world consultants must consider the impact of their actions on live systems and people, adapting their approach as needed; consultants will often request POC approval before executing commands that could trigger account lockouts or system downtime
Deconfliction: If an attack is detected, SOC teams may raise a deconfliction event to confirm it was part of the assessment; if not confirmed, the alert could trigger a full-scale incident response process
Post-Engagement Procedures: After the OSCP exam, the student’s only obligation is to submit a report; in contrast, wrapping up legitimate consulting engagements may involve artifact cleanup, resolving deconfliction events, stakeholder presentations, blue team debriefs, infrastructure teardown, and secure data destruction
Cloud-Hosted Tools: Using third-party or cloud-hosted tools to process clients’ artifacts—such as for reverse engineering, data exfiltration, or hash cracking—carries the risk of exposing secrets to systems beyond client or consultant control; because the OSCP exam uses entirely fictional data, its restrictions around cloud usage are more flexible
Timeline: The OSCP exam splits the practical and reporting components into two ~24-hour phases that test a candidate’s ability to rapidly identify, exploit, and document vulnerabilities; in contrast, real-world engagements typically span several weeks per phase depending on scope and client expectations
Threat Modeling: Some assessments require consultants to emulate specific threat actors by using a tailored subset of tactics, techniques, and procedures (TTPs); during the OSCP, students are not bound by these constraints
Kali Linux Requirement: The OSCP must be completed using a Kali Linux VM, but while Kali is a popular Linux distribution for ethical hacking, its large toolset increases both operational overhead and the probability of detection; real-world operators often use custom minimal Linux builds with obfuscated toolkits deployed via continuous integration and continuous delivery/deployment (CI/CD) pipelines to reduce both detection risk and scaling costs
Social Engineering: While the OSCP exam may involve limited client-side attacks (an assumption based on the fact that there is a “Client-Side Attacks” module in the publicly available syllabus), its highly automated structure means it offers few opportunities to exploit the weakest link in any cybersecurity program: the human element; in real-world assessments, consultants may use tactics like spear-phishing, vishing, or smishing (if the ROE permits it) to achieve credential access or arbitrary code execution (ACE) capabilities
Physical Security: Some assessments allow physical intrusion tactics—such as piggybacking/tailgating or lock-picking—to gain access to critical infrastructure and test physical security controls; while not feasible during the OSCP exam and somewhat niche, it’s still valuable to conceptually understand these attack vectors
The OSCP is an achievement to be proud of, but it doesn’t perfectly mirror professional practice. Keeping these differences in mind, students can more accurately frame their OSCP experience, communicate their skills more effectively, and set realistic expectations for job responsibilities. Recognizing its limitations is a critical step toward bridging the gap between certification and your career.
Develop Healthy Exam Habits
If this is your first multi-day practical exam, it’s best to build healthy habits and eliminate disruptive ones early. This sets you up for long-term success and a better experience in future exams, regardless of which certification you’re pursuing.
The OSCP exam, for those unfamiliar, is a grueling ordeal. It begins with a 23-hour, 45-minute technical assessment where the student must exfiltrate a minimum number of flags from six machines. Three of these are standalone targets that require the student to complete the full attack path—from initial access to privilege escalation. The other three form an Active Directory (AD) set, where the student is ceded access as a lower-privileged user and escalates to Domain Admin or equivalent-level access. To pass, students must capture enough flags to reach at least 70 out of 100 points (each flag is worth 10 points). They’re then given ~24 more hours to submit a professional report detailing how they achieved each objective. Needless to say, it’s an exhausting endeavor and a major source of stress for many.
As painful as it is to admit, the OSCP—for all its notoriety and difficulty—is considered an entry-level certification in offensive security consulting. It covers a wide breadth of knowledge but ultimately scratches the surface of or doesn’t attempt to address topics like evading operational security (OPSEC) solutions, deploying and maintaining command and control (C2) infrastructure, and identifying more advanced vulnerabilities, to name a few. While certifications aren’t strict gatekeepers to the industry or career advancement, an employer may eventually require you to pursue more advanced practical exams (or you may feel pressured to do so to stay competitive in the job market). With that in mind, and especially if the OSCP is your first multi-day practical exam, it’s in your best interest to develop sustainable exam habits early on to avoid building a detrimental relationship with certifications.
Let’s start with the simplest, yet arguably hardest, topic: sleep. While it may be tempting to pull an all-nighter and grind through flags as quickly as possible, this approach is likely counterproductive. Research consistently show that sleep deprivation impairs cognitive functioning, stifles creativity, and slows reaction times—all of which are essential during the OSCP exam. Some studies even suggest that sleeping more than usual the night before a test is correlated with better performance. For multi-day exams, I aim for at least eight hours of sleep each night, regardless of how much progress I made the day before. If you’re interested in the science behind sleep, I highly recommend Why We Sleep by Matthew Walker, PhD.
Your exam success largely depends on the quality of your notes. Make a habit of taking structured, detailed, and legible notes throughout your technical challenges. Consider building a note template in a node-based application like Obsidian and refining it during a few PEN-200 Challenge Labs or Hack the Box (HTB) machine exercises. The more structure you establish in advance, the more mental bandwidth you preserve on exam day. Effective note-taking is a transferable skill that strengthens both your technical execution and report-writing abilities as an offensive security consultant.
A few days before an exam, I like to deep clean my office—starting with vacuuming the floors and finishing by decluttering my workspace. A minimalist setup not only supports compliance with OffSec’s exam policies (more on that later), but also fosters a calmer mental space where you can think clearly and move efficiently. I also recommend silencing your phone, placing it out of reach, notifying others that you’ll be unavailable, and using noise-canceling headphones if you’re in a shared household. The fewer distractions in your space, the easier it is to focus on solving complex problems.
The tight 24-hour window of the OSCP exam demands a strategic approach to time management. Techniques like the Pomodoro Technique—working in focused sprints followed by short breaks—can help prevent burnout and minimize the risk of losing hours chasing rabbit holes. Even if you choose not to use a formal time-management method, entering the exam with a clear plan is far more effective than charging in with a purely reactive mindset. Some approaches that merit attention include capping your focus on a single challenge to 60-90 minutes before pivoting to another, or pre-allocating specific blocks of time to each machine/challenge set in the exam.
Your time-management strategy should also account for the maintenance of your own body: plan your meals in advance, step away from the screen while eating, and stay well hydrated. If possible, build in time on test-day for light aerobic activity—such as a quick jog, a walk with the dog, or a short set of bodyweight exercises like jumping jacks, mountain climbers, or burpees. Brief physical movements can help re-energize your mind, reduce stress, and boost cognitive performance.
To help anchor your experience and reduce anxiety, consider designing personal pre- and post-exam rituals. The night before, do something relaxing—like casually reviewing your notes, solving an easy HTB machine, or writing encouraging Post-it notes to stick on your wall. Set your clothes, snacks, and water up like you’re getting ready for a marathon—because in many ways, you are. After the exam, give yourself a buffer to recover, reflect, and decompress. Personally, I like to go out with friends, play nostalgic video games, or grab a Guinness. Whatever your rituals look like, make them personal and genuinely rewarding.
Finally, I encourage all students to embrace the result of the exam, pass or fail. The OSCP is not the final word on your skills—it’s a checkpoint, not a verdict. In fact, failing by a narrow margin can often be more educational—and ultimately more empowering—than barely passing. By adopting a growth mindset, you can view a missed attempt not as a reflection of your limitations, but as an opportunity to walk away with clearer insight into your strengths and gaps. This self-awareness can be carried with confidence into job interviews, real-world engagements, and the refinement of your study plan. We’ll explore this topic more deeply in the next post.
Building sustainable and empowering exam habits isn’t just about getting through a difficult 24 hours; it’s about establishing a process you can carry into future certifications, real-world assessments, and high-stakes professional challenges. By developing tenable and fulfilling exam-day practices with intent, you give yourself the best possible chance to succeed—not just in the exam, but in the career that follows.
Don’t Risk Your Exam Attempt
The OSCP certification is a multi-thousand dollar investment, so the last thing any student wants is to have their attempt invalidated due to a preventable mistake or misunderstanding that results in an accusation of academic misconduct. Rather than viewing the exam solely as a test of technical skill, candidates should approach it as a professional engagement with clearly defined operational and ethical boundaries. To safeguard the time, effort, and money you’ve invested in the OSCP journey, it’s imperative to read every instruction carefully, double-check your testing environment, and follow OffSec’s exam-day guidelines to the letter.
As one of the most recognized credentials in cybersecurity, the OSCP carries significant industry weight—and OffSec therefore takes the integrity of its exam process seriously. In 2018, in response to growing concerns about cheating, OffSec introduced an online proctoring system to the exam. Candidates are required to verify their identity with a government-issued ID and maintain continuous screen sharing and webcam visibility during the first ~24 hours of the exam.
In 2019, an individual using the handle cyb3rsick publicly released write-ups for several [now retired] OSCP exam machines, reportedly in protest of the exam’s format, which they claimed “allowed thousands of [students] to cheat and pass the exam”. Coverage of the incident highlighted both the controversy and the industry’s reaction. In response, OffSec published a blog post that provided insight into the organization’s anti-cheating measures. These include: relying on community reports, monitoring suspicious groups or individuals, modifying exam systems on a “regular basis”, using undisclosed detection mechanisms during grading, and online proctoring. Most notably, OffSec emphasized that cheaters may face severe consequences—including potential legal action. As stated in their post, “cheaters have lost their certs, paid fines, lost their jobs, and been embarrassed in front of their peers”.
Some stories involving failed exam attempts, revoked certifications, or bans appear to stem from accidental missteps rather than deliberate misconduct. While it’s clear that OffSec has taken meaningful action against individuals who have knowingly violated academic integrity policies, it’s also reasonable to acknowledge that some cases may result from honest mistakes, misunderstandings, or technical issues. One example occurred in 2019, when a student used the common Linux/Unix* post-exploitation enumeration tool, LinPEAS, during their exam. At the time, a recent update to the script had introduced an auto-exploitation feature, which resulted in the student escalating privileges immediately on the target host. Because the Exam Restrictions prohibit the use of tools with auto-exploitation capabilities, the student initially received a failing grade. OffSec later addressed the incident in a blog post, and the student reportedly had their result overturned and was awarded a passing grade. There have also been multiple incidents of students losing their certifications after their private exam reports were leaked or stolen and subsequently used by others to cheat—an issue OffSec has acknowledged in their Support Portal.
This section is not intended to criticize or undermine OffSec’s authority to vigorously pursue cases of academic misconduct or copyright infringement, but rather to inform aspiring OSCP-certified professionals—especially those acting in good faith—on how to conduct themselves confidently and transparently on exam day.
To align with OffSec’s expectations for a successful exam day, I recommend the following:
Revisit the OSCP Exam Guide and PEN-200 Reporting Requirements a week or two before your exam; consider incorporating them into a Requirements or Rules of Engagement section in your report template to reinforce them into memory
Keep the proctoring window visible at all times, reply promptly to requests, and reconnect your camera immediately if it becomes disconnected
Store your phone in a separate room and notify others that you’ll be unreachable during the exam
Before the exam, take inventory of your toolkit and review each utility’s documented functionality to ensure it doesn’t include features that OffSec prohibits (e.g., spoofing, automatic exploitation, commercial services) and keep a record of any new tools you use during the exam; this level of caution is also applicable to real-world engagements, where it is important to fully understand the behavior and implications of the tools you deploy in a client environment
Keep all notes local; avoid accessing documents stored on cloud platforms (e.g., GitHub, GitLab, or OneNote)
Terminate unnecessary screen-sharing programs (e.g., Discord, Zoom, Teams); even idle background processes can raise red flags
Use a single device and identity throughout the exam; ensure the name on your ID matches your OffSec registration details, complete the exam on a single authorized system, and terminate any third-party virtual private network (VPN) applications—as changing IP addresses mid-exam may be interpreted as location switching
Minimize physical and digital movement; don’t leave the camera’s view without telling the proctor, and avoid switching desktops, using unrelated virtual machines (VMs), or removing hardware devices
Never download artifacts from the exam environment to your local machine; all work should remain within your VM
Be mindful of physical cues that might appear suspicious on camera, such as repeated glances away from the screen, whispering, interacting with unmonitored people, or unexplained movements
If you’re referencing notes from a previous attempt, inform the proctor to distinguish it from reused or plagiarized content
Have a backup device and mobile hotspot ready in case of system failure or internet loss
Consider creating a clean system user profile just for the exam to reduce redundant applications and protect your privacy
If, despite following this advice, you’re still found guilty of academic misconduct, stay calm and professional. Cooperate fully with the investigation, be honest and transparent, and avoid becoming defensive—it’s important not to escalate the situation. Instead, politely request specific details regarding the accusation, seek to understand the exact concerns, and explain any misunderstood behavior or tools (e.g., a tool that was not on the shortlist of restricted software but raised concern). If you’re unsatisfied with the outcome, wait a week or two to cool off before submitting a formal appeal to challenges [at] offsec [dot] com. Maintain the same professional and respectful tone in your appeal as you did during the investigation.
On a final note, it’s important to acknowledge that OffSec exams involve a high degree of monitoring. Your screen is shared throughout the exam, you’re under near-continuous video surveillance, and you must perform a 360-degree scan of your workspace to confirm that no unauthorized devices or individuals are present. Before beginning the exam, Windows users are required to execute a proctor-provided PowerShell script that gathers system information and lists running processes—likely to flag potentially unauthorized tools. Out of an abundance of caution, it’s a good idea to clean up your local system before exam day; remove any personal files or unfamiliar tools that could trigger concern. For more details on how OffSec collects and processes personal data, refer to their Privacy Policy.
OffSec has every right (and responsibility) to uphold the integrity of its certification, but that doesn’t make the proctoring process any less stressful for honest students. Trying to be diplomatic while raising a nuanced point, it’s fair to say that even well-intentioned candidates may find themselves under scrutiny. By taking proactive steps to minimize ambiguity in your environment and interactions with the proctors, you not only protect your OSCP investment but also reinforce the professional habits OffSec aims to instill through its arduous exam process.
Conclusion
Feel free to leave a comment with any questions, feedback, or additional advice to contribute to this discussion. In the final post of this series, I’ll cover what students should do after each OSCP exam attempt—whether they pass or not.
NTLM relay attacks have been around for a long time. While many security practitioners think NTLM relay is a solved problem, or at least a not-so-severe one, it is, in fact, alive and kicking and arguably worse than ever before. Relay attacks are the easiest way to compromise domain-joined hosts nowadays, paving a path for lateral movement and privilege escalation.NTLM relay attacks are more complicated than many people realize. There are a lot of moving parts that operators have to track using
NTLM relay attacks have been around for a long time. While many security practitioners think NTLM relay is a solved problem, or at least a not-so-severe one, it is, in fact, alive and kicking and arguably worse than ever before. Relay attacks are the easiest way to compromise domain-joined hosts nowadays, paving a path for lateral movement and privilege escalation.
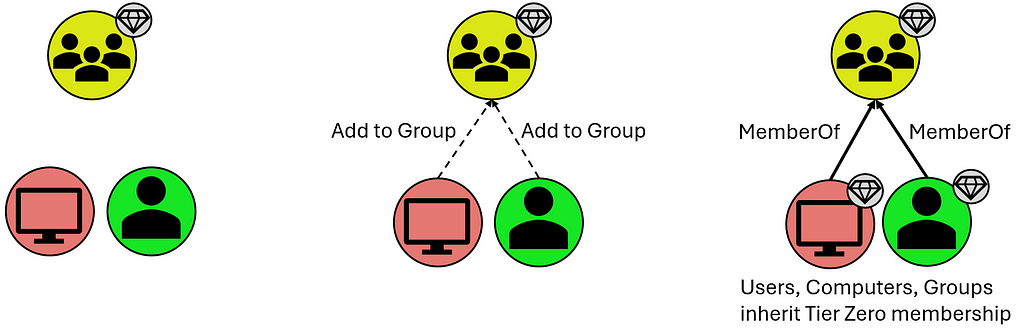
NTLM relay attacks are more complicated than many people realize. There are a lot of moving parts that operators have to track using different tools, but we have recently introduced NTLM relay edges into BloodHound to help you keep on thinking in graphs with new edges that represent coercion and relay attacks against domain-joined computers, originating from Authenticated Users and leading into the computer that could be compromised via SMB, LDAP/LDAPS, and ADCS ESC8. Each of these edges is composed of different components and prerequisites, but they all follow the same “Zero to Hero” pattern from Authenticated Users to the would-be compromised computer.
While there are many great resources on this old attack, I wanted to consolidate everything you need to know about NTLM into a single post, allowing it to be as long as needed, and I hope everyone will be able to learn something new.
Once Upon a Time
NTLM is a legacy authentication protocol that Microsoft introduced in 1993 as the successor to LAN Manager. NTLM literally stands for New Technology LAN Manager, a name that didn’t age well. While Kerberos is the preferred authentication protocol in Active Directory environments (and beyond), NTLM is still widely used whenever Kerberos isn’t viable or, more commonly, when NTLM usage is hard-coded.
NTLM Fundamentals
My favorite research area is authentication protocols, and over the years, I’ve noticed that every authentication protocol is designed to thwart one or two primary threats. For NTLM, I believe it is replay attacks. Not relay attacks (obviously, given the title), but replay attacks, where an attacker intercepts a valid authentication exchange and replays the packets/messages later to impersonate the victim. NTLM prevents such attacks using a challenge-response exchange: the server generates a random challenge, and the client produces a cryptographic response that proves possession of the client’s credentials.
The NTLM authentication exchange involves a three-message exchange:
The Negotiate (type 1) message is sent from the client to the server to initiate authentication and negotiate session capabilities, such as a session key exchange and signing (more on those later), through a set of flags indicating the client’s supported/preferred security attributes for the session.
The Challenge (type 2) message is sent from the server to the client. It contains a corresponding set of flags indicating the server’s supported/preferred session capabilities and an 8-byte randomly generated nonce, known as the server challenge.
The Authenticate (type 3) message is sent from the client to the server. It contains a set of flags indicating the determined session capabilities based on the client’s and server’s preferences and a cryptographically generated response to the server challenge. There are two major NTLM response generation algorithm versions: NTLMv1 and NTLMv2.
The server then validates the response to authenticate the client. Local accounts are validated against the NT hashes stored in the local SAM, and domain accounts are sent to a domain controller for validation via the Netlogon protocol.
NTLMv1
NTLMv1 is the original response algorithm. It was developed in 1993, in the unfortunate days when DES was the standard encryption algorithm, so that’s what Microsoft used to generate the response, as described in the diagram below:
As shown above, the client’s password is transformed into an NT hash, which is the MD4 hash of the Unicode-encoded password, to be used as the DES encryption key. However, there was a little hiccup: the NT hash was 16 bytes, while the effective DES key length was 7 bytes. Microsoft came up with a creative solution — split the NT hash into three keys: the first seven bytes, the following seven bytes, and the last two bytes padded with zeros. Each of these keys encrypts the server challenge three times independently, and the ciphertexts are concatenated to produce a 24-byte-long response.
NTLMv1 is Bad
NTLMv1 turned out to be a bad idea for three main reasons:
First, DES encryption is… not great, as it can be cracked relatively easily.
Second, the response isn’t “salted”, meaning that the same password and server-challenge combination always produces the same response, making it susceptible to rainbow table attacks.
Third, combining the two previous reasons makes one of my all-time favorite attacks, discovered by Moxie Marlinspike and David Hulton. They managed to recover the raw NT hash by cracking each of the three ciphertexts individually, using rainbow tables and custom hardware. Why should we care about the NT hash? After all, it’s not a password, right? We’ll discuss the infamous Pass the Hash attack soon.
“NTLM2” Precedes NTLMv2
Just for completeness, I’ll mention “NTLM2”, also known as “NTLM2 Session Response” or “NTLMv1 with Enhanced Session Security”. This interim version between NTLMv1 and NTLMv2 introduced an 8-byte client-generated nonce, known as the client challenge. The client challenge was concatenated with the server challenge, and then the combined value was MD5-hashed and, finally, DES-encrypted as in NTLMv1. This enhancement ensured every response was unique and thwarted rainbow table attacks. However, the algorithm is still fundamentally flawed, and the NT hash can be recovered with modern GPUs within less than 24 hours, on average, at a cost of about $30.
NTLM2 is just a distraction, though. Feel free to forget you ever read the paragraph above.
NTLMv2
Shortly after, still in the ’90s, Microsoft released NTLMv2, replacing DES encryption with HMAC-MD5, as described below. This algorithm is still in use today.
The NT hash is used as the key to generate an HMAC of the client’s domain name and username. It is called the “NT One Way Function v2” or NTOWFv2. The NTOWFv2 HMAC value is then used as the key to generate another HMAC, this time of the server challenge, along with additional information, such as a random client challenge and a timestamp to thwart rainbow table attacks, and additional session attributes, which we will discuss later. This HMAC value is the NT Proof String or NTProofStr. Many people mistakenly think that the NTProofStr is the NTLMv2 response, but it is only part of it. All the additional information used to generate the NTProofStr is also included in the NTLMv2 response to allow the server to generate the same HMAC and validate the client’s response.
LM Compatibility Level
Every Windows host acts as both a server, when someone authenticates to it, and a client, when it authenticates to another host. A single registry value controls both the server and client NTLM version support, located at HKLM\System\CurrentControlSet\Control\Lsa\LmCompatibilityLevel. It allows enabling/disabling NTLMv1 and NTLMv2 for the entire host as a server and as a client, as described in the table below:
When a client authenticates to a member server using a domain account, the server sends the response to a DC for validation. Therefore, the DC’s LmCompatibilityLevel is the one that determines whether NTLMv1 is accepted or not. Note that different DCs can technically have different configurations. However, it is very uncommon to see DCs with LmCompatibilityLevel set to 5 (I’ve never seen that outside of lab environments), so it’s safe to assume the DC will support both NTLMv1 and NTLMv2, as a server, for domain accounts.
It is not uncommon to see DCs with a lower LmCompatibilityLevel. I believe the reason is that some sysadmins mistakenly think that a lower LmCompatibilityLevel is required to support NTLMv1 clients in the domain, while, in fact, they just enable NTLMv1 on the DCs as clients, which can have dire consequences, as we will explain soon.
Looking at the table above, we can make a few observations:
As a client, a Windows host can have either NTLMv1 or NTLMv2 enabled but not both.
As a server, a Windows host will likely enable both NTLMv1 and NTLMv2.
If a Windows host enables NTLMv1 as a client, it must also enable it as a server.
A Windows host doesn’t have to enable NTLMv1 as a client to enable it as a server.
Additional settings allow restricting or auditing outgoing or incoming NTLM authentication or requiring session security settings, but we won’t elaborate on those.
Password Cracking is a Problem
There are different tools for capturing NTLM responses for cracking. Responder is the most well-known and widely used tool, but Inveigh and Farmer deserve an honorable mention, too.
An attacker can potentially crack a captured NTLM exchange, whether it’s NTLMv1 or NTLMv2, to recover the password if it is not sufficiently strong. In the case of NTLMv1, the NT hash can always be recovered, and it can be abused in a couple of ways. If it is a computer/service account, the attacker can forge an RC4-encrypted Kerberos silver ticket and impersonate a privileged account to the host or the service. The NT hash can also be used for NTLM authentication, without cracking the cleartext password, through the infamous Pass the Hash attack.
Pass the Hash
When taking a closer look at the NTLMv1 and NTLMv2 flows, you may notice that, technically, we don’t need the cleartext password to produce a valid NTLM response. If we skip the first step in the flow, the NT hash is all we need.
Who Needs to Crack Passwords Anyway?
The real problem with NTLM is relay attacks. An attacker can simply relay the NTLM messages between a client and server, back and forth, until the server establishes a session for the client, allowing the attacker to perform any operation the client could perform on the server. For clarity, we will refer to the client as the “victim” and the server as the “target”.
Relay attacks allow authenticating as the victim to the target without spending time and resources on password cracking and without depending on weak passwords.
Not an Opportunistic Attack
Some defenders belittle relay attacks because they seem to be somewhat opportunistic. However, relay attacks can be executed with intention and precision when combined with authentication coercion attacks.
Generally, the mechanics of computer account authentication coercion and user account authentication coercion are different.
Computer Account Authentication Coercion
Computer account authentication coercion typically involves an RPC call to a vulnerable function on a remote host (the relay victim). Specifically, we’d try to call a function that would attempt to access an arbitrary path we can control. Then, when the remote service attempts to access the specified path, we’d require authentication and kick off a relay attack. The remote service would authenticate as the relay victim computer account if the service runs as SYSTEM or NETWORK SERVICE and if it doesn’t impersonate a different context before attempting to access the resource.
The two most notable computer authentication coercion primitives are the Printer Bug and PetitPotam. The Printer Bug abuses the function RpcRemoteFindFirstPrinterChangeNotification[Ex] in the Print Spooler service, which establishes a connection to an arbitrary path to send notifications about print object status changes. PetitPotam abuses several functions in the Encrypting File System (EFS) service, such as EfsRpcOpenFileRaw, which opens a file in an arbitrary path for backup/restore. These techniques result in an immediate authentication attempt from the victim computer account without user interaction.
Authenticated Users are permitted to trigger these computer account authentication coercion attack primitives, allowing almost anyone to initiate the relay attack.
User Account Authentication Coercion
User account authentication coercion is more complicated and, in some cases, somewhat opportunistic. The classic user account authentication coercion primitives involve planting a reference to an external resource in a document, email, or even a web page. When the victim renders the document, the client attempts to load the resource, sometimes without their knowledge or consent, and initiates an authentication attempt with the user’s credentials. These primitives require one to three clicks and can be sent directly to the victim or strategically planted in a high-traffic shared folder or website for a watering hole attack.
Dominic Chell highlighted a more sophisticated, well-known approach that abuses Windows Shell. Windows Shell is the operating system’s user interface. It has extensions and handlers that enrich the user experience, for example, by generating thumbnails/previews or customizing icons. Specially crafted files can manipulate these mechanisms to access arbitrary paths as soon as the operating system “sees” them, without any user interaction. The most common way to abuse it is to pass to the icon handler a reference to an attacker-controlled path, which would result in a user authentication attempt as soon as the user browses the folder in which the file is located, even if the user doesn’t even click or highlight the file. The most notable file types that support this kind of manipulation are:
Windows Search Connectors (.searchConnector-ms)
URL files (.url)
Windows Shortcuts (.lnk)
Windows Library Files (.library-ms)
For example, the following URL file would try to load its icon from the path \\attackerhost\icons\url.icon from the user’s security context, so it authenticates with the user’s credentials.
Attackers can drop these files in strategic file shares, such as high-traffic file shares or those frequently used by privileged users, and then kick off a relay attack as soon as an authentication attempt comes through.
Credential Abuse Without Lateral Movement
Traditionally, when attackers gain admin access to a host with an interesting logged-on user, they would move laterally to that host and then attempt one of many credential abuse techniques to impersonate the user and continue maneuvering toward their objectives. However, as EDRs and other endpoint security solutions improve, the detection risk of lateral movement and credential abuse TTPs increases.
Instead, attackers can reduce the detection risk by accessing the remote file system via an administrative share, such as C$, and dropping an authentication coercion file on the logged-on user’s desktop. The moment the file is dropped, Windows Shell starts processing it, and an authentication attempt to the attacker-controlled host is initiated. It works even if the file is hidden, the workstation is locked, or the RDP session is disconnected. More specifically, it works as long as explorer.exe runs in a suitable security context, meaning it is associated with a logon session with credentials cached in the MSV1_0 authentication package.
The attacker can try to crack the NTLM response to recover the password or establish a session on a target server by relaying it.
Taking Over 445
In case you missed it, it is possible to bind a listener to port 445 on Windows hosts without loading a driver, loading a module into LSASS, or requiring a reboot of the Windows machine, as Nick Powers discovered last year.
Too Good to Be True?
So far, NTLM relay attacks may seem very powerful and somewhat simple. However, over the years, Microsoft introduced several mitigations to complicate things.
Session Security
NTLM supports signing (integrity) and sealing (encryption/confidentiality) to secure the session. It is achieved by exchanging a session key in the NTLM Authenticate message. The client generates a session key and RC4-encrypts it using a key generated, in part, from the client’s NT hash. A common misunderstanding is that when signing is negotiated, NTLM relay attacks fail to establish a session (authenticate). However, even with signing, authentication is successful. The problem is that the attacker can’t recover the session key without possessing either the victim’s NT hash or the target’s credentials. But if the attacker possessed either of them, there would be no need for relaying anyway. Therefore, if the target indeed requires all the subsequent messages in the session to be signed with the session key, the attacker would not be able to use the session. Luckily for the attackers, not all servers implement such a requirement, as we will see soon.
The screenshot below shows a portion of a typical NTLM Authenticate message in which a session key is exchanged and signing is negotiated.
The premise of an NTLM relay attack is a man-in-the-middle position. Therefore, the attacker’s obvious next step should be tampering with this Authenticate message in flight to remove the session key and reset the Negotiate Key Exchange and Negotiate Sign flags, pretending the victim never negotiated those.
Message Integrity Code (MIC)
Microsoft anticipated such attempts and introduced an integrity check to the NTLM messages. An HMAC is added to the Authenticate message to protect all three NTLM messages with the session key. The server validates the MIC upon receiving the message, and if a single bit in any of the three NTLM messages is flipped, authentication fails.
Drop the MIC?
The MIC is a later addition to the NTLM protocol. Windows XP and Windows Server 2003 and older, as well as some 3rd party platforms, don’t support it. So, can’t the attacker drop the MIC and pretend the client never added it?
Microsoft anticipated that, too, and added an attribute to the NTLMv2 response indicating the MIC’s presence.
Therefore, an attacker would have to remove/reset that attribute before removing the MIC, but because this attribute is part of the NTLMv2 response, changing it would invalidate the NTProofStr, and authentication would fail.
Those of you who are paying attention should realize that NTLMv1 does not incorporate any additional information into the NTLMv1 response, meaning that NTLMv1 is always susceptible to MIC removal and tampering with the Negotiate flags and the session key.
A Blast From the Past
In 2019, Yaron Zinar and Marina Simakov discovered a couple of vulnerabilities in the NTLM implementation, allowing attackers to Drop the MIC even in NTLMv2. However, we will not delve into those because Microsoft released patches, and it is extremely rare to encounter Windows hosts affected by these vulnerabilities nowadays.
Channel Binding
Channel binding, also commonly referred to as Extended Protection for Authentication (EPA), is a mechanism that prevents man-in-the-middle attacks by incorporating a token from the secure channel (TLS), that is, the server certificate hash, into the NTLM Authenticate message. The server can compare the channel binding token to its own certificate hash and reject the authentication attempt if there is a mismatch. Any service running over TLS, such as HTTPS and LDAPS, can support channel binding.
Just like session security and the MIC, channel binding is not mandatory, but it is part of the NTLMv2 response, and therefore, it is protected by the NTProofStr, so the attacker can’t remove it and pretend it was never there. However, NTLMv1 does not support channel binding.
Backward Compatibility
All these mitigations are later additions to the protocol, so some older or 3rd party platforms may not support them. Therefore, they may not be required by the target server. The server behavior depends on its configuration, whether it is configured to support or even require session security or channel binding, and whether it is designed or implemented to honor the session capabilities negotiated in the NTLM exchange. Given that this is just about the midpoint of this post, you can assume it is not uncommon for targets not to require or enforce these mitigations.
Protected Users
Microsoft introduced the Protected Users security group in the Windows Server 2012R2 functional level to mitigate several attacks that can lead to credential material theft. Members of this group are not permitted to perform NTLM, and hosts running Windows Server 2012R2/Windows 8.1 or later do not cache the NT hash in LSA memory. These protections and others may have usability issues, so only privileged/sensitive accounts should be added to this group. Unfortunately, this group is too often left empty.
Not Too Good to Be True
Given everything discussed above, what are the conditions for relay attacks?
A relay attack should be viable if the target does not support these mitigations by design/implementation or configuration (disabled) or the target supports these mitigations (enabled) but does not require them, and one of the following applies:
The victim does not negotiate session security and channel binding
The victim’s session negotiation is unprotected (NTLMv1)
The target implementation ignores the negotiated capabilities
Relaying is only half the story, though. A successful relay satisfies authentication and establishes a session. However, authorization, meaning what the attacker can do afterward, depends on the victim’s permissions.
Targeting SMB
The first and simplest scenario we introduced into BloodHound is relaying NTLM to SMB. SMB servers don’t support channel binding with NTLM, and they negotiate signing at the SMB protocol level, outside the NTLM exchange, meaning that even if the victim negotiates signing in the NTLM Authenticate message, the target will disregard it and only consider what’s negotiated in the SMB headers, which the attacker can control. To be clear, configuring SMB clients to require SMB signing does not affect NTLM relay attacks.
Below is an excerpt from a typical SMB2 negotiate response message with SMB signing enabled but not required. The server is vulnerable to relay attacks if the signing required bit is not set.
Domain controllers starting with Windows Server 2008 and all Windows hosts starting with Windows Server 2025 and Windows 11 require SMB signing by default. In practice, it means that nowadays, most Windows hosts out there, especially Windows servers, don’t require SMB signing by default. Unfortunately, many organizations don’t change these defaults for the unjustified fear of backward compatibility or a myth about performance impact.
Introducing the CoerceAndRelayNTLMToSMB Edge
The new CoerceAndRelayNTLMToSMB edge is the simplest of the new NTLM relay edges. The edge always comes out of the Authenticated Users node and leads into the target computer node. It represents a combination of computer account authentication coercion against the relay victim and an NTLM relay attack against the relay target.
Collection
SharpHound collects all the required information as follows:
SMB signing status collection does not require authentication. It is collected from the relay target by actively establishing a connection with the host over SMB and parsing the SMB negotiation response messages.
Local admin rights are collected from the relay target. They can be collected from the host directly over RPC, which may or may not require admin rights, depending on the OS version and configuration, or from the DC via GPO analysis.
Outgoing NTLM restriction is collected from the relay victim via WMI or Remote Registry, which requires admin rights.
Edge Creation
BloodHound creates the edge if the following criteria are met:
SMB signing on the target computer is not required — this is the relay target. The edge will not be created if the SMB signing status is not collected/ingested into BloodHound.
At least one computer account in the environment has local admin access to the target computer — this is the relay victim.
There is no outgoing NTLM restriction on the victim host. In BloodHound Community Edition, if this data wasn’t collected/ingested, it will be assumed to be false (not restricted), as per the default configuration. In BloodHound Enterprise, this assumption is not made, and the edge will not be created.
If the domain functional level is Windows Server 2012R2, the relay victim must not be a member of the Protected Users group.
The edge is always created from Authenticated Users to the computer node representing the relay target.
Expanding the Coercion Targets accordion lists the relay victims, and expanding the Composition view shows a visual representation.
Abuse
An attacker can traverse this edge to gain access to the C$ or ADMIN$ share on the relay target, dump LSA secrets from Remote Registry, including the computer account password, or move laterally via the Service Control Manager.
A very common scenario captured by this new edge is SCCM TAKEOVER 2, coercing authentication from the SCCM site server and relaying it to the SCCM database server to take over the entire hierarchy.
SMB-Specific Limitations
The CoerceAndRelayNTLMToSMB edge only covers scenarios in which a computer (victim) has admin access to another computer (target) that does not require SMB signing. It doesn’t cover user accounts as the relay victim, and it doesn’t cover access to resources that a relay victim might be able to access via SMB without admin rights, such as non-administrative file shares.
Other limitations that apply to all new NTLM relay edges will be discussed later.
Targeting ADCS (ESC8)
The new CoerceAndRelayNTLMToADCS edge is much more complicated than relaying to SMB because certificate abuse has a lot of requirements. However, the relaying logic is still relatively simple. Relaying to ADCS web enrollment allows obtaining a certificate for the relay victim and using it for authentication to impersonate the victim. This is the infamous ADCS ESC8 that Will Schroeder and Lee Chagolla-Christensen disclosed in their Certified Pre-Owned white paper.
The ADCS Certificate Authority Web Enrollment endpoint and Certificate Enrollment Web Service run on IIS. IIS does not support session security, but it does support Extended Protection for Authentication (EPA), also known as channel binding. EPA is supported over HTTPS, but not HTTP because HTTP has no secure channel to bind. So, if web enrollment is available over HTTP or over HTTPS with EPA disabled, then relay is viable. This is the default configuration on Windows Server 2022 and older, but no longer the default on Windows Server 2025. Note that it applies to any site served on IIS with NTLM authentication, not just ADCS web enrollment.
As mentioned, relaying is all about authentication. Once authenticated, the attacker can do whatever the relay victim is permitted to do. This attack is viable only if the relay victim is permitted to enroll a client authentication certificate (requires EKUs that allow performing Kerberos PKINIT authentication or Schannel authentication to LDAP) and the CA is trusted by the domain controller and added to the domain’s NTAuthCertificates. Jonas Bülow Knudsen explains these requirements in detail in this blog post.
Introducing the CoerceAndRelayNTLMToADCS Edge
The new CoerceAndRelayNTLMToADCS edge comes out of the Authenticated Users node and leads into the victim computer node, unlike CoerceAndRelayNTLMToSMB, which leads into the relay target computer node. The reason for the difference is that the attack compromises the relay victim rather than the relay target.
Collection
SharpHound collects all the required information as follows:
Connect to the ADCS enrollment endpoints and attempt to perform NTLM authentication with and without EPA to determine if it’s enabled, required, or disabled. This can be collected without admin access.
All the ADCS certificate enrollment requirements are collected via LDAP, as done for all existing ADCS edges. This can be collected without admin access.
Outgoing NTLM restriction is collected from the relay victim via WMI or Remote Registry, which requires admin rights.
Edge Creation
BloodHound creates the edge if the following criteria are met:
The relay victim is a computer permitted to enroll a certificate with a template that meets the requirements listed below. The relay victim must have the enroll permission on the enterprise CA and the certificate template.
The certificate template has (1) EKUs that enable PKINIT/Schannel authentication, (2) manager approval disabled, and (3) no authorized signatures required.
The enterprise CA is trusted for NT authentication, and its certificate chain is trusted by the domain controller.
The enterprise CA published the certificate template.
The enterprise CA that published the certificate has a web enrollment endpoint available over HTTP or HTTPS with EPA disabled.
There is no outgoing NTLM restriction on the victim host. In BloodHound Community Edition, if this data wasn’t collected/ingested, it will be assumed to be false (not restricted), as per the default configuration. In BloodHound Enterprise, this assumption is not made, and the edge will not be created.
If the domain functional level is Windows Server 2012R2, the relay victim must not be a member of the Protected Users group.
The edge is always created from Authenticated Users to the computer node representing the relay victim.
Expanding the composition view shows all the components involved, including the certificate template and enterprise CA to target.
Abuse
After enrolling a certificate, the attacker can perform PKINIT authentication as the computer account using Rubeus to obtain a Kerberos Ticket Granting Ticket (TGT) and even the NT hash for the computer account through the UnPAC the Hash attack. With these, the attacker can compromise the relay victim host via S4U2Self abuse or a silver ticket, or use the TGT or the NT hash to access any resource that the computer account is permitted to access.
If the CA is susceptible to relay attacks, all the computers that can enroll a suitable certificate are exposed. Note that the default “Machine” certificate template meets the above criteria and exposes all the computers in the domain.
ADCS-Specific Limitations
The CoerceAndRelayNTLMToADCS edge only covers scenarios in which a computer (victim) can enroll a domain authentication certificate and the certificate authority web enrollment (target) that is vulnerable to relay attacks. It doesn’t cover user accounts as the relay victim, and it does not cover certificate templates incompatible with domain authentication.
Other limitations that apply to all new NTLM relay edges will be discussed later.
Targeting LDAP or LDAPS
The new CoerceAndRelayNTLMToLDAP and CoerceAndRelayNTLMToLDAPS edges are by far more complicated to abuse. Unlike SMB and IIS, LDAP servers are implemented to require the capabilities negotiated with the client in the NTLM exchange, meaning that if the client negotiates session security with signing, the LDAP server will require all the subsequent messages in the session to be signed with the session key.
Computer account authentication coercion can trigger authentication from the SMB client, but the SMB client always negotiates session security with signing in the NTLM Authenticate message, so SMB can’t be relayed to LDAP. The exception to this rule is clients that have NTLMv1 enabled because, in NTLMv1, the MIC can be dropped, and the Negotiate Sign flag can be reset.
But that’s not a dead end. Some authentication coercion primitives, including the Printer Bug and PetitPotam, accept WebDAV paths simply by adding the at sign followed by a port number to the hostname, e.g., “\\attackerhost@80\icons\url.icon”.
WebDAV is encapsulated in HTTP messages sent by the Web Client service, which doesn’t negotiate signing and is, therefore, compatible with relaying to LDAP. However, by default, the Web Client would only authenticate to targets in the Intranet Zone, as per the default Internet Settings.
Getting in the (Intranet) Zone
HTTP clients in Windows should call the MapUrlToZoneEx2 function to determine which zone a given URL belongs to. The function determines that a URL maps to the Intranet Zone based on the following rules:
Direct Mapping: URLs manually added to the Intranet Zone
The PlainHostName Rule (aka “The Dot Rule”): If the URL’s hostname does not contain any dots
Fixed Proxy List Bypass: Sites added to the fixed proxy bypass list
WPAD Proxy Script: URLs for which the proxy script returns “DIRECT”
If you use the host’s “shortname” (the hostname portion of the FQDN, e.g., hostname.contoso.local) or NetBIOS name, the underlying name resolution mechanisms will resolve the name to an IP address, even though the URL is “dot-less”, because DNS automatically appends a suffix based on the client’s DNS search list, which is typically configured via DHCP or GPO.
But how can we get DNS resolution for our attacker-controlled host?
Bring Your Own DNS Record
By default, Active Directory Integrated DNS allows all Authenticated Users to create DNS records via LDAP or Dynamic DNS (DDNS), as discussed in this blog post by Kevin Robertson, and can be done with his tools Powermad and Sharpmad.
WebDAV Is a Hit or Miss
Authentication coercion can trigger WebDAV traffic only if the Web Client service is installed on the host, which it is by default on Windows desktops but requires the Desktop Experience or the WebDAV Redirector feature on Windows servers. Even if it is installed, it also needs to be running, which is not the default on desktops. Most user account authentication coercion primitives will automagically trigger the Web Client service to start. However, computer accounts are more tricky. While most computer account authentication coercion primitives support WebDAV paths, they will not start the Web Client service. Therefore, when we target computer accounts, which is what we do here, we are limited to computers that currently have the Web Client service already running.
When the Web Client service starts, it opens a named pipe called DAV RPC SERVICE, so we can determine whether it is running remotely without admin rights.
One important thing to note is that when the Web Client service runs, it affects all processes running on the host in any context, not just the user who started it. Therefore, if we trigger the service to start via user account authentication coercion, for example, by dropping an authentication coercion file into a high-traffic shared folder, any user that browses the share potentially exposes the host they logged in on to NTLM relay to LDAP.
LDAP Relay Mitigations
LDAP servers support mitigating relay attacks with LDAP signing and LDAP channel binding. Each can be configured individually, and both must be enforced to prevent relay attacks. If either one isn’t, there is a bypass:
If LDAP signing is required and LDAP channel binding is disabled, the attacker can relay to LDAPS instead of LDAP, and because LDAPS encapsulates the traffic in a TLS channel, the domain controller considers the signing requirement to be met.
If LDAP channel binding is enforced and LDAP signing is disabled, the attacker can relay to LDAP with StartTLS, as discussed in this blog post, because the TLS channel is established only post-authentication.
These settings are DC-level settings, not domain-level settings, meaning that you may find different domain controllers with different configurations in the same environment.
Up until Windows Server 2025, domain controllers did not enforce these by default, and given that most organizations have not yet changed both of these settings, at this time, most domain controllers out there are vulnerable to NTLM relay attacks. However, as of Windows Server 2025, domain controllers enforce encryption (sealing) via session security on LDAP SASL bind by default, and with that new configuration, relaying to LDAP or LDAPS is no longer viable. But at this time, domain controllers running on Windows Server 2025 are still few and far between.
Note that enabling LDAP client signing does not mitigate relay attacks, as we’re not abusing LDAP clients; we are abusing web clients.
Viability Criteria
All things considered, relaying to LDAP is viable under the following conditions.
For the relay target, there is at least one domain controller that:
Is running on Windows Server 2022 or older and does not require LDAP signing or LDAPS turned on without channel binding.
Is running on Windows Server 2025 with LDAP signing explicitly disabled.
For the relay victim, the computer must either have the Web Client installed and running or have NTLMv1 enabled.
I Successfully Relayed to LDAP. Now What?
As I reiterated several times, relaying gets you through the authentication step. What you can do with the session afterward depends on the permission of the relay victim. A successful relay to LDAP would allow you to perform any action that the relay victim is permitted to perform in Active Directory, with one caveat — password change/reset must happen over an encrypted channel, so that action is possible only when relaying to LDAPS.
In this scenario, we coerce and relay a computer account to LDAP or LDAPS. In this case, it is very unlikely that the relay victim, a computer account, would have high privileges in the domain. However, computers are allowed to change some attributes of their own computer account, including:
msDS-AllowedToActOnBehalfOfOtherIdentity, which would allow taking over the host via Resource-Based Constrained Delegation (RBCD), as explained in detail in this post.
msDS-KeyCredentialLink, which would allow taking over the host via the Shadow Credentials attack, as explained in detail in this post. Note that a computer account is permitted to add a new value to the msDS-KeyCredentialLink attribute as a validated write, only if there isn’t an existing key credential already present. However, even if there is already a key credential present, the computer account is allowed to delete it and then add a new one, which would require relaying twice: once for deletion and a second time for the Shadow Credentials attack.
Introducing the CoerceAndRelayNTLMToLDAP and CoerceAndRelayNTLMToLDAPS Edges
The new CoerceAndRelayNTLMToLDAP and CoerceAndRelayNTLMToLDAPS edges come out of the Authenticated Users node and lead into the victim computer node, just like the CoerceAndRelayNTLMToADCS edge, because here, too, the attack compromises the relay victim rather than the relay target.
Collection
SharpHound collects all the required information as follows:
Connect to the domain controllers via LDAP and LDAPS and attempt to perform NTLM authentication with and without signing and channel binding to determine if they’re enabled, required, or disabled. This can be collected without admin access.
Connect to the relay victim via SMB to check whether the DAV RPC SERVICE named pipe is open. This can be collected without admin access.
Outgoing NTLM restriction is collected from the relay victim via WMI or Remote Registry, which requires admin rights.
Edge Creation
BloodHound creates the CoerceAndRelayNTLMToLDAP edge if the following criteria are met:
There is at least one domain controller running on Windows 2022 or older, and LDAP signing is not required.
The relay victim has the Web Client service running.
There is no outgoing NTLM restriction on the victim host. In BloodHound Community Edition, if this data wasn’t collected/ingested, it will be assumed to be false (not restricted), as per the default configuration. In BloodHound Enterprise, this assumption is not made, and the edge will not be created.
BloodHound creates the CoerceAndRelayNTLMToLDAPS edge if the following criteria are met:
There is at least one domain controller running on Windows 2022 or older, and LDAPS is available without channel binding required.
The relay victim has the Web Client service running.
There is no outgoing NTLM restriction on the victim host. In BloodHound Community Edition, if this data wasn’t collected/ingested, it will be assumed to be false (not restricted), as per the default configuration. In BloodHound Enterprise, this assumption is not made, and the edge will not be created.
If the domain functional level is Windows Server 2012R2, the relay victim must not be a member of the Protected Users group.
The edge is always created from Authenticated Users to the computer node representing the relay victim.
Expanding the Relay Targets section in the information panel lists all the affected domain controllers that can be targeted.
Abuse
As mentioned above, following a successful relay, the relay victim can configure RBCD or Shadow Credentials against its own computer account to compromise the host. In addition to that, if the computer account happens to have any abusable permissions in Active Directory, those will be viable as well, with the caveat that the ForcePasswordChange edge (password reset) is only abusable via LDAPS and not via LDAP.
In the real world, it is very common to find domain-joined workstations with the Web Client running, and domain controllers are very rarely configured to require both LDAP signing and channel binding or run on Windows Server 2025, so this is a very rel(a)yable way to compromise domain-joined hosts. It is even more common to abuse this technique for local privilege escalation on domain-joined workstations due to the ease of turning the Web Client service on and coercing authentication from SYSTEM as a low-privileged user.
LDAP-Specific Limitations
You may have noticed that BloodHound currently doesn’t take NTLMv1 into consideration for edge creation.
Another important limitation to note is that the CoerceAndRelayNTLMToLDAP and CoerceAndRelayNTLMToLDAPS edges are created based on the current Web Client service status, but it is very dynamic. The fact that the service was not running on a host during collection does not mean it will remain that way and that the host is not exposed.
General Limitations
So far, we have mentioned some limitations affecting specific edge types. There are also limitations affecting all the new NTLM relay edges:
Only computer account authentication coercion scenarios are considered. User authentication coercion is out of scope at this time.
Only coercion scenarios are considered. Opportunistic relay attacks, i.e., waiting for a suitable relay victim to authenticate to an attacker-controlled host, such as authenticated vulnerability scanners, are out of scope.
Firewalls or sorts and network restrictions are out of scope and not taken into consideration for these new relay edges, just as they were not taken into consideration for any of the previous BloodHound edges.
We also make a general assumption that computer account authentication coercion can be triggered by Authenticated Users, as explained earlier.
Future Work
We plan to introduce additional relay edges in the future. We already have relay to MS SQL and WinRM on our roadmap. We are always open to suggestions if you have additional ideas/requests.
NTLM Abuse Strategy
Let’s take everything covered in this post and put together an NTLM abuse strategy.
First, let’s make some observations and assumptions:
NTLM challenge-response capture is less noisy than NTLM relay, but cracking depends on the strength of the password.
User authentication coercion can trigger the Web Client service to start, but computer authentication coercion can’t.
Scanning for hosts with the Web Client service running can be noisy. Similarly, collecting session information is noisy or even impossible without local admin rights.
NTLM relay attacks should be precise on red team operations. The “Spray and Pray” approach should be avoided.
Given the above, I propose the following approach:
At the beginning of an op/assessment, cast a wide net for user authentication coercion through watering hole attacks on high-traffic file shares or web pages. Try to coerce and capture both WebDAV and SMB traffic if you can. SMB is sometimes more likely to succeed, but this is your opportunity to start the Web Client service on every affected client.
As you capture NTLM responses, keep track of where users authenticate from — it tells you where they have a session. It is, in a way, passive session collection.
Attempt to crack passwords of interesting accounts that can help you escalate privileges or achieve your objectives. Don’t waste your GPU on meaningless accounts.
If you identify an interesting user but can’t crack the password, it’s time to relay.
Target the computer on which the user was active and compromise it via relay to ADCS (ESC8) or via relay to LDAP/LDAPS (RBCD or Shadow Credentials).
Once you gain admin access to the host, you can potentially avoid the risk involved in lateral movement and credential abuse by placing an authentication coercion file on the user’s desktop via the C$ share and relaying the NTLM exchange to the target resource.
What is Microsoft Doing About It?
Microsoft has been making efforts to mitigate these attacks. As I mentioned, relaying to LDAP is no longer possible against domain controllers running Windows Server 2025, and all Windows 11 and Windows Server 2025 hosts now require SMB signing by default. It’s a good start.
Microsoft has been working on a much more significant initiative to deprecate NTLM altogether. They’ve identified the following reasons why Windows hosts still use NTLM and have started working on solutions:
Until recently, the only option for local account authentication was NTLM. Microsoft is in the process of rolling out a “local KDC” to support Kerberos authentication for local accounts.
When clients don’t have a line of sight to a domain controller, they can’t obtain Kerberos tickets and have to fall back to NTLM. Microsoft is in the process of rolling out IAKERB, which will turn every Windows host into a Kerberos proxy.
Kerberos authentication requires mapping the resource that the client is trying to access to a service account. This is done through service principal names (SPN). SPNs usually use hostnames rather than IP addresses, so when a client attempts to access a resource by IP address, Kerberos authentication typically fails. However, as of Windows Server 2016, SPNs support SPNs with IP addresses.
Most NTLM usage is a result of software hard-coded to call the NTLM authentication package instead of the Negotiate package, which wraps Kerberos and NTLM and negotiates the most suitable option. Microsoft has been working on fixing these hard-coded issues in its own software, and, rumor has it, they have also been working with 3rd parties to fix their code.
Microsoft intends to have NTLM disabled by default (not completely removed), which means that even when the day finally comes, we will likely still find organizations that turn it back on, just as we still find hosts with NTLMv1 enabled. Last I heard, Microsoft had plans to have it done by 2028, but I believe they are already behind schedule, and, if history has taught us anything, we should expect it will take much longer than that.
Kerberos is NOT the Solution
For many years, people thought that Kerberos was not susceptible to relay attacks because it is based on tickets, and every ticket is issued to a specific service, so you can’t relay it to arbitrary targets. But that’s no longer the case. As James Forshaw discovered and Andrea Pierini weaponized, there are authentication coercion primitives that allow the attacker to control the service name for which the relay victim obtains a Kerberos ticket. These coercion primitives negotiate session security with signing, so they can’t be relayed to LDAP/LDAPS. However, they are compatible with relaying to SMB and ADCS.
Therefore, disabling NTLM is not the solution. Ensuring all servers enforce signing and channel binding is the right way to mitigate relay attacks.
We may add Kerberos relay edges to BloodHound in the future. Until then, you can be confident that whenever you see CoerceAndRelayNTLMToADCS or CoerceAndRelayNTLMToSMB edges, you can relay either NTLM or Kerberos.
Why Are We Releasing It Now?
There are many misconceptions about the problem and the solution for the NTLM relay problems. The new edges we introduced into BloodHound will hopefully bring clarity and put it in the spotlight, helping organizations prioritize one of the most significant yet underestimated risks affecting Active Directory environments.
Better Remediation Strategies
The remediation guidance for NTLM relay attacks is often “enforce everything, everywhere”, which is not very practical in a large environment that requires backward compatibility. However, BloodHound now helps defenders see what’s actually viable in their environments and prioritize high-impact/exposure targets. BloodHound has a set of pre-built cypher queries that can get you started with that.
Conclusion
NTLM relay attacks are far from dead. In fact, they’re often easier to execute and more effective than many security practitioners realize. This old technique remains one of the paths of least resistance in modern Active Directory environments, routinely enabling trivial pivots to high-value targets. The introduction of NTLM relay edges in BloodHound has made identifying and visualizing these attack paths remarkably simple: with just a few clicks, an operator can see how Authenticated Users can relay their way from zero to hero. In other words, BloodHound now depicts, with clear, intuitive edges, what once required stitching together information from multiple tools, showing defenders the real risks they face while allowing attackers to, once again, think in graphs.
As part of my role as Service Architect here at SpecterOps, one of the things I’m tasked with is exploring all kinds of technologies to help those on assessments with advancing their engagement.Not long after starting this new role, I was approached with an interesting problem. A SQL Server database backup for a ManageEngine’s ADSelfService Plus product had been recovered and, while the team had walked through the database recovery, SQL Server database encryption was in use. With a ticking clock
As part of my role as Service Architect here at SpecterOps, one of the things I’m tasked with is exploring all kinds of technologies to help those on assessments with advancing their engagement.
Not long after starting this new role, I was approached with an interesting problem. A SQL Server database backup for a ManageEngine’s ADSelfService Plus product had been recovered and, while the team had walked through the database recovery, SQL Server database encryption was in use. With a ticking clock, the request was clear… can we do anything to recover sensitive information from the database with only a .bak file available?
One of the things that I love about this job is getting to dig into various technologies and seeing the resulting research being used in real-time. After some research, we had decryption keys, a method of decrypting sensitive data, and DA credentials extracted and ready to go!
This post will explore how this was done, look at how SQL Server encryption works, introduce some new methods of brute-forcing database encryption keys, and show a mistake in ManageEngine’s ADSelfService product which allows compromised database backups to reveal privileged credentials.
Manage Engine Protected Data
Let’s start with Manage Engine’s ADSelfService product. Documentation shows that Domain Admin credentials are likely present:
If we setup this tool in a lab environment, we find encrypted fields such as the below USER_NAME column:
Further, if we review the configuration of the database, we see that this is SQL Server’s builtin encryption functionality that is being used to protect these fields. So the mission is clear: we need to understand SQL Server Encryption before we can hope to retrieve this data in cleartext.
SQL Server Encryption Overview
The root of the cryptography chain in SQL Server is the Service Master Key (SMK). This key is associated and stored in the master database for the server.
At a database layer, the Database Master Key (DMK) is the start of the encryption chain for each database. This diagram from Microsoft gives a brilliant visualisation of this in action:
For us to explore this encryption functionality, let’s run a few TSQL commands on a lab instance of SQL Server 2019.
First up, we create a new database and master key:
USE CryptoDB;
CREATE MASTER KEY ENCRYPTION BY PASSWORD='Password123'
We can then view our created master key with:
SELECT * FROM sys.symmetric_keys
Now this doesn’t show the actual content of the master key. Instead, to see this, we can use the query to list encryption keys in a database:
SELECT * FROM sys.key_encryptions
The crypt_property field shows our newly created master key in some form. We can also see that the crypt_type and crypt_type_description fields give a good indication as to each key’s type.
After searching Microsoft’s documentation for how these keys are actually stored, or ways that we can extract them, I found a few snippets of information:
Unfortunately none of this is useful for our purpose, so into the disassembler and debugger I needed to go.
Strap In Peeps.. We’re Going Low Level!
For this exercise, it usually makes sense to try and find a good lead as to the APIs that Microsoft SQL Server may use to handle encryption/decryption. My lab ran SQL Server 2017 on Microsoft Windows Server 2019 and installing WinDBG Preview was too much of a pain without access to the Windows Store, so I spun up API Monitor and hooked the Crypto APIs to see if anything indicated their use during cryptographic operations on SQL Server. We execute the TSQL to open the master key and:
As far as indicators go, this was a good one. We see that BCryptHashData was used along with a password provided during the opening of the database master key.
The important part for us is the call stack, which showed sqllang.dll and sqlmin.dll were prime candidates for reversing:
Symbols were available for both of these dynamic-link libraries (DLLs) are grabbed using symchk.exe:
Service Master Key Encryption
Let’s look at how the Service Master Key is generated and stored on SQL Server. This is the root of the encryption chain as shown in Microsoft’s diagram, so if we can find a vulnerability here, or some method of cracking this key, everything else will fall!
We know that a Database Master Key is encrypted using the Service Master Key. We also know from Microsoft’s documentation that this is likely protected using the data protection APIs (DPAPIs), which means that if we add a breakpoint on CryptUnprotectData / CryptProtectData and create a new DMK, we are in with a shot of seeing where in SQL Server is responsible for using the SMK.
To create the new key we use:
CREATE MASTER KEY ENCRYPTION BY PASSWORD='Password123'
And we hit a breakpoint with a valuable stack trace:
Here we see two method calls which tell us a story:
CSECDBMasterKey::Decrypt
CSECServiceMasterKey::Initialize
This makes sense, because we know that the SMK is used to decrypt the DMK and the DPAPI should protect the SMK.
We can pull out the arguments to CryptoUnprotectData and find the following value being decrypted:
And if we use the following TSQL query:
SELECT * FROM master.sys.key_encryptions
We find that the encrypted SMK matches the encrypted key stored in the master database:
Another caveat is a value passed to CryptUnprotectData as the optional entropy value. After a bit of digging, we find that this value is taken from the registry key:
Unfortunately with only the database backup that we hold for ADSelfService, this isn’t an option, so we move onto the next crypto layer, the Database Master Key.
Database Master Key Encryption
With DPAPI being used to protect the SMK, next up we tackle the DMK to see what we can unearth here.
We know from our TSQL that when we initialized the DMK, we used a password:
CREATE MASTER KEY ENCRYPTION BY PASSWORD='Password123'
This password is surely a weak link in the chain, but there are a few questions that come up:
How is this password stored in the database?
Is all of the keying material for this password stored in a database backup?
Can we bruteforce this key?
First up, we need to understand how this key is actually stored in the database. We attach a debugger to SQLServr.exeand use a password to attempt to open the DMK:
OPEN MASTER KEY DECRYPTION BY PASSWORD='ABCDE'
We add breakpoints to the previously observed BCrypt suite of APIs and we find that, after being executed, we land on a method called BCryptHashData:
The call stack shows where this is invoked:
What’s interesting is the use of the word Obfus in the method CMEDProxyObfusKey::SearchEncryptionByUserData . Obfuscation usually means something fishy is going on, so we dig into this method a bit more and we find reference to a key thumbprint:
Add a breakpoint to ComparePartialThumbPrint and attempt to open the master key again with an invalid password using:
OPEN MASTER KEY DECRYPTION BY PASSWORD='password123'
This time we find that our password is passed to this method as an argument, along with the unicode byte length:
But what is this being compared to? Dumping the third argument to this method call shows the following memory content:
This is not something that we’ve seen so far, but a bit of digging in SQL reveals the following table (requires DAC / diagnostic connection on a live database):
SELECT * FROM sys.sysobjkeycrypts
This looks similar to the previous sys.key_encryptions table; however, the thumbprint value is populated this time. What is going on here?
At this point, we know that the thumbprint is being used alongside our plaintext password. Let’s look in ComparePartialThumbPrint to see what the comparison is doing.
First the provided password is hashed:
Then the hash is salted:
And then the result is compared to the thumbprint:
If this is the case, this gives us a brilliant opportunity to create a brute-force method for our target database. After all:
All of the keying material is stored in the database (and therefore the database backup)
Nothing relates to the SMK and, therefore, DPAPI
But what are the algorithms used to hash the password? Well, in the type field of sys.key_encryptions we have a number of values:
ESKP - Observed in databases starting at SQL Server 2008
ESP2 - Observed in databases starting at SQL Server 2012
Starting with ESP2, if we add a breakpoint to BCryptHashData, we find that this is SHA-512 salted with 8 bytes. The resulting hash is then truncated to 24 bytes and then compared to the thumbprint.
Unfortunately for us, there is an additional step that SQL Server takes when storing the SHA-512 hash of the DMK: the hash truncates to 24 bytes.
This step alone appears to put it out of the reach of stock Hashcat rules; however, if we turn to John The Ripper, we have the option of Dynamic Rules.
A warning in advance: this is going to be slow, but we can add the following dynamic rule which will crack ESP2 keys:
Brute-Forcing the ManageEngine Hashed Database Master Key
So now we have a technique to hopefully recover database encryption keys. We cross our fingers and look in our target database backup and we find ESKP. This means that we have a DMK protected using MD5 and, thankfully, a GPU cracking rig just waiting for us to feed it hashes!
Adding our hash to a file, we fire up our cracking job and…nothing.
The key hasn’t been rotated in a long time. Experience tells us that something is wrong here, so I did what I should have done in the first place. I spun up a local instance of ManageEngine to take a look at what was happening.
After reviewing, I found a file named product-config.xml, which looks like this:
The masterkey.password property has a value of 23987hxJ#KL95234nl0zBe, and if we throw this into our new method of cracking database encryption keys, we find that it cracks.
More concerningly, I then try this against the provided .bak file from the client environment and it cracks!
So what is this key: just a hardcoded value? A quick throw of this password into Google and…
The key is the example key used in Microsoft’s documentation for setting up a DMK!
TADA, dopamine hit! Using the database backup, we can now unseal the certificate and symmetric keys ManageEngine uses for decryption and pull out those sensitive credentials:
use DATABASE_NAME_HERE -- Update to contain the restored database name
OPEN MASTER KEY DECRYPTION BY PASSWORD = '23987hxJ#KL95234nl0zBe'
OPEN SYMMETRIC KEY ZOHO_SYMM_KEY DECRYPTION BY CERTIFICATE ZOHO_CERT;
And we can use this to decrypt any sensitive data contained within:
SELECT CONVERT(NVARCHAR(MAX), DecryptByKey((SELECT [Password] FROM ADSMDomainConfiguration))) as Password, CONVERT(NVARCHAR(MAX), DecryptByKey((SELECT [USER_NAME] FROM ADSMDomainConfiguration))) as UserName
Here’s what we’ve learned during this exercise:
ManageEngine ADSelfService backups created use an example key Microsoft provides
If you find a database backup that uses a DMK with the ESKP type, you can brute-force the decryption password with the speed of MD5
Always lab your target product before spending so much time in a disassembler
This blog post was presented at SOCON 2025. Stay tuned for the video!
IntroductionAbout five years ago, Lee Chagolla-Christensen shared a blog detailing the research and development process behind his RequestAADRefreshToken proof-of-concept (POC). In short, on Entra ID joined (including hybrid joined) hosts, it’s possible to obtain a primary refresh token (PRT) cookie from the logged in user’s logon session, enabling an attacker to satisfy single-sign-on (SSO) requirements to cloud resources. Dirk-jan Mollema has also blogged about this capability, where he noted
About five years ago, Lee Chagolla-Christensen shared a blog detailing the research and development process behind his RequestAADRefreshToken proof-of-concept (POC). In short, on Entra ID joined (including hybrid joined) hosts, it’s possible to obtain a primary refresh token (PRT) cookie from the logged in user’s logon session, enabling an attacker to satisfy single-sign-on (SSO) requirements to cloud resources. Dirk-jan Mollema has also blogged about this capability, where he noted that these PRT cookies (and access tokens requested with them) may contain the multi-factor authentication (MFA) claim — enabling the attacker to access MFA-protected resources.
For a capability that has been publicly known for half a decade, I’ve seen shockingly little online reference to it. I’m not sure if the frequency at which I encounter cloud/hybrid joined devices has recently increased or if I was sleeping on this capability for literal years (more likely), but this tradecraft has been a serious crutch on red team operations in the last six months. While some teams out there are undoubtedly reaping the benefits of this tradecraft during routine operations, I think there are probably quite a few operators out there who, like me, came across the prior works I’ve linked to but didn’t immediately connect the dots.
This blog won’t contain any truly new information or research, but it will try to distill some operationally-focused knowledge that I learned while fumbling through this tradecraft over the last year.
Situational Awareness
A new beacon has called back to your C2 server and you want to know if this blog is applicable to you! This tradecraft will work from device joined hosts — hosts that are either Entra ID joined (cloud-only join) or hybrid joined (joined to both Entra ID and on-premises AD), so we need to identify the join state.
Relevant join information, including the join type, can be obtained by calling NetGetAadJoinInformation from NetApi32.dll. I created a small Beacon object file (BOF) to call the API, which can be found in this PR to the TrustedSec situational awareness (SA) BOF repo. We’re looking for the “Device join” join type (as opposed to workplace join, where an Entra ID work/school account is added to the device but the device isn’t joined to Entra ID).
Join Type Enumeration
Some of the other information can be useful, including the tenant ID and user join information, which reveals some details about the account that was leveraged to perform the Entra ID device join (in this case, the same account I’m logged in with locally in the lab, but that is not guaranteed to always align).
Note: I’m using Havoc and its demon agent for C2 in my lab environment since it’s easy to set up, there’s no licensing to mess with, and it nicely approximates some relevant capabilities of commercial frameworks; however, the tradecraft discussed in this post is C2-agnostic. Most if not all of the tools that are referenced already have Cobalt Strike aggressor scripts or can be easily hooked into your C2 of choice.
We can also get most of this information from the registry under the key HKLM\SYSTEM\CurrentControlSet\Control\CloudDomainJoin. If present, its values hold information on the device join state and associated Entra ID tenant. An easy approach is to use TrustedSec’s SA reg_query_recursive BOF to surface the interesting values that are stored there.
Join Info Enumeration via the Registry
The JoinInfo key won’t be present on workplace joined hosts, so just the presence of that key and its values should indicate we’re on a host that is device joined.
Alright; we’ve determined the host is Entra ID joined (cloud only in my lab), so the next question is, “What work or school accounts are added to the device?” Or, “What accounts can I obtain refresh token cookies for?”
Initially, this seems like it should be a 1:1 relationship with the account our agent is running in the context of. It probably will be in most cases; however, I’ve encountered production environments where we were able to obtain refresh tokens for multiple Entra ID accounts associated with the compromised user’s logon session. This can happen if the user has added multiple “work or school” accounts within System Settings. Envision a scenario involving a user who has been provisioned a separate admin account; if the user adds both their standard Entra ID account and admin Entra ID account to their user profile, now from the standard user account logon session our agent is running in, we can obtain a refresh token for both accounts. I’ve attempted to mimic this in my lab setup (I’m logged in on the box as MattC@specterdev.onmicrosoft.com and the agent is running as this account), but I’ve also connected a second account to my profile (i.e., admin-mattc@specterdev.onmicrosoft.com) within System Settings.
Multiple Entra ID Accounts Added to the User Profile
Note:In these scenarios where multiple work/school accounts are in play, you can obtain a PRT for the account the user is locally logged in with and can obtain a refresh token for the other account(s). I’ll cover this more in the next section.
Finding a C2-friendly way to enumerate which work/school accounts have been added to the user’s profile has proven to be the most difficult part of putting these tradecraft notes together. If you’re familiar with enumerating cloud-joined or hybrid-joined devices, you probably know that you can use dsregcmd.exeto enumerate the information we’ve discussed thus far, and it can also be used to list “web account manager (WAM) accounts.” If you are unfamiliar with the WAM, it is a technology on Windows that allows software such as the Microsoft Authentication Library (MSAL) to acquire tokens for cloud-based accounts. These cloud-based accounts include Entra ID accounts, AD FS accounts (which are sometimes referred to as “Enterprise” accounts), personal Microsoft accounts, and Microsoft work or school accounts. The dsregcmd.exeutility will collectively call all of these account types “WAM accounts” because the WAM can acquire tokens for all of them. The phrase “WAM account” is seldom used elsewhere and “cloud-based accounts” may be a more appropriate phrase, but we will stick with using “WAM account” in this blog to stay consistent with the output of the dsregcmd.exeutility.
If we’re feeling into process creation and/or spawning cmd.exe, we can leverage dsregcmd.exe with the /listaccounts flag to enumerate WAM accounts that have been added (or the /status flag to enumerate the device’s join state).
😬
I can feel the collective boos raining in.
You’re right. Unfortunately, the one function dsregcmd.exeimports from dsreg.dll is undocumented, as are all the other interestingly named exports dsreg.dllhas. Reversing those functions to figure out how they can be called from a BOF is way beyond my ability. This left me trying to find other documented ways to query the web account manager. I found three ways I might approach this:
Using .NET projections of the Windows Runtime (WinRT), including the WebAuthenticationCoreManager .NET class [1, 2]
Using C++/WinRT or C APIs to access these same WinRT classes [1, 2]
My personal preference is to leverage BOFs over .NET assemblies wherever possible. I was also unsure of the viability of using C++/WinRT in a BOF, so I opted for option three: using COM. Several vibe coding sessions later, I patched enough working BOF code together to list the WAM accounts that were added to the current user profile.
WAM Account Enumeration via COM
The BOF code, along with some POC code to enumerate added WAM accounts in .NET and C++/WinRT, can be found in this repo.
Now that we’ve been responsible operators and confirmed the device join state and WAM accounts that are present, we can continue forward!
Note: My coworkers Evan McBroom and Kai Huang adeptly figured out how to call the undocumented DsrCLI API that dsregcmd.exe calls. You can find an implementation of their work here, which provides operators another option for performing these enumeration steps!
Requesting and Leveraging the PRT Cookie
Finally, the exciting part. Lee’s original RequestAADRefreshToken code was ported to a BOF by wotwot563 in their aad_prt_bof repo. This is trivial to use from our C2 agent and all we need to supply is a nonce for the request. We can obtain a nonce by running roadtx from Dirk-jan’s ROADtools project.
Nonce Request
Take the nonce back to your agent and execute the aadprt BOF to obtain a PRT cookie (if you’re following along in the lab, the Havoc script that wraps the BOF can be found in this PR, but the repo already contains an OutflankC2 script and a Cobalt Strike aggressor script you can use. The PR also contains modifications to output the cookies as a JSON blob).
Obtaining Refresh Token Cookies
You’ll likely get back a x-ms-RefreshTokenCredential and a x-ms-DeviceCredential for each account. If you obtain more than one token, you’ll see a x-ms-RefreshTokenCredential, then a x-ms-RefreshTokenCredential1, and so on. The refresh token credential(s) are what we’ll be leveraging for post-exploitation. The PR also spits out the cookies in a JSON blob as a quality of life improvement for the next section.
Using the Browser
Each time I’ve performed this in production, any MFA requirement that was present was already satisfied by the tokens that were returned (more on that in the next section). To demonstrate, if I try to logon to the Azure portal with my test account’s username and password, I’m prompted for my MFA method.
Pesky MFA Policy
Note: We will still need to satisfy all conditional access policies (CAPs) to sign in. At a minimum, this usually involves coming from a trusted IP address. So you’ll likely need to use Proxifier on Windows (or a similar solution) to tunnel your browser traffic through your C2 agent before it goes back out to Microsoft. That is outside the scope of this blog and will be left up to you.
Let’s inject the refresh token cookies from the aadprt BOF into a browser on our operator VM, confirm that we satisfy the MFA policy for our lab environment, and that we can access resources behind SSO. Lee’s blog has the steps to do this manually using Chrome’s developer tools; however, after doing this multiple times per day for multi-week operations, it gets pretty tiresome. My coworker Forrest Kasler has some slick scripts to steal cookies via the Chrome remote debugger and inject them into a new instance of Chromium. We can throw the JSON blob we received from the aadprt BOF into a file and feed the file into a script from Forrest’s collection (i.e., stealer.js), which will add the cookies to our browser and open https://login.microsoftonline.com.
Stealer.js Adding the Refresh Token Cookies to Chromium
Now, if I open a new tab and browse to the Azure Portal in this Chromium session, it’ll briefly redirect to login.microsoftonline.com and then I’ll be logged into that resource as well without receiving a prompt for MFA.
Azure Portal Access
We can leverage this same workflow to access Microsoft cloud services and apps (e.g., Azure, Teams, SharePoint, etc.) but we can also authenticate to third-party apps configured to leverage SSO. Common examples include applications such as Confluence and Jira, ServiceNow (which MDSec recently blogged about the usefulness of), CyberArk, and even custom internal apps configured to use SSO. When I first realized this, I was curious how to enumerate other third-party services the target tenant tied into SSO. Outside of downloading and reviewing browser history databases, one way is to check for app registrations in Azure. We can do this graphically in the Azure portal, or use ROADrecon data (more on this in a moment) to identify services in its “Applications” pane that contain “Reply URLs.” Here’s an example of the app registration data that was collected for a tenant’s confluence app.
ROADrecon Applications Pane
If we navigate to the reply URL in our browser while we have a valid refresh token cookie, we’ll satisfy the SSO requirement and we’ll be logged in (provided that the user we have a token for is granted access to that application).
Using [Your Favorite Entra ID/Azure Post-Ex Toolkit]
I prefer to use roadtx for token manipulation. If we take a token from the aadprtBOF output and use the roadtx auth module, we can request access tokens by passing our refresh token cookie in via the --prt-cookie argument. That will get a token for the older Azure AD Graph by default, but other resources can be specified with the -r/--resource flag.
Access Token Request Using Our PRT Cookie
Now we have a Azure AD Graph access token that we could use to perform a ROADrecon data collection with.
Dirk-jan makes a point in his blog that I think is worth repeating — refresh tokens and access tokens that are requested via a PRT cookie will inherit the same claims that the original PRT cookie had. So if the PRT cookie contained the MFA claim and a device ID (since we originally obtained it on a device joined host), our access tokens will too. This is why we can continue to satisfy CAPs that require MFA or usage of a joined device.
Access Token Containing the MFA Claim and Device ID
Shifting back to the post-exploitation examples, now that the roadtx auth module has populated my auth file (i.e., .roadtools_auth), it can be fed that into another tool such as TeamFiltration to use its exfiltration modules as well.
Collecting Microsoft Teams Data with TeamFiltration
For TeamFiltration, the --teams module gathers data including contact lists, shared attachments, and conversations. That makes it a good alternative to adding a refresh token cookie to your browser and graphically browsing Teams.
TeamFiltration Display of My Super Sensitive Teams Chat
Other tools may require tokens for different resources or different clients. As an example, MicroBurst modules that gather data on Azure resources rely on the Azure PowerShell module and thus will need an access token for the Azure Resource Manager (AzureRM) that specifies the Azure CLI client ID when authenticating. We can request that access token using roadtx by specifying the associated alias for that resource and the appropriate client name.
Access Token Request for Usage with MicroBurst
Take the resulting access token from the .roadtools_auth file and supply it to the Connect-AzAccount cmdlet from the Az PowerShell module and you should see that it succeeds.
Connecting the Azure PowerShell Module
MicroBurst can now be imported and run via Get-AzDomainInfo (in this example, we omit enumeration for things like Entra ID users and groups, which would also require a graph token).
MicroBurst Data Collection
These are just a few examples of the token requests that can be made using different tools. There are a number of other tools you utilize for different areas of the post-exploitation, but the operational workflow will generally remain the same.
Detection Guidance
The different tools outlined during this blog for situational awareness and token requests will cause different DLLs to be loaded in an agent’s process. When these DLLs are present together within the same process, that may indicate suspicious activity:
aadjoininfo BOF and dsrcli BOF — Used to enumerate the device’s join state and causes C:\Windows\System32\dsreg.dllto be loaded into the beacon process
listwamaccounts BOF — Used to enumerate work or school accounts added to the current user profile; causes C:\Windows\System32\aadWamExtension.dll to be loaded into the beacon process
aadprt BOF — Used to obtain refresh token cookies. Being based on Lee’s original POC, the DLL load event he calls out for C:\Windows\System32\MicrosoftAccountTokenProvider.dllis still applicable here
On the separate device joined and workplace joined hosts I have access to, there are no running processes (outside of the beaconing demon.x64.exeprocess) that have loaded all three DLLs. Even examining processes on my host that have just two of these DLLs loaded shows that it’s limited to svchost.exe, OneDrive.exe, and ServiceHub.IdentityHost.exe.
Processes With dsreg.dll LoadedProcesses With aadWamExtension.dll LoadedProcesses With MicrosoftAccountTokenProvider.dll Loaded
This is bound to vary from environment to environment, but baselining processes that normally load two or more of these DLLs and monitoring for anomalies may be able to provide an indication of processes to review for reconnaissance and token gathering actions, like those described in this blog.
Conclusion
This blog examined how an operator can perform situational awareness steps prior to making a token request and how tokens can be effectively used once obtained. Hopefully, you’ve come away with some guidance and examples on how to leverage this tradecraft and some of the quality of life scripts/tools that may help you!
Red Team Operations and offensive security assessments have always been a critical part to a mature security program, whether as a validation exercise or to identify new attack paths in a technology implementation. AI and LLMs are advancing at such a rapid pace that it is natural for both users and organizations to question the security implications of these technologies. That is why we are incredibly proud to announce our partnership with OpenAI to strengthen their security posture, to conduct
Red Team Operations and offensive security assessments have always been a critical part to a mature security program, whether as a validation exercise or to identify new attack paths in a technology implementation. AI and LLMs are advancing at such a rapid pace that it is natural for both users and organizations to question the security implications of these technologies. That is why we are incredibly proud to announce our partnership with OpenAI to strengthen their security posture, to conduct joint research, and to develop open-source techniques and tools. OpenAI’s announcement provides additional details on how we’ve partnered together.
Partnership
Our partnership is founded on a shared vision to secure AI systems and user’s data ensuring trustworthy AI is accessible to all. SpecterOps has always believed in transparency, both with our customers and the community — and in the advent of machine learning, artificial intelligence, and society’s increased usage of large language models; security and privacy are more critical to organizations than ever before. Leveraging OpenAI’s expertise in developing models and SpecterOps industry leadership in understanding attack paths within technologies, we are collaborating on:
Security Research to jointly discover and share novel approaches to defend against threat actors and detect malicious activity
Continuous Security Assessments that evaluate emerging technologies attack paths unique to artificial intelligence and sharing the outcomes where possible
Red Team Exercises to validate and improve the detection and response program at scale by looking at the unique complexities of the scale of OpenAI’s mission
AI and Security
A 2024 report from McKinsey captured that 72% of worldwide respondents have adopted AI and a post from National University states “83% of companies claim that AI is a top priority in their business plans”. With rapid developments by foundation model providers and businesses increasingly adopting AI comes new and additional risks. Some of the more distinct threats to AI systems can include:
Sensitive information disclosure including PII, trade secrets, confidential information, or access credentials to internal or cloud computing resources
Model and data poisoning by introducing malicious information into model training, fine-tuning, or databases for retrieval augmented generation processes
Prompt injection to bypass or maliciously control the system in unintended ways
Because of the growing AI use and the potential risks to creators and consumers, getting ahead of security issues today will better serve how AI impacts humanity tomorrow.
SpecterOps AI Red Team Services
SpecterOps is an industry leader at thinking like an adversary and leveraging red team operations to challenge assumptions to improve the security of assessed technologies. We do this by leveraging years of experience working with clients across all industries to identify and execute novel attack paths and through research efforts to create and publish tools and techniques accessible to all.
We deliver AI red team services by leveraging our adversarial mindset and security expertise to evaluate AI technologies through their design, development, deployment, and operations and maintenance stages. AI systems are decomposed into their individual components and holistically evaluated for attack vectors and vulnerabilities both unique to artificial intelligence and traditional technologies.
Our AI red team services are composed of:
Threat modeling to understand a model’s acceptable use and failures modes and then mapping out unique attack vectors that can negatively impact model development
Direct model inference assessments for security, safety and trustworthiness, alignment, and privacy
Penetration tests to identify and exploit weaknesses in AI systems’ full applications stack, identity and access management services, data storage, cloud and compute resources, agentic workflows, pipelines, and all other supporting infrastructure
Red Team Operations to exploit attack paths providing stimuli for monitoring, detection, and incident response
In partnership with OpenAI we are deepening the quality of our assessments by having direct insights into state-of-the-art model technologies. As we work together, we’re able to iterate faster and incorporate lessons learned, communicate risks that have significant value, and generate actionable remediation guidance to ensure systems and data are both secured and resilient.
Conclusion
SpecterOps is excited to partner with OpenAI to continue advancing the safety and security of AI. This new partnership marks the start of continuous assessments, research, and innovative improvements to defending systems from risks distinctive to artificial intelligence. We are even more excited to be able share outcomes with a larger audience. In collaboration with OpenAI, our world class red team services will be at the forefront of security ensuring a more secure world for our clients and the community.
tl;dr: Less FPs for Owns/WriteOwner and new Owns/WriteOwnerLimitedRights edgesBefore we get started, if you’d prefer to listen to a 10-minute presentation instead of or to supplement reading this post, please check out the recording of our most recent BloodHound Release Recap webinar. You can also sign up for future webinars here.Back in August, a BloodHound Enterprise (BHE) customer told us that they had implemented an Active Directory (AD) setting called BlockOwnerImplicitRights to help addres
tl;dr: Less FPs for Owns/WriteOwner and new Owns/WriteOwnerLimitedRights edges
Before we get started, if you’d prefer to listen to a 10-minute presentation instead of or to supplement reading this post, please check out the recording of our most recent BloodHound Release Recap webinar. You can also sign up for future webinars here.
Back in August, a BloodHound Enterprise (BHE) customer told us that they had implemented an Active Directory (AD) setting called BlockOwnerImplicitRights to help address some attack paths related to object ownership (e.g., Owns, WriteOwner), but the findings were still present in their graph.
Until this point, I had assumed that the owner of an AD object was always implicitly granted permissions to modify that object’s security descriptor to compromise the underlying computer/user (WriteDacl). This is the logic the Owns and WriteOwner edges were built upon. What was this setting I’d never heard of?
The first thing our team did was review the Microsoft documentation to estimate the work effort in removing these false positives.
Turns out, Microsoft introduced BlockOwnerImplicitRights as the 29th bit in a forest’s dSHeuristics attribute to prevent a vaguely-worded vulnerability where a user with permission to create computer-derived AD objects could modify security descriptors and sensitive attributes to elevate privileges in certain scenarios.
According to Microsoft, “The Owner of a security descriptor is implicitly granted READ_CONTROL and WRITE_DAC rights by default… these implicit rights are blocked when the following are TRUE:
The BlockOwnerImplicitRights dsHeuristic is set to 1.
The requester is a member of neither the Domain Administrators or the Enterprise Administrators group.
The objectClass being added or modified is either of type computer or is derived from type computer.”
Next, we read Jim Sykora’s excellent Owner or Pwned whitepaper, which dives into a lot more technical detail on which principal becomes the owner when objects are created, what owner permissions are abusable in different scenarios, and proactive and reactive considerations for implementing preventative controls. I highly recommend reading it to dive further into these concepts.
Now things were starting to make sense. If I understood correctly, enforcing the BlockOwnerImplicitRights bit of the dSHeuristics attribute could prevent certain scenarios we have exploited in real customer environments during offensive operations.
Consider this example:
An organization’s server team uses a specific account to programmatically join new systems to the domain, for example using Microsoft Configuration Manager (formerly SCCM — I physically can’t write a post without mentioning it) or a PowerShell script.
Remember, the account that joins a computer to the domainbecomes the owner of the created objectin many scenarios (detailed further in Jim’s whitepaper).
Years later, a computer joined to the domain by this account is promoted to a domain controller or is added to tier zero and is now susceptible to WriteDacl abuse via the owner’s implicit rights if the account that joined the system to the domain is compromised.
We have encountered many scenarios where ancient domain join credentials are exposed in a script on a file share or user’s desktop or can be decrypted from the SCCM operating system deployment task sequence, allowing us to compromise every computer they joined to the domain via their implicit WriteDacl permission.
Enter the BlockOwnerImplicitRights attribute.
If implicit ownership rights are blocked for these computer objects, the account that joined a computer to the domain cannot easily compromise the underlying machine via implicit WriteDacl abuse, unless they are already a member of Domain Admins/Enterprise Admins.
Implicit owner rights are also blocked when an ACE explicitly grants a permission to the OWNER RIGHTS SID (S-1–3–4). In this case, the owner is only granted the specific permissions in these ACEs. Here is another reference explaining use cases for this SID.
To fully understand the mechanics of these settings and how they impacted BloodHound, Matt Creel (@Tw1sm) got to work redesigning the Owns edge to eliminate false positives and accurately depict where these security features were enabled.
First, we needed to create a new edge called OwnsLimitedRights to identify any specific permissions granted to the object owner when an ACE is defined for the OWNER RIGHTS SID.
To summarize, implicit ownership rights are blocked if either of the following conditions are true:
The OWNER RIGHTS SID (S-1–3–4) is explicitly granted a permission
OR
BlockOwnerImplicitRights (29th bit of dSHeuristics ) is set to 1
The owner is not a member of Domain Admins or Enterprise Admins
The owned object is a computer or derived type
We landed on this design for the Owns and OwnsLimitedRights edges that were updated/introduced in BloodHound v7.1.0.
How are WriteOwner permissions impacted by these changes?
Matt found that this was a bit more complex because ACEs defining permissions for the OWNER RIGHTS SID that are not inherited (i.e., are explicitly defined) are removed from objects when their owner changes.
As a result, we needed to check whether any ACE granted rights to the OWNER RIGHTS SID (S-1–3–4), whether such an ACE was inherited or explicitly defined, and whether it granted abusable permissions in order to correctly depict the WriteOwner edge. We also created a new edge called WriteOwnerLimitedRights that identifies specific abusable permissions granted to the OWNER RIGHTS SID.
We landed on this design for the WriteOwner and WriteOwnerLimitedRights edges, which are also in BloodHound since v7.1.0:
I picked up where Matt left off to implement these changes with a ton of help from Rohan Varzarkar (@CptJesus) and John Hopper, our Director of Engineering.
To process the outcome of each of these scenarios, we needed to compare the forest’s dSHeuristics attribute value to the ACEs on each domain object. Since we don’t know what order data will be uploaded to BloodHound in or whether it’s complete (e.g., only the computers.json or domains.json file is uploaded), that meant we had to add portions of the logic to post-processing, which is the phase that occurs after ingestion of all data during a single upload.
Other portions of the logic could be created during the ingestion phase itself, such as creating edges when the OWNER RIGHTS SID is explicitly granted abusable permissions, in which case we never need to look at the dSHeuristics attribute since implicit owner rights are never granted.
To make the change backwards-compatible with previous SharpHound and third-party collector versions and as lightweight as possible, we wanted to avoid collecting every single ACE (as opposed to only abusable ACEs like SharpHound had always done), but we also needed to know whether any non-abusable permissions were granted to the OWNER RIGHTS SID and whether any such permissions were inherited. As a result, we created two new boolean properties for each object, DoesAnyAceGrantOwnerRights and DoesAnyInheritedAceGrantOwnerRights.
While coding and wiring everything together, we had to account for several other complex scenarios. For example, when both explicitly defined, abusable permissions and inherited, non-abusable permissions are granted to the OWNER RIGHTS SID, the explicitly defined permissions are deleted on ownership change but the inherited ones are not, so the Owns ACE is abusable but WriteOwner ACEs are not. In other cases where explicitly defined, non-abusable permissions are granted to the OWNER RIGHTS SID, the Owns ACE is not abusable. However, those explicitly defined permissions are deleted on owner change, so WriteOwner ACEs could be abusable if the forest’s BlockOwnerImplicitRights attribute is not set or if it is set but the object is not a computer-derived type.
The good news is, BloodHound does all of this processing for you now!
We learned that implementing these changes eliminated a ton of false positives from the graph for BloodHound users who block owner implicit rights. Users also get the OwnsLimitedRights and WriteOwnerLimitedRights edges “for free”, regardless of what collector they use, because these edges do not depend on collection of dSHeuristics or non-abusable OWNER RIGHTS ACEs.
In the diagrams below:
Red edges are now recalculated and removed as false positives when using the new SharpHound collector and BloodHound release
Green edges are reclassified asOwnsLimitedRights/WriteOwnerLimitedRights
Blue edges are unchanged
BlockOwnerImplicitRights = 1:
BlockOwnerImplicitRights = 0:
Thanks for reading! If you have any questions or feedback for this post, please reach out to me (@_Mayyhem) on Twitter or in the BloodHound Slack (@Mayyhem)!
How to leverage the PEN-200 simulated black-box penetration testing scenarios for maximal self-improvement and career success.DISCLAIMER:All opinions expressed in this article are solely my own. I have reviewed the content to ensure compliance with OffSec’s copyright policies and agreements. I have not been sponsored or incentivized in any way to recommend or oppose any resources mentioned in this article.IntroductionIn the last post of this series, I explored some hidden benefits and extra step
How to leverage the PEN-200 simulated black-box penetration testing scenarios for maximal self-improvement and career success.
DISCLAIMER:
All opinions expressed in this article are solely my own. I have reviewed the content to ensure compliance with OffSec’s copyright policies and agreements. I have not been sponsored or incentivized in any way to recommend or oppose any resources mentioned in this article.
“Success is no accident. It is hard work, perseverance, learning, studying, sacrifice, and most of all, love of what you are doing.” — Pelé
The PEN-200 course includes multiple virtual lab environments, each offering an opportunity to grow as an offensive security professional. The three key takeaways from this post are:
Learn how to write a high-quality penetration testing report and apply those skills to each lab network
Use the labs as a baseline to build your own testing environment where you can refine offensive techniques, understand how misconfigurations arise, and analyze network packets associated with different attacks
Develop a repeatable testing methodology, apply it to the labs, and continuously refine it through an iterative process
Write Reports for Each Lab
For all the effort OSCP candidates put into identifying and exploiting technical vulnerabilities, the irony of the course is that its arguably most valuable skill is also the least offensive: report writing. In the real world, the value of an offensive security engagement doesn’t come from hacking efforts alone—it mostly comes from a legible, actionable, and informative report. Given this, it’s somewhat disappointing that the OSCP exam report—a required component of the certification process—is graded more on accuracy than quality. According to the PEN-200 Reporting Requirements, “[students] must submit an exam penetration test report clearly demonstrating how [they] successfully achieved the certification exam objectives”. This policy ensures that passing students have demonstrated the minimum technical competency of an offensive security professional, but not necessarily the writing skills needed to excel in the field. If your goal is not just to pass the exam but to be a standout candidate in future consulting roles, you should learn how to write an exemplary penetration test report and use the PEN-200 labs as practice.
Report writing is often the least enjoyable part of a penetration test, but a poorly written report can have serious consequences. The most immediate impact may be frustration from supervisors or colleagues, but the affected audience is often much larger. If your firm has a quality assurance (QA) process, multiple rounds of revision can delay the report’s delivery, damaging the company’s reputation. Worse, if significant errors slip through and the client receives a flawed report—such as one containing incorrect, incomplete, or difficult-to-read sections—the aftermath can be disastrous. Miscommunication about findings can lead to delayed security improvements, inadequate risk mitigations, and ultimately an unresolved attack surface. The client may become furious over wasted time and resources, potentially demanding revisions, reattempts, or—worst-case scenario—a partial or full refund.
Given the stakes, it’s imperative to take reporting seriously—and this is where the PEN-200 labs come in. While their official purpose is to provide students a sandbox environment for practicing their newly learned offensive techniques, they also serve as an excellent training ground for report writing. The lab structures simulate a black-box penetration test scenario, lending authenticity and relevance to aspiring offensive security professionals. Furthermore, three lab networks are specifically designed to replicate the OSCP exam conditions, allowing students to simulate the exam environment under self-imposed time constraints.
NOTE:
Consider attempting two of these lab networks within a 48-hour window (24-hours each for testing and reporting) before your first exam attempt, reserving the third for after you’ve conducted your first attempt postmortem (more on that later in the series).
Before you begin report writing, it’s essential to understand their structure. While formats vary across firms, most reports include at least an Executive Summary, Assessment Results, Attack Path Narrative, and Appendix. A full breakdown of these sections is beyond the scope of this post, but for practical guidance, Brian King’s Hack for Show, Report for Dough (Wild West Hackin’ Fest 2018) is a phenomenal resource. It also covers several report writing best and worst practices, helping students refine their skills. Students can also reference OffSec’s official OSCP exam report templates as a primary source for understanding the certification provider’s expectations.
When writing reports, I strongly advise sticking to Microsoft Word. While I personally find it somewhat infuriating and a victim of “featuritis”, it remains the dominant word processor application in the industry and offers useful features like change trackers (especially relevant for collaborative projects), cross-references, and a citation management system. For screenshots, I highly recommend Greenshot, Flameshot, Snagit, and ZoomIt from the Sysinternals suite. Including a network topology diagram in your lab reports can improve clarity—draw.io is a popular choice for this. Finally, ensure that your report writing toolset does not violate OffSec’s Academic Policy; for example, as stated in the OSCP Exam Guide, using large language models (LLMs) and artificial intelligence (AI) chatbots to generate or refine content constitutes sharing PEN-200 material with a third-party, which is a copyright violation.
Each firm has its own style guide for consultants, so it’s important to adopt a writing style that aligns with industry expectations when creating lab reports. While I couldn’t find a publicly available style guide specifically for penetration test reports, the Microsoft Writing Style Guide serves as a suitable alternative. Below are key writing principles to follow, with some modifications and additions to Microsoft’s guide:
Use active voice over passive voice (e.g., “the student scanned the host…” vs. “the host was scanned by the student…”), unless the latter sounds objectively less “awkward”
Maintain a consistent preterite verb tense and third-person narrative (e.g., “the student conducted a penetration test…”)
The main drawback of using the PEN-200 labs for report writing practice is that students cannot share their reports for peer-review due to copyright restrictions. According to Section 16 (IP Ownership) of OffSec Terms and Conditions, students are forbidden from sharing derivative PEN-200 content such as lab walk-throughs—which implicitly includes reports. Violating this agreement could result in punitive action from OffSec, such as having existing certifications revoked or being banned from future enrollment. To work within these constraints, students should conduct independent research on report writing and rigorously self-grade their reports while keeping them private. Those seeking peer feedback can instead write reports on alternative virtual lab environments with looser copyright restrictions, such as Hack the Box (HTB), and request evaluation from qualified career mentors.
It’s in your best interest to start developing your report writing skills early and the professionally managed PEN-200 lab networks provide an excellent environment to practice within. If you’re still struggling with report writing—or want to learn more about report review, delivery, and feedback procedures in general—consider enrolling in Luke Rogerson’s The Art of Report Writing, offered by Zero-Point Security. While I haven’t personally taken the course, it comes highly recommended by many in the consulting field and features an expansive syllabus. Investing in your report writing abilities—both during the PEN-200 labs and through external resources—will pay dividends in your future career.
Use the Labs as a Baseline for Your Personal Lab
The PEN-200 labs are excellent for simulating black-box penetration tests, but students shouldn’t rely solely on them for experimenting with offensive techniques. Your ultimate goal should be to either design a personal lab for yourself or use an existing template by the time you have completed the PEN-200 labs. If you choose to follow the former path, don’t be afraid to take inspiration from the labs when designing your own.
Developing your own cyber range offers several advantages over the PEN-200 labs. Most obviously, your lab access won’t expire when your OffSec subscription ends. Setting up a personal lab manually also deepens your understanding of how misconfigurations and vulnerable applications introduce security risks. You can also expand upon the PEN-200 syllabus by incorporating technologies not covered in the course, such as security incident and event management (SIEM) solutions, Kerberos delegation attack paths, and persistence techniques, to name a few. If you want to get even more granular, you can use a network protocol analyzer utility like Wireshark to manually inspect the network packets associated with your favorite tools or exploits. Finally, for students eager to stay current with cybersecurity trends, a personal lab provides a low-risk environment to deploy and test new exploits and tools.
Historically, deploying a personal cybersecurity lab was a costly endeavor. The resources required to simulate an entire Active Directory (AD) network required substantial investments in RAM, CPU cores, and HDD/SSD storage, often housed in bulky rack servers or large PC chassis. For those starting from scratch, costs can easily creep up to hundreds or even thousands of dollars. Luckily, mini PCs like the GMKtec NucBox offer a significantly more affordable and compact alternative to the comically large and expensive gaming rigs often associated with home labs. You can even purchase a barebones mini PC—no RAM, SSD, or OS pre-installed—and salvage memory and storage components from refurbished PCs. By integrating them into a custom-built setup and installing an open-source OS like Ubuntu, you can significantly cut costs while still aggregating the hardware required to create a fully functional lab environment.
Ludus is a cyber range orchestration platform that Erik Hunstad, the founder of Bad Sector Labs and Chief Technology Officer of Sixgen, created. The platform is built on top of the Proxmox Virtual Environment (Proxmox VE) hypervisor—a powerful open-source solution for VM and container management—enabling the virtualization of entire simulated networks. Among its many features, Ludus supports user-defined networking and firewall rules, DNS record management, snapshot functionality, and automated configuration pulls from Ansible Galaxy’s collection library. It deploys VM templates that can either be sourced from Ludus’s builtin library or customized and imported. The end-user only needs to install Ludus on a dedicated host, create an environment configuration file, deploy the range, and apply host- or domain-specific changes—which can easily be automated. Ludus is an extremely powerful and customizable tool for students who want to focus on refining their penetration testing skills rather than spending excessive time troubleshooting setup issues.
Designing a cyber range from scratch can be intimidating, but fortunately, multiple preconfigured penetration testing labs are available for students to deploy. One of the most popular lab templates today is Game of Active Directory (GOAD) by M4yFly, offered by Orange Cyberdefense. GOAD supports multiple attack path scenarios, many of which are covered in the PEN-200 course, making it an ideal choice for a first personal cyber range. It is also compatible with Ludus, further simplifying deployment.
Regardless of whether you use GOAD, a custom-built network, or another public lab template, consider supplementing the range with Elastic Security, an SIEM platform from the Elastic Stack (ELK). Integrating Elastic Security—or another free SIEM solution—into your lab allows students to observe how offensive techniques are detected in real time, providing valuable insights into defensive strategies. Elastic Security is also Ludus-compatible and, to demonstrate how to integrate it with a personal cyber range, I recommend this walkthrough from I.T. Security Labs that shows how to deploy GOAD with Elastic Security through Ludus.
NOTE:
Other noteworthy lab templates include BadBlood, ADCS Lab, and SCCM Lab, the last two of which are compatible with Ludus. BadBlood (by Secframe) is a PowerShell scripting suite that generates polymorphic Microsoft AD cyber ranges, ensuring distinct challenges with each invocation. The ADCS and SCCM labs focus on Active Directory Certificate Services (AD CS) and Microsoft Configuration Manager (MCM/SCCM). While not covered in the PEN-200 syllabus, recent security research has demonstrated that they both represent a significantly large attack surface, and the aforementioned labs provide an opportunity to develop skills in testing and securing both technology stacks.
In conclusion, a personal cybersecurity range inspired by the PEN-200 lab networks provides several key advantages: freedom from OffSec subscription limits, exposure to multiple relevant technologies, a sandbox for testing new techniques and tools, and the ability to integrate operational security (OPSEC) solutions. If you successfully design a custom penetration testing lab from scratch (not derivative of PEN-200 content), you can share your deployment template publicly—a valuable addition to your portfolio that can strengthen future job applications.
Develop a Testing Methodology
Once you begin the PEN-200 labs, it’s crucial to develop a repeatable and self-improving testing methodology early to avoid falling into a “spray and pray” mentality. A structured approach not only helps you uncover hidden vulnerabilities more efficiently, but also minimizes the risk of needing lab extensions or incurring multiple exam retake fees—maximizing the value of your PEN-200 experience.
In the context of PEN-200 and offensive security, a testing methodology is a systematic process encompassing enumeration, documentation, tool selection, exploit testing, privilege escalation, and post-exploitation routines. Ideally, your methodology should evolve as you progress through the labs—allowing you to address knowledge gaps, adopt time-saving techniques, and incorporate novel attack strategies. Students who follow a codified and mature testing methodology are less likely to waste time redoing scans, chase dead ends, overlook low-hanging fruit, become prone to burnout and frustration, or rely on luck or accidental success to achieve the testing objective.
In the first post of this series, I introduced the concept of command reference guides (AKA “cheat sheets”), which serve as a repository for your preferred offensive tooling usage. Beyond providing easy copy-and-paste shortcuts for commands, your reference guide can be structured to align with your testing methodology. In our previous example, I demonstrated how you could leverage Obsidian to document the usage of impacket-GetUserSPNs for conducting a Kerberoasting attack. Let’s expand on this example by organizing the navigation pane of the guide into distinct phases of a simple penetration testing methodology.
Our reference guide now consists of seven root directories, each representing a major phase of a typical penetration test (e.g., Reconnaissance, Initial Access, Privilege Escalation, etc.). Notice how each of the three tools we’ve added so far (i.e., impacket-GetUserSPNs, BloodHound, and Hashcat) is intuitively placed within the appropriate parent directory, and further compartmentalized into subdirectories based on the specific technique utilized during that phase (e.g., Identifying Kerberoastable Accounts, Kerberoasting, Hash Cracking, etc.). In the Internal Enumeration and Privilege Escalation phases, we’ve gone a step further by dividing techniques by the environment we’re working in—in this case, Active Directory, Linux, and Windows. Since Kerberoasting is specific to AD environments, we placed our entry for BloodHound and impacket-GetUserSPNs in the Active Directory subdirectory of Internal Enumeration and Privilege Escalation, respectively.
I want to emphasize the importance of iterative learning when developing your testing methodology. It’s unrealistic to expect that your initial attempt at following a testing methodology will be optimal, so it’s critical to refine your process after each lab or exercise—especially during the early, high-growth stage of your OSCP journey. Consider keeping a brief log for each machine or network within your reference guide, summarizing the attack path, the tools and techniques you utilized, and the areas where you struggled most. Use the last section in particular to feed both successes and setbacks into your methodology refinement. This continuous improvement process will steadily strengthen your assessment methodology, significantly boosting your confidence and skills ahead of the OSCP exam.
In conclusion, I strongly encourage students to treat the labs not just as an opportunity to improve their ability to identify and exploit vulnerabilities, but also as a chance to build an iterative, professional methodology for offensive security engagements—and to commit to regularly polishing it as they progress. Doing so will not only prepare you for the OSCP exam, but will also translate directly to future responsibilities in a consulting role, strengthen your technical interview performance, and ultimately support your growth as a security professional.
Conclusion
If you have questions, feedback, or suggestions you feel should have been included in this post, please feel free to leave a comment. In the next installment of this series, I’ll dive into the OSCP exam itself.
Getting Started with BHE — Part 2Contextualizing Tier ZeroTL;DRAn accurately defined Tier Zero provides an accurate depiction of Attack Path Findings in your BHE tenant.Different principals (groups, GPOs, OUs, etc.) have different implications when Tier Zero is defined — understanding these will help reduce confusion around why something is showing up as Tier Zero.Welcome to round two of the Getting Started with BloodHound Enterprise series. Today’s focus will be on understanding and contextuali
An accurately defined Tier Zero provides an accurate depiction of Attack Path Findings in your BHE tenant.
Different principals (groups, GPOs, OUs, etc.) have different implications when Tier Zero is defined — understanding these will help reduce confusion around why something is showing up as Tier Zero.
Welcome to round two of the Getting Started with BloodHound Enterprise series. Today’s focus will be on understanding and contextualizing Tier Zero and ensuring that we have an accurate depiction of the Attack Paths that exist in your BloodHound Enterprise (BHE) tenant.
I started the last blog with a problem statement meant to align our focus, and I’ll include another one today. In this case, that would look something like:
“Have we identified (and configured) Tier Zero in our environment so that we have an accurate depiction of the Attack Paths that are increasing risk in our environment?”
In order to make progress here, we need to define and understand what it means when we’re talking about Tier Zero. You may have a unique definition for your organization which may require some additional due diligence, however our definition here at SpecterOps is:
“Tier Zero is a set of assets in control of enterprise identities and their security dependencies”
Where:
Control: A relationship that can contribute to compromising the controlled asset or impact its operability
Security dependency: A component whose security impacts another component’s security [1]
Out of the box, BHE comes with some default Tier Zero options [2] that will always be marked as a Tier Zero object for each domain collected, including:
The Domain head object
AdminSDHolder object
Built-in Administrator account
Domain Admins
Domain Controllers
Schema Admins
Enterprise Admins
Key Admins
Enterprise Key Admins
Administrators
Not listed here are:
Users and Computers that are members of these groups, however they inherit Tier Zero classification from the Groups they share the “MemberOf” relationship with:
T0 Inheritance via Group Membership
Organizational Units (OUs) and Containers that contain these Tier Zero objects, though they are assigned Tier Zero based on containing Tier Zero objects as indicated below:
T0 Inheritance via “Contains” Relationship
Group Policy Objects (GPOs) that apply to these objects, though these are automatically marked as Tier Zero objects when they apply to a separate Tier Zero object:
T0 Inheritance via “GPLink” Relationship
What is not included in the default definition are groups like Account Operators (among several others). This is a group that, in your domain(s), may or may not be empty, and may or may not contain your helpdesk which generally opens wide your Tier Zero unnecessarily. There are also accounts like the MSOL account, responsible for Azure synchronization; your Privileged Access Workstations (PAWs); Password Managers (which have the ability to change the password on Tier Zero principals); and so on. These often become evident after the first collection when you may see a handful of principals that “shouldn’t be there” because there is a known relationship that is 100% valid (which you will generally know based on additional context you may have as a member of your organization). These are your “custom” Tier Zero objects that didn’t get wrapped up in BHE’s initial default definition. We do, of course, have additional documentation for these [3,4,5,6,7,8,9,10].
These custom additions will need to be manually added to Tier Zero in one of a couple different ways:
Tagging Tier Zero from the Explore Page
The first is through the Explore page, where you can search for individual objects and add them by right-clicking the object and selecting “Add to Tier Zero.” Similarly, if you select the “Explore” option for a Finding on the Attack Paths page, that will take you to this same Explore page where you can similarly add the object to Tier Zero. See below:
Exploring an Attack Path Finding to Add the Principal to Tier ZeroAdding the Attack Path Finding Principal to Tier Zero via the Explore Page
Either of these methods are a bit piecemeal and not the fastest ways to modify Tier Zero, but they are a good way to inspect and validate your Tier Zero additions during this process. Don’t fear, though, there’s a faster way to add objects to Tier Zero.
The second option is through the Group Management page which takes you to an overview of your Tier Zero:
Add or Remove Members (from Tier Zero) on the Group Management PageSpecify Members for Bulk Add on the Group Management Page
With this option, you can specify several names to add to Tier Zero and do a bulk add of any principals. Be aware that the changes that will take place, as noted above, include:
Groups that are added will cause members (computers, groups, users) to be added to Tier Zero
If the principal being added to Tier Zero is in an OU that is non-Tier Zero, the OU will be added to Tier Zero
If the principal being added to Tier Zero has GPOs that apply to it that are non-Tier Zero, these will be marked as Tier Zero
An important note to make about either of these options is that neither is necessarily the “right” or the “wrong” way, and both get you to the same end state. Generally, I find that the former (adding via “Explore”) is best suited when inspecting individual Findings on the Attack Paths page, as these may merit additional analysis before adding the object to Tier Zero. On the other hand, the “Group Management” page is great when you have a series of objects you want to add and don’t require additional inspection of anything before adding them to your Tier Zero definition. Basically, if you’re looking for a batch of updates that you want to add at one time, “Group Management” is the best way to go.
New Tier Zero additions will also cause new Findings to appear where non-Tier Zero principals have permissions against these newly-added Tier Zero principals. But this is good — this is what we’re looking for.
And that’s the next step — custom-tagged Tier Zero assets. When this is complete, you’ll have a clearer picture of what the Attack Paths and valid Findings actually are. In some cases, this may point to a couple of groups with very extensive permissions, or you might find a swath of misconfigurations that you did not realize existed buried deep in your AD structure.
What does this look like in practice? Here’s an example of what your BHE tenant might look like before you’ve added any context (red indicates an Attack Path Finding in BHE, for clarity):
Contextualizing Tier Zero — “Default” View
Here we have a “default” Tier Zero object (Domain Admins) and four Findings under the “Generic All” Attack Path. If we expand this out, to see full exposure, it might look like this (black lines depict relationships):
Contextualizing Tier Zero — Exposure View
Here we can see that there’s only one Tier Zero principal (Domain Admins), with four Attack Paths, but an exposure count of nine (count of non-Tier Zero principals). Again, this is after default collection with no additional contextualization except that we’re visualizing exposure in a simplified scenario.
But you might look at one of those and say, “Hey, Group: A is a Tier Zero object, too.” So we add it to Tier Zero and then we see the following:
Contextualizing Tier Zero — Defined Tier Zero View
Now we have two Tier Zero principals:
Domain Admins
Group: A
We also have eight Attack Paths:
Three Tier One principals with GenericAll over Domain Admins
Five Tier One principals with GenericWrite over Group: A
We would also see a slight change in Exposure because one of the nine principals that would previously contribute to our count has been added to Tier Zero. Exposure here has decreased to eight.
Now we have a better picture of what the Findings are in our environment, which allows us to better understand what needs attention, what needs to be mitigated, and what’s potentially leading to unnecessary exposure to Tier Zero. This is because we’ve taken the time to define Tier Zero for our organization.
Contextualizing your Tier Zero definition is important because otherwise your Findings will not accurately represent tiering violations, which is one of the first things you need to be able to see within BHE. This is what the Attack Path page shows you, and part of the reason it can be so valuable for organizations is that it summarizes pathways that cause exposure risks to your critical assets.
Once we have all that figured out, we’ll run into either of the following outcomes with no change in exposure:
Larger Tier Zero definition, decrease in Findings
Larger Tier Zero definition, increase in Findings
Objectively speaking, neither of these is better or worse than the other based on the change in Findings. Either is better than the previous state of visibility because it represents a more accurate view of your domain and the true Attack Paths that require your attention.
If we don’t figure this out, nothing changes and when we open up BHE we’re going to see an inaccurate depiction of what we actually care about. Again, that’s pathways (Attack Paths) that cause exposure risks to your critical assets (Tier Zero).
Join me again next time for Part 3, where we’ll work on identifying sources of exposure using Cypher queries.
[10] — “Defining the Undefined: What is Tier Zero, Pt IV,” by Martin Christensen, Lee Chagolla-Christensen, and Jonas Bülow Knudsen: https://www.youtube.com/watch?v=lLpCPBJIFkQ
Getting Started with BHE — Part 1Understanding Collection, Permissions, and Visibility of Your EnvironmentTL;DRAttack Path visibility is dependent upon scope of collection; complete collection is dependent upon appropriate permissions.Your collection strategy benefits from tiering just like your domain(s).IntroductionWelcome to my series on Getting Started with BloodHound Enterprise! This series comes after having had several discussions with customers about internal requirements for starting co
Understanding Collection, Permissions, and Visibility of Your Environment
TL;DR
Attack Path visibility is dependent upon scope of collection; complete collection is dependent upon appropriate permissions.
Your collection strategy benefits from tiering just like your domain(s).
Introduction
Welcome to my series on Getting Started with BloodHound Enterprise! This series comes after having had several discussions with customers about internal requirements for starting collection and I wanted to be able to provide something moving forward that reads more like a blog/conversation that’s easy to digest. That said, this doesn’t mean it’s irrelevant to the BloodHound Community Edition (BHCE) users, and there will still be components of information that are valuable for users on both the Enterprise and Community Edition sides. This series will focus more on users who are interested in gaining maximum visibility of their environments, defining Tier Zero, and understanding how to identify potential sources of exposure.
So, if you’ve got your BloodHound Enterprise (BHE) tenant up and running and are asking yourself “What now? Where do I start when it comes to BHE?” this series will give you actionable next steps and useful context for maximizing your BHE tenant.
Active Directory — Collecting with SharpHound
It may be obvious, but the first two things that need to be addressed are Collection and Permissions. These are necessary because you can’t see anything without collection, and collection is ultimately contingent upon the permissions you’re willing to grant your collector, which in this case discussion will be SharpHound (Active Directory). In other words, with greater permission comes greater visibility. Uncle Ben never said that to Peter Parker in Spider-Man, but he would have if they had been working on a SharpHound install.
More directly, talking about collection and permissions here will help address the following problem statement. If this resonates with you, you’re in the right place:
Are we positioned to collect the data required to accurately depict objective exposure risks that result in Attack Paths in our environment?
Collection and associated permissions include:
Active Directory Structure Data: Authenticated User group membership
Certificate Services: Authenticated User group membership
Local Group Membership: local Administrator on domain-joined systems
Sessions (logons): local Administrator on domain-joined systems
Domain Controller Registry: Administrator on domain controller(s)
Certificate Authority Registry: Administrator on enterprise CA(s)
The first (AD structure data) is the baseline requirement for BHE functionality; the others provide valuable context for understanding exposure risks that require additional data beyond what can be pulled from a domain controller via LDAP queries. Note that the second, Certificate Services, can be collected with the same basic privileges that AD structure data can be collected.
But what does this all mean practically? Depending on what your domain looks like it could be the difference between seeing 5% exposure and 95% exposure. I often deal with a lot of kickback on this series of requirements, but this is the tradeoff required for adequate visibility, accurate attack path mapping, and inherent risk associated with the relationships and configurations that exist in your AD environment.
If you do not have all of this collection, you’re going to miss some important information:
Where do ADCS attack paths exist that enable domain takeover?
Where do logon sessions exist that facilitate credential theft resulting in privilege escalation or lateral movement?
Where are tiering violations occurring because of bad practices with admins logging into systems at a lower tier?
This leads into a secondary discussion, which is often asked in the form of “How many resources do I need to get this data into BHE?”
In some cases, SharpHound and AzureHound can both be run on the same server. However it depends on how much is being collected and how you break up the schedule for your collectors. If you have a large environment with 100,000 users and you try collecting both AD and Azure environments at the same time, you’re probably going to run into some issues.
This next discussion will focus specifically on SharpHound, and for proper, hardened collection of SharpHound, I would recommend as many collectors as you have Tiers. I’ll use the standard three-tier model here:
A Tier Zero collector collects everything at the Tier Zero level, which easily accounts for the first requirement, but also allows visibility of all the others (at Tier Zero). You can run your AD structure data, Certificate Services, CA/DC registries, and Tier Zero group and session collection here. This is the primary visibility you want.
A Tier One collector should only need to collect group and session information at Tier One.
A Tier Two collector should only need to collect group and session information at Tier Two.
Here’s a visualization to depict what this might look like:
Tiered SharpHound Deployment
I do recommend following this tiering structure as much as possible, as this scoping of collection can help mitigate unnecessary exposure as a result of cross-tiered collection. While I do see variants of this where SharpHound is either Tier Zero or Tier One and collects from every tier, a tiered collection structure is the safest route forward for collection.
I also recommend following our hardening guidance for the SharpHound service account, which we list here [1]. This includes using a group managed service account (gMSA) for the SharpHound service account, rather than a regular AD user account. Additionally, adding this account to the Protected User group will limit the ability for Kerberos delegation and authentication relaying attacks.
Whichever path you choose here, understand that the privileges you give to the collector will align with the visibility you have of your environment. If you’re content with only seeing direct permissions based on Access Control Entries (ACEs), AD structure data will be sufficient. But if you want group and session collection, and if you would like to have full visibility of ADCS attack paths — you will need additional collection.
For more information on Data Collection and Permissions, check out our documentation here [2].
And that’s it for now! Come back later for our next topic, which will focus on what to do after you’ve got collection up and running and you’re ready to start working on cleaning things up: Contextualizing Tier Zero.
TL;DR: SCCM forest discovery accounts can be decrypted including accounts used for managing untrusted forests. If the site server is a managed client, service account credentials can be decrypted via the Administration Service API.IntroductionWhile Duane Michael, Chris Thompson, and I were originally working on the Misconfiguration Manager project, one of the tasks I took on was to create every possible account in the service and see how many of them could be discovered and extracted. Nearly all
TL;DR: SCCM forest discovery accounts can be decrypted including accounts used for managing untrusted forests. If the site server is a managed client, service account credentials can be decrypted via the Administration Service API.
Introduction
While Duane Michael, Chris Thompson, and I were originally working on the Misconfiguration Manager project, one of the tasks I took on was to create every possible account in the service and see how many of them could be discovered and extracted. Nearly all of those credentials, at least in a standard deployment, can be recovered using the techniques in CRED-5 that Benjamin Delpy and Adam Chester originally shared. There were accounts though that couldn’t be decrypted the same way and were stored in the SC_UserAccount table in a completely different format.
SCCM provides a number of discovery methods for identifying clients including Active Directory (AD) user and system discovery, network discovery, heartbeat, and forest discovery. Unlike the others that identify users and computers that may need to be managed, the forest discovery’s role is to identify locations that can be added as boundaries for client management by querying the local and trusted forests. The default for this discovery method is to use the site server’s machine account as it is already a member of the forest. However, another option is for administrators to manually add a forest and set credentials for a forest discovery account. This can be even more useful when managing untrusted forests.
Over the last few years of researching and attacking SCCM, the most common issue I’ve observed is that the various service accounts are configured with excessive permissions. I suspect the same is true for forest discovery accounts as well and are likely high value; especially when the objective is to move laterally where no direct path exists between forests. Naturally, I wanted to decrypt them.
Decryption
While manually forcing a forest discovery, I checked the modules loaded in the smsexec.exe service, which handles the bulk of processing tasks executed from the management console, and found a pretty descriptive .NET assembly: ActiveDirectoryForestDiscoveryAgent.dll.
Loading the assembly into dnSpy, the RunDiscovery method kicks off the discovery process. The method starts by first ensuring a database connection exists then generates a list of forests to target for discovery from the SCCM database. Once the list is built, ConnectToForest is called to query the database for each forest’s associated discovery account username.
If one exists, that username is passed to the GetCredentialsWrapper utility method, which is a wrapper for the native GetUserCredentials function imported from the ADForestDisc.dll to acquire the account’s password. The verbose logger shows that whatever is returned from GetCredentialsWrapper should be “successfully obtained credentials…” which is a good sign.
Looking at the ADForestDisc.dll in Ghidra, the GetUserCredentials function ensures a username is set then passes the username to GetGlobalUserAccount before returning the account’s password. The error handling logging message that states “failed to get account information from site control file for the discovery user” is a clue to where the credential material is stored.
According to Microsoft, the site control file (SCF) “…defines the settings for a specific site” and is stored in the SCCM site database. Two control files exist at any given time: the “actual” SCF for current site settings and the “delta” SCF for staged changes to update site settings. To perform any modifications to the site programmatically, an administrative user must establish a session handle on the file, commit the changes, then release the handle. This is necessary to prevent multiple users trying to modify site settings and creating conflicts. Admin users have likely experienced this working in the Configuration Manager console when trying to modify settings while another user has the same window open. If not properly handled, duplicate entries or even entire duplicate SCFs can occur, which can brick SCCM (ask me how I know).
Admins can use the Get-CMHierarcySetting PowerShell cmdlet to view the site’s current settings and, by expanding the Props embedded property, find entries for GlobalAccounts; including the account information being queried by the GetGlobalUserAccount function. This is promising as the first eight bytes of the blob stored in Value2 matches how Adam described other credential blobs are stored in the database.
Continuing with the basesvr!GetGlobalUserAccount function is where things get interesting and we start to get some insight into the decryption flow and where the credential is stored.
The function loads then recovers an encrypted session key blob from the site definition file for the target user with CSCItem_Property::GetCopyFromArray
Decrypts the session key blob with the CServerAccount::Decrypt function
Calls CSCItem_UserAccount::GetPassword to retrieve the encrypted password for the user account
The password is finally decrypted with the CServerAccount:DecrptEx function
Quick observation of the CServerAccount::Decrypt function reveals it’s the equivalent of what has already been shared for decrypting credentials in CRED-5, which makes sense considering the session key’s blob format.
To validate this, we can use the script Chris recently shared to decrypt the blob and recover the session key.
Now, to get the encrypted password, the baseobj.dll!GetPassword function just did not decompile well when imported to Ghidra.
Instead, I attached a debugger to the smsexec.exe process and set a breakpoint on the GetPassword symbol imported from baseobj.dll and kicked off a forest discovery.
Once the breakpoint is hit, the global user account and session key blob are visible in the memory dump. This lines up with what we’ve worked out so far in the decryption flow and are now trying to get the encrypted password value.
Step over the break point a bit and eventually land on a call to CServerAccount:DecryptEX and see the same encrypted password value from the SC_UserAccount table shown at the beginning of the blog along with the session key in the registers. And, after the call to DecryptEx is returned, the password for the account is visible.
Looking into the DecryptEx function, the bulk of it is just prepping the session key and encrypted password data formats for a call to another function to return the decrypted value.
The final function performs multiple steps to finally decrypt the password. It:
Establishes cryptographic service provider context; it initially tries to reuse an existing key container and, if it doesn’t, it creates one
Formats the session key for CryptImportKey. This is actually pretty cool and is a nice trick by the devs to reformat the session key. The CreatePrivateExponentOneKey function “encrypts” the session key with a private exponent value of 1 which mathematically checks out but does nothing to encrypt the session key. What it is doing, though, is basically encoding it into SIMPLEBLOB format for session key transport that CryptImportKey expects for session keys
Imports the formatted key
Allocates memory space for the decrypted password
Calls CryptDecrypt to decrypt the password with the session key
I originally set out to rewrite the native code to decrypt the string, but recalled seeing another decryption method (Microsoft.ConfigurationManager.CommonBase.EncryptionUtilities.DecryptWithGeneratedSessionKey) when I was recreating Adam’s work with CRED-5.
This made it pretty easy to create a wrapper around this method to decrypt the forest discovery password.
# Load the DLL Add-Type -Path "C:\Program Files\Microsoft Configuration Manager\bin\X64\microsoft.configurationmanager.commonbase.dll"
function Invoke-DecryptEx { [CmdletBinding()] param ( [Parameter(Mandatory = $true, Position = 0)] [string]$sessionKey,
[Parameter(Mandatory = $true, Position = 1)] [string]$encryptedPwd )
While reading documentation on untrusted forest deployment, I came across an interesting requirement for site system installation that provides another opportunity to recover forest credentials. To support untrusted forest deployment, admins must configure an account in the target domain to use for site installation. The account must have local admin permissions on the host and will be used for all future connections to the site system.
Site system installation accounts are stored the same way most other credentials are in the database and can be decrypted with the various methods from CRED-5.
Finally, while exploring all these various credential blobs, I discovered essentially every encrypted credential in SCCM can be recovered via the Administration Service API. Previously, I summarized the SCCM site control file (SCF) and how administrators can review it with PowerShell. It’s also visible from the API via the /wmi/SMS_SCI_SiteDefintion endpoint.
The SC_UserAccount table from the site database has an equivalent endpoint at /wmi/SMS_SCI_Reserved.
I don’t believe this is an exhaustive list yet but this discovery, in combination with the PowerShell decryption methods, can make credential recovery trivial. If the site server’s host system is a managed client, operators can leverage SCCMHunter’s admin module to recover and decrypt credentials stored in SCCM.
As a demo credential blobs from the SC_UserAccount table can be extracted with the get_creds command.
You can use the decrypt command to decrypt the blobs. The target environment will either need script approval disabled or you’ll need a secondary set of approver credentials since the decrypt function uses scripting under the hood. Again, the site server must be a managed client for this to work.
Defensive Considerations
While more credentials are available for abuse following hierarchy takeover, there really isn’t anything new here that warrants new defensive techniques. The defensive recommendations for CRED-5 are applicable here. In particular, the recommendations in PREVENT-10 to enforce the principle of least privilege for service accounts. Additionally, many of the accounts I’ve seen from previous assessments had an account name of “not configured”.
This happens when an account was being used for an action, in this case forest discovery, and then removed from that service. My conclusion here is admins may incorrectly believe removing the account from the service deletes the account. Organizations should review accounts found in the \Administration\Overview\Security\Accounts panel and remove them if they’re no longer in use.
Final Thoughts
I recognize that, if SCCM is managing an untrusted forest, there are likely clients running on devices from that forest and those can be leveraged for the same or greater lateral movement. I personally like to have as many credentials as possible and believe the credentials shown here may be extremely valuable.
Soon after this blog is published, we plan to update Misconfiguration Manager with these techniques to ensure they’re available to attackers and defenders. We have many more updates to make, which we’ll be publishing at a later date.
Come hang out with us in the #sccm channel on the BloodHound Slack. It’s been cool to see other members of the industry develop SCCM tradecraft and we discuss much of that conversation there.
When we founded SpecterOps, one of our core principles was to build a company which brought unique insight into high-capability adversary tradecraft, constantly innovating in research and tooling. We aspired to set the cadence of the cyber security industry through a commitment to benefit our entire security community. Today, I am thrilled to announce that SpecterOps has raised $75 million in Series B funding to further our mission and strengthen our work in solving the complex problems posed by
When we founded SpecterOps, one of our core principles was to build a company which brought unique insight into high-capability adversary tradecraft, constantly innovating in research and tooling. We aspired to set the cadence of the cyber security industry through a commitment to benefit our entire security community. Today, I am thrilled to announce that SpecterOps has raised $75 million in Series B funding to further our mission and strengthen our work in solving the complex problems posed by Identity Attack Paths.
We look forward to expanding the reach of BloodHound, our platform for comprehensively identifying and removing Identity Attack Paths and accelerating our contributions to the community through open-source tools and research. As we look to the future, we are growing product engineering and research teams to continue to build out attack path coverage and features in the BloodHound platform, in addition to sales and marketing teams to better serve our customers and the broader security community.
The Series B round was led by global software investor Insight Partners, with participation from Ansa Capital, M12, Ballistic Ventures, Decibel, and Cisco Investments. We are privileged to work with partners that bring strong cybersecurity expertise and, most importantly, they understand the complexity of the problem we are trying to solve. Their support will be invaluable as we continue our growth trajectory.
As corporate systems become more distributed and complex due to cloud adoption and organizational change, Identity Risk becomes increasingly prevalent. Identity services, like Microsoft Active Directory and Entra ID, become pathways into enterprise networks. These environments become extremely challenging to secure against attacks as their complexity enables exponential growth in lateral movement and escalation opportunities which are difficult to detect. Tens of thousands of user accounts and devices across multiple technology stacks, coupled with decades of built-up technical debt and misconfigurations, create Identity Attack Paths that attackers can exploit to turn initial access into complete enterprise takeover.
Strong Identity security, centered through Attack Path Management, significantly constrains attackers’ options as they gain initial footholds into the enterprise, preventing them from attaining their objectives and causing devastating business impacts. Our approach focuses on identifying the Attack Paths that matter most — the “choke points” that lead to high-value assets. Attack Path Management identifies the least disruptive configuration changes that will reduce the most risk. On average, our customers see a 40% reduction in Identity Risk in the first 30 days of implementation.
Since launching BloodHound Enterprise in 2021, SpecterOps has experienced significant growth in company headcount, new customers, and revenue. We received FedRAMP® High Authorization for BloodHound Enterprise in December 2024 and earned CREST accreditation for penetration testing services this January. Within the last year, Kevin Mandia joined us as chair of our Board of Directors, and we launched our fast-growing channel partner program to accelerate adoption of Attack Path Management to combat complex Identity Risk.
Our team exists as a collection of aspirations made real by hard work, but we also exist within the constraints of the society in which we operate. We believe that security is a fundamental right in our increasingly digital world, and our mission is to help organizations protect their most critical assets from sophisticated attackers.
I invite you to join me, along with fellow executives Jared Atkinson and Justin Kohler, for a webinar on “What’s New in BloodHound: Latest Updates and A Look Ahead” at 2 p.m. EDT on Thursday, March 20. Additionally, SpecterOps will host our annual cybersecurity conference SO-CON 2025 March 31-April 1 in Arlington, Virginia. To register for the event, visit https://specterops.io/so-con/.
We feel incredibly grateful for the partners, customers, and friends we have gained throughout our company journey, and we are excited for the next stage in our growth as we continue our work to strengthen Identity security and help organizations better protect themselves in an increasingly complex threat landscape.
In this second post of a five-part series, I provide advice on how to best utilize the PEN-200 course material for a successful career in ethical hacking.Disclaimer:All opinions expressed in this article are solely my own. I have reviewed the content to ensure compliance with OffSec’s copyright policies and agreements. I have not been sponsored or incentivized in any way to recommend or oppose any resources mentioned in this article.IntroductionIn my previous post in this series, I discussed pra
In this second post of a five-part series, I provide advice on how to best utilize the PEN-200 course material for a successful career in ethical hacking.
Disclaimer:
All opinions expressed in this article are solely my own. I have reviewed the content to ensure compliance with OffSec’s copyright policies and agreements. I have not been sponsored or incentivized in any way to recommend or oppose any resources mentioned in this article.
Introduction
In my previous post in this series, I discussed practical steps students could take before enrolling in the PEN-200 to get the most value out of the pursuit for the Offensive Security Certified Professional (OSCP) certification. The next step is to discuss what to do while reading the official course material.
“One hour per day of study in your chosen field is all it takes. One hour per day of study will put you at the top of your field within three years. Within five years, you’ll be a national authority. In seven years, you can be one of the best people in the world at what you do.” — Earl Nightingale
The PEN-200 course is composed of 28 distinct modules covering fundamental penetration testing concepts. In this post, I discuss my advice for students starting the course. My three main arguments are:
Use the note-taking process and exercises in PEN-200 as a chance to build confidence with tools and platforms relevant to offensive security roles
Not all PEN-200 techniques are practical for real-world assessments — some require adaptation to evade defenses while others risk service disruption, credential exposure, and more; understanding these nuances will make you a more effective and responsible professional
PEN-200’s curated references to blogs, proof of concepts (PoCs), and whitepapers provide not only valuable learning but also insight into key industry contributors, which can give you an edge in job hunting and networking
Use Job-Relevant Tools and Platforms to Write Your Notes
The OSCP certification is primarily geared towards beginner-level security professionals, so it’s fair to assume that most students have limited experience with the tools that offensive security consultants commonly use. The PEN-200 course provides a valuable opportunity for OSCP candidates to gain exposure to these tools and build their proficiency before entering the field.
To clarify, this section is not about the “hacking tools” you will inevitably use to identify and exploit vulnerabilities — PEN-200 provides ample guidance on those. My advice focuses on tools that are tangential to offensive tasks but still widely used in cybersecurity roles.
The PEN-200 course is designed to be completed using Kali Linux, a Debian-based distribution pre-installed with many of the most popular tools for offensive security testing. While Kali is convenient for quickly deploying a Linux virtual machine (VM) with a broad toolkit, you shouldn’t feel restricted to using it for professional development. Experiment with other Linux distributions (e.g., Parrot OS, BackBox Linux, BlackArch) and even Windows-based distributions (e.g., CommandoVM, FLARE-VM) while improving your proficiency with virtualization software like VMWare or VirtualBox.
Although it is more commonly associated with software development, git — the popular version control system — is a valuable asset to offensive security consultants. Deploying your PEN-200 notes to a git repository offers a great opportunity to improve your fluency with fundamental operations like commit, pull, push, merge, and more. The biggest hurdle to mastering git is often the concept of “branching”: the process of diverging from the master branch (often called master or main , depending on your platform), making independent changes, then later merging those changes back into the main branch. Fortunately, there are many excellent online tutorials to help with this.
If you choose to use git for your notes, consider hosting them in a private repository on GitHub or GitLab. Both platforms are based on git but offer additional features such as access control, repository templates, Markdown support, and more. Personally, I prefer GitLab for storing my notes due to its granular visibility controls, but GitHub is undeniably the most popular option and the one you’re most likely to encounter in a cybersecurity role. Whichever platform you choose, make absolutely sure it’s locked down and only you can access it. Copyright infringements of OffSec’s proprietary course materials — even accidental ones — can result in punitive responses from OffSec.
Now that you’ve chosen where to host your notes, it’s time to start writing them! The three most popular command-line text editors are Vim, Emacs, and nano. Of these, nano is the most beginner-friendly and an excellent starting point. Both Vim and Emacs are feature-rich and highly customizable, but have a high learning curve. If productivity and modularity are values you prioritize, it pays to start learning one (or both) early. The debate over which is superior is so enduring that it even has its own Wikipedia article.
Of the two, I only have experience with Vim, so it’s the only one I can recommend. Its commands can be confusing at times, but it’s a huge productivity booster in the long-run. If you decide to go down the Vim rabbit hole, I recommend starting with Vi, Vim’s precursor. Vi supports fewer commands, but is more likely to be encountered on older Linux distributions, so you won’t be caught off guard when your favorite Vim commands aren’t working. Once you’ve got the hang of Vi and are ready to graduate to Vim mastery, consider using the online tutorial/game VIM Adventures to hone your skills.
Command-line text editors can be fun, but they’re not for everyone. If that’s you, I highly recommend Obsidian as your note-taking application. As I discussed in my last blog post, Obsidian is an extremely popular graphical text editor packed with useful features. In 2021, an employee of the cybersecurity consulting firm TrustedSec published a blog post detailing how they incorporated Obsidian into their internal tradecraft documentation. While this setup isn’t a one-to-one equivalent of an online course, the features showcased in the article — especially the usage of the Obsidian-Git community plugin — are particularly relevant for PEN-200 students.
tmux is an open-source terminal multiplexer which allows users to manage multiple terminal instances from a single screen. This might not seem groundbreaking if you work from a multi-monitor desktop; however, tmux is a game-changer when you’re managing multiple jobs on a remote Linux system with only shell access. You can split your terminal into multiple panes, reattach to sessions in case a connection drops, or run concurrent background jobs and reconnect to them as needed. Needless to say, it’s an incredibly powerful utility that’s often overlooked. Most PEN-200 students know IppSec from his Hack the Box (HTB) walkthroughs, but his tmux tutorial is just as valuable to OSCP-hopefuls.
Lastly, take advantage of every opportunity to sharpen your scripting skills in languages like Python, Bash, PowerShell, and more. Some great use cases would be scheduling tasks on Kali via cron jobs, or automating the process of reconnaissance, post-exploitation enumeration, and credential extraction. As you study, you’ll come across many PoC exploits — some written in languages you don’t know, others that could be improved upon. Instead of settling, why not rewrite the PoC yourself in your preferred language? Not only does this give you a working exploit, but it also becomes a strong addition to your job application portfolio. For inspiration, check out this blog post by a colleague of mine, who developed a working exploit for CVE-2022–35914 after finding the official solution for an OffSec Proving Grounds machine unsatisfactory. When developing scripts or PoCs, consider using a code editor like Visual Studio Code, a popular Microsoft option packed with features and supported languages.
In short, be proactive when writing your notes. While you may never need to learn an entirely new scripting language, coding platform, or operating system on the fly during a billable engagement, it helps to have a solid grasp of the most useful technologies before landing your first consulting job.
Understand the Real-World Impact of Each Technique
The PEN-200 course provides a thorough and comprehensive foundation in penetration testing. However, applying its techniques in real-world engagements exactly as taught — without considering their potential impact — can lead to unintended consequences. Understanding not just how a technique works but also when, where, and whether to use it, distinguishes a skilled penetration tester from “script kiddies”. This section explores the risks of blindly following course material and how students can develop the judgment necessary to apply techniques responsibly in real-world engagements.
NOTE:
Developing a mature understanding of our tradecraft also helps mitigate the risk of introducing a backdoor through our toolkit. This is demonstrated in a recent CloudSEK report, which revealed that a trojanized version of a remote access Trojan (RAT) malware builder infected 18,459 devices, mostly belonging to cybersecurity students and hobbyists.
OSCP-certified professionals generally agree that PEN-200 does not emphasize stealth. While the syllabus includes an antivirus (AV) evasion module, the course primarily teaches identifying and exploiting vulnerabilities rather than evading detection — likely to prevent overwhelming new students. However, many of these techniques would immediately trigger alerts in security-mature environments. For example, Mimikatz, a popular tool for extracting plaintext credentials and password hashes from Windows Local Security Authority Subsystem Service (LSASS) memory, would almost certainly trigger endpoint detection and response (EDR) alerts if triggered in its original binary form. Many penetration testing techniques face similar scrutiny, and students should understand their OPSEC implications before applying them in real-world assessments.
When people think of service disruption in cybersecurity, their minds often jump to denial of service (DoS) attacks. However, even legitimate penetration testing techniques , if used carelessly, can cause outages and service unavailability. This risk is a major deterrent for businesses considering cybersecurity consulting services, as potential disruptions — such as bandwidth spikes, application latency, or unscheduled downtime — can lead to performance degradation and reputational damage. Common offenders include port scanners like Nmap, vulnerability scanners like Nessus, and brute-force password tools like Kerbrute, which can trigger account lockouts due to repeated failed login attempts. In real-world scenarios, penetration testers must pace network scans carefully, communicate clearly with the client about targeted systems and services, and adhere to account lockout policies to minimize disruptions.
Some tools and techniques can inadvertently expose plaintext credentials or hashed passwords, introducing serious security risks. In a simulated exercise, for example, we might use Mimikatz to dump NT LAN Manager (NTLM) hashes from memory or input a username and password into the Get-Credential PowerShell cmdlet before passing them to a PowerView function. While this may seem harmless in a controlled lab environment, the real-world consequences are far graver. If a Windows host logs command line output or an EDR solution records process activity, these credentials could be stored in logs accessible to administrators, regular users, or even threat actors — potentially leading to credential theft and further malicious actions long after the engagement is complete. Using third-party cloud-hosted tools to process artifacts containing client secrets — such as CrackStation for password hashes or DynamiteLab for packet captures — could also result in credential exposure, as neither the consultants nor the client have control over where that sensitive data is stored.
Lastly, we must consider whether a method could violate personal ethical boundaries or contractual obligations. Cybersecurity consulting firms often establish internal guidelines prohibiting high-risk activities that could cause irreversible damage with little value in a report, such as intentional DoS attacks, disabling security services, unauthorized password changes, or exfiltrating sensitive data like the ntds.dit database or structures containing personally identifiable information (PII). Consultants are also contractually bound by the client-imposed rules of engagement (ROE), which may restrict certain tactics or system/user targets, requiring testers to adjust their tradecraft. For example, Responder, a tool used for capturing NTLM v2 hashes, could unintentionally collect credentials from out-of-scope users or systems, constituting an indirect ROE violation. Ultimately, both personal ethics and professional constraints can significantly impact how penetration testers apply offensive techniques in real-world engagements.
In this section, I’ve explored four critical questions students should ask themselves after becoming proficient with a new security tool or technique:
Does this tool/technique carry a high risk of triggering OPSEC solutions?
Could this tool/technique result in service disruptions?
Could this tool/technique expose plaintext credentials or weak password hashes?
How could this tool/technique violate ethical or contractual boundaries?
NOTE:
Other important questions to consider — but omitted for brevity — include: “Would bypassing a common OPSEC solution for this tool/technique require disabling security services?”, “Does this tool/technique leave behind system artifacts that require cleanup to maintain stealth or as part of post-engagement procedures?”, and “Which threat actors have used this tool/technique before?”.
While these questions are important, they should not interfere with your learning process while navigating the course for the first time. Instead, keep them in the back of your mind and revisit them once you have the confidence and time to explore them fully. Developing this awareness early will help ensure you approach offensive security with the professionalism and responsibility expected in real-world engagements.
Read the Footnotes and Follow the Authors
Earlier this year, while preparing for the Offensive Security Experienced Penetration Tester (OSEP) certification, I was working through the PEN-300 course material, a direct continuation of the techniques taught in PEN-200. As I reviewed the footnotes in one of the modules, a particular blog post caught my attention. The topic was interesting, but what really stood out was the author’s handle — it looked vaguely familiar. Curious, I clicked on their profile to dig deeper.
A few seconds later, it hit me. I had accidentally stumbled on my boss’s old blog channel!
This story underscores an important lesson: the footnotes in PEN-200 (and other OffSec courses) aren’t just extra reading material — they’re a window into the offensive security industry. The white papers, PoCs, and blog posts referenced in these courses were written by researchers and hackers who have shaped modern penetration testing techniques and, in some cases, you may even cross paths with them later in your career. Taking the time to explore these citations offers more than just educational enrichment. It provides insight into “who’s who” in the industry, giving you an edge when networking or job hunting. While the extra reading may seem tedious, its benefits are an underappreciated strength of the course.
Understanding who the key players are in offensive security isn’t just an academic exercise; it’s a form of situational awareness that can benefit your career. The individuals whose blog posts and exploit code appear throughout the PEN-200 course are often the same ones presenting at security conferences, contributing to your favorite security tools, or even leading your next interview. The offensive security industry is surprisingly small, so by familiarizing yourself with just a handful of regular contributors, you gain a solid understanding of current industry trends, the companies driving innovation in different areas of cybersecurity, and even what technical skills hiring managers are prioritizing. This awareness can help you make more informed decisions, from identifying career mentors to choosing which companies to apply to.
Once you’ve read the footnote and understood its material, make an effort to follow the author on any platform where they have a public profile. Many security researchers publish their articles on Medium, but it’s also common to find their work cross-posted on personal websites. If the author works at a cybersecurity consulting firm, check their company’s blog — firms like TrustedSec, Mandiant, PortSwigger, and SpecterOps regularly publish security research. If the footnote references a coding project, explore the author’s GitHub profile to see their other work or contributions to open-source projects. Following them on X (formerly Twitter), BlueSky, or LinkedIn ensures you’ll receive timely updates on future publications. Lastly, try searching for the author on YouTube by their full name or handle, as they may have presented at major cybersecurity conferences like DEF CON, Black Hat, or RSA Conference.
Taking the time to read the footnotes and dive into the work of influential security researchers not only enhances the educational value you gain from the PEN-200 course, but also sharpens your situational awareness of the offensive security industry. This knowledge can serve as a powerful networking tool, help you discover new areas of professional interest, and guide your career path. So, next time you come across a footnote, don’t just skim it — take the extra step and use it as a launchpad for further exploration. You might just end up connecting with your next manager…
Conclusion
As always, feel free to comment if you enjoyed the article, have questions/criticisms, or would have liked to see other arguments included. In the next post, I will discuss my advice for the PEN-200 labs.
During red team operations, stealth is a critical component. We spend a great deal of time ensuring our payloads will evade any endpoint detection and response (EDR) solution, our traffic is obfuscated and hard to trace, and our commands will interact with a system in a way that limits the number of possible detection opportunities based on our actions that could thwart our operation; however, even when tiptoeing around a client environment, we have likely all experienced a scenario where we hap
During red team operations, stealth is a critical component. We spend a great deal of time ensuring our payloads will evade any endpoint detection and response (EDR) solution, our traffic is obfuscated and hard to trace, and our commands will interact with a system in a way that limits the number of possible detection opportunities based on our actions that could thwart our operation; however, even when tiptoeing around a client environment, we have likely all experienced a scenario where we happen to list the wrong directory, read the wrong file, or access the wrong registry key and set off an alert to the Security Operations Center (SOC) to get an investigation rolling. I am, of course, talking about that pesky system access control list (SACL) that made a simple Windows event to let the SOC know someone tried to access something they should not.
DACL vs. SACL
If you have spent some time in the field, you are likely familiar with DACLs and SACLs, but I will do a quick recap to refresh some minds and educate the rest. We will start with the securable object. From Microsoft’s documentation: “A securable object is an object that can have a security descriptor. All named Windows objects are securable. Some unnamed objects, such as process and thread objects, can have security descriptors too.” So, any securable object can have a security descriptor applied to it that can contain access control lists (ACLs). We are talking about files, registry keys, processes, pipes, services, etc. The ACLs within the security descriptor come in two flavors: discretionary access control lists (DACLs) and SACLs.
Most people are more familiar with the DACL, which determines whether a security principal attempting to access a securable object in question is allowed to do so based on allow or deny entries. This is done based on several factors in the access token, but in short, we can equate it to the doorman at a bar. A user attempts to access the bar and presents their ID to the doorman, then the doorman checks their ID and allows or denies them entry based on the information provided. SACLs, on the other hand, are more like a logbook. They are not determining access; they only log whether the security principal succeeded or failed to access the securable object. We can think of this as a scribe standing next to the doorman at the bar, writing down the names of every person who attempts to access the bar and whether the doorman allows or denies them.
We have seen the use of these technological trip flares increasing lately. While the increase in SACL usage is not bad, it does mean that we need to be even more careful about what we access in an environment. Honeypot accounts in Active Directory (AD) can catch the use of tools like BloodHound when it tries to read an AD object that no one was intended to read, the registry could be watched to see if an attacker tries to access local security authority (LSA) registry keys, or it could be as simple as a “password” file on a share set to let defenders know if someone tries to access some suspiciously sweet administrator credentials. As organizations and defenses mature, it is becoming more crucial for red teamers to know what we should not risk touching.
Enter SACL Scanner
To help with this, and learn C along the way, I created a simple C program called SACL_Scanner to aid fellow red teamers in identifying the configured trip flares so we can avoid them. Currently, it will scan for SACLs on three local Windows securable objects and AD: registry keys, services, files/directories, and AD objects. It is also compiled to run with execute_pe in most C2 frameworks since it is much more likely that a red teamer will be in that scenario rather than directly on a host running programs.
Before we get into the demos, we need to talk about the obvious barrier to what we are trying to achieve: privileges. We will need the SE_SECURITY_NAME privilege corresponding to the objects we are trying to read. This means that we must be at least an administrator or have the SE_SECURITY_NAME privilege assigned to our access token. It is likely that when you are really worried about SACLs on other users’ files, registry keys for the security account manager (SAM), or mucking with services on the local host, you are already an administrator; ergo, it should not be too much of an issue there. However, when trying to read the SACLs on AD objects, we run into a bit of a catch-22 in that we might want to know what objects we should not touch so we can execute an attack path in AD to elevate our access therein, but we need elevated permissions to read the SACLs on AD objects to know which objects we should not touch. Sadly, I do not have a solution for that as that is AD working correctly. Nevertheless, we can still obtain additional information once we have elevated our access, tread lightly, and limit our indicators of compromise (IOCs).
Additionally, something the tool is not going to do is let you know the status of whether auditing itself is enabled. SACLs are two parts that combine to make event logs for detection: the SACL itself on the securable object and the computer audit policy settings determine whether the logs themselves are generated. Both of these must be enabled for a SACL to provide any value. If the SACL is set on an object but auditing is not enabled, the SACL does not really matter. Conversely, if auditing is enabled but nothing has a SACL set, then auditing is not generating anything. One could argue this is only partially true as there are objects such as LSASS that have SACLs set by default, but we will not get into that list here as Microsoft does not make it readily available. In our case, to reiterate, we are only checking for SACLs themselves on securable objects here; not whether auditing is enabled.
For demo purposes, I am running a simple Windows environment with a single workstation and domain controller (DC). For my command and control (C2) framework, I am using the Mythic framework with a Merlin agent running on the workstation. In this case, the agent runs under the context of an elevated user to show the output. Also, forewarning, I will not be covering covert techniques themselves but rather a down-the-middle use case to focus on the tool and output itself.
Alright; now that the background, summary, and requirements are complete, let’s get into the simple demos. We will start with the registry. There is so much information available to us in the registry that we are almost guaranteed to interact with it in some way during an assessment, whether it is intentional or not. But where do we want to start our testing to see which important registry (sub)keys defenders might be watching? Thankfully, one of my defensive cohorts, Luke Paine, already made a sample list in his post of The Defender’s Guide — The Defender’s Guide to the Windows Registry. Included in his detailed coverage of registry SACLs, he provided a .csv file with a list of keys and the registry operation to watch: Highly Targeted Registry Keys.csv. Let’s start with a few items in this list to test our SACL setup in a lab.
The following few pictures show the setup of the audit policies and SACLs so we can conduct testing. If you are unfamiliar with setting this up, you can think of it as a little guide to setting SACLs in your environment. First, for our local host, we go into Local Security Policy, then Local Policies > Audit Policy, and ensure that Audit object access is enabled (Figure 1).
Figure 1 — Audit Object Access Enabled
Next, we can start setting up some SACLs. We will use the HKLM\SYSTEM\CurrentControlSet\Services registry key referenced in the Defender’s Guide. For simplicity, open regedit.exe, browse to the key, right-click, and select Permissions (Figure 2).
Select “Advanced” in the security permissions window (Figure 3).
Figure 3 — Security Permissions Window
Next, select auditing. If you are unfamiliar with the basic setup of the advanced security window, the permissions tab will show and set DACLs, auditing handles SACLs, and effective access is, as it sounds, testing the access of the account you ask it. In my case, you will see that I have set a SACL to audit anyone in Authenticated Users accessing this registry key (Figure 4).
Figure 4 — Advanced Security Settings
If we select the SACL, we can see the principal again; the type is set to success auditing, applies to this key and subkeys (inheritance set), and audits on Set Value and Create Subkey (Figure 5).
Figure 5 — SACL Settings on Registry Key
Now that we have our test SACLs set, we can pick a service to modify and ensure it works. In my case, I went with the OneSyncSvc and decided to change the ImagePath to set up some simple persistence (Figure 6).
Figure 6 — OneSyncSvc Registry Keys
Before we start the SACL testing, we open the Windows Event Viewer, navigate to Windows Logs > Security, and set a filter on Windows event ID (EID) 4663: “An attempt was made to access an object” (Figure 7). I just cleared them up to make sure we have a fresh list.
Figure 7 — Event Viewer Filtered
In our elevated Merlin agent, we use a simple run sc config command to modify the binPath of the service OneSyncSvc to instead point to a payload (Figure 8).
Figure 8 — Service Modification
After the command, we can double-check that the service changed by refreshing our regedit and see that the ImagePath has changed for OneSyncSvc (Figure 9).
Figure 9 — ImagePath Changed
In Event Viewer, we now have a new EID 4663 (i.e., “An attempt was made to access an object”) stating that NT AUTHORITY/SYSTEM accessed the registry key HKLM\SYSTEM\CurrentControlSet\Services\OneSyncSvc (Figure 10). This event is our expected result since we had the SACL set to audit any access and inherit it from Services, so we catch modifications on all services. Opening the event, we see that the requested access was Set key value, corresponding to our modification (Figure 11).
Figure 10 — Event 4663 LoggedFigure 11 — Access Requested: Set Key Value
We can double-check things like this ahead of time to prevent tripping the SACL with this simple SACL_Scanner tool. It works with execute_pe (and Octoberfest7’s inline-execute-pe). Running this tool with the “-r” flag followed by the key we want to target will give us the desired information. It will scan the entire hive if we target a hive itself (HKEY_LOCAL_MACHINE, HKEY_CURRENT_USER). We check whether an item has any SACLs, if it is a direct or inherited SACL, and the SACL info we desire to let us know what is being audited (Figure 12). Now, depending on how the SACL is set up, this is not full proof to check without being detected, but I will go into further details on this in the detection section.
Figure 12 — Registry Services SACL_Scanner Result
Now, let’s check OneSyncSvc directly. It tells us there is a SACL applied to the key but does not give us details on it (Figure 13). This is intentional since it is an inherited SACL. It will display direct SACLs when requested, but inherited SACLs will only display when the verbose flag (-v) is added so we do not get too much information when scanning multiple items.
Figure 13 — Registry OneSyncSvc SACL_Scanner Result
Rerunning the command with the “-v” flag gives us the complete information we want and some additional security identifier (SID) information (Figure 14).
Figure 14 — Verbose Registry Key Check
Adding the “-opsec” flag allows us to run an additional check to determine if the SIDs within the SACL match any SIDs applied to our current access token. We can see that we have a detected match in this case, which lets us know that we should avoid modifying this registry key further, or we would trip the SACL (Figure 15). Note: a known limitation of this is that the tool compares the SIDs in the access token to the SACL, which means any nested groups that would not be added to the access token will not come back as detected since we are not unrolling groups here.
Figure 15 — SACL OPSEC Check
Now, let’s check the SAM SACL to see if dumping the SAM would get us burned. We can start by setting a SACL on HKLM\SAM with the same steps. When we try to access a key under HKLM\SAM, an event log lets us know someone has tried to access those keys (Figure 16).
Figure 16 — HKLM\SAM SACL Event
When checking HKEY_LOCAL_MACHINE\SAM with SACL_Scanner, we get the info we want to see, letting us know there is a SACL set and that we should avoid dumping the SAM (Figure 17).
Figure 17 — HKLM\SAM SACL_Scanner Check
I will run through some of the other flags pretty quickly as they should be understood pretty easily. Using the “-f” flag followed by a file on the host or share will similarly check the SACLs (Figure 18).
Figure 18 — File SACL Check
Next, we can use “-d” to instead feed it a directory to check the files therein. Notice that we have multiple files here and only one has SACLs applied (Figure 19). Sometimes we can judge based on names and settings. In our example below, we can see that there is a SACL directly applied to my tongue-in-cheek mock honeypot file to alert on reading the file; however, the server_PWs.txt file right above it has none. We can infer that I might not want to touch the more tempting file if I can avoid it.
Figure 19 — SACL_Scanner Directory Check
If we throw the “-opsec” flag into the directory listing, we first check the directory itself to see if we should list files. If we trip a SACL while enumerating file SACLs, we will skip it (Figure 20). This check is nice with a targeted directory but even more important when we use just “-d” without a supplied directory, which will scan the entire C:\ drive.
Figure 20 — Directory SACL Check
Also, while I have not seen it much, we can scan services with “-s.” The flag by itself will check all services, or we can add a specific service to target (Figure 21).
Figure 21 — SACL_Scanner Service Check
Now, on to some AD checks. We start by ensuring the Audit Policy on the domain controller has “Audit directory service objects” enabled (Figure 22). We do not necessarily need it for our SACL checks, but it is good to include it if anyone needs the extra step to help turn on SACL eventing.
Figure 22 — Enabled Directory Object Auditing
As I stated earlier in the post, the major blocker in reading the AD SACLs is simply having the privilege to read the SACLs objects. I know it’s a bit counterproductive and, sadly, this means that we cannot collect them like we do DACLs with a tool like SharpHound. As such, it will likely be of better use if you try to establish domain persistence versus finding an attack path to rise to the top. The flags should make sense based on what we covered. We add the “-a” flag to target AD followed by the “LDAP://{distinguished name}” of the object we want to target. Adding the “-opsec” flag will again check our SIDs to see if we would trip the SACL, and there is a hash map (the reason the file is a bit big) with the GUIDs mapped to user object class attributes. In our case below, we can see that there is a SACL applied to specterDA, which will trigger on writing to the msDS-KeyCredentialLink attribute (Figure 23). If we have not done shadow credentials so far during our assessment, we know we should not try to do that as our persistence on this DA account.
Figure 23 — Domain Admin Check
While the hash map covers those user object class attributes, we can still obtain the SACLs on other objects, like the data protection API (DPAPI) domain backup key. Running the scanner targeting that in my little test lab provides a sample output of no SACLs applied, so we should be fine in a SACL sense to backup that key and do what we need to from there (Figure 24).
Figure 24 — Domain Backup Key Check
Detections
When dealing with SACLs, there will be some fallibility in interacting with a securable object to get the information. The SACLs I commonly see on objects are auditing either modifications of an object or reading the data in a file or registry key. The event log this generates on a host is EID 4663 (i.e., “An attempt was made to access an object”). While this event is the primary log SACL_Scanner is designed to identify in the hope of avoiding generating it, you can use additional logs to detect the tool. For example, we can use EID 4656 (i.e., “A handle to an object was requested”) to get the precursor information to EID 4663. We will still need to obtain the handle to interact with it and read the permissions when reading the object information. We can add “Read Permissions” or “Read Attributes” checks to the SACL to identify SACL_Scanner obtaining the handle to read the SACLs (Figure 25). There are pros and cons to this, as with anything in security, as adding these checks to the SACL will create many more events as standard Windows programs like explorer.exe do their essential functions.
Figure 25 — Event Generated by SACL_Scanner
Similarly, in AD, we try to avoid writing the wrong properties by identifying them first, but other SACLs can detect our access attempts. By setting SACLs on reading object properties, specifically the Public-Information property set’s Object-Class attribute containing the NT-Security-Descriptor, we can detect SACL_Scanner looking at the SACLs on an AD object. We can see the GUIDs in an EID 4662 log, showing that we are reading those properties (Figure 26) and comparing them to the Microsoft documentation (Figure 27 and Figure 28). Auditing reading AD objects will generate an immense amount of traffic, so going that route will need to be severely tuned to gain any real value from it.
Figure 26 — Event Generate by SACL_Scanner Reading AD ObjectFigure 27 — Public-Information Property Set GUIDFigure 28 — Object-Class Attribute GUID
I am not a detection engineer, but to help with this I have made a basic Sigma rule that should help with detecting this tool and hopefully similar techniques.
That’s all for today. I hope this gives you a deeper understanding of how defenders are leveraging SACLs to detect unauthorized access attempts and how you can use SACL_Scanner to adapt your tradecraft accordingly. By being aware of these audit tripwires, you can fine-tune your enumeration, privilege escalation, and other techniques to remain stealthy.
Remember, effective red teaming isn’t just about bypassing defenses — it’s about continuously evolving alongside them. Stay proactive in researching new detection mechanisms, refining your OPSEC, and understanding the blue team’s perspective.
Getting the Most Value Out of the OSCP: Pre-Course PrepThe first post in a five-part practical guide series on maximizing the professional, educational, and financial value of the OffSec certification pursuit for a successful career in offensive cybersecurity consultingDisclaimer:All opinions expressed in this article are solely my own. I have reviewed the content to ensure compliance with OffSec’s copyright policies and agreements. I have not been sponsored or incentivized in any way to recomme
Getting the Most Value Out of the OSCP: Pre-Course Prep
The first post in a five-part practical guide series on maximizing the professional, educational, and financial value of the OffSec certification pursuit for a successful career in offensive cybersecurity consulting
Disclaimer:
All opinions expressed in this article are solely my own. I have reviewed the content to ensure compliance with OffSec’s copyright policies and agreements. I have not been sponsored or incentivized in any way to recommend or oppose any resources mentioned in this article.
Introduction
Love it or hate it, the Offensive Security Certified Professional (OSCP) remains a significant hurdle for many aspiring offensive security consulting professionals. While the course and exam offer undeniable educational value, I believe there are underappreciated practical steps students can take during their “OSCP journey” to strengthen their candidacy and develop the essential soft and technical skills needed for success in the field. In this post (hopefully the first of a small series), I’ll explore three pieces of practical advice for students to consider before enrolling in the course. In future posts, I hope to explore more advice tailored to distinct phases of the OSCP journey.
I am an associate consultant in the offensive security consulting industry, having successfully transitioned from a career as a software engineer in information technology (IT). While my background in offensive security consulting is still growing, I feel that my recent experience as a student trying to earn the OSCP certification (or, as I like to call them, “OSCP-hopefuls”) and my successful pivot into this field have provided me with valuable insights to share on this topic.
Some Background Context
The OSCP is a popular cybersecurity certification that tests an individual’s ability to identify, exploit, and report on misconfigurations/vulnerabilities affecting web applications, common network services, and the Linux and Windows operating systems. Maintained by OffSec (formerly Offensive Security), the certification stands out due to its rigorous exam, which requires candidates to complete a 24-hour practical black-box penetration testing scenario. Students are given an additional 24 hours to write and submit a report for grading. To earn the OSCP, candidates must successfully exfiltrate a minimum number of “flags” and submit a satisfactory report.
Employers widely recognize the OSCP as a valuable credential for entry-level roles in the offensive security consulting industry, which includes cybersecurity services like penetration tests, red team engagements, and purple team exercises. Its frequent appearance in job postings (which has earned it the joking moniker, “the LSAT for hackers”) and the challenging nature of the exam for junior ethical hackers make it a significant milestone. As a result, it’s common for students who pass the exam to altruistically share their experience in OSCP journey articles, offering insights to others who are on the same path, detailing what they studied, how they approached the exam, and their personal takeaways.
I was originally going to write my own article following this same prototype, but recent developments led me to reconsider. Although I passed the exam in March 2024, the OSCP exam underwent a significant format change in September 2024. Given these changes, I felt that a “review” of my OSCP journey would likely be outdated.
So Why Are You Writing This?
While I consider the OSCP a strong addition to my resume, I’ve found that much of the “value” I gained from the pursuit of the OSCP — value I’ve leveraged during job applications and in my current role— came from unexpected places. As it turns out, the OSCP journey is just as important, if not more so, than the credential itself. With that in mind, I felt compelled to share specific details of my OSCP experience, the lessons that served me well, and the actions I would take if I could go back and do it all over again.
If you look at the bulk of OSCP-related content online, it’s clear that the focus is overwhelmingly on developing the technical mastery needed to pass the exam. While this focus is understandably important, it overlooks the broader picture. The exam itself, along with the technical content required to pass it, offers valuable lessons, but they’re just one part of the overall journey that can contribute to a thriving career in offensive security.
This article aims to fill that gap by offering practical advice that students can follow to not only pass the OSCP but also to grow into well-rounded penetration testers. Some of this advice may be considered “extra mile” exercises, while others are proactive steps that can be employed more passively. Regardless, all of them are designed to help candidates maximize the professional, personal, and financial value of earning an OSCP certification.
A Few Disclaimers Before We Dive In:
Article Structure: Due to the length of my original draft, I decided to split this post into a five-part series representing each “phase” of the OSCP journey: 1) pre-course preparation, 2) during the course, 3) during the labs, 4) during the exam, and 5) after the exam (pass or fail)
Target Audience: While the primary audience for this article is for students hoping to break into the offensive security consulting industry, I do not mean to discount or exclude individuals who have already secured a consultant role or are pursuing the OSCP for other reasons such as personal enrichment or workplace/regulatory compliance (luckily, I believe much of my advice still generally applies to these individuals)
Not an Endorsement: This article is not an endorsement of the OSCP itself (at various points in this series, I will submit what I believe to be valid but fair criticism of the credential), but rather a vehicle to share insights from my personal experience with the certification
No Guarantees: I cannot promise that students who follow this advice will pass the OSCP exam or successfully pivot into the offensive security consulting industry
Other Paths are Valid: The OSCP is not a gatekeeper to the offensive security consulting industry (I know many junior to senior-level experts without the credential) and I would advise students to consider every path to a successful and fulfilling career before committing to the certification program
Before the Course…
“By failing to prepare, you are preparing to fail.” - Benjamin Franklin
Let’s start with advice that applies to students who are either considering enrolling in the PEN-200 course or are actively planning to. If you could walk away from this article with just three takeaways, here they are:
Estimate whether the return on investment (ROI) will be positive or negative before committing to enrollment, and explore ways to reduce upfront costs
If you’re preparing for the PEN-200 with external training, complete the training before enrolling and use that time to build your resume with practical and challenging achievements
Start creating a reference guide (AKA a “command cheat sheet”) early to improve your testing efficiency and become more familiar with common offensive security tools
Consider the ROI
The OSCP is undeniably an expensive certification program. Given the steep financial and time commitments, one must consider whether the tangible and intangible benefits of the program represent a net-positive, neutral, or net-negative ROI relative to the candidate’s career goals and personal circumstances.
At the time of this article, the base cost of the OSCP certification starts at $1,749, which includes 90 days of access to the online course, lab materials, and a single exam attempt. However, a more realistic estimate — factoring in multiple exam attempts and lab extensions — can easily exceed $2,000. Individual exam retakes cost $250 each, while 30-day lab extensions cost $360 apiece. Additionally, many students choose to invest in external training resources, each with its own associated costs (more on that later). For those seeking an extended study period and additional benefits, the LearnOne subscription offers a year of course and lab access, two exam attempts, and other perks for $2,749/year.
Additionally, studying for the OSCP is a significant time investment, and failed exam attempts include mandatory cooldown periods that can further extend the overall timeline and costs. While everyone progresses through the PEN-200 course and labs at their own pace, the most effective approach is often a marathon pace, not a sprint. If you’re under a strict time constraint or primarily seeking quick, incremental resume boosters, the OSCP may not align with your current goals.
The OSCP is also not the only practical ethical hacking certification program available, many of which are more cost-effective. Some of these courses cover material that is not included in the PEN-200 course but is arguably critical knowledge in the offensive security consulting industry, such as command and control (C2) frameworks and their infrastructure, antivirus (AV) evasion techniques, and more sophisticated web application and Active Directory (AD) attack vectors. While my personal experience is limited to Zero Point Security’s Certified Red Team Operator (CRTO) certification, I’ve heard positive reviews of the Hack the Box Certified Penetration Testing Specialist (HTB CPTS) and Practical Network Penetration Tester (PNPT) credentials. These programs are comparable in difficulty and scope to the OSCP and, perhaps most notably, are currently below $500, making them a more affordable alternative to the OSCP.
It should also be noted that certification programs are just one of many pathways to a career in offensive security consulting. While they are often a key metric technical recruiters use to assess candidates, other accomplishments — such as independent ethical hacking projects, competitive tournaments, or content creation — can carry equal or even greater weight on an application. These alternative routes showcase not only technical expertise but also initiative, creativity, and passion for cybersecurity, most of which come at a much lower upfront cost.
Still, there are notable benefits to pursuing the OSCP. The PEN-200 course encompasses an impressive breadth of penetration testing knowledge and the exam itself is notoriously challenging. Considering this, the OSCP has earned a well-deserved reputation as a litmus test for prospective consultants and technical recruiters therefore eagerly seek OSCP-certified candidates. Additionally, the certification has been around for a relatively long time and has strong name-brand recognition in the industry. Finally, it includes an impressive set of lab networks for students to practically apply the technical skills learned during the course to an environment composed of intentionally vulnerable machines. This aspect in particular provides a well-defined path to an audience — mostly composed of entry-level ethical hackers — from beginner to professional-level penetration testing mastery.
There are also pragmatic reasons to pursue the OSCP. Although I don’t have specific metrics to support my claim, my anecdotal experience in the job market suggests that many organizations incorporate the OSCP in their hiring process. Some firms require candidates to hold the certification, model their technical interviews after the exam, or mandate new hires to earn the credential within a specified time frame. Earning the OSCP early in your job search could therefore open up more doors for you professionally. Moreover, if your next role represents a significant increase in base income, the associated costs of the OSCP may be offset relatively quickly.
One straightforward way to increase the ROI of an OSCP investment is to reduce the upfront cost associated with the bundle. For currently enrolled university students, OffSec offers a 10% discount on a LearnOne subscription through its Achieve financing program. OffSec has also historically held an annual sale on LearnOne subscriptions during November through January. Beyond OffSec, many nonprofits offer partial or complete discounts for common certification programs — including the OSCP — to successful applicants of scholarship programs. Many companies also provide professional development benefits, which can cover the cost of an OSCP voucher. This is especially common among cybersecurity consulting firms and serves as a compelling argument in favor of waiting until after securing a new position before enrolling in the PEN-200.
In summary, the OSCP is a significant financial investment and prospective students should not take it lightly. For many, it represents a major milestone in their ethical hacking journey, a source of personal growth, and a pathway to a new career. For others, its benefits may only be marginal or, depending on the circumstances, not in their best interests. Ultimately, the decision rests with the individual, who should weigh all the factors and considerations to determine if the OSCP is the right choice for them.
Build Your Resume While You Study
While the course provides robust hands-on training, many OSCP-hopefuls — including myself — supplement their PEN-200 training with additional resources to enhance their learning experience. By strategically choosing training options, you can not only deepen your technical knowledge but also strengthen your resume or CV, making your study efforts even more rewarding.
The official OffSec motto is “Try Harder”, which essentially means that successful problem solvers are persistent, creative, and open to new ideas. At the risk of sounding arrogant, I’d suggest adding another adjective to the mix: “retrospective”. Penetration testers and others who face recurring challenges throughout their careers are more likely to succeed if they can learn from past experiences and apply those lessons to current problems. External training, then, is a natural extension of the Try Harder mindset. It’s also prudent, since we can deliberately select exercises we can showcase on a resume, reference in cover letters, or leverage using the STAR method during behavioral interviews.
Generally, I recommend completing external resources before enrolling in PEN-200 for two reasons. First, supplemental training establishes a solid foundation in both theoretical knowledge and practical experience with tactics, techniques, and procedures (TTPs) before starting the course. Although PEN-200 assumes no prior experience in ethical hacking, having a baseline understanding of key concepts can make the course more manageable and improve your efficiency. Second, when you purchase a course and exam voucher, your access to the online course material and lab networks is automatically activated, and the expiration date is set. If you complete the course and labs before your access expires but still require additional training, any time spent on external resources during this period could have been used to take full advantage of OffSec’s official resources (such as reviewing the course material or writing reports on the lab networks, which I will discuss later in the series). Finishing most or all of your external training before starting PEN-200 ensures you aren’t wasting the expensive time you paid for by focusing on extrinsic resources.
Take full advantage of the low-pressure environment of external training by experimenting with different commands, refining your assessment methodology (more on that later in the series), and discovering which technology stack you enjoy hacking the most. Platforms like Hack the Box (HTB) and OffSec’s Proving Grounds are perfect for this. You may even pick up knowledge that isn’t covered in the PEN-200, giving you a potential edge when applying for jobs and helping you stand out as a candidate. Additionally, many external training platforms have active communities where learners can collaborate, share insights, and support each other. Building connections within these communities can provide valuable peer feedback, challenge your assumptions, and give you a sense of camaraderie as you navigate the complexities of penetration testing.
In conclusion, practical supplemental training offers the dual benefit of preparing you for the challenging PEN-200 course while strengthening your profile as a candidate for offensive security consulting roles. Below, I have included a table of my personal recommendations for practical training resources, including their costs, the types of challenges they offer, and how they can enhance your job application. I have focused primarily on resources that I have personally used and are affordable, keeping in mind our previous discussion on ROI.
Begin Writing a Reference Guide
A reference guide is essentially a structure where consultants store key information they need to recall during engagements, such as command syntax or the requirements to launch a specific attack — essentially a “cheat sheet”. Not only is this type of resource valuable for the OSCP labs and exam, but it can also be an asset during a live engagement or published as a personal project that can be included on a job application.
I personally find command reference guides incredibly useful in both simulated training environments and live engagements. A well-organized, personalized reference guide not only improves your efficiency but also reinforces your assessment methodology, core-concept understanding, and technical writing abilities. Think of your guide as a living document that evolves alongside your growth as an ethical hacker, serving as a modular and reliable resource. Starting your reference guide early— even before beginning the PEN-200 course —can significantly enhance your testing efficiency and tool expertise.
A reference guide can arguably be started at any point in the OSCP journey, but I chose to include it in the “Pre-Course” section for multiple reasons. First, the guide should ideally transcend the OSCP and be useful for any ethical hacking project, so it makes sense to include it in one of the sections separate from the PEN-200 material. Second, if the student intends to pursue external training resources, they are bound to encounter useful tools before starting the course, making it prudent to document their usage. Finally, maintaining a reference guide is a continuous process, so I would like to get students in the habit of writing reference guides early as opposed to much later in the OSCP journey.
My favorite tool for creating reference guides is Obsidian, a free and cross-platform node-based note-taking utility. It offers a rich set of features, including an interactive graph, Markdown language support, a tagging system, and much more. Other node-based programs worth considering are Microsoft OneNote, Standard Notes, and CherryTree.
Let’s take impacket-GetUserSPNs as an example. This tool is part of Fortra’s Impacket suite and is based on the original GetUserSPNs.py module. It automates the “Kerberoasting” attack, which allows attackers to retrieve the password hash of a service account in an AD environment.
If we were writing a page for this tool in Obsidian, we could start with an overview section. This would include a link to the source code for the tool, as well as the MITRE ATT&CK framework page for Kerberoasting.
Next, we need to define the requirements necessary for this attack to be feasible. In this case, we should note that the attacker needs access to a valid credential set in AD and that the target user(s) must be a service account associated with a Service Principal Name (SPN). Additionally, it’s important to mention that this tool can be executed remotely from the attacker’s Linux machine on the same network, as some tools require execution on a victim’s Windows machine or through a C2 framework like Cobalt Strike. If verifying the feasibility of an attack requires additional tools, we can create links to other Obsidian pages and embed them here.
Next, we should include some command examples. Tools like impacket-GetUserSPNs often have many different command-line arguments and optional flags, so it’s best to prioritize the ones most relevant to you and omit the others.
Although it is considered [mostly] out of scope of the PEN-200 course, I still recommend including a section discussing how to enhance the “stealth” of a given command and thwart operational security (OPSEC) efforts. This is a critical topic in offensive security consulting and could help you stand out among other job candidates (a candidate who can demonstrate both technical aptitude with a given tool and how to use it stealthily is more desirable than one who only knows the former). While Kerberoasting is generally considered an “OPSEC-loud” technique, we will do our best to evade detection and explain our efforts in the OPSEC section. If you’re unsure whether a TTP can be made stealthier, consider researching it on resources like HackTricks or revisit this section later.
Finally, we will want to include the output from the command’s help menu (impacket-GetUserSPNs --help ).
If we wanted to go a step further, we could include an in-depth analysis of what happens “under the hood” when executing a typical Kerberoasting command. This would involve screenshots of the impacket-GetUserSPNs source code and network packets that Wireshark captured in a personal lab (more on this later in the series). Additionally, we could use Obsidian’s tagging system to link this page to a “kerberoasting” tag, unifying all other tools related to the Kerberoasting technique.
On a final note, a reference guide can serve multiple purposes depending on how you design it. A personalized guide — tailored to your study habits, tools, and workflow — can significantly improve your efficiency during exams or live engagements by helping you quickly locate critical information. If you’re like me and struggle with staying organized during an assessment, structuring your guide around an adversary emulation framework (e.g., the MITRE ATT&CK Framework, Lockheed Martin’s Cyber Kill Chain, and Mandiant’s Targeted Attack Lifecycle) can support a systematic approach to problem solving. In any case, it is best to start writing your own guide early and continue building it as you progress on your ethical hacking journey.
Conclusion
I hope you enjoyed the first post in this series. If you have any comments, criticisms, or advice you think should have been included, please feel free to leave a comment. In the next post, I’ll explore additional advice for students as they begin reading the official PEN-200 course materials.
TL;DR:Refreshed user interface with a new vertical navigation layout for improved user experience.General Availability of “Improved Analysis Algorithm” that provides more accurate risk scoring for findings across your environment.Enhancements to the Posture page, including a new “Attack Paths” metric and increased visibility into your Attack Path security posture.Release highlights focus on helping security teams better visualize, assess, and remediate identity-based Attack Paths.General Availab
Refreshed user interface with a new vertical navigation layout for improved user experience.
General Availability of “Improved Analysis Algorithm” that provides more accurate risk scoring for findings across your environment.
Enhancements to the Posture page, including a new “Attack Paths” metric and increased visibility into your Attack Path security posture.
Release highlights focus on helping security teams better visualize, assess, and remediate identity-based Attack Paths.
General Availability of Improved Analysis Algorithm and Security Posture Management Improvements
The BloodHound team previewed several concepts in the last couple of releases that made it easier for customers to visualize Attack Paths and show improvements in identity risk reduction over time.
This week’s release of BloodHound v7.0 includes significant enhancements focused on improving user experience and Attack Path risk assessment. Thanks to the feedback from customers and community, we are excited to showcase these enhancements together!
Fresh User Experience
In v7.0, the look and feel of BloodHound Enterprise (BHE) and BloodHound Community Edition (BHCE) have been given a noticeable refresh! With the goal of improving the user experience, the navigation pane has been moved to a vertical format.
New vertical navigation pane for BHE and BHCE.
When users hover over the icons the menu bar appears. This new open layout enhances the user experience, especially for users of ultra-wide monitors.
Improved Analysis Algorithm
In the BHE v7.0 release we are excited to announce the General Availability (GA) of Improved Analysis Algorithm. This was made available as Early Access in BHE v6.3 and enabled customers to get a risk assessment of the Attack Paths in their environment through:
· Enhanced risk scoring — Improved risk scoring by utilizing Impact and Exposure measurements that analyzes the blast radius of an object.
· Granular risk measurement — assessing the risk of every finding so you can pinpoint where to prioritize your efforts.
· Hybrid Attack Path risk analysis — Quantifying Attack Path risk associated with moving between Active Directory (AD) and Entra ID environments.
The Improved Analysis Algorithm leverages Exposure and Impact for risk scoring.
The Improved Analysis Algorithm has been refined to provide a more accurate measurement of risk scoring for findings across BloodHound, including measuring the risk generated from hybrid paths, resulting in a more precise Attack Path risk assessment of your environment.
Example: Impact signifies the granular risk measurement and risk score of the above Attack Path.
Posture Page Update
The Posture page was also re-worked in BHE v6.3. With this release, it now provides improved visibility into resolved Attack Paths and additional metrics to track remediation over time. The new, intuitive format is more ideal for board-level reporting. Building on that foundation, the following enhancements have been added in BHE v7.0:
· Attack Paths metric
· Viewing all environments by type
· Increased visibility of findings
Attack Paths Metric
Security teams and CISOs are primarily focused on their organization’s security risk posture. However, with the onslaught of threats, cutting through the noise to focus on what matters most and tracking remediation progress is challenging for blue teams.
The addition of Attack Paths gives practitioners a representative metric that starts to address this challenge by providing a read out on risk assessments and tracking remediation efforts on what matters most. The Attack Paths metric measures the risk highlighted by the combination of all findings within an environment. For most of our findings, which are focused on Tier Zero, the Exposure is used, indicating how many principals (user or computer account) can gain access through any path to the Tier Zero object identified. For other findings, such as Kerberoastable assets, or control by large default groups, we use the Impact, that is how many principals can be controlled by the given asset once compromised.
Attack Paths Metric provides a summary on risk assessment and remediation progress.
Viewing all environments by type
Most organizations have multiple environments, whether from separation of duties such as development or production, expansion through mergers and acquisitions, or migrations into hybrid environments, it’s common for customers to have multiple AD domains or Azure tenants which can create identity risk. These organizations need visibility across all their environments from one place to centralize risk measurement and reporting.
BHE v7.0 makes this easier by providing your security teams with holistic visibility into the Attack Path security posture across all your environments at once on a per-type basis. This view summarizes the Attack Paths, Findings, and Tier Zero Objects metrics across multiple environments, and shows them all in one place for quick review of the progress your teams have made.
Visibility of all environments by type.
Increased visibility of findings
SecOps teams often struggle to provide their leadership with effective board-level reporting. Risk reporting is either too abstract or dives deep into the data, making it difficult to utilize. When it comes to Attack Path risk assessments, it is critical to have a clear before and after snapshot as well as visibility into the intermediate findings along the remediation journey.
Prior to BHE v7.0, the Posture page provided a high-level summary of initial findings and resolutions, which was a useful baseline. In BHE v7.0, we’ve improved this reporting with granular visibility between initial findings to resolution path including any intermediate findings. This enables practitioners to provide a more meaningful summary on the risk and remediation progress for board-level reporting.
Visibility of findings.
Improved CSV export functionality
The ability to export data and easily share and sync with other tools, systems and teams is essential in today’s complex cybersecurity ecosystem.
For example, security teams can now ingest Attack Path findings into their SIEM/SOAR platforms. This helps automate incident threat response workflows and streamline security tasks. Additionally, the Attack Path data can be leveraged by incident response, threat hunting, vulnerability management and other security teams and systems.
The CSV export functionality on the Attack Paths page was improved to make the exported fields consistent across findings, added the new Exposure/Impact measurements where appropriate, and added human-readable column headers when the CSV is exported out of the UI.
Improved CSV export functionality.
Summary
BloodHound v7.0 packs a lot of capabilities that enable security teams to better assess and prioritize risks, track remediation efforts, and ultimately strengthen their security posture. All BloodHound users can find expanded details on these updates in our release notes or by contacting your Technical Account Manager.
Our team is excited to showcase the latest enhancements and share what’s coming down the line for BloodHound at our upcoming SO-CON event in the Washington, DC area from March 31 — April 1, 2025. We look forward to seeing you there!
A new Mythic add-on for Windows AgentsMythic provides flexibility to agent developers for how they want to describe and execute techniques. While this is great, it also means that when operators hop from agent to agent, they can have issues with slight differences between similar commands. Because of this, there have been some requests within the Mythic community to provide a feature similar to Sliver’s amazing Armory project so that, if desired, there can be a more standardized way of executing
Mythic provides flexibility to agent developers for how they want to describe and execute techniques. While this is great, it also means that when operators hop from agent to agent, they can have issues with slight differences between similar commands. Because of this, there have been some requests within the Mythic community to provide a feature similar to Sliver’s amazing Armory project so that, if desired, there can be a more standardized way of executing beacon object files (BOFs) and .NET assemblies.
Introducing Forge
Forge in Mythic
Mythic uses Docker to provide a plug-and-play framework of adding/removing agents and communication profiles dynamically. This means that adding a new Docker container to Mythic simply adds that new agent. You can use that agent to build payloads, get callbacks, and run commands, but that’s all specific to that one agent. The commands from Apollo are not available to another agent like Poseidon, so how can Mythic provide some standardized command across multiple agents?
Mythic 3.3 introduced the concept of a “Command Augmentation” container that in many ways acts the same as a normal agent container. This container brings along new commands to Mythic; however, instead of having them tied to a specific agent, they’re automatically added to all callbacks that meet certain criteria. This criteria can be callbacks on certain operating systems or callbacks based on certain other agents. These “Command Augmentation” containers process the command like normal, but instead of handing that finished command to the agent for execution, it’s handed to another agent’s container for further processing.
Forge is the first “Command Augmentation” container released on the MythicAgents GitHub organization. The Forge Docker image is built with all of Flangvik’sSharpCollection compiled assemblies and Sliver’s Armory of compiled BOFs. Forge offers a few management commands that allow you to list out collections of commands, register assemblies/BOFs within your callbacks, add support for other agents, and more. Let’s look at two examples of what Forge can do.
.NET Assembly Support
Forge Collections SharpCollection
The forge_collections command allows you to list out the available commands that are part of a collection. The SharpCollection and SliverArmory collections exist by default, but you can add new ones at any time. In the output above, we can see the ability to re-download the command (this fetches the .NET versions again from GitHub and can be helpful if there’s a new version released), to register the command (make it available to execute), and some information about the command name and what the assembly does. Clicking the download or register buttons will register the command within this callback and all callbacks that have support with Forge. Let’s say we click the register button for the Rubeus entry. We’ll get a new command we can issue called forge_net_Rubeus; the name of this command allows you to easily identify commands added as part of Forge and if this is a .NET command or a BOF command.
New assembly commands always have the same arguments: the argument string that’s passed to the .NET assembly, the version of the assembly to use, and if this should be executed via execute_assembly (fork-and-run) or inline_assembly (in process).
Forge .NET Parameters
These parameters are always the same for each .NET assembly because in the offensive security community, .NET assemblies are made to take in a single string and do the parsing themselves instead of using named parameters.
BOF Support
Forge Collections Sliver Armory
BOF support in Forge works a little differently thanks to the amazing work that the Sliver team did for their Armory plugins. Unlike .NET assemblies, BOFs have a very specific set of arguments they take, in a specific order, and with specific formats. Many people use BOFs with Cobalt Strike, so they have Aggressor Scripting files created for them that describe these parameters. Unfortunately, this format isn’t usable outside of Cobalt Strike, but the Sliver team went above and beyond to convert many of these to JSON. As part of this, the Sliver team has forked versions many common BOF projects (e.g., https://github.com/sliverarmory/CS-Situational-Awareness-BOF) where they store compiled versions of the BOFs and this converted JSON data in tagged releases.
Forge hooks into their work by fetching the latest tagged release for the command you want to register and extracts the object files along with the extension.json file that describes the BOF’s arguments. Since Mythic already supports defining commands with named parameters, their types, and their orders, Mythic can use the extension.json file to dynamically create Mythic styled parameters.
BOF Argument Support
In this example, the BOF command forge_bof_sa-netgroup , takes three parameters: a number (0 or 1 based on the description) and two strings. Due to Sliver’s format, we can even identify which arguments are required and which ones are optional. Unfortunately, we miss additional context about default values that could be pre-populated, so that’s still up to the individual BOFs or for them to call out in their parameter descriptions.
When an operator submits this task, Forge looks up the associated extension.json file and converts these named parameters back into a normal Mythic TypedArray format that is then passed to a supporting agent’s command (like Apollo’s execute_coff ) for processing before a callback picks it up.
Normally, BOF execution requires an operator to upload the right object file, know the exact types and orderings of parameters for the bof (ex: zisZZZ), and provide the right values in that order. This would require execution like some_bof_command zisZZZ test 3 0 bob testing.com Mozilla. Naturally, this is error prone and not very operator friendly. With Forge, you could instead issue a task like forge_bof_myBof -location test -loops 3 -useAdmin 0 -user bob -domain testing.com -useragent Mozilla. Notice how, especially with all of the parameters being tab-completable, it’s much more operator friendly, especially if you don’t already know all of the parameters needed for the BOF.
Forging Forward
Forge is based on a series of JSON files on disk that describe things like what agents work with Forge, what collections are available, and what commands are available in each collection. You aren’t limited to SharpCollection and SliverArmory though. With the forge_create command, you can upload your own .NET assembly or BOF files (including extension.json) and have those turned into new commands on the fly. If you want to set this up ahead of time though, you can always edit the JSON files directly on disk or through the Mythic UI.
Forge comes with default support for the Apollo and Athena agents, but pull requests are always welcome to provide default support for other agents as well. Additionally, only Flangvik’s SharpCollection and Sliver’s Armory are pre-installed in the container. If the community has other sources of tooling they’d like to see pre-installed, PRs are also welcome.
Mythic has many different kinds of containers and features available, so hopefully Forge will inspire the community about other kinds of “Command Augmentation” containers they can make.
If you aren’t already aware, the BloodHound slack has open invites with a thriving community that discusses Mythic in the #mythic channel. I’m also available on Twitter, BlueSky, and Mastodon if you want to reach out.
Further Adventures With CMPivot — Client CoercionPerfectly Generated AI Depiction based on TitleTL:DRCMPivot queries can be used to coerce SMB authentication from SCCM client hostsIntroductionCMPivot is a component part of the Configuration Manager framework. With the rise in popularity for ConfigMgr as a target in red team operations, this post looks to cover a way other than using CMPivot (CMP) data gathering capabilities for taking over a computer object in Active Directory environments. If i
CMPivot queries can be used to coerce SMB authentication from SCCM client hosts
Introduction
CMPivot is a component part of the Configuration Manager framework. With the rise in popularity for ConfigMgr as a target in red team operations, this post looks to cover a way other than using CMPivot (CMP) data gathering capabilities for taking over a computer object in Active Directory environments. If interested in leveraging CMP for data enumeration, see the previous post “Lateral Movement without Lateral Movement”
Why
After learning about CMPivot’s potential for offensive operations, how much information it can pull from a client host (almost as if you’d be operating within the target itself) and more importantly for this post, how it achieves this, I always itched to go a little further than just using the queries for how they are meant to be used (i.e., data collection). This post will showcase a simple but effective way to use CMPivot to coerce authentication from an SCCM/ConfigMgr client host.
CMPivot for offensive operators
From the point of view of an offensive operator, CMPivot’s “intended” use flow of remote data querying does have the potential to reveal information that could indirectly aid in taking over an SCCM client host. For example, if we use the query that allows us to read file contents and happen to find an SSH key on a client host, we could then leverage those keys for lateral movement.
Now, even though the ability to enumerate almost any data from a host is a big plus for us as offensive operators, that is where the intended capabilities of CMPivot’s end: with data enumeration.
Rather than allowing any type of remote command execution, CMP was designed with the sole purpose of gathering information from client hosts.
Note: SCCM/ConfigMgr does have built in ways for a user to achieve execution on clients when working under the right context and privileges. These privileges are not always attainable and probably more closely tracked nowadays.
CMPivot Relay Background
The way CMPivot gathers data from clients is by taking any queries we make on the CMPivot GUI or via SharpSCCM (adminservice command) and sends those to the CCMExec client engine living on a client host. After this the client software runs a PowerShell script with our CMP query as one of the parameters. The CMPivot client PowerShell script on the target will then filter our queries most of the time for use with WMI methods to enumerate the specific information we asked for. The results of those queries will be collected and sent back to the ConfigMgr/SCCM site Management Point. Ultimately, that data will be presented to the querying user’s GUI.
In most cases, whatever input we provide as part of these CMPivot queries is correlated to a WMI class and method executed on the client host. For example, let’s look at the CMPivot client side script located at C:\Windows\CCM\ScriptStore on client machines. When calling the “Users” CMPivot query from the GUI, the client side powershell script will leverage the Win32_LoggedOnuser WMI class as seen in the code block below.
# If this is not a built-in account if(( $parts[1] -ne "Window Manager" ) -and (($parts[1] -ne $env:COMPUTERNAME) -or (($parts[3] -notlike "UMFD-*")) -and ($parts[3] -notlike "DWM-*"))) { # add to list $users.Add($parts[1] + "\\" + $parts[3]) } }
# Create unique set of users $users | sort-object -Unique | foreach-object { $results.Add(@{ UserName = $_ }) } }
My assumption was that this was the modus operandi for all queries that we can make with CMPivot. Further inspecting the client-side PowerShell script shows this section referring to some “one-off” cases that are easier to deal with using straight PowerShell versus Windows Management Instrumentation (WMI) classes:
#Create the result set
$results = New-Object System.Collections.Generic.List[Object]

**#deal with one-offs that don't work well over WMI**
if( $wmiquery -eq 'SMBConfig' )
{
# Get Smb Config
$smbConfig = Get-SmbServerConfiguration -ErrorAction Stop| Select-object -Property $propertyFilter
.. SNIP SNIP ..

elseif ($wmiquery.StartsWith("FileContent(") )
Included in that section of the PowerShell script, we have the logic that deals with the “File” and “FileContent” CMPivot queries among others. Those two let us check if an arbitrary file exists on the target and to retrieve its contents depending on the type of data.
These two queries fall into what the CMPivot client script classifies as “one-off” calls. When calling either of those queries, our input is taken all the way to the command being executed , which can be seen here:
elseif ($wmiquery.StartsWith("FileContent(") )
{
  $first = $wmiquery.IndexOf("'")+1
  $last = $wmiquery.LastIndexOf("'")
  $filepath = [System.Environment]::ExpandEnvironmentVariables( $wmiquery.Substring($first, $last-$first) )
  #verify if the file exists
  if( [System.IO.File]::Exists($filepath) )
{
  $lines = (get-content -path $filepath -ErrorAction Stop)
  # our code handles lines as list of object
  # get-content return list of lines if multiple lines are present
  # in case of single line a string is returned which is casted to list
  if ($lines -is [string]) {
  $lines = @($lines)
}
for ($index = 0; $index -lt $lines.Length; $index++)
{
  $line = $lines[$index]
  $hash = @{
  Line = $index+1
  Content = $line
}
$results.Add($hash)
    }
  }
}
Above, we can see that in the case of the “FileContent” query this is just ran as a simple PowerShell Get-Content cmdlet in the background.
CMPivot Reading File Content Remotely
Actual CMPivot Relay Demo
Where it gets more interesting is that the check for file existence [System.IO.File]::Exists($filepath) and the Get-Content cmdlet also allow for UNC paths and, as mentioned in my previous CMPivotblogpost, the actions taken to gather the data on client host are performed as NT AUTHORITY/SYSTEM. Something as simple as pointing our query to a UNC path under our control lets us coerce SMB authentication from any SCCM client host that we can run CMPivot queries against. Let’s look at a relay example.
For this example, I used PortBender to take over port 445/TCP on a previously compromised host where I had full control. If you are not familiar with PortBender, you can read about ithere. There is also a great post by Nick Powers on taking over 445/TCP, which I highly recommend calledRelay Your Heart Away: A Conscious Approach to 445 Takeover.
We start our relay server and point it to a certificate authority (CA) in order to take advantage of the incoming SMB authentication.
Relay Server Setup
Next, we set up our required proxies:
Cobalt Strike Socks Proxy
…and our port forwards.
Cobalt Strike 445 Port Forward Setup
The relay server is set to point our victim to the domain’s CA and request for a certificate which can later be used to request a kerberos ticket for the machine account of our target.
We can use tools like SharpSCCM to execute a CMPivot query against the target SCCM client. The admin-service command is our ally in this case. For more CMPivot and SharpSCCM admin-service usage details, see the previous postLateral Movement without Lateral Movement.
SharpSCCM admin-service File Contents Read Query
If we have access to the CMPivot GUI, we can use the standard FileContent query.
CMPivot GUI File Contents Read Query
And we end up getting a hit on our relay server and the resulting base64 blob for our desired certificate.
Relay Server Hit
Outro
Hopefully, this adds one more tool to the arsenal when it comes to getting control of a machine object without executing foreign tradecraft on a target and helps build tradecraft depth when operating within ConfigMgr/SCCM environments. If a low privilege account has been assigned the right security roles, that user could potentially escalate their privileges with this technique.
Requirements
These are some of the permissions and security roles that allow CMPivot querying:
Permissions:
Run CMPivot permission on the Collection
Read permission on Inventory Reports
Read permissions on Devices and Collections.
Security Roles:
Read-Only Analyst (Built-in role) — Can run CMPivot queries but cannot take action.
Full Administrator — Has all permissions, including CMPivot.
Custom Role (if creating a new one) — Needs specific permissions (see below).
When dealing with a custom security role, it needs at at least the following permissions:
CMPivot Execution Permissions
Scope:
The user must have access to the collections where CMPivot is being executed.
Connectivity:
For the scenario presented in the example:
ConfigMgr clients should be able to talk to the Management Point
Clients need to be able to reach the relay or proxy server
TLDR: SlackPirate has been defunct for a few years due to a breaking change in how the Slack client interacts with the Slack API. It has a new PR by yours truly to let you loot Slack again out of the box, and a BOF exists to get you all the credential material you need to do it. I recommend you let Nemesis do the heavy lifting of finding interesting data in what you pull back.Slack Cookies BOF PRSlackPirate PRThe BOFThis all started because I noticed that my brilliant colleague Matt Creel had ad
TLDR: SlackPirate has been defunct for a few years due to a breaking change in how the Slack client interacts with the Slack API. It has a new PR by yours truly to let you loot Slack again out of the box, and a BOF exists to get you all the credential material you need to do it. I recommend you let Nemesis do the heavy lifting of finding interesting data in what you pull back.
This all started because I noticed that my brilliant colleague Matt Creel had added a new BOF to TrustedSec’s CS-Remote-OPs-BOF collection that pulled Slack cookies from the memory of either a browser or Slack client process. This would allow an operator to then utilize the stolen cookies to proxy browser traffic through a compromised machine and access the target organization’s Slack instance. He released a great blog about it if you want to learn more.
Slack is awesome, and full of valuable data about an organization. There’s the obvious stuff like people being lax and pasting credentials, but don’t forget that is also a comprehensive directory of who works there, and probably more valuable than their internal documentation (when was the last time you actually searched Confluence? Exactly.)
I was stoked to start using Matt’s BOF, since there hasn’t been an assessment where I got access to Slack where it didn’t prove useful. That said, something was nagging at me… This is the age of Nemesis! We don’t need to read anymore, reading is for squares! We have computers to do that for us while we watch short-form videos of animals with funny things on their heads (see below). Reading Slack was no exception.
A classic.
So I set out to find a good Slack looter. I quickly stumbled upon SlackPirate, created by Mikail Tunç, which seemed to be the defacto choice. And for good reason! It is simple, fairly comprehensive, and also quite modular; you can change what is being searched for with relative ease. By default though it does a lot, such as:
Scraping all messages for private keys, passwords, and cloud provider credentials
Grabbing a list of all Slack users
Downloading hosted files en-masse
Pulling important Slack-specific data, such as pinned messages
Great! I plugged in my cookie and… no dice. I was unable to authenticate to any of the API endpoints I should be able to. I knew the Slack cookie I had was valid, so it was time to investigate.
Troubleshooting
Figuring out what was the matter was pretty breezy! Slack is an Electron app, so you can still access the Chrome dev tools. Slack used to allow this by exporting a particular environment variable:
SET SLACK_DEVELOPER_MENU=TRUE && start C:\Users\<USER>\AppData\Local\slack\slack.exe
You could then access the developer tools by pressing ctrl + alt + i. This no longer works for me, so I instead opted to use Chrome remote debugging, which was successful.
(NOTE: If you’re reading this blog, there’s a good chance your security team will have an alert in place for Chrome remote debugging to prevent cookie crimes. You may want to check with them before doing this on a work computer.)
Then when you browse to chrome://inspect/ you will be able to see Slack as with option to inspect:
Chrome remote debugging
By pressing “inspect” you get your dev tools, plus a neat window of the Electron app you are debugging! I have never tried to use this to screen-peek on an Electron app over a proxy, but wouldn’t that be neat.
Inspecting Slack network traffic
My strategy at this point was to record network traffic while performing actions that seemed like they would have to be hitting a defined API endpoint from the client and seeing what the network traffic looked like. For example, going to the “users” page and finding what endpoint got hit to retrieve them. That’s what I am doing in the screenshot above for the BloodHoundGang slack (which you should join if you haven’t).
This allowed me to compare the requests with what was being performed in SlackPirate and determine what had changed to break it.
Turns out, not much! The APIs ended up being the same as before, the only piece that was missing what that now requests were made with a token included in the request payload itself, in addition to the cookie in the headers we already knew about.
An API request for user data containing an API token
As you can see, this token is also in a nice searchable format, starting with “xoxc”, so the same technique used by Matt’s BOF to pull the cookie from memory can be used for the token. Now the BOF pulls both, and can be used not only get the credential material needed to browse a target organization’s Slack via a proxy, but also interact with it programmatically.
With these two pieces of information, you can hit the Slack API just as if you were the client when a user clicks around and types. You can even make your own janky Slack bots that post out of your account… which of course I did. But you already knew that from the title. So here’s screenshots of my fellow Specters suffering while I posted the entire Bee Movie into our group chat, each line as its own message. We all know it’s what you’re here for.
🐝The aftermath
Quick aside — you may be thinking: Why go through all the trouble of doing this with the Electron client? Why not just open Slack in a web browser and inspect that traffic?
Anecdotally, I see people using the client way more often, so I wanted to make sure whatever I looked at would be representative of that. Also developers seem to trust dedicated clients more, so the tokens and cookies you snoop from them last much longer. For instance my buddy Jesko got tired of having to reauth to Slack, so he snagged a token from his phone’s client that never expires. My janky Slack bots haven’t had to reauth yet either.
SlackPirate Updates
So with our new programmatic access, it is time to loot! For the most part all of my changes to SlackPirate were updating the script to utilize the new token in addition to a cookie. There are a few other changes I threw in though that you may want to be aware of:
There was an “interactive mode” that let you interact with multiple workspaces. This functionality has been removed and you will always need to provide the appropriate token and cookie for the individual workspace you want to target as arguments to the script
The list of what files and strings are searched for by default is more focused on finding credential material, especially in file formats that are easy for Nemesis to parse
And there you have it. With these new updates, you are ready to get back to a nice easy life of not reading and letting Nemesis read your target’s whole Slack for you. So kick back and let your reading comprehension regress to a third-grade level with another classic animal-with-thing-on-head video from the cellar. It is a fine vintage.