Recently, Microsoft changed the way the Entra Connect Connect Sync agent authenticates to Entra ID. These changes affect attacker tradecraft, as we can no longer export the sync account credentials; however, attackers can still take advantage of an Entra Connect sync account compromise and gain new opportunities that arise from the changes.How It Used To WorkPrior to the change, an “AAD Connector” account would be created upon Entra Connect sync install. Upon creation, a randomized password woul
Prior to the change, an “AAD Connector” account would be created upon Entra Connect sync install. Upon creation, a randomized password would be generated and set for the connector account. The AAD Connector account was a user principal that would be assigned a special sync role, and it would authenticate just like any old user. You may have seen these before; they look like this:
In this instance, ENTRACONNECT is the hostname on which the agent is running. There are a wide variety of attack paths that can stem from compromising this account, so it is a very advantageous target for attackers.
Old Attacker Tradecraft
Thanks to AADInternals, it was simple to obtain the sync password of the AAD Connector Account used to import and export data from Entra ID. Some decryption steps are documented here, but that mostly focuses on the on-premises accounts. If you are an AADInternals user, you would need to impersonate the context of the Entra Connect sync account and run the command:
Get-AADIntSyncCredentials
And that’s it! You could use your creds to do all sorts of sync mischief. Under the hood, the ADSync service account would connect to a SQL database where it would obtain a key to decrypt an “AAD configuration” blob. The plaintext password of the AAD Connector Account (Connects to Entra ID) would be in that blob. If an attacker got privileged access to a host running Entra Connect Sync, they could obtain this plaintext password and authenticate off-host, conditional access policies (CAPs) permitting. The theft of such a credential would have a huge impact on any organization, so I presume that Microsoft moved over to an application registration to reduce such a risk.
The Client Credentials Flow
If you are new to Entra ID, you can read how the Client Credentials flow works here. In a nutshell, an application registration can authenticate as itself utilizing the app roles assigned to it. To authenticate and obtain access tokens, it needs credentials provisioned to it. These credential types aren’t exclusive, and an application can have multiple. They can be in the form of:
Secrets (plaintext password)
Certificates
Federated Credentials
If the application uses a certificate, it will sign an attestation when authenticating to obtain an access token. Here is an example:
POST /{tenant}/oauth2/v2.0/token HTTP/1.1               // Line breaks for clarity
Host: login.microsoftonline.com:443
Content-Type: application/x-www-form-urlencoded

scope=https%3A%2F%2Fgraph.microsoft.com%2F.default
&client_id=11112222-bbbb-3333-cccc-4444dddd5555
&client_assertion_type=urn%3Aietf%3Aparams%3Aoauth%3Aclient-assertion-type%3Ajwt-bearer
&client_assertion=eyJhbGciOiJSUzI1NiIsIng1dCI6Imd4OHRHeXN5amNScUtqRlBuZDdSRnd2d1pJMCJ9.eyJ{a lot of characters here}M8U3bSUKKJDEg
&grant_type=client_credentials
How It Works Now
The new Entra Connect Sync agent moved from a “user” centric authentication mechanism to an app registration, which uses the client credentials flow. Since app registrations support certificate authentication, a self-signed certificate is generated on install and saved in the NGC Crypto Provider store. The installer will use the login information you provided (which must be a Global Administrator or Hybrid Identity Administrator) to create a new application registration with the self-signed certificate as an authentication certificate. Once Entra Connect sync completes installation, an application will exist in Entra ID that looks like this:
And the configured app roles:
New Tradecraft
In a perfect world, an attacker could no longer dump plaintext credentials (because there are none) and the private key that corresponds to the certificate is sitting on a TPM. It would appear that any AD Connector account abuses must be performed on-host from here on out, forcing an attacker to persist on a Tier Zero asset. If there is no TPM support, we may be able to export the certificate private key, but I don’t want to rely on that. To the red teamer, it may seem all is lost–but fret not; there is still hope.
After examining the .NET assemblies provided in the new release, it appeared that a graph token of a Global Administrator or Hybrid Identity Administrator was not required to add a new key to the application registration.
This came off as strange because the application was not provisioned with either Application.ReadWrite.All or Application.ReadWrite.OwnedBy. Let’s take a look at the decompiled code in Microsoft.Azure.ActiveDirectory.AdsyncManagement.Server:
if (!string.IsNullOrEmpty(graphToken))
{
    httpClient.DefaultRequestHeaders.Authorization = new AuthenticationHeaderValue("Bearer", graphToken);
    string text2;
    if (!ServicePrincipalHelper.CheckUserRole(azureInstanceName, httpClient, out text2))
    {
        Tracer.TraceError(text2, Array.Empty<object>());
        throw new AccessDeniedException(text2);
    }
}
else
{
    azureAuthenticationProvider = AzureAuthenticationProviderFactory.CreateAzureAuthenticationProvider(aadCredential.UserName, aadCredential.Password, InteractionMode.Desktop);
    string text4;
    string text3 = azureAuthenticationProvider.AcquireServiceToken(AzureService.MSGraph, out text4, false);
    if (string.IsNullOrEmpty(text3))
    {
        Tracer.TraceError("ServicePrincipalHelper: Failed to acquire an access token for graph. {0}", new object[]
        {
            text4
        });
        throw new AccessDeniedException(text4);
    }
    httpClient.DefaultRequestHeaders.Authorization = new AuthenticationHeaderValue("Bearer", text3);
    azureInstanceName = azureAuthenticationProvider.AzureInstanceName;
}
That whole else block is handling the case for when a graph token (presumably that of a Global Administrator or Hybrid Identity Administrator) is not provided. How interesting!
The aadCredential username and password is a bit misleading, as it’s actually holding the UUID of the application registration and the sha256 hash of the existing certificate, as this function call shows:
So what we need is the cert hash of the existing certificate credential and the ability to load it into our AzureAuthenticationProviderFactory. Once we do, we can use that certificate to do two things:
Obtain a graph token to make the addKey API call
Obtain a proof of possession (POP) assertion proving that we are currently in possession of the private key
Further down in the function, the following code executes if no graph token is provided:
public KeyCredentialModel AddKey(Guid appId, KeyCredentialModel keyCredential, string proof) { if (appId == Guid.Empty) { throw new ArgumentException("appId"); } if (keyCredential == null) { throw new ArgumentNullException("keyCredential"); } if (string.IsNullOrEmpty(proof)) { throw new ArgumentNullException("proof"); } string requestUri = string.Format(this.graphEndpoint + "/v1.0/applications(appId='{0}')/addKey", appId); string passwordCredential = null; string content = JsonConvert.SerializeObject(new { keyCredential, proof, passwordCredential }, ODataResponse.JsonSettings.Value); KeyCredentialModel result; using (HttpRequestMessage httpRequestMessage = new HttpRequestMessage(HttpMethod.Post, requestUri) { Content = new StringContent(content, Encoding.UTF8, "application/json") }) { using (HttpResponseMessage httpResponseMessage = base.SendRequest(httpRequestMessage)) { result = JsonConvert.DeserializeObject<KeyCredentialModel>(httpResponseMessage.Content.ReadAsStringAsync().GetAwaiter().GetResult()); } } return result; }
We now know what is needed to add a new key. As an attacker, we can generate a new private key, build a certificate, obtain a POP token, and register it with the application registration. This provides us persistent, off-host, access to the application registration. To do this, we can build out a .NET assembly that performs the necessary steps in the context of the ADSync account.
Proof of Concept
Our goal is to prove that we can still persist our access to a compromised AAD connector account, even if a TPM protects the private key. We can accomplish this by generating our own certificate and adding it to the service principal.
First, we need to obtain an access token and a signed POP assertion. We can do this with the certificate that is installed on the host and can be performed by running this program here:
Our graph token looks like this:
And the POP assertion looks like this:
According to the documentation here, this should be enough to add credentials to our application registration, given that we have at least Application.ReadWrite.OwnedBy.
However, our application does not have any required app roles!
How can this be? Well, if you are an astute reader, or simply have an attention span past the first paragraph of Graph documentation, you’ll see this banger on the addKeys page:
As it turns out, if you have access to an existing key, you can just add your own with no permissions needed!
How have I missed this?!
Mystery solved, and our path is clear for how we can persist our access to the AAD connector account off-host.
If we run our AddKey binary (posted here) with just our access token and POP assertion, you can see that we successfully added our key.
And the updated key is reflected here:
Red team crisis averted; we can keep our sync tradecraft, albeit a bit more “detectable”. Also, as a general takeaway, the ability to sign POP assertions equals the ability for any application to add new certificates to itself, which is pretty cool.
New Opportunities
Here is a list of users who could compromise the sync account previously:
Previously, a privileged auth administrator or higher could change the password of the Sync account; however, since the sync agent would no longer successfully authenticate, it would break the functionality of the sync agent. This left only Global Administrator and Hybrid Identity Administrator as viable attack paths for a red teamer. Let’s look at the new pseudo-graph:
This update presents an attacker with the opportunity to add credentials without interrupting the normal day-to-day flow of the sync agent. In addition, it is far more common to have principals assigned the Application/Cloud Application administrator, making the attack surface larger for sync attacks. While tradecraft may have shifted for on-premises attackers, the Entra ID attack surface has expanded. In addition, Conditional Access typically doesn’t affect service principals, so the likelihood of being able to use these credentials off-target is significantly higher. Ultimately, this is a cleaner yet more abuse-prone implementation.
Detections
Here is the good news. Detecting a new credential on an Application Registration is easy and a dead giveaway that something interesting is happening. Since the normal flow of UpdateADSyncApplicationKey removes the old key, the existence of more than one certificate on the Entra Connect application registration is a good indication that something is amiss. Should an attacker choose to be stealthy and actually replace the certificate that the Entra Connect Sync agent uses, then there are still detections for credential manipulation on an application registration. Here is a KQL query that surfaced all of my key additions:
AuditLogs
| where ActivityDisplayName has_any ("Add service principal credentials", "Update application", "Add key credential")
| where TargetResources[0].type =~ "Application"
| extend AppName = tostring(TargetResources[0].displayName)
| extend ChangedProps = TargetResources[0].modifiedProperties
| extend Initiator = tostring(InitiatedBy.user.displayName)
| project TimeGenerated, AppName, ActivityDisplayName, Initiator, ChangedProps
| where ChangedProps has_any ("keyCredentials", "passwordCredentials")
Takeaways
This is a brand-new update for Entra Connect Sync, so I don’t expect to see it in the wild for some time. I’m not quite sure I’m sold on the ability for an application to “roll its own keys”, as the documentation states. If access to a key is equivalent to the ability to produce more keys, then what’s the point of an expiration date?
NTLM relay attacks have been around for a long time. While many security practitioners think NTLM relay is a solved problem, or at least a not-so-severe one, it is, in fact, alive and kicking and arguably worse than ever before. Relay attacks are the easiest way to compromise domain-joined hosts nowadays, paving a path for lateral movement and privilege escalation.NTLM relay attacks are more complicated than many people realize. There are a lot of moving parts that operators have to track using
NTLM relay attacks have been around for a long time. While many security practitioners think NTLM relay is a solved problem, or at least a not-so-severe one, it is, in fact, alive and kicking and arguably worse than ever before. Relay attacks are the easiest way to compromise domain-joined hosts nowadays, paving a path for lateral movement and privilege escalation.
NTLM relay attacks are more complicated than many people realize. There are a lot of moving parts that operators have to track using different tools, but we have recently introduced NTLM relay edges into BloodHound to help you keep on thinking in graphs with new edges that represent coercion and relay attacks against domain-joined computers, originating from Authenticated Users and leading into the computer that could be compromised via SMB, LDAP/LDAPS, and ADCS ESC8. Each of these edges is composed of different components and prerequisites, but they all follow the same “Zero to Hero” pattern from Authenticated Users to the would-be compromised computer.
While there are many great resources on this old attack, I wanted to consolidate everything you need to know about NTLM into a single post, allowing it to be as long as needed, and I hope everyone will be able to learn something new.
Once Upon a Time
NTLM is a legacy authentication protocol that Microsoft introduced in 1993 as the successor to LAN Manager. NTLM literally stands for New Technology LAN Manager, a name that didn’t age well. While Kerberos is the preferred authentication protocol in Active Directory environments (and beyond), NTLM is still widely used whenever Kerberos isn’t viable or, more commonly, when NTLM usage is hard-coded.
NTLM Fundamentals
My favorite research area is authentication protocols, and over the years, I’ve noticed that every authentication protocol is designed to thwart one or two primary threats. For NTLM, I believe it is replay attacks. Not relay attacks (obviously, given the title), but replay attacks, where an attacker intercepts a valid authentication exchange and replays the packets/messages later to impersonate the victim. NTLM prevents such attacks using a challenge-response exchange: the server generates a random challenge, and the client produces a cryptographic response that proves possession of the client’s credentials.
The NTLM authentication exchange involves a three-message exchange:
The Negotiate (type 1) message is sent from the client to the server to initiate authentication and negotiate session capabilities, such as a session key exchange and signing (more on those later), through a set of flags indicating the client’s supported/preferred security attributes for the session.
The Challenge (type 2) message is sent from the server to the client. It contains a corresponding set of flags indicating the server’s supported/preferred session capabilities and an 8-byte randomly generated nonce, known as the server challenge.
The Authenticate (type 3) message is sent from the client to the server. It contains a set of flags indicating the determined session capabilities based on the client’s and server’s preferences and a cryptographically generated response to the server challenge. There are two major NTLM response generation algorithm versions: NTLMv1 and NTLMv2.
The server then validates the response to authenticate the client. Local accounts are validated against the NT hashes stored in the local SAM, and domain accounts are sent to a domain controller for validation via the Netlogon protocol.
NTLMv1
NTLMv1 is the original response algorithm. It was developed in 1993, in the unfortunate days when DES was the standard encryption algorithm, so that’s what Microsoft used to generate the response, as described in the diagram below:
As shown above, the client’s password is transformed into an NT hash, which is the MD4 hash of the Unicode-encoded password, to be used as the DES encryption key. However, there was a little hiccup: the NT hash was 16 bytes, while the effective DES key length was 7 bytes. Microsoft came up with a creative solution — split the NT hash into three keys: the first seven bytes, the following seven bytes, and the last two bytes padded with zeros. Each of these keys encrypts the server challenge three times independently, and the ciphertexts are concatenated to produce a 24-byte-long response.
NTLMv1 is Bad
NTLMv1 turned out to be a bad idea for three main reasons:
First, DES encryption is… not great, as it can be cracked relatively easily.
Second, the response isn’t “salted”, meaning that the same password and server-challenge combination always produces the same response, making it susceptible to rainbow table attacks.
Third, combining the two previous reasons makes one of my all-time favorite attacks, discovered by Moxie Marlinspike and David Hulton. They managed to recover the raw NT hash by cracking each of the three ciphertexts individually, using rainbow tables and custom hardware. Why should we care about the NT hash? After all, it’s not a password, right? We’ll discuss the infamous Pass the Hash attack soon.
“NTLM2” Precedes NTLMv2
Just for completeness, I’ll mention “NTLM2”, also known as “NTLM2 Session Response” or “NTLMv1 with Enhanced Session Security”. This interim version between NTLMv1 and NTLMv2 introduced an 8-byte client-generated nonce, known as the client challenge. The client challenge was concatenated with the server challenge, and then the combined value was MD5-hashed and, finally, DES-encrypted as in NTLMv1. This enhancement ensured every response was unique and thwarted rainbow table attacks. However, the algorithm is still fundamentally flawed, and the NT hash can be recovered with modern GPUs within less than 24 hours, on average, at a cost of about $30.
NTLM2 is just a distraction, though. Feel free to forget you ever read the paragraph above.
NTLMv2
Shortly after, still in the ’90s, Microsoft released NTLMv2, replacing DES encryption with HMAC-MD5, as described below. This algorithm is still in use today.
The NT hash is used as the key to generate an HMAC of the client’s domain name and username. It is called the “NT One Way Function v2” or NTOWFv2. The NTOWFv2 HMAC value is then used as the key to generate another HMAC, this time of the server challenge, along with additional information, such as a random client challenge and a timestamp to thwart rainbow table attacks, and additional session attributes, which we will discuss later. This HMAC value is the NT Proof String or NTProofStr. Many people mistakenly think that the NTProofStr is the NTLMv2 response, but it is only part of it. All the additional information used to generate the NTProofStr is also included in the NTLMv2 response to allow the server to generate the same HMAC and validate the client’s response.
LM Compatibility Level
Every Windows host acts as both a server, when someone authenticates to it, and a client, when it authenticates to another host. A single registry value controls both the server and client NTLM version support, located at HKLM\System\CurrentControlSet\Control\Lsa\LmCompatibilityLevel. It allows enabling/disabling NTLMv1 and NTLMv2 for the entire host as a server and as a client, as described in the table below:
When a client authenticates to a member server using a domain account, the server sends the response to a DC for validation. Therefore, the DC’s LmCompatibilityLevel is the one that determines whether NTLMv1 is accepted or not. Note that different DCs can technically have different configurations. However, it is very uncommon to see DCs with LmCompatibilityLevel set to 5 (I’ve never seen that outside of lab environments), so it’s safe to assume the DC will support both NTLMv1 and NTLMv2, as a server, for domain accounts.
It is not uncommon to see DCs with a lower LmCompatibilityLevel. I believe the reason is that some sysadmins mistakenly think that a lower LmCompatibilityLevel is required to support NTLMv1 clients in the domain, while, in fact, they just enable NTLMv1 on the DCs as clients, which can have dire consequences, as we will explain soon.
Looking at the table above, we can make a few observations:
As a client, a Windows host can have either NTLMv1 or NTLMv2 enabled but not both.
As a server, a Windows host will likely enable both NTLMv1 and NTLMv2.
If a Windows host enables NTLMv1 as a client, it must also enable it as a server.
A Windows host doesn’t have to enable NTLMv1 as a client to enable it as a server.
Additional settings allow restricting or auditing outgoing or incoming NTLM authentication or requiring session security settings, but we won’t elaborate on those.
Password Cracking is a Problem
There are different tools for capturing NTLM responses for cracking. Responder is the most well-known and widely used tool, but Inveigh and Farmer deserve an honorable mention, too.
An attacker can potentially crack a captured NTLM exchange, whether it’s NTLMv1 or NTLMv2, to recover the password if it is not sufficiently strong. In the case of NTLMv1, the NT hash can always be recovered, and it can be abused in a couple of ways. If it is a computer/service account, the attacker can forge an RC4-encrypted Kerberos silver ticket and impersonate a privileged account to the host or the service. The NT hash can also be used for NTLM authentication, without cracking the cleartext password, through the infamous Pass the Hash attack.
Pass the Hash
When taking a closer look at the NTLMv1 and NTLMv2 flows, you may notice that, technically, we don’t need the cleartext password to produce a valid NTLM response. If we skip the first step in the flow, the NT hash is all we need.
Who Needs to Crack Passwords Anyway?
The real problem with NTLM is relay attacks. An attacker can simply relay the NTLM messages between a client and server, back and forth, until the server establishes a session for the client, allowing the attacker to perform any operation the client could perform on the server. For clarity, we will refer to the client as the “victim” and the server as the “target”.
Relay attacks allow authenticating as the victim to the target without spending time and resources on password cracking and without depending on weak passwords.
Not an Opportunistic Attack
Some defenders belittle relay attacks because they seem to be somewhat opportunistic. However, relay attacks can be executed with intention and precision when combined with authentication coercion attacks.
Generally, the mechanics of computer account authentication coercion and user account authentication coercion are different.
Computer Account Authentication Coercion
Computer account authentication coercion typically involves an RPC call to a vulnerable function on a remote host (the relay victim). Specifically, we’d try to call a function that would attempt to access an arbitrary path we can control. Then, when the remote service attempts to access the specified path, we’d require authentication and kick off a relay attack. The remote service would authenticate as the relay victim computer account if the service runs as SYSTEM or NETWORK SERVICE and if it doesn’t impersonate a different context before attempting to access the resource.
The two most notable computer authentication coercion primitives are the Printer Bug and PetitPotam. The Printer Bug abuses the function RpcRemoteFindFirstPrinterChangeNotification[Ex] in the Print Spooler service, which establishes a connection to an arbitrary path to send notifications about print object status changes. PetitPotam abuses several functions in the Encrypting File System (EFS) service, such as EfsRpcOpenFileRaw, which opens a file in an arbitrary path for backup/restore. These techniques result in an immediate authentication attempt from the victim computer account without user interaction.
Authenticated Users are permitted to trigger these computer account authentication coercion attack primitives, allowing almost anyone to initiate the relay attack.
User Account Authentication Coercion
User account authentication coercion is more complicated and, in some cases, somewhat opportunistic. The classic user account authentication coercion primitives involve planting a reference to an external resource in a document, email, or even a web page. When the victim renders the document, the client attempts to load the resource, sometimes without their knowledge or consent, and initiates an authentication attempt with the user’s credentials. These primitives require one to three clicks and can be sent directly to the victim or strategically planted in a high-traffic shared folder or website for a watering hole attack.
Dominic Chell highlighted a more sophisticated, well-known approach that abuses Windows Shell. Windows Shell is the operating system’s user interface. It has extensions and handlers that enrich the user experience, for example, by generating thumbnails/previews or customizing icons. Specially crafted files can manipulate these mechanisms to access arbitrary paths as soon as the operating system “sees” them, without any user interaction. The most common way to abuse it is to pass to the icon handler a reference to an attacker-controlled path, which would result in a user authentication attempt as soon as the user browses the folder in which the file is located, even if the user doesn’t even click or highlight the file. The most notable file types that support this kind of manipulation are:
Windows Search Connectors (.searchConnector-ms)
URL files (.url)
Windows Shortcuts (.lnk)
Windows Library Files (.library-ms)
For example, the following URL file would try to load its icon from the path \\attackerhost\icons\url.icon from the user’s security context, so it authenticates with the user’s credentials.
Attackers can drop these files in strategic file shares, such as high-traffic file shares or those frequently used by privileged users, and then kick off a relay attack as soon as an authentication attempt comes through.
Credential Abuse Without Lateral Movement
Traditionally, when attackers gain admin access to a host with an interesting logged-on user, they would move laterally to that host and then attempt one of many credential abuse techniques to impersonate the user and continue maneuvering toward their objectives. However, as EDRs and other endpoint security solutions improve, the detection risk of lateral movement and credential abuse TTPs increases.
Instead, attackers can reduce the detection risk by accessing the remote file system via an administrative share, such as C$, and dropping an authentication coercion file on the logged-on user’s desktop. The moment the file is dropped, Windows Shell starts processing it, and an authentication attempt to the attacker-controlled host is initiated. It works even if the file is hidden, the workstation is locked, or the RDP session is disconnected. More specifically, it works as long as explorer.exe runs in a suitable security context, meaning it is associated with a logon session with credentials cached in the MSV1_0 authentication package.
The attacker can try to crack the NTLM response to recover the password or establish a session on a target server by relaying it.
Taking Over 445
In case you missed it, it is possible to bind a listener to port 445 on Windows hosts without loading a driver, loading a module into LSASS, or requiring a reboot of the Windows machine, as Nick Powers discovered last year.
Too Good to Be True?
So far, NTLM relay attacks may seem very powerful and somewhat simple. However, over the years, Microsoft introduced several mitigations to complicate things.
Session Security
NTLM supports signing (integrity) and sealing (encryption/confidentiality) to secure the session. It is achieved by exchanging a session key in the NTLM Authenticate message. The client generates a session key and RC4-encrypts it using a key generated, in part, from the client’s NT hash. A common misunderstanding is that when signing is negotiated, NTLM relay attacks fail to establish a session (authenticate). However, even with signing, authentication is successful. The problem is that the attacker can’t recover the session key without possessing either the victim’s NT hash or the target’s credentials. But if the attacker possessed either of them, there would be no need for relaying anyway. Therefore, if the target indeed requires all the subsequent messages in the session to be signed with the session key, the attacker would not be able to use the session. Luckily for the attackers, not all servers implement such a requirement, as we will see soon.
The screenshot below shows a portion of a typical NTLM Authenticate message in which a session key is exchanged and signing is negotiated.
The premise of an NTLM relay attack is a man-in-the-middle position. Therefore, the attacker’s obvious next step should be tampering with this Authenticate message in flight to remove the session key and reset the Negotiate Key Exchange and Negotiate Sign flags, pretending the victim never negotiated those.
Message Integrity Code (MIC)
Microsoft anticipated such attempts and introduced an integrity check to the NTLM messages. An HMAC is added to the Authenticate message to protect all three NTLM messages with the session key. The server validates the MIC upon receiving the message, and if a single bit in any of the three NTLM messages is flipped, authentication fails.
Drop the MIC?
The MIC is a later addition to the NTLM protocol. Windows XP and Windows Server 2003 and older, as well as some 3rd party platforms, don’t support it. So, can’t the attacker drop the MIC and pretend the client never added it?
Microsoft anticipated that, too, and added an attribute to the NTLMv2 response indicating the MIC’s presence.
Therefore, an attacker would have to remove/reset that attribute before removing the MIC, but because this attribute is part of the NTLMv2 response, changing it would invalidate the NTProofStr, and authentication would fail.
Those of you who are paying attention should realize that NTLMv1 does not incorporate any additional information into the NTLMv1 response, meaning that NTLMv1 is always susceptible to MIC removal and tampering with the Negotiate flags and the session key.
A Blast From the Past
In 2019, Yaron Zinar and Marina Simakov discovered a couple of vulnerabilities in the NTLM implementation, allowing attackers to Drop the MIC even in NTLMv2. However, we will not delve into those because Microsoft released patches, and it is extremely rare to encounter Windows hosts affected by these vulnerabilities nowadays.
Channel Binding
Channel binding, also commonly referred to as Extended Protection for Authentication (EPA), is a mechanism that prevents man-in-the-middle attacks by incorporating a token from the secure channel (TLS), that is, the server certificate hash, into the NTLM Authenticate message. The server can compare the channel binding token to its own certificate hash and reject the authentication attempt if there is a mismatch. Any service running over TLS, such as HTTPS and LDAPS, can support channel binding.
Just like session security and the MIC, channel binding is not mandatory, but it is part of the NTLMv2 response, and therefore, it is protected by the NTProofStr, so the attacker can’t remove it and pretend it was never there. However, NTLMv1 does not support channel binding.
Backward Compatibility
All these mitigations are later additions to the protocol, so some older or 3rd party platforms may not support them. Therefore, they may not be required by the target server. The server behavior depends on its configuration, whether it is configured to support or even require session security or channel binding, and whether it is designed or implemented to honor the session capabilities negotiated in the NTLM exchange. Given that this is just about the midpoint of this post, you can assume it is not uncommon for targets not to require or enforce these mitigations.
Protected Users
Microsoft introduced the Protected Users security group in the Windows Server 2012R2 functional level to mitigate several attacks that can lead to credential material theft. Members of this group are not permitted to perform NTLM, and hosts running Windows Server 2012R2/Windows 8.1 or later do not cache the NT hash in LSA memory. These protections and others may have usability issues, so only privileged/sensitive accounts should be added to this group. Unfortunately, this group is too often left empty.
Not Too Good to Be True
Given everything discussed above, what are the conditions for relay attacks?
A relay attack should be viable if the target does not support these mitigations by design/implementation or configuration (disabled) or the target supports these mitigations (enabled) but does not require them, and one of the following applies:
The victim does not negotiate session security and channel binding
The victim’s session negotiation is unprotected (NTLMv1)
The target implementation ignores the negotiated capabilities
Relaying is only half the story, though. A successful relay satisfies authentication and establishes a session. However, authorization, meaning what the attacker can do afterward, depends on the victim’s permissions.
Targeting SMB
The first and simplest scenario we introduced into BloodHound is relaying NTLM to SMB. SMB servers don’t support channel binding with NTLM, and they negotiate signing at the SMB protocol level, outside the NTLM exchange, meaning that even if the victim negotiates signing in the NTLM Authenticate message, the target will disregard it and only consider what’s negotiated in the SMB headers, which the attacker can control. To be clear, configuring SMB clients to require SMB signing does not affect NTLM relay attacks.
Below is an excerpt from a typical SMB2 negotiate response message with SMB signing enabled but not required. The server is vulnerable to relay attacks if the signing required bit is not set.
Domain controllers starting with Windows Server 2008 and all Windows hosts starting with Windows Server 2025 and Windows 11 require SMB signing by default. In practice, it means that nowadays, most Windows hosts out there, especially Windows servers, don’t require SMB signing by default. Unfortunately, many organizations don’t change these defaults for the unjustified fear of backward compatibility or a myth about performance impact.
Introducing the CoerceAndRelayNTLMToSMB Edge
The new CoerceAndRelayNTLMToSMB edge is the simplest of the new NTLM relay edges. The edge always comes out of the Authenticated Users node and leads into the target computer node. It represents a combination of computer account authentication coercion against the relay victim and an NTLM relay attack against the relay target.
Collection
SharpHound collects all the required information as follows:
SMB signing status collection does not require authentication. It is collected from the relay target by actively establishing a connection with the host over SMB and parsing the SMB negotiation response messages.
Local admin rights are collected from the relay target. They can be collected from the host directly over RPC, which may or may not require admin rights, depending on the OS version and configuration, or from the DC via GPO analysis.
Outgoing NTLM restriction is collected from the relay victim via WMI or Remote Registry, which requires admin rights.
Edge Creation
BloodHound creates the edge if the following criteria are met:
SMB signing on the target computer is not required — this is the relay target. The edge will not be created if the SMB signing status is not collected/ingested into BloodHound.
At least one computer account in the environment has local admin access to the target computer — this is the relay victim.
There is no outgoing NTLM restriction on the victim host. In BloodHound Community Edition, if this data wasn’t collected/ingested, it will be assumed to be false (not restricted), as per the default configuration. In BloodHound Enterprise, this assumption is not made, and the edge will not be created.
If the domain functional level is Windows Server 2012R2, the relay victim must not be a member of the Protected Users group.
The edge is always created from Authenticated Users to the computer node representing the relay target.
Expanding the Coercion Targets accordion lists the relay victims, and expanding the Composition view shows a visual representation.
Abuse
An attacker can traverse this edge to gain access to the C$ or ADMIN$ share on the relay target, dump LSA secrets from Remote Registry, including the computer account password, or move laterally via the Service Control Manager.
A very common scenario captured by this new edge is SCCM TAKEOVER 2, coercing authentication from the SCCM site server and relaying it to the SCCM database server to take over the entire hierarchy.
SMB-Specific Limitations
The CoerceAndRelayNTLMToSMB edge only covers scenarios in which a computer (victim) has admin access to another computer (target) that does not require SMB signing. It doesn’t cover user accounts as the relay victim, and it doesn’t cover access to resources that a relay victim might be able to access via SMB without admin rights, such as non-administrative file shares.
Other limitations that apply to all new NTLM relay edges will be discussed later.
Targeting ADCS (ESC8)
The new CoerceAndRelayNTLMToADCS edge is much more complicated than relaying to SMB because certificate abuse has a lot of requirements. However, the relaying logic is still relatively simple. Relaying to ADCS web enrollment allows obtaining a certificate for the relay victim and using it for authentication to impersonate the victim. This is the infamous ADCS ESC8 that Will Schroeder and Lee Chagolla-Christensen disclosed in their Certified Pre-Owned white paper.
The ADCS Certificate Authority Web Enrollment endpoint and Certificate Enrollment Web Service run on IIS. IIS does not support session security, but it does support Extended Protection for Authentication (EPA), also known as channel binding. EPA is supported over HTTPS, but not HTTP because HTTP has no secure channel to bind. So, if web enrollment is available over HTTP or over HTTPS with EPA disabled, then relay is viable. This is the default configuration on Windows Server 2022 and older, but no longer the default on Windows Server 2025. Note that it applies to any site served on IIS with NTLM authentication, not just ADCS web enrollment.
As mentioned, relaying is all about authentication. Once authenticated, the attacker can do whatever the relay victim is permitted to do. This attack is viable only if the relay victim is permitted to enroll a client authentication certificate (requires EKUs that allow performing Kerberos PKINIT authentication or Schannel authentication to LDAP) and the CA is trusted by the domain controller and added to the domain’s NTAuthCertificates. Jonas Bülow Knudsen explains these requirements in detail in this blog post.
Introducing the CoerceAndRelayNTLMToADCS Edge
The new CoerceAndRelayNTLMToADCS edge comes out of the Authenticated Users node and leads into the victim computer node, unlike CoerceAndRelayNTLMToSMB, which leads into the relay target computer node. The reason for the difference is that the attack compromises the relay victim rather than the relay target.
Collection
SharpHound collects all the required information as follows:
Connect to the ADCS enrollment endpoints and attempt to perform NTLM authentication with and without EPA to determine if it’s enabled, required, or disabled. This can be collected without admin access.
All the ADCS certificate enrollment requirements are collected via LDAP, as done for all existing ADCS edges. This can be collected without admin access.
Outgoing NTLM restriction is collected from the relay victim via WMI or Remote Registry, which requires admin rights.
Edge Creation
BloodHound creates the edge if the following criteria are met:
The relay victim is a computer permitted to enroll a certificate with a template that meets the requirements listed below. The relay victim must have the enroll permission on the enterprise CA and the certificate template.
The certificate template has (1) EKUs that enable PKINIT/Schannel authentication, (2) manager approval disabled, and (3) no authorized signatures required.
The enterprise CA is trusted for NT authentication, and its certificate chain is trusted by the domain controller.
The enterprise CA published the certificate template.
The enterprise CA that published the certificate has a web enrollment endpoint available over HTTP or HTTPS with EPA disabled.
There is no outgoing NTLM restriction on the victim host. In BloodHound Community Edition, if this data wasn’t collected/ingested, it will be assumed to be false (not restricted), as per the default configuration. In BloodHound Enterprise, this assumption is not made, and the edge will not be created.
If the domain functional level is Windows Server 2012R2, the relay victim must not be a member of the Protected Users group.
The edge is always created from Authenticated Users to the computer node representing the relay victim.
Expanding the composition view shows all the components involved, including the certificate template and enterprise CA to target.
Abuse
After enrolling a certificate, the attacker can perform PKINIT authentication as the computer account using Rubeus to obtain a Kerberos Ticket Granting Ticket (TGT) and even the NT hash for the computer account through the UnPAC the Hash attack. With these, the attacker can compromise the relay victim host via S4U2Self abuse or a silver ticket, or use the TGT or the NT hash to access any resource that the computer account is permitted to access.
If the CA is susceptible to relay attacks, all the computers that can enroll a suitable certificate are exposed. Note that the default “Machine” certificate template meets the above criteria and exposes all the computers in the domain.
ADCS-Specific Limitations
The CoerceAndRelayNTLMToADCS edge only covers scenarios in which a computer (victim) can enroll a domain authentication certificate and the certificate authority web enrollment (target) that is vulnerable to relay attacks. It doesn’t cover user accounts as the relay victim, and it does not cover certificate templates incompatible with domain authentication.
Other limitations that apply to all new NTLM relay edges will be discussed later.
Targeting LDAP or LDAPS
The new CoerceAndRelayNTLMToLDAP and CoerceAndRelayNTLMToLDAPS edges are by far more complicated to abuse. Unlike SMB and IIS, LDAP servers are implemented to require the capabilities negotiated with the client in the NTLM exchange, meaning that if the client negotiates session security with signing, the LDAP server will require all the subsequent messages in the session to be signed with the session key.
Computer account authentication coercion can trigger authentication from the SMB client, but the SMB client always negotiates session security with signing in the NTLM Authenticate message, so SMB can’t be relayed to LDAP. The exception to this rule is clients that have NTLMv1 enabled because, in NTLMv1, the MIC can be dropped, and the Negotiate Sign flag can be reset.
But that’s not a dead end. Some authentication coercion primitives, including the Printer Bug and PetitPotam, accept WebDAV paths simply by adding the at sign followed by a port number to the hostname, e.g., “\\attackerhost@80\icons\url.icon”.
WebDAV is encapsulated in HTTP messages sent by the Web Client service, which doesn’t negotiate signing and is, therefore, compatible with relaying to LDAP. However, by default, the Web Client would only authenticate to targets in the Intranet Zone, as per the default Internet Settings.
Getting in the (Intranet) Zone
HTTP clients in Windows should call the MapUrlToZoneEx2 function to determine which zone a given URL belongs to. The function determines that a URL maps to the Intranet Zone based on the following rules:
Direct Mapping: URLs manually added to the Intranet Zone
The PlainHostName Rule (aka “The Dot Rule”): If the URL’s hostname does not contain any dots
Fixed Proxy List Bypass: Sites added to the fixed proxy bypass list
WPAD Proxy Script: URLs for which the proxy script returns “DIRECT”
If you use the host’s “shortname” (the hostname portion of the FQDN, e.g., hostname.contoso.local) or NetBIOS name, the underlying name resolution mechanisms will resolve the name to an IP address, even though the URL is “dot-less”, because DNS automatically appends a suffix based on the client’s DNS search list, which is typically configured via DHCP or GPO.
But how can we get DNS resolution for our attacker-controlled host?
Bring Your Own DNS Record
By default, Active Directory Integrated DNS allows all Authenticated Users to create DNS records via LDAP or Dynamic DNS (DDNS), as discussed in this blog post by Kevin Robertson, and can be done with his tools Powermad and Sharpmad.
WebDAV Is a Hit or Miss
Authentication coercion can trigger WebDAV traffic only if the Web Client service is installed on the host, which it is by default on Windows desktops but requires the Desktop Experience or the WebDAV Redirector feature on Windows servers. Even if it is installed, it also needs to be running, which is not the default on desktops. Most user account authentication coercion primitives will automagically trigger the Web Client service to start. However, computer accounts are more tricky. While most computer account authentication coercion primitives support WebDAV paths, they will not start the Web Client service. Therefore, when we target computer accounts, which is what we do here, we are limited to computers that currently have the Web Client service already running.
When the Web Client service starts, it opens a named pipe called DAV RPC SERVICE, so we can determine whether it is running remotely without admin rights.
One important thing to note is that when the Web Client service runs, it affects all processes running on the host in any context, not just the user who started it. Therefore, if we trigger the service to start via user account authentication coercion, for example, by dropping an authentication coercion file into a high-traffic shared folder, any user that browses the share potentially exposes the host they logged in on to NTLM relay to LDAP.
LDAP Relay Mitigations
LDAP servers support mitigating relay attacks with LDAP signing and LDAP channel binding. Each can be configured individually, and both must be enforced to prevent relay attacks. If either one isn’t, there is a bypass:
If LDAP signing is required and LDAP channel binding is disabled, the attacker can relay to LDAPS instead of LDAP, and because LDAPS encapsulates the traffic in a TLS channel, the domain controller considers the signing requirement to be met.
If LDAP channel binding is enforced and LDAP signing is disabled, the attacker can relay to LDAP with StartTLS, as discussed in this blog post, because the TLS channel is established only post-authentication.
These settings are DC-level settings, not domain-level settings, meaning that you may find different domain controllers with different configurations in the same environment.
Up until Windows Server 2025, domain controllers did not enforce these by default, and given that most organizations have not yet changed both of these settings, at this time, most domain controllers out there are vulnerable to NTLM relay attacks. However, as of Windows Server 2025, domain controllers enforce encryption (sealing) via session security on LDAP SASL bind by default, and with that new configuration, relaying to LDAP or LDAPS is no longer viable. But at this time, domain controllers running on Windows Server 2025 are still few and far between.
Note that enabling LDAP client signing does not mitigate relay attacks, as we’re not abusing LDAP clients; we are abusing web clients.
Viability Criteria
All things considered, relaying to LDAP is viable under the following conditions.
For the relay target, there is at least one domain controller that:
Is running on Windows Server 2022 or older and does not require LDAP signing or LDAPS turned on without channel binding.
Is running on Windows Server 2025 with LDAP signing explicitly disabled.
For the relay victim, the computer must either have the Web Client installed and running or have NTLMv1 enabled.
I Successfully Relayed to LDAP. Now What?
As I reiterated several times, relaying gets you through the authentication step. What you can do with the session afterward depends on the permission of the relay victim. A successful relay to LDAP would allow you to perform any action that the relay victim is permitted to perform in Active Directory, with one caveat — password change/reset must happen over an encrypted channel, so that action is possible only when relaying to LDAPS.
In this scenario, we coerce and relay a computer account to LDAP or LDAPS. In this case, it is very unlikely that the relay victim, a computer account, would have high privileges in the domain. However, computers are allowed to change some attributes of their own computer account, including:
msDS-AllowedToActOnBehalfOfOtherIdentity, which would allow taking over the host via Resource-Based Constrained Delegation (RBCD), as explained in detail in this post.
msDS-KeyCredentialLink, which would allow taking over the host via the Shadow Credentials attack, as explained in detail in this post. Note that a computer account is permitted to add a new value to the msDS-KeyCredentialLink attribute as a validated write, only if there isn’t an existing key credential already present. However, even if there is already a key credential present, the computer account is allowed to delete it and then add a new one, which would require relaying twice: once for deletion and a second time for the Shadow Credentials attack.
Introducing the CoerceAndRelayNTLMToLDAP and CoerceAndRelayNTLMToLDAPS Edges
The new CoerceAndRelayNTLMToLDAP and CoerceAndRelayNTLMToLDAPS edges come out of the Authenticated Users node and lead into the victim computer node, just like the CoerceAndRelayNTLMToADCS edge, because here, too, the attack compromises the relay victim rather than the relay target.
Collection
SharpHound collects all the required information as follows:
Connect to the domain controllers via LDAP and LDAPS and attempt to perform NTLM authentication with and without signing and channel binding to determine if they’re enabled, required, or disabled. This can be collected without admin access.
Connect to the relay victim via SMB to check whether the DAV RPC SERVICE named pipe is open. This can be collected without admin access.
Outgoing NTLM restriction is collected from the relay victim via WMI or Remote Registry, which requires admin rights.
Edge Creation
BloodHound creates the CoerceAndRelayNTLMToLDAP edge if the following criteria are met:
There is at least one domain controller running on Windows 2022 or older, and LDAP signing is not required.
The relay victim has the Web Client service running.
There is no outgoing NTLM restriction on the victim host. In BloodHound Community Edition, if this data wasn’t collected/ingested, it will be assumed to be false (not restricted), as per the default configuration. In BloodHound Enterprise, this assumption is not made, and the edge will not be created.
BloodHound creates the CoerceAndRelayNTLMToLDAPS edge if the following criteria are met:
There is at least one domain controller running on Windows 2022 or older, and LDAPS is available without channel binding required.
The relay victim has the Web Client service running.
There is no outgoing NTLM restriction on the victim host. In BloodHound Community Edition, if this data wasn’t collected/ingested, it will be assumed to be false (not restricted), as per the default configuration. In BloodHound Enterprise, this assumption is not made, and the edge will not be created.
If the domain functional level is Windows Server 2012R2, the relay victim must not be a member of the Protected Users group.
The edge is always created from Authenticated Users to the computer node representing the relay victim.
Expanding the Relay Targets section in the information panel lists all the affected domain controllers that can be targeted.
Abuse
As mentioned above, following a successful relay, the relay victim can configure RBCD or Shadow Credentials against its own computer account to compromise the host. In addition to that, if the computer account happens to have any abusable permissions in Active Directory, those will be viable as well, with the caveat that the ForcePasswordChange edge (password reset) is only abusable via LDAPS and not via LDAP.
In the real world, it is very common to find domain-joined workstations with the Web Client running, and domain controllers are very rarely configured to require both LDAP signing and channel binding or run on Windows Server 2025, so this is a very rel(a)yable way to compromise domain-joined hosts. It is even more common to abuse this technique for local privilege escalation on domain-joined workstations due to the ease of turning the Web Client service on and coercing authentication from SYSTEM as a low-privileged user.
LDAP-Specific Limitations
You may have noticed that BloodHound currently doesn’t take NTLMv1 into consideration for edge creation.
Another important limitation to note is that the CoerceAndRelayNTLMToLDAP and CoerceAndRelayNTLMToLDAPS edges are created based on the current Web Client service status, but it is very dynamic. The fact that the service was not running on a host during collection does not mean it will remain that way and that the host is not exposed.
General Limitations
So far, we have mentioned some limitations affecting specific edge types. There are also limitations affecting all the new NTLM relay edges:
Only computer account authentication coercion scenarios are considered. User authentication coercion is out of scope at this time.
Only coercion scenarios are considered. Opportunistic relay attacks, i.e., waiting for a suitable relay victim to authenticate to an attacker-controlled host, such as authenticated vulnerability scanners, are out of scope.
Firewalls or sorts and network restrictions are out of scope and not taken into consideration for these new relay edges, just as they were not taken into consideration for any of the previous BloodHound edges.
We also make a general assumption that computer account authentication coercion can be triggered by Authenticated Users, as explained earlier.
Future Work
We plan to introduce additional relay edges in the future. We already have relay to MS SQL and WinRM on our roadmap. We are always open to suggestions if you have additional ideas/requests.
NTLM Abuse Strategy
Let’s take everything covered in this post and put together an NTLM abuse strategy.
First, let’s make some observations and assumptions:
NTLM challenge-response capture is less noisy than NTLM relay, but cracking depends on the strength of the password.
User authentication coercion can trigger the Web Client service to start, but computer authentication coercion can’t.
Scanning for hosts with the Web Client service running can be noisy. Similarly, collecting session information is noisy or even impossible without local admin rights.
NTLM relay attacks should be precise on red team operations. The “Spray and Pray” approach should be avoided.
Given the above, I propose the following approach:
At the beginning of an op/assessment, cast a wide net for user authentication coercion through watering hole attacks on high-traffic file shares or web pages. Try to coerce and capture both WebDAV and SMB traffic if you can. SMB is sometimes more likely to succeed, but this is your opportunity to start the Web Client service on every affected client.
As you capture NTLM responses, keep track of where users authenticate from — it tells you where they have a session. It is, in a way, passive session collection.
Attempt to crack passwords of interesting accounts that can help you escalate privileges or achieve your objectives. Don’t waste your GPU on meaningless accounts.
If you identify an interesting user but can’t crack the password, it’s time to relay.
Target the computer on which the user was active and compromise it via relay to ADCS (ESC8) or via relay to LDAP/LDAPS (RBCD or Shadow Credentials).
Once you gain admin access to the host, you can potentially avoid the risk involved in lateral movement and credential abuse by placing an authentication coercion file on the user’s desktop via the C$ share and relaying the NTLM exchange to the target resource.
What is Microsoft Doing About It?
Microsoft has been making efforts to mitigate these attacks. As I mentioned, relaying to LDAP is no longer possible against domain controllers running Windows Server 2025, and all Windows 11 and Windows Server 2025 hosts now require SMB signing by default. It’s a good start.
Microsoft has been working on a much more significant initiative to deprecate NTLM altogether. They’ve identified the following reasons why Windows hosts still use NTLM and have started working on solutions:
Until recently, the only option for local account authentication was NTLM. Microsoft is in the process of rolling out a “local KDC” to support Kerberos authentication for local accounts.
When clients don’t have a line of sight to a domain controller, they can’t obtain Kerberos tickets and have to fall back to NTLM. Microsoft is in the process of rolling out IAKERB, which will turn every Windows host into a Kerberos proxy.
Kerberos authentication requires mapping the resource that the client is trying to access to a service account. This is done through service principal names (SPN). SPNs usually use hostnames rather than IP addresses, so when a client attempts to access a resource by IP address, Kerberos authentication typically fails. However, as of Windows Server 2016, SPNs support SPNs with IP addresses.
Most NTLM usage is a result of software hard-coded to call the NTLM authentication package instead of the Negotiate package, which wraps Kerberos and NTLM and negotiates the most suitable option. Microsoft has been working on fixing these hard-coded issues in its own software, and, rumor has it, they have also been working with 3rd parties to fix their code.
Microsoft intends to have NTLM disabled by default (not completely removed), which means that even when the day finally comes, we will likely still find organizations that turn it back on, just as we still find hosts with NTLMv1 enabled. Last I heard, Microsoft had plans to have it done by 2028, but I believe they are already behind schedule, and, if history has taught us anything, we should expect it will take much longer than that.
Kerberos is NOT the Solution
For many years, people thought that Kerberos was not susceptible to relay attacks because it is based on tickets, and every ticket is issued to a specific service, so you can’t relay it to arbitrary targets. But that’s no longer the case. As James Forshaw discovered and Andrea Pierini weaponized, there are authentication coercion primitives that allow the attacker to control the service name for which the relay victim obtains a Kerberos ticket. These coercion primitives negotiate session security with signing, so they can’t be relayed to LDAP/LDAPS. However, they are compatible with relaying to SMB and ADCS.
Therefore, disabling NTLM is not the solution. Ensuring all servers enforce signing and channel binding is the right way to mitigate relay attacks.
We may add Kerberos relay edges to BloodHound in the future. Until then, you can be confident that whenever you see CoerceAndRelayNTLMToADCS or CoerceAndRelayNTLMToSMB edges, you can relay either NTLM or Kerberos.
Why Are We Releasing It Now?
There are many misconceptions about the problem and the solution for the NTLM relay problems. The new edges we introduced into BloodHound will hopefully bring clarity and put it in the spotlight, helping organizations prioritize one of the most significant yet underestimated risks affecting Active Directory environments.
Better Remediation Strategies
The remediation guidance for NTLM relay attacks is often “enforce everything, everywhere”, which is not very practical in a large environment that requires backward compatibility. However, BloodHound now helps defenders see what’s actually viable in their environments and prioritize high-impact/exposure targets. BloodHound has a set of pre-built cypher queries that can get you started with that.
Conclusion
NTLM relay attacks are far from dead. In fact, they’re often easier to execute and more effective than many security practitioners realize. This old technique remains one of the paths of least resistance in modern Active Directory environments, routinely enabling trivial pivots to high-value targets. The introduction of NTLM relay edges in BloodHound has made identifying and visualizing these attack paths remarkably simple: with just a few clicks, an operator can see how Authenticated Users can relay their way from zero to hero. In other words, BloodHound now depicts, with clear, intuitive edges, what once required stitching together information from multiple tools, showing defenders the real risks they face while allowing attackers to, once again, think in graphs.
Getting Started with BHE — Part 2Contextualizing Tier ZeroTL;DRAn accurately defined Tier Zero provides an accurate depiction of Attack Path Findings in your BHE tenant.Different principals (groups, GPOs, OUs, etc.) have different implications when Tier Zero is defined — understanding these will help reduce confusion around why something is showing up as Tier Zero.Welcome to round two of the Getting Started with BloodHound Enterprise series. Today’s focus will be on understanding and contextuali
An accurately defined Tier Zero provides an accurate depiction of Attack Path Findings in your BHE tenant.
Different principals (groups, GPOs, OUs, etc.) have different implications when Tier Zero is defined — understanding these will help reduce confusion around why something is showing up as Tier Zero.
Welcome to round two of the Getting Started with BloodHound Enterprise series. Today’s focus will be on understanding and contextualizing Tier Zero and ensuring that we have an accurate depiction of the Attack Paths that exist in your BloodHound Enterprise (BHE) tenant.
I started the last blog with a problem statement meant to align our focus, and I’ll include another one today. In this case, that would look something like:
“Have we identified (and configured) Tier Zero in our environment so that we have an accurate depiction of the Attack Paths that are increasing risk in our environment?”
In order to make progress here, we need to define and understand what it means when we’re talking about Tier Zero. You may have a unique definition for your organization which may require some additional due diligence, however our definition here at SpecterOps is:
“Tier Zero is a set of assets in control of enterprise identities and their security dependencies”
Where:
Control: A relationship that can contribute to compromising the controlled asset or impact its operability
Security dependency: A component whose security impacts another component’s security [1]
Out of the box, BHE comes with some default Tier Zero options [2] that will always be marked as a Tier Zero object for each domain collected, including:
The Domain head object
AdminSDHolder object
Built-in Administrator account
Domain Admins
Domain Controllers
Schema Admins
Enterprise Admins
Key Admins
Enterprise Key Admins
Administrators
Not listed here are:
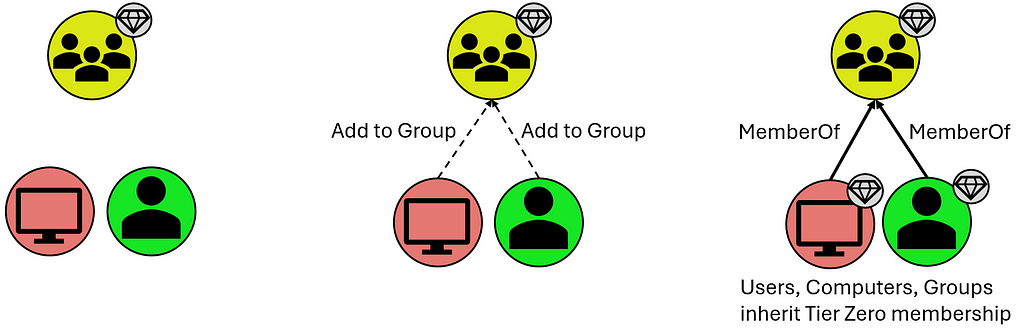
Users and Computers that are members of these groups, however they inherit Tier Zero classification from the Groups they share the “MemberOf” relationship with:
T0 Inheritance via Group Membership
Organizational Units (OUs) and Containers that contain these Tier Zero objects, though they are assigned Tier Zero based on containing Tier Zero objects as indicated below:
T0 Inheritance via “Contains” Relationship
Group Policy Objects (GPOs) that apply to these objects, though these are automatically marked as Tier Zero objects when they apply to a separate Tier Zero object:
T0 Inheritance via “GPLink” Relationship
What is not included in the default definition are groups like Account Operators (among several others). This is a group that, in your domain(s), may or may not be empty, and may or may not contain your helpdesk which generally opens wide your Tier Zero unnecessarily. There are also accounts like the MSOL account, responsible for Azure synchronization; your Privileged Access Workstations (PAWs); Password Managers (which have the ability to change the password on Tier Zero principals); and so on. These often become evident after the first collection when you may see a handful of principals that “shouldn’t be there” because there is a known relationship that is 100% valid (which you will generally know based on additional context you may have as a member of your organization). These are your “custom” Tier Zero objects that didn’t get wrapped up in BHE’s initial default definition. We do, of course, have additional documentation for these [3,4,5,6,7,8,9,10].
These custom additions will need to be manually added to Tier Zero in one of a couple different ways:
Tagging Tier Zero from the Explore Page
The first is through the Explore page, where you can search for individual objects and add them by right-clicking the object and selecting “Add to Tier Zero.” Similarly, if you select the “Explore” option for a Finding on the Attack Paths page, that will take you to this same Explore page where you can similarly add the object to Tier Zero. See below:
Exploring an Attack Path Finding to Add the Principal to Tier ZeroAdding the Attack Path Finding Principal to Tier Zero via the Explore Page
Either of these methods are a bit piecemeal and not the fastest ways to modify Tier Zero, but they are a good way to inspect and validate your Tier Zero additions during this process. Don’t fear, though, there’s a faster way to add objects to Tier Zero.
The second option is through the Group Management page which takes you to an overview of your Tier Zero:
Add or Remove Members (from Tier Zero) on the Group Management PageSpecify Members for Bulk Add on the Group Management Page
With this option, you can specify several names to add to Tier Zero and do a bulk add of any principals. Be aware that the changes that will take place, as noted above, include:
Groups that are added will cause members (computers, groups, users) to be added to Tier Zero
If the principal being added to Tier Zero is in an OU that is non-Tier Zero, the OU will be added to Tier Zero
If the principal being added to Tier Zero has GPOs that apply to it that are non-Tier Zero, these will be marked as Tier Zero
An important note to make about either of these options is that neither is necessarily the “right” or the “wrong” way, and both get you to the same end state. Generally, I find that the former (adding via “Explore”) is best suited when inspecting individual Findings on the Attack Paths page, as these may merit additional analysis before adding the object to Tier Zero. On the other hand, the “Group Management” page is great when you have a series of objects you want to add and don’t require additional inspection of anything before adding them to your Tier Zero definition. Basically, if you’re looking for a batch of updates that you want to add at one time, “Group Management” is the best way to go.
New Tier Zero additions will also cause new Findings to appear where non-Tier Zero principals have permissions against these newly-added Tier Zero principals. But this is good — this is what we’re looking for.
And that’s the next step — custom-tagged Tier Zero assets. When this is complete, you’ll have a clearer picture of what the Attack Paths and valid Findings actually are. In some cases, this may point to a couple of groups with very extensive permissions, or you might find a swath of misconfigurations that you did not realize existed buried deep in your AD structure.
What does this look like in practice? Here’s an example of what your BHE tenant might look like before you’ve added any context (red indicates an Attack Path Finding in BHE, for clarity):
Contextualizing Tier Zero — “Default” View
Here we have a “default” Tier Zero object (Domain Admins) and four Findings under the “Generic All” Attack Path. If we expand this out, to see full exposure, it might look like this (black lines depict relationships):
Contextualizing Tier Zero — Exposure View
Here we can see that there’s only one Tier Zero principal (Domain Admins), with four Attack Paths, but an exposure count of nine (count of non-Tier Zero principals). Again, this is after default collection with no additional contextualization except that we’re visualizing exposure in a simplified scenario.
But you might look at one of those and say, “Hey, Group: A is a Tier Zero object, too.” So we add it to Tier Zero and then we see the following:
Contextualizing Tier Zero — Defined Tier Zero View
Now we have two Tier Zero principals:
Domain Admins
Group: A
We also have eight Attack Paths:
Three Tier One principals with GenericAll over Domain Admins
Five Tier One principals with GenericWrite over Group: A
We would also see a slight change in Exposure because one of the nine principals that would previously contribute to our count has been added to Tier Zero. Exposure here has decreased to eight.
Now we have a better picture of what the Findings are in our environment, which allows us to better understand what needs attention, what needs to be mitigated, and what’s potentially leading to unnecessary exposure to Tier Zero. This is because we’ve taken the time to define Tier Zero for our organization.
Contextualizing your Tier Zero definition is important because otherwise your Findings will not accurately represent tiering violations, which is one of the first things you need to be able to see within BHE. This is what the Attack Path page shows you, and part of the reason it can be so valuable for organizations is that it summarizes pathways that cause exposure risks to your critical assets.
Once we have all that figured out, we’ll run into either of the following outcomes with no change in exposure:
Larger Tier Zero definition, decrease in Findings
Larger Tier Zero definition, increase in Findings
Objectively speaking, neither of these is better or worse than the other based on the change in Findings. Either is better than the previous state of visibility because it represents a more accurate view of your domain and the true Attack Paths that require your attention.
If we don’t figure this out, nothing changes and when we open up BHE we’re going to see an inaccurate depiction of what we actually care about. Again, that’s pathways (Attack Paths) that cause exposure risks to your critical assets (Tier Zero).
Join me again next time for Part 3, where we’ll work on identifying sources of exposure using Cypher queries.
[10] — “Defining the Undefined: What is Tier Zero, Pt IV,” by Martin Christensen, Lee Chagolla-Christensen, and Jonas Bülow Knudsen: https://www.youtube.com/watch?v=lLpCPBJIFkQ
Getting Started with BHE — Part 1Understanding Collection, Permissions, and Visibility of Your EnvironmentTL;DRAttack Path visibility is dependent upon scope of collection; complete collection is dependent upon appropriate permissions.Your collection strategy benefits from tiering just like your domain(s).IntroductionWelcome to my series on Getting Started with BloodHound Enterprise! This series comes after having had several discussions with customers about internal requirements for starting co
Understanding Collection, Permissions, and Visibility of Your Environment
TL;DR
Attack Path visibility is dependent upon scope of collection; complete collection is dependent upon appropriate permissions.
Your collection strategy benefits from tiering just like your domain(s).
Introduction
Welcome to my series on Getting Started with BloodHound Enterprise! This series comes after having had several discussions with customers about internal requirements for starting collection and I wanted to be able to provide something moving forward that reads more like a blog/conversation that’s easy to digest. That said, this doesn’t mean it’s irrelevant to the BloodHound Community Edition (BHCE) users, and there will still be components of information that are valuable for users on both the Enterprise and Community Edition sides. This series will focus more on users who are interested in gaining maximum visibility of their environments, defining Tier Zero, and understanding how to identify potential sources of exposure.
So, if you’ve got your BloodHound Enterprise (BHE) tenant up and running and are asking yourself “What now? Where do I start when it comes to BHE?” this series will give you actionable next steps and useful context for maximizing your BHE tenant.
Active Directory — Collecting with SharpHound
It may be obvious, but the first two things that need to be addressed are Collection and Permissions. These are necessary because you can’t see anything without collection, and collection is ultimately contingent upon the permissions you’re willing to grant your collector, which in this case discussion will be SharpHound (Active Directory). In other words, with greater permission comes greater visibility. Uncle Ben never said that to Peter Parker in Spider-Man, but he would have if they had been working on a SharpHound install.
More directly, talking about collection and permissions here will help address the following problem statement. If this resonates with you, you’re in the right place:
Are we positioned to collect the data required to accurately depict objective exposure risks that result in Attack Paths in our environment?
Collection and associated permissions include:
Active Directory Structure Data: Authenticated User group membership
Certificate Services: Authenticated User group membership
Local Group Membership: local Administrator on domain-joined systems
Sessions (logons): local Administrator on domain-joined systems
Domain Controller Registry: Administrator on domain controller(s)
Certificate Authority Registry: Administrator on enterprise CA(s)
The first (AD structure data) is the baseline requirement for BHE functionality; the others provide valuable context for understanding exposure risks that require additional data beyond what can be pulled from a domain controller via LDAP queries. Note that the second, Certificate Services, can be collected with the same basic privileges that AD structure data can be collected.
But what does this all mean practically? Depending on what your domain looks like it could be the difference between seeing 5% exposure and 95% exposure. I often deal with a lot of kickback on this series of requirements, but this is the tradeoff required for adequate visibility, accurate attack path mapping, and inherent risk associated with the relationships and configurations that exist in your AD environment.
If you do not have all of this collection, you’re going to miss some important information:
Where do ADCS attack paths exist that enable domain takeover?
Where do logon sessions exist that facilitate credential theft resulting in privilege escalation or lateral movement?
Where are tiering violations occurring because of bad practices with admins logging into systems at a lower tier?
This leads into a secondary discussion, which is often asked in the form of “How many resources do I need to get this data into BHE?”
In some cases, SharpHound and AzureHound can both be run on the same server. However it depends on how much is being collected and how you break up the schedule for your collectors. If you have a large environment with 100,000 users and you try collecting both AD and Azure environments at the same time, you’re probably going to run into some issues.
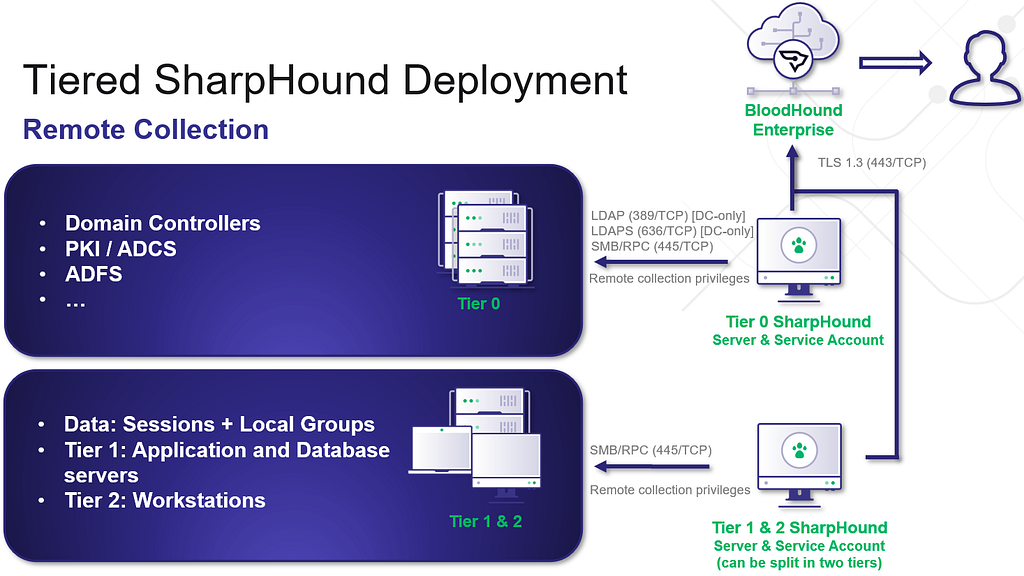
This next discussion will focus specifically on SharpHound, and for proper, hardened collection of SharpHound, I would recommend as many collectors as you have Tiers. I’ll use the standard three-tier model here:
A Tier Zero collector collects everything at the Tier Zero level, which easily accounts for the first requirement, but also allows visibility of all the others (at Tier Zero). You can run your AD structure data, Certificate Services, CA/DC registries, and Tier Zero group and session collection here. This is the primary visibility you want.
A Tier One collector should only need to collect group and session information at Tier One.
A Tier Two collector should only need to collect group and session information at Tier Two.
Here’s a visualization to depict what this might look like:
Tiered SharpHound Deployment
I do recommend following this tiering structure as much as possible, as this scoping of collection can help mitigate unnecessary exposure as a result of cross-tiered collection. While I do see variants of this where SharpHound is either Tier Zero or Tier One and collects from every tier, a tiered collection structure is the safest route forward for collection.
I also recommend following our hardening guidance for the SharpHound service account, which we list here [1]. This includes using a group managed service account (gMSA) for the SharpHound service account, rather than a regular AD user account. Additionally, adding this account to the Protected User group will limit the ability for Kerberos delegation and authentication relaying attacks.
Whichever path you choose here, understand that the privileges you give to the collector will align with the visibility you have of your environment. If you’re content with only seeing direct permissions based on Access Control Entries (ACEs), AD structure data will be sufficient. But if you want group and session collection, and if you would like to have full visibility of ADCS attack paths — you will need additional collection.
For more information on Data Collection and Permissions, check out our documentation here [2].
And that’s it for now! Come back later for our next topic, which will focus on what to do after you’ve got collection up and running and you’re ready to start working on cleaning things up: Contextualizing Tier Zero.
TL;DR: SCCM forest discovery accounts can be decrypted including accounts used for managing untrusted forests. If the site server is a managed client, service account credentials can be decrypted via the Administration Service API.IntroductionWhile Duane Michael, Chris Thompson, and I were originally working on the Misconfiguration Manager project, one of the tasks I took on was to create every possible account in the service and see how many of them could be discovered and extracted. Nearly all
TL;DR: SCCM forest discovery accounts can be decrypted including accounts used for managing untrusted forests. If the site server is a managed client, service account credentials can be decrypted via the Administration Service API.
Introduction
While Duane Michael, Chris Thompson, and I were originally working on the Misconfiguration Manager project, one of the tasks I took on was to create every possible account in the service and see how many of them could be discovered and extracted. Nearly all of those credentials, at least in a standard deployment, can be recovered using the techniques in CRED-5 that Benjamin Delpy and Adam Chester originally shared. There were accounts though that couldn’t be decrypted the same way and were stored in the SC_UserAccount table in a completely different format.
SCCM provides a number of discovery methods for identifying clients including Active Directory (AD) user and system discovery, network discovery, heartbeat, and forest discovery. Unlike the others that identify users and computers that may need to be managed, the forest discovery’s role is to identify locations that can be added as boundaries for client management by querying the local and trusted forests. The default for this discovery method is to use the site server’s machine account as it is already a member of the forest. However, another option is for administrators to manually add a forest and set credentials for a forest discovery account. This can be even more useful when managing untrusted forests.
Over the last few years of researching and attacking SCCM, the most common issue I’ve observed is that the various service accounts are configured with excessive permissions. I suspect the same is true for forest discovery accounts as well and are likely high value; especially when the objective is to move laterally where no direct path exists between forests. Naturally, I wanted to decrypt them.
Decryption
While manually forcing a forest discovery, I checked the modules loaded in the smsexec.exe service, which handles the bulk of processing tasks executed from the management console, and found a pretty descriptive .NET assembly: ActiveDirectoryForestDiscoveryAgent.dll.
Loading the assembly into dnSpy, the RunDiscovery method kicks off the discovery process. The method starts by first ensuring a database connection exists then generates a list of forests to target for discovery from the SCCM database. Once the list is built, ConnectToForest is called to query the database for each forest’s associated discovery account username.
If one exists, that username is passed to the GetCredentialsWrapper utility method, which is a wrapper for the native GetUserCredentials function imported from the ADForestDisc.dll to acquire the account’s password. The verbose logger shows that whatever is returned from GetCredentialsWrapper should be “successfully obtained credentials…” which is a good sign.
Looking at the ADForestDisc.dll in Ghidra, the GetUserCredentials function ensures a username is set then passes the username to GetGlobalUserAccount before returning the account’s password. The error handling logging message that states “failed to get account information from site control file for the discovery user” is a clue to where the credential material is stored.
According to Microsoft, the site control file (SCF) “…defines the settings for a specific site” and is stored in the SCCM site database. Two control files exist at any given time: the “actual” SCF for current site settings and the “delta” SCF for staged changes to update site settings. To perform any modifications to the site programmatically, an administrative user must establish a session handle on the file, commit the changes, then release the handle. This is necessary to prevent multiple users trying to modify site settings and creating conflicts. Admin users have likely experienced this working in the Configuration Manager console when trying to modify settings while another user has the same window open. If not properly handled, duplicate entries or even entire duplicate SCFs can occur, which can brick SCCM (ask me how I know).
Admins can use the Get-CMHierarcySetting PowerShell cmdlet to view the site’s current settings and, by expanding the Props embedded property, find entries for GlobalAccounts; including the account information being queried by the GetGlobalUserAccount function. This is promising as the first eight bytes of the blob stored in Value2 matches how Adam described other credential blobs are stored in the database.
Continuing with the basesvr!GetGlobalUserAccount function is where things get interesting and we start to get some insight into the decryption flow and where the credential is stored.
The function loads then recovers an encrypted session key blob from the site definition file for the target user with CSCItem_Property::GetCopyFromArray
Decrypts the session key blob with the CServerAccount::Decrypt function
Calls CSCItem_UserAccount::GetPassword to retrieve the encrypted password for the user account
The password is finally decrypted with the CServerAccount:DecrptEx function
Quick observation of the CServerAccount::Decrypt function reveals it’s the equivalent of what has already been shared for decrypting credentials in CRED-5, which makes sense considering the session key’s blob format.
To validate this, we can use the script Chris recently shared to decrypt the blob and recover the session key.
Now, to get the encrypted password, the baseobj.dll!GetPassword function just did not decompile well when imported to Ghidra.
Instead, I attached a debugger to the smsexec.exe process and set a breakpoint on the GetPassword symbol imported from baseobj.dll and kicked off a forest discovery.
Once the breakpoint is hit, the global user account and session key blob are visible in the memory dump. This lines up with what we’ve worked out so far in the decryption flow and are now trying to get the encrypted password value.
Step over the break point a bit and eventually land on a call to CServerAccount:DecryptEX and see the same encrypted password value from the SC_UserAccount table shown at the beginning of the blog along with the session key in the registers. And, after the call to DecryptEx is returned, the password for the account is visible.
Looking into the DecryptEx function, the bulk of it is just prepping the session key and encrypted password data formats for a call to another function to return the decrypted value.
The final function performs multiple steps to finally decrypt the password. It:
Establishes cryptographic service provider context; it initially tries to reuse an existing key container and, if it doesn’t, it creates one
Formats the session key for CryptImportKey. This is actually pretty cool and is a nice trick by the devs to reformat the session key. The CreatePrivateExponentOneKey function “encrypts” the session key with a private exponent value of 1 which mathematically checks out but does nothing to encrypt the session key. What it is doing, though, is basically encoding it into SIMPLEBLOB format for session key transport that CryptImportKey expects for session keys
Imports the formatted key
Allocates memory space for the decrypted password
Calls CryptDecrypt to decrypt the password with the session key
I originally set out to rewrite the native code to decrypt the string, but recalled seeing another decryption method (Microsoft.ConfigurationManager.CommonBase.EncryptionUtilities.DecryptWithGeneratedSessionKey) when I was recreating Adam’s work with CRED-5.
This made it pretty easy to create a wrapper around this method to decrypt the forest discovery password.
# Load the DLL Add-Type -Path "C:\Program Files\Microsoft Configuration Manager\bin\X64\microsoft.configurationmanager.commonbase.dll"
function Invoke-DecryptEx { [CmdletBinding()] param ( [Parameter(Mandatory = $true, Position = 0)] [string]$sessionKey,
[Parameter(Mandatory = $true, Position = 1)] [string]$encryptedPwd )
While reading documentation on untrusted forest deployment, I came across an interesting requirement for site system installation that provides another opportunity to recover forest credentials. To support untrusted forest deployment, admins must configure an account in the target domain to use for site installation. The account must have local admin permissions on the host and will be used for all future connections to the site system.
Site system installation accounts are stored the same way most other credentials are in the database and can be decrypted with the various methods from CRED-5.
Finally, while exploring all these various credential blobs, I discovered essentially every encrypted credential in SCCM can be recovered via the Administration Service API. Previously, I summarized the SCCM site control file (SCF) and how administrators can review it with PowerShell. It’s also visible from the API via the /wmi/SMS_SCI_SiteDefintion endpoint.
The SC_UserAccount table from the site database has an equivalent endpoint at /wmi/SMS_SCI_Reserved.
I don’t believe this is an exhaustive list yet but this discovery, in combination with the PowerShell decryption methods, can make credential recovery trivial. If the site server’s host system is a managed client, operators can leverage SCCMHunter’s admin module to recover and decrypt credentials stored in SCCM.
As a demo credential blobs from the SC_UserAccount table can be extracted with the get_creds command.
You can use the decrypt command to decrypt the blobs. The target environment will either need script approval disabled or you’ll need a secondary set of approver credentials since the decrypt function uses scripting under the hood. Again, the site server must be a managed client for this to work.
Defensive Considerations
While more credentials are available for abuse following hierarchy takeover, there really isn’t anything new here that warrants new defensive techniques. The defensive recommendations for CRED-5 are applicable here. In particular, the recommendations in PREVENT-10 to enforce the principle of least privilege for service accounts. Additionally, many of the accounts I’ve seen from previous assessments had an account name of “not configured”.
This happens when an account was being used for an action, in this case forest discovery, and then removed from that service. My conclusion here is admins may incorrectly believe removing the account from the service deletes the account. Organizations should review accounts found in the \Administration\Overview\Security\Accounts panel and remove them if they’re no longer in use.
Final Thoughts
I recognize that, if SCCM is managing an untrusted forest, there are likely clients running on devices from that forest and those can be leveraged for the same or greater lateral movement. I personally like to have as many credentials as possible and believe the credentials shown here may be extremely valuable.
Soon after this blog is published, we plan to update Misconfiguration Manager with these techniques to ensure they’re available to attackers and defenders. We have many more updates to make, which we’ll be publishing at a later date.
Come hang out with us in the #sccm channel on the BloodHound Slack. It’s been cool to see other members of the industry develop SCCM tradecraft and we discuss much of that conversation there.
TL;DR:Refreshed user interface with a new vertical navigation layout for improved user experience.General Availability of “Improved Analysis Algorithm” that provides more accurate risk scoring for findings across your environment.Enhancements to the Posture page, including a new “Attack Paths” metric and increased visibility into your Attack Path security posture.Release highlights focus on helping security teams better visualize, assess, and remediate identity-based Attack Paths.General Availab
Refreshed user interface with a new vertical navigation layout for improved user experience.
General Availability of “Improved Analysis Algorithm” that provides more accurate risk scoring for findings across your environment.
Enhancements to the Posture page, including a new “Attack Paths” metric and increased visibility into your Attack Path security posture.
Release highlights focus on helping security teams better visualize, assess, and remediate identity-based Attack Paths.
General Availability of Improved Analysis Algorithm and Security Posture Management Improvements
The BloodHound team previewed several concepts in the last couple of releases that made it easier for customers to visualize Attack Paths and show improvements in identity risk reduction over time.
This week’s release of BloodHound v7.0 includes significant enhancements focused on improving user experience and Attack Path risk assessment. Thanks to the feedback from customers and community, we are excited to showcase these enhancements together!
Fresh User Experience
In v7.0, the look and feel of BloodHound Enterprise (BHE) and BloodHound Community Edition (BHCE) have been given a noticeable refresh! With the goal of improving the user experience, the navigation pane has been moved to a vertical format.
New vertical navigation pane for BHE and BHCE.
When users hover over the icons the menu bar appears. This new open layout enhances the user experience, especially for users of ultra-wide monitors.
Improved Analysis Algorithm
In the BHE v7.0 release we are excited to announce the General Availability (GA) of Improved Analysis Algorithm. This was made available as Early Access in BHE v6.3 and enabled customers to get a risk assessment of the Attack Paths in their environment through:
· Enhanced risk scoring — Improved risk scoring by utilizing Impact and Exposure measurements that analyzes the blast radius of an object.
· Granular risk measurement — assessing the risk of every finding so you can pinpoint where to prioritize your efforts.
· Hybrid Attack Path risk analysis — Quantifying Attack Path risk associated with moving between Active Directory (AD) and Entra ID environments.
The Improved Analysis Algorithm leverages Exposure and Impact for risk scoring.
The Improved Analysis Algorithm has been refined to provide a more accurate measurement of risk scoring for findings across BloodHound, including measuring the risk generated from hybrid paths, resulting in a more precise Attack Path risk assessment of your environment.
Example: Impact signifies the granular risk measurement and risk score of the above Attack Path.
Posture Page Update
The Posture page was also re-worked in BHE v6.3. With this release, it now provides improved visibility into resolved Attack Paths and additional metrics to track remediation over time. The new, intuitive format is more ideal for board-level reporting. Building on that foundation, the following enhancements have been added in BHE v7.0:
· Attack Paths metric
· Viewing all environments by type
· Increased visibility of findings
Attack Paths Metric
Security teams and CISOs are primarily focused on their organization’s security risk posture. However, with the onslaught of threats, cutting through the noise to focus on what matters most and tracking remediation progress is challenging for blue teams.
The addition of Attack Paths gives practitioners a representative metric that starts to address this challenge by providing a read out on risk assessments and tracking remediation efforts on what matters most. The Attack Paths metric measures the risk highlighted by the combination of all findings within an environment. For most of our findings, which are focused on Tier Zero, the Exposure is used, indicating how many principals (user or computer account) can gain access through any path to the Tier Zero object identified. For other findings, such as Kerberoastable assets, or control by large default groups, we use the Impact, that is how many principals can be controlled by the given asset once compromised.
Attack Paths Metric provides a summary on risk assessment and remediation progress.
Viewing all environments by type
Most organizations have multiple environments, whether from separation of duties such as development or production, expansion through mergers and acquisitions, or migrations into hybrid environments, it’s common for customers to have multiple AD domains or Azure tenants which can create identity risk. These organizations need visibility across all their environments from one place to centralize risk measurement and reporting.
BHE v7.0 makes this easier by providing your security teams with holistic visibility into the Attack Path security posture across all your environments at once on a per-type basis. This view summarizes the Attack Paths, Findings, and Tier Zero Objects metrics across multiple environments, and shows them all in one place for quick review of the progress your teams have made.
Visibility of all environments by type.
Increased visibility of findings
SecOps teams often struggle to provide their leadership with effective board-level reporting. Risk reporting is either too abstract or dives deep into the data, making it difficult to utilize. When it comes to Attack Path risk assessments, it is critical to have a clear before and after snapshot as well as visibility into the intermediate findings along the remediation journey.
Prior to BHE v7.0, the Posture page provided a high-level summary of initial findings and resolutions, which was a useful baseline. In BHE v7.0, we’ve improved this reporting with granular visibility between initial findings to resolution path including any intermediate findings. This enables practitioners to provide a more meaningful summary on the risk and remediation progress for board-level reporting.
Visibility of findings.
Improved CSV export functionality
The ability to export data and easily share and sync with other tools, systems and teams is essential in today’s complex cybersecurity ecosystem.
For example, security teams can now ingest Attack Path findings into their SIEM/SOAR platforms. This helps automate incident threat response workflows and streamline security tasks. Additionally, the Attack Path data can be leveraged by incident response, threat hunting, vulnerability management and other security teams and systems.
The CSV export functionality on the Attack Paths page was improved to make the exported fields consistent across findings, added the new Exposure/Impact measurements where appropriate, and added human-readable column headers when the CSV is exported out of the UI.
Improved CSV export functionality.
Summary
BloodHound v7.0 packs a lot of capabilities that enable security teams to better assess and prioritize risks, track remediation efforts, and ultimately strengthen their security posture. All BloodHound users can find expanded details on these updates in our release notes or by contacting your Technical Account Manager.
Our team is excited to showcase the latest enhancements and share what’s coming down the line for BloodHound at our upcoming SO-CON event in the Washington, DC area from March 31 — April 1, 2025. We look forward to seeing you there!
Now that we know how to add credentials to an on-premises user, lets pose a question:“Given access to a sync account in Domain A, can we add credentials to a user in another domain within the same Entra tenant?”This is a bit of a tall order assuming we have very few privileges in Entra itself. Remember from Part 1 that the only thing we can sync down, by default, is the msDS-KeyCredentialLink property. In order to understand how to take advantage of this, we need to learn some more fundamentals
Now that we know how to add credentials to an on-premises user, lets pose a question:
“Given access to a sync account in Domain A, can we add credentials to a user in another domain within the same Entra tenant?”
This is a bit of a tall order assuming we have very few privileges in Entra itself. Remember from Part 1 that the only thing we can sync down, by default, is the msDS-KeyCredentialLink property. In order to understand how to take advantage of this, we need to learn some more fundamentals of the Entra sync engine and how the rules work:
Rule Intro
We have yet to look at a concrete rule, so let’s look at the first rule defined in the Rules Editor.
Note that the direction is not shown here, but I am showing the inbound rules in the sync rules editor. The direction is in the XML definition. The “Connected System” is the connector space that the source object is coming from (in this case, hybrid.hotnops.com). Since the AD object is a user, the connector space object is “user” and the user representation in the metaverse is called a “person”. The link type of “Provision” is saying “create a metaverse object if one does not exist yet”. In sum, this rule is telling the sync engine to create a metaverse object for any user in the connector space. Remember the connector is responsible for enumerating LDAP and populating all AD users into the connector space.
Next, the scoping filter sets which objects are to be provisioned. We can see here that if the connector space object has a property of isCriticalSystemObject not set to “true” AND adminDescription doesn’t start with “User_”, then the object will be provisioned. Remember that the object still exists in connector space, even though it won’t be projected into the metaverse.
Next, we get to the “join” rules which are critical to understand. The join rules are the logic that creates the links between the metaverse objects, and the connector space objects, resulting in concrete MSSQL relationships. In this case, the rule is saying that the ms-DS-ConsistencyGuid on the connector space object needs to match the sourceAnchorBinary on the metaverse object. If the ms-DS-ConsistencyGuid property doesn’t exist, the objectGUID is used. It’s also important to remember that joins happen for both inbound (from a connector space into the metaverse) and outbound (from the metaverse into the connector space) attribute flows.
Lastly, the transformations list which target object properties need to be mutated. Note that the language for these transformations is effectively VBA. In this case, two properties will be set on the metaverse person:
cloudFiltered — This will be important later. This is a rather large rule that describes a list of string patterns, such as if the sAMAccountName starts with “krbtgt_” or “AAD_”, etc. If “true”, then a property called cloudFiltered will be set to “true” on the metaverse object.
sourceAnchorBinary — Remember this from the join rule? In this rule, the sourceAnchorBinary is set on the metaverse object to match either the ms-DS-ConsistencyGuid or the objectId.
We have now walked through a full provisioning rule but note that most rules do not provision anything; rather, they are joined to existing objects and certain transformations are projected into the metaverse.
So far, we have described the flow into the metaverse, so how does a property flow out? Let’s take a look at the two rules we care about. First, let’s look at how users are provisioned in Entra:
The “Link Type” is “Provision”, meaning that a new object will be created in the Entra connector space. The Entra connector (Sync Agent), will use that object creation to trigger a new user creation in Entra.
This part is really important. If we look at the filter, objects are only provisioned to the Entra connector space if all of these conditions are met. Remember that some of our privileged accounts, such as the “MSOL” account, “krbtgt”, and “AAD_” account names are set to be cloud filtered. That means that they are projected into the metaverse, but the Entra user provisioning is simply being blocked by the sync engine.
Last rule, I promise. Let’s look at how Entra users are joined to on-premises users:
This is saying that if an Entra user with a source anchor matches a metaverse object with the same source anchor, they will be tied together.
Do you see it?
There are partially linked objects in the metaverse, and we can trigger a link by creating a new user with the matching sourceAnchor.
In simple terms, CloudFiltered objects are prevented from being provisioned only!AKA Outbound Filtering. If we can provision the Entra user ourselves, we can complete the inbound join rule and take over the user account in another domain, as long as the MSOL account can write their msDS-KeyCredentialLink property.
And chaining this together, because we can control the user password and creation from the compromised sync account in Domain A, we can then add the WHFB credentials discussed in the part one of this blog series and add credentials to a potentially privileged user.
Before we continue, this attack has some important caveats:
The MSOL account used for attribute flows has write permissions at the “Users” OU level by default. If a user account has inheritance disabled, then MSOL will not be able to write to it and this attack will not affect the account.
Walkthough
Enough talking; let’s do a walkthrough. In this scenario, we have a tenant (hotnops.com) with two on-premises domains: federated.hotnops.comand hybrid.hotnops.com. As an attacker, we have fully compromised federated.honops.comand have an unprivileged Beacon in hybrid.hotnops.com. We will take advantage of the compromised Entra Connect Sync account in federated.honops.com to take over hybrid.hotnops.com.
If you want a full walkthrough with all the command line minutae, the video is here:
Step 1
From the Beacon in hybrid.hotnops.com, we need to identify an account we’d like to take over and identify the sourceAnchor that we need.
To do this, we want to find partially synced metaverse objects. For the sake of this walkthrough, we can run dsquery:
With those results, we want to look for any account that matches our “CloudFiltered” rule, which is defined here. In our case, there is an account named “AAD_cb48101f-7fc5–4d40-ac6c-09b22d42a3ed”. These are older connector accounts installed with AAD Connect Sync. If you identify an account that may be cloud filtered, you will need the corresponding ObjectID associated with the account that is in the dsquery results. In our case, the object ID is
0A08E28B-5D21–4960-A25A-F724F1E96155
Since the ObjectId is used as the sourceAnchor, we want to create a new Entra user with that sourceAnchor so it will link to our targeted “AAD_” account. In order to convert the UUID to a sourceAnchor, we simply need to convert the UUID to a binary blob where each section is little endian. I have a script to do it here, but there are probably easier ways.
We now want to use our Sync Account in federated.hotnops.comto create a new user with that sourceAnchor so that it will create a link to our target user in hybrid.hotnops.com. We can do that by obtaining credentials for the ADSync account and using the provisioning API. You’ll need to obtain an access token for the ADSync account, which I demonstrate in the video linked above. Once you have your token, you’ll need to use AADInternals to create the account.
At this point, we have achieved Step 1. We have a new user in Entra with a matching sourceAnchor, and now we need to wait up to 30 minutes (by default) for the target domain to run an Entra Connect sync, at which time the Entra user and the on-premises target “AAD_cb48101f-7fc5–4d40-ac6c-09b22d42a3ed” link together.
Step 2
Once the user is created, add an msDS-KeyCredentialLink to the newly created Entra user as documented in the first blog post in this series.
Step 3: Profit
Once the Entra Connect sync agent on hybrid.hotnops.comruns the next sync, it will use the join rule “In from AAD — User Join” to link the Entra user to the metaverse object associated with the on-premises “AAD_cb48101f-7fc5–4d40-ac6c-09b22d42a3ed” account.
From here, we will use our Beacon in hybrid.hotnops.comand methods documented in the Shadow Credentials blog to elevate privileges.
As a result of registering a Windows Hello For Business (WHFB) key on your created Entra user, you will have a key called “winhello.key”. In order to use it with Rubeus, we need to format it as a PFX file. The steps are below:
Congratulations! Your Beacon process now has a token for your targeted account.
Prevention
Identify All Partially Synced Users
For our purposes, a partially synced user is one that has an object in the on-premises connector space, a projection in the metaverse, but not an object in the Entra connector space. The reason why these exist, as mentioned earlier, is due to outbound filtering. In order to determine which users are partially synced, we can query all the objects in the metaverse and connector spaces and see which ones don’t have an object in the Entra connector space. The script to do that is here and here is an example output:
Identify All Privileged Users Inheriting Permissions From the Users OU
When Entra Connect is installed, an Active Directory Domain Services (AD DS) Connector account is created in the naming scheme of “MSOL_<random garbage>”. This account is responsible for syncing hashes (yes, it has DCSync privileges) and reading/writing properties on users to support the attribute flows. As a result of this, the MSOL account is given write all over all users in the “Users” OU.
That means this attack can affect any user that inherits their discretionary access control lists (DACLs) from the Users OU (which is pretty much all users). This is generally true of any Sync attack; however, something I learned during this research is that users added to sensitive privileged groups such as Domain Administrators will automatically have their inheritance disabled. Even when I re-enable it, some script comes along and disables it again. This led me to this technet article which claims that any AD group marked “protected” will routinely get a template DACL applied to them located at CN=AdminSDHolder,CN=System,DC=hybrid,DC=hotnops,DC=com.
So which users are “protected”?
Any user that has the adminCount property set to “1”. (Edit: Thanks to Clément Notin (@cnotin) for pointing out that the adminCount is the result of AD evaluating such criteria, not the source. More details here) Ultimately, as long as the target’s msDS-KeyCredentialLink attribute is writable by the MSOL account AND it is partially synced, then it is susceptible to this attack. I provided a powershell cmdlet to list all users that inherit their DACLs from the Users OU:
Detection
Detection of this misconfiguration/attack may be difficult but there are some solid signals that something is off. If any users in the Entra connector space have a metaverse projection with a “cloudFiltered” attribute set to “true”, then something is wrong. You can use the powershell cmdlet here to check for those users. While this doesn’t detect all hijackable metaverse objects, it does cover the most obvious case of cloudFiltered users.
TLDRThis blog walks you through setting up an ADFS lab using Ludus and/or a flexible hybrid cloud environment for testing.The associated GitHub repo is here.IntroductionI was recently on an engagement where the customer was using Active Directory Federated Services (ADFS). ADFS is an Identity Provider (idP) by Microsoft that allows third-party applications and internal applications to delegate authentication to Active Directory.I see ADFS all the time during my engagements, and although I knew a
I was recently on an engagement where the customer was using Active Directory Federated Services (ADFS). ADFS is an Identity Provider (idP) by Microsoft that allows third-party applications and internal applications to delegate authentication to Active Directory.
I see ADFS all the time during my engagements, and although I knew about this technology in theory, I wanted to gain more experience with it. How fun would it be to spin up an ADFS lab, learn how it works under the hood, practice attacks, and analyze possible detection’s? The possibilities are endless with a home lab!
I’m a heavy Ludus user, and I use Zach Stein’s SCCM Ludus range all the time, so going with Ludus was a no brainer. Erik Hunstad developed Ludus which simplifies lab deployments, making it a powerful tool for managing virtual environments. If you’re not familiar with it yet, be sure to check out the Ludus documentation here.
Entra Challenge
While I was building the lab, I wanted to see if it would be possible to automate the process for integrating Microsoft 365 apps with ADFS for authentication. To do this on a domain-joined system, I would need to run the AzureAdConnect.msi installer, which replicates objects from an on-prem Active Directory environment to Entra ID and when configured can also write changes from Entra ID back to on-prem AD. Automating this became more difficult than I anticipated.
Instead, I’ve created an Ansible role called “entra_prep”, which prepares a dedicated server to connect your on-prem AD environment to Entra ID. You can find more details in the “Roles” section on how this works. Keep in mind that you’ll need your own Entra tenant to move forward. Once that’s set up, the only other step is running the AzureADConnect installer and following the wizard. Everything else you need for a hybrid cloud lab is ready to go.
What makes this lab super flexible is that it is essentially “choose your own adventure”. You have the freedom to decide exactly how you would like to structure your lab.
Don’t want to use ADFS, but just want a hybrid cloud lab? This setup works for that!
Want to experiment with ADFS locally and not use the cloud? Perfect!
Desire to understand how password hash syncing works under the hood? We have a winner!
Interested in playing with setting up Office Apps with ADFS and researching potential weaknesses? This works for that as well!
Want to test how a Golden SAML attack works and pivot from on-prem AD to the cloud? This lab will help you get there!
You get the picture, there’s a lot you can do with this home lab. I do believe this lab strikes a good balance between automation and manual setup that lets you set up how you want the cloud environment to be and still save you some time.
Roles
Ludus uses Ansible roles to manage the software and configurations in the lab environment. The following are roles that I created for this lab.
install_adfs
This role installs the ADFS role on a server, creates an ADFS service account, and requests a certificate that ADFS uses.
import_root_cert
This role requests the root certificate from the certificate authority (CA) and imports it into the local machine security store. This is necessary to remove the following certificate error which is caused because the lab machine does not trust the CA that signed the cert being used by ADFS.
entra_prep
This role adds an alternative user principal name (UPN) to the local domain which is required before connecting an on-prem domain to Entra ID. This role also installs TLS 1.2 which AzureAdConnect.msi requires. Next, this role creates a service account which is used for syncing AD objects from on-prem AD to Entra ID. There are some settings that allow Entra ID to replicate changes to on-prem AD such as group writeback, device writeback, or password writeback. If any of these settings are configured, then some changes in Entra ID like group creation, or password resets will be replicated from Entra ID to on-prem AD. Finally, this role downloads the AzureAdConnect.msi installer to the server that will be used for replication between on-prem AD and Entra ID.
Installation
I won’t be covering the installation of Ludus as this is already heavily documented in the Ludus docs. Installation of the ADFS range is simple, you just need to clone the ludas_adfs repo.
ludus range config set -f /opt/ludus_adfs/ADFS-Range.yml
ludus range deploy
Once the deployment completes, you can visit the following URL to confirm that the ADFS deployment was successful (the domain and hostname will be different if you modified the ADFS-Range.yml file).
This provides a working ADFS deployment. All that is left for you to do is to integrate third-party applications for Single Sign-On (SSO) using ADFS.
Additionally, if you have an Entra tenant and would like to migrate the domain to a hybrid deployment, simply login to the EntraConnect-WinServer2022 virtual machine and run the installer found at c:\windows\tasks\AzureAdConnect.msi.
Follow the wizard with your details and you’re on your way!
Closing Thoughts
It was a pleasure to write this blog! If you find this tool helpful in any way, or have suggestions for improvements, please don’t hesitate to reach out!
This is part one in a two (maybe three…) part series regarding attacker tradecraft around the syncing mechanics between Active Directory and Entra. This first blog post is a short one, and demonstrates how complete control of an Entra user is equal to compromise of the on-premises user. For the entire blog series the point I am trying to make is this:The Entra Tenant is the trust boundaryThat means that if your tenant consists of 100 domains, a compromise of one domain is likely to equal a compr
This is part one in a two (maybe three…) part series regarding attacker tradecraft around the syncing mechanics between Active Directory and Entra. This first blog post is a short one, and demonstrates how complete control of an Entra user is equal to compromise of the on-premises user. For the entire blog series the point I am trying to make is this:
The Entra Tenant is the trust boundary
That means that if your tenant consists of 100 domains, a compromise of one domain is likely to equal a compromise in all other domains, assuming line of sight to the targeted domain.
Intro to Entra Connect Sync
Entra Connect Sync is the software responsible for propagating changes between Active Directory and Entra (often still referred to as Azure Active Directory). For most cases, the changes are propagated from Active Directory to Entra. As a quick example, consider a new user created in an on-premises Active Directory. The next time Entra Connect Sync runs a sync cycle, a special Entra sync account will send a provisioning message to adminwebservice.onmicrosoft.com to create a new Entra user that represents that user. This process has been covered very well and tooling exists to manipulate this syncing mechanic in AADInternals. An interesting, and fairly unexplored, part of this mechanic is the “metaverse” within Entra Connect.
The metaverse is a virtual representation of multiple data sources. Think of it like a conflict manager for directories. Each data source (AD and Entra) are called “connected directories”. The connected directories are enumerated via remote protocol (LDAP, https, etc.) by a connected directory specific “connector”. Each connected directory has a virtual representation called a “connector space” that represents all of the desired data synced from the connected directory. Once a connected directory runs an “import”, all of the users/devices/groups/etc. exist in the connector space. After import, a synchronization is executed and the connector space objects are “projected” into the metaverse.
The metaverse object is the aggregation of all associated properties from multiple connected directories. Since this is an abundance of lingo, let’s walk through an example. In Active Directory, I’m going to create a user named “jack.burton@hybrid.hotnops.com”. Once the user is created, we run a “delta import” in the Synchronization Service
As you can see, we have one “Add” and the user Jack Burton now exists in the connector space, but not the Metaverse yet.
In order for the Jack Burton user to be projected into the metaverse, we need to run a sync. In this case, I’ll run a delta sync.
Clicking on the “Projections” link, we can see that a new user has been projected into the Metaverse.
There is also a new export attribute flow, which indicates that this user is to be provisioned to another connected directory (Entra). To trigger this provision, we lastly need to run an export on the Entra connector space.
Don’t worry about the export errors, I have been doing stuff. At this point, we have an end to end flow of an object being created in AD, projected into the metaverse, and then provisioned in Entra. But from the Entra Connect standpoint, there’s no special differentiator between Entra and Active Directory, they are both simply connector spaces.
So can attributes go from Entra to Active Directory?
Yes!
The flow of attributes are specified by the Entra Connect rules, which have a default setup that I will speak to in the next blog post. By default, there is one and only one attribute that is written from an Entra user to an Active Directory user and that is the searchableDeviceKey -> msDS-KeyCredentialLink attribute flow. If msDS-KeyCredentialLink sounds familiar, it’s because it has been covered extensively as an abuse primitive known as “Shadow Credentials”. Long story short, if we can add a public key to the msDS-KeyCredentialLink attribute of a user, we can obtain a TGT for that user with the private key. This means that if we can add a key to an Entra user, we can authenticate as them on-premises. This will prove to be a powerful primitive in the following blog posts when we do a deeper dive on Metaverse and cross domain attacks.
Abusing the WHFB key to gain access to on-premises account
Any key material (Window Hello For Buiness or FIDO2) key that is added to an Entra user will be synced down to the on-premises user to the msDS-KeyCredentialLink attribute. To perform this attack, we are assuming complete control of an Entra user account. This includes plaintext password and access to MFA methods. We will try to ease these assumptions later, but for now I simply want to prove-out the idea.
Here are the following commands that we can run to get an msDS-KeyCredentialLink set on the on premises user. As a high level overview, we are going to be registering a WHFB key. We could also do a FIDO2 key in theory, but this will be easier for demonstration. This attack, at the moment, requires knowledge of the plaintext password and possession of at least one MFA authenticator. To register a WHFB key, we are going to create a fake device, obtain a PRT, and enrich it with an ngcmfa claim. A lot of the heavy lifting for this has already been done by Dirjkan in the roadtools toolkit. The steps are as follows:
Obtain a token for the enterprise device registration resource server
roadtx winhello –access-token <token from previous step>
At this point, we have added a WHFB key to the Entra user and now need to wait up to 30 minutes for it to sync down to the on-premises user. For the sake of this writeup, I can manually trigger the sync, but note that this is not a normal order of operations for Entra Connect sync. In this image, we can see that a new property has been ingested into the Entra connector space.
The delta sync shows that the updated property has been projected onto the joined user in the metaverse.
Lastly, the export shows that the msDS-KeyCredentialLink has been provisioned to the Active Directory user, as shown in the msDS-KeyCredentialLink row.
We have shown that an attacker can add a public key to the msDS-KeyCredentialLink property, but now what?
We need to do some massaging with the key material to obtain a TGT for jack.burton.
First, we need to create a certificate signing request with the key we registered above
And there you have it, we obtained a TGT for a user by actions we took on the Entra side. You may be wondering
“If we have the user plaintext password, why would we need or even want to do this?”
I have three answers:
In the event that an attacker has the ability to modify a user password in Entra when password writeback is disabled, this will enable them to access the account on-premises.
The primitive of adding a key to a user may not necessarily require a password or access to an MFA authenticator. I am currently in search of better ways to do this, and I suspect that there are many ways to achieve the same result.
The primitive of adding a key to an Entra user will serve as a foundation for the cross domain attacks we will perform in the next two parts of this blog series. In many cases, we control the user, password, and MFA authenticators.
Just in time for the holidays, sharper tools for faster defenseToday, the SpecterOps team rolled out a number of new features, product enhancements, and recommendations intended to help users of BloodHound Enterprise and BloodHound Community Edition more easily visualize attack paths and show improvements in identity risk reduction over time. Scroll down to learn more about v6.3.0 and related changes to BloodHound Enterprise and BloodHound Community Edition.BloodHound Enterprise UpdatesReport on
Just in time for the holidays, sharper tools for faster defense
Today, the SpecterOps team rolled out a number of new features, product enhancements, and recommendations intended to help users of BloodHound Enterprise and BloodHound Community Edition more easily visualize attack paths and show improvements in identity risk reduction over time. Scroll down to learn more about v6.3.0 and related changes to BloodHound Enterprise and BloodHound Community Edition.
BloodHound Enterprise Updates
Report on attack path risk with Revamped Posture page
The BloodHound Enterprise team has completely redesigned the Posture page, delivering several significant enhancements:
Enhanced visibility into resolved attack paths
New metrics to track remediation progress over time
New filter and search capabilities to highlight specific improvements
Consolidated view of relevant data into a single page, reducing unnecessary scrolling
The new Posture page in BloodHound Enterprise provides visibility into resolved attack paths and additional metrics for board-level reporting.The new Posture page in light mode — this author’s unpopular, but preferred version :)
Improved Analysis Algorithm
This is a massive upgrade to BloodHound Enterprise’s risk analysis capability with a new algorithm we call “Butterfly”:
Enhanced risk scoring with “Impact” analysis
Granular risk measurement per finding for better prioritization
Support for hybrid attack path risk analysis
Let’s get more specific with the first two bullets; Enhanced risk scoring and better prioritization.
Enhanced risk scoring with “Impact” analysis
BloodHound Enterprise has historically assessed the risk of attack paths by modeling the principals that can target specific identities and resources:
Starting with v6.3, BloodHound will also incorporate Impact analysis — the principals that can be attacked by a target node:
This new bi-directional risk analysis significantly improves BloodHound Enterprise capabilities in determining severity for attack paths:
The “Butterflly” algorithm as we call it internally
For example, here is the improved analysis in action with Kerberoastable Users:
A quick refresher on Kerberoast attack: A Kerberoast attack exploits the Kerberos authentication protocol by targeting service account passwords in a Windows Active Directory environment. An attacker requests Kerberos service tickets for Service Principal Names (SPNs), extracts them, and performs offline password cracking since the tickets are encrypted with the service account’s NTLM hash. If successful, the attacker gains the plaintext service account credentials, which can be used for lateral movement or privilege escalation.
Anyone can request the service ticket for a kerberoastable account which means the exposure is always 100%. The risk of this finding is what an attacker could do with access to that account with a successful crack. Therefore, the risk is determined by the impact; or what can be attacked once the attacker has control of the account.
Granular risk measurement per finding for better prioritization
BloodHound Enterprise delivers better prioritization by analyzing risk per finding with v6.3. Historically, risk was calculated per attack path type:
BHE v6.2 (previous version) with no granular risk measurements per finding.
Now, BloodHound Enterprise will assess the risk of every finding, allowing you to pinpoint where to start first:
BHE v6.3 (new version) with enhanced risk analysis and granularity at the finding level
In the example above, one particular login is more risky than the others and should be prioritized. BloodHound Enterprise is simplifying the analysis for you to enable better prioritization. In this case, APP4.TITANCORP.LOCAL is prioritized above the rest as DOMAIN USERS has the ability to RDP into the host and capture the user session:
100% of users with access to a computer with a user session from SVCINTRUST (a Tier Zero account)
This granularity is on every finding. Let’s look again at a large list of Kerberoastable users. Thanks to this improvement, we now know where to prioritize our efforts:
BloodHound Enterprise prioritizing Kerberoastable users for remediation based on Impact
BloodHound Common Updates
All enhancements listed below are available to both BloodHound Community and BloodHound Enterprise users.
Node/Edge Label Toggle makes for more flexible public reporting
A long-requested feature has returned to BHCE and also available in BHE, allowing users to show or hide sensitive node and edge labels directly in the UI. This was contributed by the community member @palt — whom we give major kudos to!
The Node/Edge label toggle has returned due to popular demand. This feature allows users to show or hide sensitive node and edge labels directly in the UI.
New CoerceToTGT Edge Type
This new edge type provides more visibility into unconstrained delegation scenarios:
Indicates principals configured for potential ticket-granting ticket (TGT) coercion
For Enterprise users, this consolidates previous “Unconstrained Delegation” findings into a single, more informative attack path finding
The new CoerceToTGT Edge Type provides additional visibility into unconstrained delegation scenarios.BloodHound Enterprise automatically identifying the new CoerceToTGT / Unconstrained Delegation Attack Paths
Single Sign On (SSO) Improvements
Added OpenID Connect (OIDC) support alongside existing SAMLv2 providers
Automatic redirection for environments with a single SSO provider
Enterprise Domain Controllers Group Improvement
Improved consistency when creating an Enterprise Domain Controllers group to reduce confusion depending on how a collection was performed (note: requires a SharpHound upgrade).
Minor Improvements and Bug Fixes
The release also includes several quality-of-life improvements:
Fixed scrolling issues in entity panels
Resolved file upload hanging problems
Corrected a pre-saved Cypher query for “Kerberoastable users with most privileges”
Improved error handling in SharpHound data collection
Recommendations, Early Access and Further Information
Upgrade Recommendations:
Upgrade to SharpHound v2.5.12 (Enterprise) or v2.5.9 (Community Edition)
Upgrade to AzureHound to v2.2.1 for performance improvements
Early Access Features
Administrators can enable the new analysis algorithm from the Administration -> Early Access configuration screen
To learn more about this release, sign up and join us for BloodHound Live: Monthly Release Recap on December 18 — and bring your questions! All BloodHound users can find expanded details on these updates today in our release notes or by contacting their Technical Account Manager.