Getting Started with BHE — Part 2Contextualizing Tier ZeroTL;DRAn accurately defined Tier Zero provides an accurate depiction of Attack Path Findings in your BHE tenant.Different principals (groups, GPOs, OUs, etc.) have different implications when Tier Zero is defined — understanding these will help reduce confusion around why something is showing up as Tier Zero.Welcome to round two of the Getting Started with BloodHound Enterprise series. Today’s focus will be on understanding and contextuali
An accurately defined Tier Zero provides an accurate depiction of Attack Path Findings in your BHE tenant.
Different principals (groups, GPOs, OUs, etc.) have different implications when Tier Zero is defined — understanding these will help reduce confusion around why something is showing up as Tier Zero.
Welcome to round two of the Getting Started with BloodHound Enterprise series. Today’s focus will be on understanding and contextualizing Tier Zero and ensuring that we have an accurate depiction of the Attack Paths that exist in your BloodHound Enterprise (BHE) tenant.
I started the last blog with a problem statement meant to align our focus, and I’ll include another one today. In this case, that would look something like:
“Have we identified (and configured) Tier Zero in our environment so that we have an accurate depiction of the Attack Paths that are increasing risk in our environment?”
In order to make progress here, we need to define and understand what it means when we’re talking about Tier Zero. You may have a unique definition for your organization which may require some additional due diligence, however our definition here at SpecterOps is:
“Tier Zero is a set of assets in control of enterprise identities and their security dependencies”
Where:
Control: A relationship that can contribute to compromising the controlled asset or impact its operability
Security dependency: A component whose security impacts another component’s security [1]
Out of the box, BHE comes with some default Tier Zero options [2] that will always be marked as a Tier Zero object for each domain collected, including:
The Domain head object
AdminSDHolder object
Built-in Administrator account
Domain Admins
Domain Controllers
Schema Admins
Enterprise Admins
Key Admins
Enterprise Key Admins
Administrators
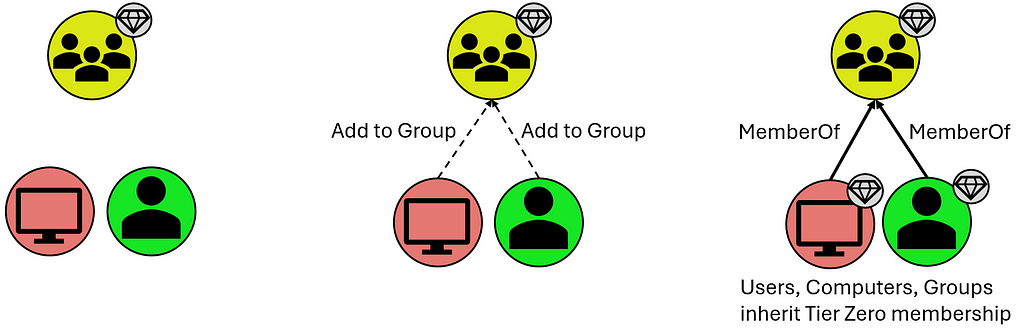
Not listed here are:
Users and Computers that are members of these groups, however they inherit Tier Zero classification from the Groups they share the “MemberOf” relationship with:
T0 Inheritance via Group Membership
Organizational Units (OUs) and Containers that contain these Tier Zero objects, though they are assigned Tier Zero based on containing Tier Zero objects as indicated below:
T0 Inheritance via “Contains” Relationship
Group Policy Objects (GPOs) that apply to these objects, though these are automatically marked as Tier Zero objects when they apply to a separate Tier Zero object:
T0 Inheritance via “GPLink” Relationship
What is not included in the default definition are groups like Account Operators (among several others). This is a group that, in your domain(s), may or may not be empty, and may or may not contain your helpdesk which generally opens wide your Tier Zero unnecessarily. There are also accounts like the MSOL account, responsible for Azure synchronization; your Privileged Access Workstations (PAWs); Password Managers (which have the ability to change the password on Tier Zero principals); and so on. These often become evident after the first collection when you may see a handful of principals that “shouldn’t be there” because there is a known relationship that is 100% valid (which you will generally know based on additional context you may have as a member of your organization). These are your “custom” Tier Zero objects that didn’t get wrapped up in BHE’s initial default definition. We do, of course, have additional documentation for these [3,4,5,6,7,8,9,10].
These custom additions will need to be manually added to Tier Zero in one of a couple different ways:
Tagging Tier Zero from the Explore Page
The first is through the Explore page, where you can search for individual objects and add them by right-clicking the object and selecting “Add to Tier Zero.” Similarly, if you select the “Explore” option for a Finding on the Attack Paths page, that will take you to this same Explore page where you can similarly add the object to Tier Zero. See below:
Exploring an Attack Path Finding to Add the Principal to Tier ZeroAdding the Attack Path Finding Principal to Tier Zero via the Explore Page
Either of these methods are a bit piecemeal and not the fastest ways to modify Tier Zero, but they are a good way to inspect and validate your Tier Zero additions during this process. Don’t fear, though, there’s a faster way to add objects to Tier Zero.
The second option is through the Group Management page which takes you to an overview of your Tier Zero:
Add or Remove Members (from Tier Zero) on the Group Management PageSpecify Members for Bulk Add on the Group Management Page
With this option, you can specify several names to add to Tier Zero and do a bulk add of any principals. Be aware that the changes that will take place, as noted above, include:
Groups that are added will cause members (computers, groups, users) to be added to Tier Zero
If the principal being added to Tier Zero is in an OU that is non-Tier Zero, the OU will be added to Tier Zero
If the principal being added to Tier Zero has GPOs that apply to it that are non-Tier Zero, these will be marked as Tier Zero
An important note to make about either of these options is that neither is necessarily the “right” or the “wrong” way, and both get you to the same end state. Generally, I find that the former (adding via “Explore”) is best suited when inspecting individual Findings on the Attack Paths page, as these may merit additional analysis before adding the object to Tier Zero. On the other hand, the “Group Management” page is great when you have a series of objects you want to add and don’t require additional inspection of anything before adding them to your Tier Zero definition. Basically, if you’re looking for a batch of updates that you want to add at one time, “Group Management” is the best way to go.
New Tier Zero additions will also cause new Findings to appear where non-Tier Zero principals have permissions against these newly-added Tier Zero principals. But this is good — this is what we’re looking for.
And that’s the next step — custom-tagged Tier Zero assets. When this is complete, you’ll have a clearer picture of what the Attack Paths and valid Findings actually are. In some cases, this may point to a couple of groups with very extensive permissions, or you might find a swath of misconfigurations that you did not realize existed buried deep in your AD structure.
What does this look like in practice? Here’s an example of what your BHE tenant might look like before you’ve added any context (red indicates an Attack Path Finding in BHE, for clarity):
Contextualizing Tier Zero — “Default” View
Here we have a “default” Tier Zero object (Domain Admins) and four Findings under the “Generic All” Attack Path. If we expand this out, to see full exposure, it might look like this (black lines depict relationships):
Contextualizing Tier Zero — Exposure View
Here we can see that there’s only one Tier Zero principal (Domain Admins), with four Attack Paths, but an exposure count of nine (count of non-Tier Zero principals). Again, this is after default collection with no additional contextualization except that we’re visualizing exposure in a simplified scenario.
But you might look at one of those and say, “Hey, Group: A is a Tier Zero object, too.” So we add it to Tier Zero and then we see the following:
Contextualizing Tier Zero — Defined Tier Zero View
Now we have two Tier Zero principals:
Domain Admins
Group: A
We also have eight Attack Paths:
Three Tier One principals with GenericAll over Domain Admins
Five Tier One principals with GenericWrite over Group: A
We would also see a slight change in Exposure because one of the nine principals that would previously contribute to our count has been added to Tier Zero. Exposure here has decreased to eight.
Now we have a better picture of what the Findings are in our environment, which allows us to better understand what needs attention, what needs to be mitigated, and what’s potentially leading to unnecessary exposure to Tier Zero. This is because we’ve taken the time to define Tier Zero for our organization.
Contextualizing your Tier Zero definition is important because otherwise your Findings will not accurately represent tiering violations, which is one of the first things you need to be able to see within BHE. This is what the Attack Path page shows you, and part of the reason it can be so valuable for organizations is that it summarizes pathways that cause exposure risks to your critical assets.
Once we have all that figured out, we’ll run into either of the following outcomes with no change in exposure:
Larger Tier Zero definition, decrease in Findings
Larger Tier Zero definition, increase in Findings
Objectively speaking, neither of these is better or worse than the other based on the change in Findings. Either is better than the previous state of visibility because it represents a more accurate view of your domain and the true Attack Paths that require your attention.
If we don’t figure this out, nothing changes and when we open up BHE we’re going to see an inaccurate depiction of what we actually care about. Again, that’s pathways (Attack Paths) that cause exposure risks to your critical assets (Tier Zero).
Join me again next time for Part 3, where we’ll work on identifying sources of exposure using Cypher queries.
[10] — “Defining the Undefined: What is Tier Zero, Pt IV,” by Martin Christensen, Lee Chagolla-Christensen, and Jonas Bülow Knudsen: https://www.youtube.com/watch?v=lLpCPBJIFkQ
Getting Started with BHE — Part 1Understanding Collection, Permissions, and Visibility of Your EnvironmentTL;DRAttack Path visibility is dependent upon scope of collection; complete collection is dependent upon appropriate permissions.Your collection strategy benefits from tiering just like your domain(s).IntroductionWelcome to my series on Getting Started with BloodHound Enterprise! This series comes after having had several discussions with customers about internal requirements for starting co
Understanding Collection, Permissions, and Visibility of Your Environment
TL;DR
Attack Path visibility is dependent upon scope of collection; complete collection is dependent upon appropriate permissions.
Your collection strategy benefits from tiering just like your domain(s).
Introduction
Welcome to my series on Getting Started with BloodHound Enterprise! This series comes after having had several discussions with customers about internal requirements for starting collection and I wanted to be able to provide something moving forward that reads more like a blog/conversation that’s easy to digest. That said, this doesn’t mean it’s irrelevant to the BloodHound Community Edition (BHCE) users, and there will still be components of information that are valuable for users on both the Enterprise and Community Edition sides. This series will focus more on users who are interested in gaining maximum visibility of their environments, defining Tier Zero, and understanding how to identify potential sources of exposure.
So, if you’ve got your BloodHound Enterprise (BHE) tenant up and running and are asking yourself “What now? Where do I start when it comes to BHE?” this series will give you actionable next steps and useful context for maximizing your BHE tenant.
Active Directory — Collecting with SharpHound
It may be obvious, but the first two things that need to be addressed are Collection and Permissions. These are necessary because you can’t see anything without collection, and collection is ultimately contingent upon the permissions you’re willing to grant your collector, which in this case discussion will be SharpHound (Active Directory). In other words, with greater permission comes greater visibility. Uncle Ben never said that to Peter Parker in Spider-Man, but he would have if they had been working on a SharpHound install.
More directly, talking about collection and permissions here will help address the following problem statement. If this resonates with you, you’re in the right place:
Are we positioned to collect the data required to accurately depict objective exposure risks that result in Attack Paths in our environment?
Collection and associated permissions include:
Active Directory Structure Data: Authenticated User group membership
Certificate Services: Authenticated User group membership
Local Group Membership: local Administrator on domain-joined systems
Sessions (logons): local Administrator on domain-joined systems
Domain Controller Registry: Administrator on domain controller(s)
Certificate Authority Registry: Administrator on enterprise CA(s)
The first (AD structure data) is the baseline requirement for BHE functionality; the others provide valuable context for understanding exposure risks that require additional data beyond what can be pulled from a domain controller via LDAP queries. Note that the second, Certificate Services, can be collected with the same basic privileges that AD structure data can be collected.
But what does this all mean practically? Depending on what your domain looks like it could be the difference between seeing 5% exposure and 95% exposure. I often deal with a lot of kickback on this series of requirements, but this is the tradeoff required for adequate visibility, accurate attack path mapping, and inherent risk associated with the relationships and configurations that exist in your AD environment.
If you do not have all of this collection, you’re going to miss some important information:
Where do ADCS attack paths exist that enable domain takeover?
Where do logon sessions exist that facilitate credential theft resulting in privilege escalation or lateral movement?
Where are tiering violations occurring because of bad practices with admins logging into systems at a lower tier?
This leads into a secondary discussion, which is often asked in the form of “How many resources do I need to get this data into BHE?”
In some cases, SharpHound and AzureHound can both be run on the same server. However it depends on how much is being collected and how you break up the schedule for your collectors. If you have a large environment with 100,000 users and you try collecting both AD and Azure environments at the same time, you’re probably going to run into some issues.
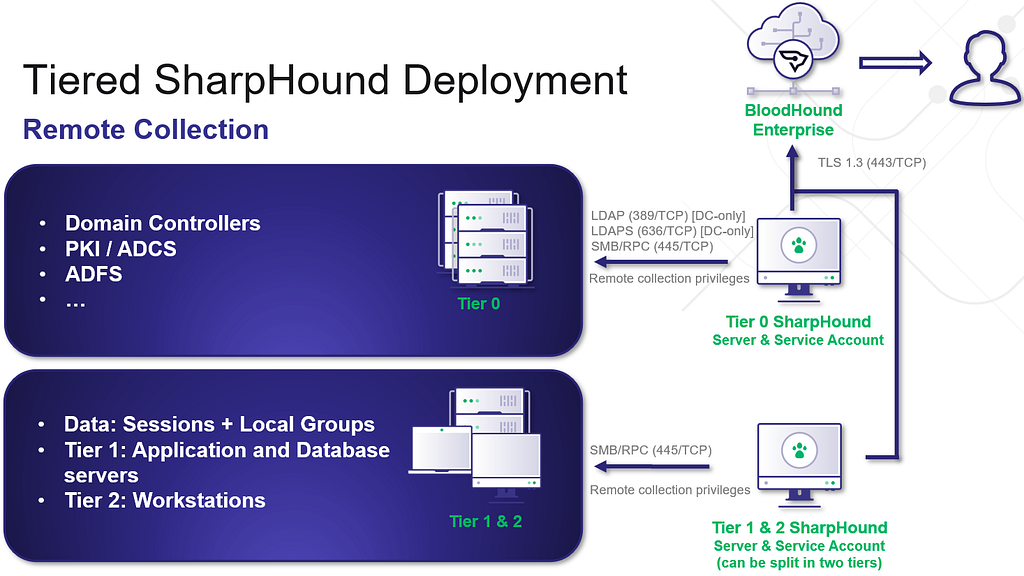
This next discussion will focus specifically on SharpHound, and for proper, hardened collection of SharpHound, I would recommend as many collectors as you have Tiers. I’ll use the standard three-tier model here:
A Tier Zero collector collects everything at the Tier Zero level, which easily accounts for the first requirement, but also allows visibility of all the others (at Tier Zero). You can run your AD structure data, Certificate Services, CA/DC registries, and Tier Zero group and session collection here. This is the primary visibility you want.
A Tier One collector should only need to collect group and session information at Tier One.
A Tier Two collector should only need to collect group and session information at Tier Two.
Here’s a visualization to depict what this might look like:
Tiered SharpHound Deployment
I do recommend following this tiering structure as much as possible, as this scoping of collection can help mitigate unnecessary exposure as a result of cross-tiered collection. While I do see variants of this where SharpHound is either Tier Zero or Tier One and collects from every tier, a tiered collection structure is the safest route forward for collection.
I also recommend following our hardening guidance for the SharpHound service account, which we list here [1]. This includes using a group managed service account (gMSA) for the SharpHound service account, rather than a regular AD user account. Additionally, adding this account to the Protected User group will limit the ability for Kerberos delegation and authentication relaying attacks.
Whichever path you choose here, understand that the privileges you give to the collector will align with the visibility you have of your environment. If you’re content with only seeing direct permissions based on Access Control Entries (ACEs), AD structure data will be sufficient. But if you want group and session collection, and if you would like to have full visibility of ADCS attack paths — you will need additional collection.
For more information on Data Collection and Permissions, check out our documentation here [2].
And that’s it for now! Come back later for our next topic, which will focus on what to do after you’ve got collection up and running and you’re ready to start working on cleaning things up: Contextualizing Tier Zero.
Intune Attack Paths — Part 1Prior WorkSeveral people have recently produced high-quality work around Intune tradecraft. I want to specifically mention:Chris Thompson and his work on MaestroDirk-jan Mollema and his work with Primary Refresh TokensAdam Chester and his work with Web Account ManagerBrett Hawkins and his work with Intune lateral movement detectionThibault Van Geluwe de Berlaere, Karl Madden, and Corné de Jong, and their work on abusing MS Graph permissions against IntuneDr. Nestori S
Intune is a Microsoft service that administrators can use for endpoint management. Microsoft appears to be investing most of its efforts into pushing administrators towards Intune and away from other endpoint management systems such as SCCM.
Intune isn’t universal… yet.
Intune adoption appears to be far from universal — admins are still widely using “legacy” endpoint management systems such as Group Policy and SCCM; however, with Microsoft pushing its customers towards Intune, we expect Intune adoption to accelerate in the coming years and for Intune tradecraft to become more relevant.
Intune is an attractive system for adversaries to target, as it is an authorized system capable of performing the most highly privileged actions on endpoints, such as running arbitrary commands and applications as the NT AUTHORITY\SYSTEM principal.
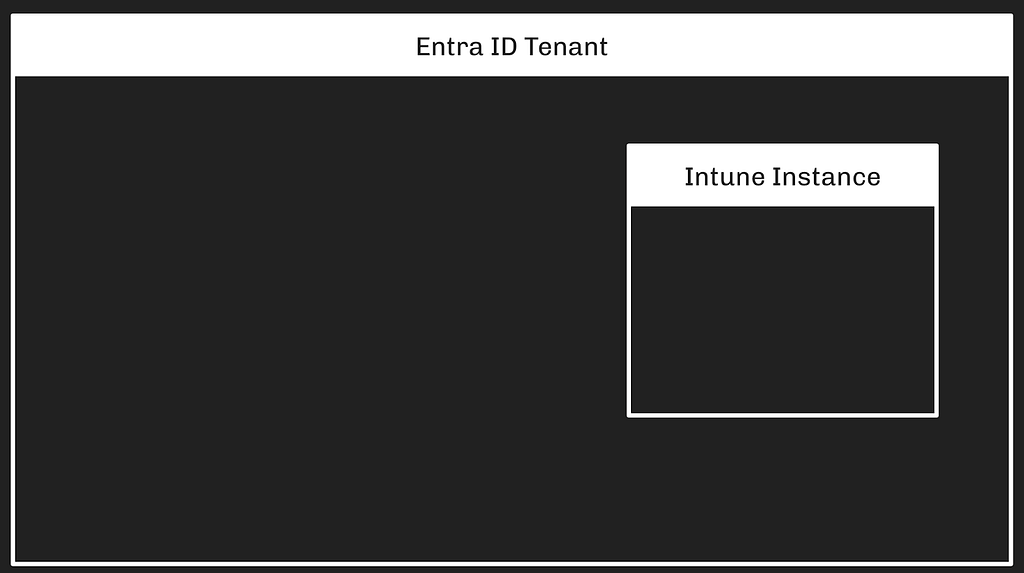
Intune Trust Boundary
Intune is an Azure service and requires an existing Entra tenant for admins to use it. Only one Intune instance can be associated with each Entra tenant. Intune instances can not be associated with more than one Entra tenant.
Two roles in the Entra tenant grant full control of an Intune instance:
Global Administrator
Intune Administrator
There is also a distinct authorization system within the Intune service with its own roles and mechanics.
Because the Intune service must be associated with precisely one Entra tenant, and because Entra’s authorization system grants full control of the Intune instance, the trust boundary around an Intune instance is established and enforced by the Entra tenant:
Intune Devices vs. Entra Devices
The Intune service refers to managed endpoints as “devices.” This is the same word Entra uses when describing endpoints. Intune Devices are typically endpoints that are registered or joined to the Entra tenant, but this is not a hard requirement. It is possible to manage an endpoint in Intune while that endpoint is not registered or joined to an Entra tenant.
Because of this, Intune Devices are distinct objects from Entra Devices. They are accessed and managed with a distinct API and they have universally unique identifiers that are distinct from Entra Devices:
We can determine when an Intune Device is the same endpoint as an Entra Device by comparing two fields:
The deviceId field on Entra Devices
The azureADDeviceId field on Intune Devices
In this example, we can see that the two devices are, in fact, the same endpoint:
An Intune Device may represent the same endpoint as an Entra Device; furthermore, both of these objects may also represent an on-premises Active Directory joined computer. When that is the case, the on-premises AD computer’s LDAP object will have the same value for its objectGUID property:
This is one endpoint represented across three systems with three distinct objects.
Intune RBAC vs. Entra RBAC vs. MS Graph
Intune has its own role-based access control (RBAC) system that is distinct from the Entra ID RBAC system, but the Intune service is also subject to Entra RBAC — an Entra Global Admin has full control of the Intune instance. Intune is accessed via the MS Graph API and there are several relevant MS Graph permissions that can control access to the Intune instance as well.
Intune RBAC — Role Assignments
The Intune RBAC system is very similar to the Entra RBAC system in that it is based on role definitions, role assignments, permissions, and scopes.
The first material difference of note is that Intune roles must be assigned to groups. While it is possible to create an Intune role assignment for a user, the system will not respect this configuration. Intune role assignments only work when assigned to groups, while Entra roles work when assigned to any principal type:
Intune RBAC — Permissions
Intune permissions (more accurately called Resource Operations) enable specific actions against specific Intune object classes. Intune permissions are formatted as:
Microsoft.<ServiceName>_<ObjectClass>_<Action>
All Intune permissions have “Intune” as the service name.
An example Intune permission is:
Microsoft.Intune_DeviceConfigurations_Create
This permission enables a principal to Create new Intune objects called DeviceConfigurations. This is a powerful permission that enables remote code execution on Intune-managed endpoints.
At time of writing, Intune has 239 distinct permissions, there does not appear to be an online resource listing all of these permissions, and MS Graph serves them at the /deviceManagement/resourceOperations API endpoint. BARK’s Get-IntuneResourceOperations hits that endpoint to list all Intune permissions.
Intune RBAC — Scope Groups
Intune’s RBAC system supports limiting role assignments to particular sets of endpoints. The mechanism for this is called Scope Groups. Scope Groups are Entra ID security groups. The default (and most common) configuration is to use a virtual scope group called allDevicesAndLicensedUsers. This scope group value means the role assignment will enable the principal to perform actions against all devices in the Intune instance.
Scope Groups may be used to limit which devices a principal can control when granted a role assignment. For example, the Entra group called “Seattle Admins” may have an Intune role assignment for the built-in role called “School Administrator”:
If the Intune admin wants to limit this role assignment to only granting control of devices in Seattle, they may create a new Entra group called “Seattle Devices” and then add the relevant Entra Devices (not the Intune Devices) to that group.
Recall from earlier that Entra devices and Intune devices that represent the same endpoint share a common property value that ties the objects to the same host.
Putting this all together, we can visualize the above configuration as such:
The one piece that is missing is the inclusion of the Scope Group configuration within the role assignment itself. Let’s add that in:
This configuration means that the “Seattle Admins” group will have all permissions granted by the “School Administrator” role, but only for those devices that belong to the groups listed in the “scopeGroups” attribute of the role assignment. The “Seattle Admins” group gains control of the Intune Device due to this configuration:
There may be other Intune devices in this instance, but if those devices are not added to the “Seattle Devices” group, then this configuration means the “Seattle Admins” group does not gain control of those other devices:
If an Entra Device that is associated with an Intune Device is added to the “Seattle Devices” group, then the “School Admins” group will gain control of that device:
If the “scopeGroups” property on the role assignment is changed to allDevicesAndLicensedUsers, then the “Seattle Admins” group will gain control of all Intune-managed devices within the Intune instance:
You can use RBAC and scope tags to make sure that the right admins have the correct access and visibility to the required Intune objects. Roles determine what access admins have to which objects. Scope tags determine which objects admins can see.
Scope Tags limit visibility, they do not limit access.
Scope Tags are a distinct class of Intune object. They are referenced on most Intune objects including roles, role assignments, applications, and devices. For example, let’s say we want members of the “Seattle Admins” group to only be able to see devices that belong to the “Seattle Devices” group.
The Intune admin must first create the scope tag. Then, they modify the scope tag so that the scope tag itself includes the “Seattle Devices” group:
Next, the Intune admin would modify the existing role assignment connecting the “Seattle Admins” group to the “School Administrator” role. The modification is to update the “scopeTags” attribute on the role assignment itself to reference the existing scope tag. When this update happens, the members of the “Seattle Admins” group will lose the ability to see any device that is not a member of the “Seattle Devices” group:
While the members of the “Seattle Admins” group can no longer see those devices in Intune, they still control those devices. We can prove this in a lab by logging in as a member of the “Seattle Admins” group and deploying a new configuration to include all devices. Because the “scopeGroups” attribute of the role assignment is inclusive of all devices, the change will apply to all devices.
Scope tags do not appear to be commonly used in the real world. There are complicated rules around scope tags that I believe will introduce enough friction to discourage most Intune admins from making use of scope tags.
Entra ID RBAC
Two built-in roles in Entra have full control of an Intune instance:
Global Administrator
Intune Administrator
Principals with either of those roles are not limited in any way by Intune RBAC. I still need to look into which specific Entra ID permissions may be relevant in the same way, as admins may be using custom Entra ID roles that also have control of Intune.
MS Graph App Roles
Intune is accessed via MS Graph, which has its own set of permissions related to Intune. The MS Graph app roles that apply to Intune include, for example:
DeviceManagementRBAC.ReadWrite.All
DeviceManagementConfiguration.ReadWrite.All
DeviceManagementManagedDevices.ReadWrite.All
Most (all?) of the Intune-relevant MS Graph app roles begin with “DeviceManagement”.
Some of these app roles enable abuse. For example:
DeviceManagementConfiguration.ReadWrite.All app role enables arbitrary, privileged command execution on all Intune-managed endpoints
DeviceManagementRBAC.ReadWrite.All enables privileged role assignment in Intune, including the ability to grant Intune role assignments that lead to arbitrary, privileged command execution on Intune-managed endpoints
Those are the two MS Graph app roles I have completed the research on. There are others that appear very attractive, including:
DeviceManagementApps.ReadWrite.All
DeviceManagementServiceConfig.ReadWrite.All
Intune Arbitrary Command Execution via Remediations
Intune is an endpoint management system and, as such, provides Intune admins with various mechanisms for performing privileged actions on endpoints such as controlling operating system configurations, installing arbitrary applications, and running arbitrary commands.
One method of running arbitrary commands is by using Remediations (previously known as “Proactive Remediations”). Remediations allow Intune admins to run PowerShell scripts on Intune-managed devices as the Windows NT AUTHORITY\SYSTEM principal.
Remediations run PowerShell scripts. To run a remediation script, the admin must create or modify an existing PowerShell script. This step is done locally on the admin’s own host.
Next, the Intune admin must create or modify an existing script package. Creating a new script package is done by making a “POST” request to the MS Graph /devicemanagement/deviceHealthScriptsendpoint. This is a privileged action. In order to successfully make a “POST” request to that endpoint, a principal must have one of the following:
A. One of these Entra ID roles:
Global Administrator
Intune Administrator
B. An Intune role assignment including the atomic permission (resource operation), Microsoft.Intune_DeviceConfigurations_Create. These built-in Intune roles have that permission:
School Administrator
Policy and Profile Manager
C. The MS Graph app role, DeviceManagementConfiguration.ReadWrite.All
The PowerShell script is stored as a base64-encoded string on the deviceHealthScript resource:
The script package defines which groups are able to run the package. For example, the admin may assign the script package to the “Seattle Devices” group in order to make the package available to those devices:
Script packages also allow admins to include or exclude devices using assignment filters:
Finally, script packages allow admins to exclude groups using an exclusion property of the package:
We have not observed wide-spread usage of exclusion groups or inclusion/exclusion filters. Due to the complexity involved with these filters, we do not expect most Intune admins to make use of filters beyond using the readily-available “All devices” assignment, or selecting specific groups to include.
We expect a typical environment to not make use of most of these filter mechanisms. In our example, we will simplify the diagram so that the “Seattle Devices” group is included in the script package:
Now that the script package is created and assigned to the “Seattle Devices” group, the script will automatically run on a specified interval; the default is once every 24 hours.
Intune Arbitrary Command Execution via On-Demand Proactive Remediation
Intune allows administrators to run specific remediation scripts on specific devices via a feature called on-demand proactive remediations. This feature is currently in preview and subject to change.
In order to run an on-demand proactive remediation, the admin must create a script (or target an existing script). The documentation for the initiateOnDemandProactiveRemediation action indicates that this action can be used to trigger several kinds of scripts within the Intune platform:
deviceHealthScripts
deviceManagementScripts
deviceComplianceScripts
At the time of writing (December 17, 2024), I have finished the work to understand which permissions are required in order to perform the initiateOnDemandProactiveRemediation action when sending a POST request to this URI:
A principal with an Intune role activated that includes one of the following permissions will successfully perform a “POST” request to the above endpoint:
The following built-in Intune roles have that/those permissions:
Help Desk Operator
School Administrator
In the previous section titled “Intune Arbitrary Command Execution via Remediations”, we discussed how script package filters limit which devices a remediation script package will automatically run on. For the endpoint discussed in this section, the initiateOnDemandProactiveRemediation action is not limited by those filters. Even if a script package is explicitly configured to not run on a set of devices, the initiateOnDemandProactiveRemediation action will successfully execute those same script packages on that same set of devices.
January 27, 2025 update: I made a mistake, the above repo is NOT an official Microsoft repo. I will try to get an answer from Microsoft directly regarding whether this behavior is expected.
Intune Script Packages
There are several Intune resource types admins can use to store and execute scripts on Intune-managed devices. The most obvious is a resource called deviceHealthScript. These objects are called “Script Packages” in the Intune portal GUI:
Look carefully at the above screenshot. Look at what the arrow on the left is pointing at. The Intune portal GUI calls the items in this list “Script Packages”. The Intune GUI says there are 37 “script packages”. Now carefully look at what the arrow on the right is pointing at: the number 37. Now look at the URI that was accessed to retrieve that number: it’s the deviceHealthScripts URI.
“Script Package” is the customer-facing name. That is the name Microsoft uses in the remediations feature documentation. “deviceHealthScript” is the name that MS Graph’s Intune API endpoints uses.
Because most Intune admins will likely be more familiar with the term “Script Package”, that is the name we will use when describing these objects.
Script packages (deviceHealthScripts) are Intune resources. There are several properties on these objects that are interesting to an attacker:
id — The universally unique identifier (UUID) of the script package
detectionScriptContent — Base64 encoded PowerShell “detection” script that will run on an endpoint executing this script package
remediationScriptContent — Base64 encoded PowerShell “remediation” script that will run on an endpoint executing this script package
runAsAccount — Whether the script will run as the logged-on user or as the NT AUTHORITY\SYSTEM principal
Intune admins can populate the detectionScriptContent and remediationScriptContent properties of these objects with anything they want; it doesn’t need to be a PowerShell script, but PowerShell is the only type of script that will successfully execute on an endpoint running a script package.
Adversaries find PowerShell scripts attractive because they may have contents that lead to successfully actioning an operational objective. Those contents may include less-sensitive data such as internal hostnames, or highly-sensitive data such as credentials.
A principal with one of the following Entra ID admin roles can read the contents of all script packages within an Intune instance:
Global Administrator
Intune Administrator
Global Reader
Security Reader
Reports Reader
Security Operator
Security Administrator
Helpdesk Administrator
A principal with one of the following built-in Intune roles can read the contents of all script packages within an Intune instance:
Help Desk Operator
Endpoint Security Manager
Policy and Profile Manager
Read Only Operator
School Administrator
Application Manager
The atomic Intune permission that enables reading script package contents is:
Microsoft.Intune_DeviceConfigurations_Read
These MS Graph app roles allow a service principal to read all deviceHealthScripts in the Intune instance:
DeviceManagementConfiguration.Read.All
DeviceManagementConfiguration.ReadWrite.All
Intune Platform Scripts
Platform scripts are Intune resources that store information about scripts that can run on Intune-managed devices. “Platform script” is the user-facing name of this resource. The MS Graph API refers to these resources as deviceManagementScripts. We will refer to them as “Platform Scripts”.
Platform scripts, similar to script packages, contain the base64-encoded script that will run on Intune-managed endpoints. Those scripts may contain sensitive information such as internal host names or credentials.
A principal with one of the following Entra ID admin roles can read the contents of all platform scripts within an Intune instance:
Global Administrator
Intune Administrator
Global Reader
Security Reader
Reports Reader
Security Operator
Security Administrator
Helpdesk Administrator
A principal with one of the following Intune roles can read the contents of all platform scripts within an Intune instance:
Help Desk Operator
Endpoint Security Manager
Policy and Profile Manager
Read Only Operator
School Administrator
Application Manager
The atomic Intune permission that enables reading platform script contents is:
Microsoft.Intune_DeviceConfigurations_Read
These MS Graph app roles allow a service principal to read all platform scripts in the Intune instance:
DeviceManagementConfiguration.Read.All
DeviceManagementConfiguration.ReadWrite.All
Intune Compliance Scripts
Compliance scripts are scripts that run during an Intune-managed Windows or Linux system. Compliance scripts are referred to as “Scripts” within the compliance policy GUI, and as “deviceComplianceScripts” by the API. We will call them “Compliance Scripts”.
Compliance scripts are associated with compliance policies. Compliance policies specify which devices/groups are in-scope for that particular policy. Compliance scripts automatically run once every 24 hours when associated with a compliance policy.
Admins can force a compliance script to execute “on-demand” by instructing a device to “sync”.
Intune Device User Hunting
When an on-premises Active Directory user logs onto a domain-joined computer, several artifacts are created within the operating system that make it possible to impersonate that user. This is well-established knowledge going back to at least 2008 when Luke Jennings published the seminal paper, “Security Implications of Windows Access Tokens — A Penetration Tester’s Guide”.
This tradecraft means adversaries are interested in discovering which Intune-managed devices users have logged onto. There are several data sources we can pull from to discover which users have logged onto which devices, each with their own strengths and drawbacks:
User Hunting via Sign-in Logs
Of the built-in options, Entra sign-in logs are the highest-fidelity source for discovering which users have performed some kind of abusable logon on a device.
Sign-in logs are a trove of information. In the above screenshot, we can see:
The UUID of the user that performed a sign-in
The date and time of the sign-in
The application the user was “signing into” (Azure Portal)
Version information about the browser the user used
The UUID of the Entra device the user used
This is more than enough information to populate an attack graph:
Notice that, in the above diagram, we have labeled the device as an “Entra Device” and not as an “Intune Device”. This is because Entra logs the Entra device identifier, NOT the Intune device identifier. Recall from earlier that we can identify hosts that are both Entra-joined and Intune-managed devices by comparing the deviceId and azureADDeviceId property values:
We can connect the Entra and Intune device nodes with an edge indicating they are the same host. This reveals the full pattern connecting the Intune device to the Entra user:
But Entra sign-in logs come with serious limitations. Adversaries may be unable or unwilling to rely on Entra sign-in logs for user hunting for a few reasons:
Comprehensive sign-in log collection is very slow. It can take several hours to collect those logs from the MS Graph API
The available filters to constrain the sign-in logs MS Graph returns do not materially reduce the time it takes to collect those logs
Reading sign-in logs requires non-default permissions that an initial-access user or service principal is unlikely to possess
User Hunting via Intune Device “usersLoggedOn” Attribute
Intune devices have a property called usersLoggedOn. This attribute is a collection of loggedOnUser resources. A loggedOnUser resource contains two pieces of information:
The Entra ID of the user that logged onto the device
The timestamp of the most recent time that user logged onto that device
This data source gives us all three elements we need to construct a similar attack graph as in the previous section:
Using this attribute for user hunting comes with some advantages:
Collecting Intune devices via the MS Graph API is dramatically faster than collecting Entra sign-in logs
The usersLoggedOn attribute stores 30 days worth of logons (the same length as Entra sign-in logs)
The rights needed to collect Intune devices may be “lower” than those needed to collect sign-in logs
User Hunting via Entra/Intune Device Owner
Entra and Intune devices have “owners”. Ownership of an Entra or Intune device does not guarantee control of the device, nor does it guarantee that the user that owns the device uses the device. In the real world, we see many Entra and Intune devices where the owner has been set to an IT contact. We do not consider device ownership a reliable indicator for the purposes of user hunting.
In the real world, we have seen little reason to put much trust in the “primary user” of an Intune device for user hunting purposes, especially in light of the Intune device usersLoggedOn attribute.
Conclusion and Future Work
Intune attack paths are interesting for the attack paths that emerge within the Intune platform itself. But these attack paths are compelling for the attack paths that emerge connecting Entra/Azure to on-premises Active Directory and vice versa. This blog post hopefully sets some foundational knowledge to setup for the next post(s) in this series, which will show real examples of performing the abuse primitives this post discusses.
I will also be continuing Intune tradecraft research, to include:
Finishing research on atomic Entra ID RBAC permissions that enable abuse of Intune resources
Learning how line of business apps and permissions against them can be abused
Investigating Intune device query and determining the data collection and other abuse primitive types that may be enabled by this feature
Researching Remote Help and Intune’s Teamviewer integration to understand how those features work and how they may be abused for lateral movement