Visualização normal

Antes de ontemStream principal
  • ✇Low-level adventures
  • Fuzzing projects with american fuzzy lop (AFL) 0x434b
    PrefaceThis quick article will give a short introduction on what fuzzers are, how they work and how to properly setup the afl - american fuzzy lop fuzzer to find flaws in arbitrary projects.Well known alternatives to afl (for the same or other purposes):boofuzz: Network Protocol Fuzzing for HumansGoogles - OSS-Fuzz - Continuous Fuzzing for Open Source Softwarelibfuzzerand many moreWhat is fuzzing?In short, we can define fuzzing as the following"Fuzzing is a Black Box software testing technique,
     

Fuzzing projects with american fuzzy lop (AFL)

Por:0x434b
4 de Maio de 2020, 12:07

Preface

Fuzzing projects with american fuzzy lop (AFL)

This quick article will give a short introduction on what fuzzers are, how they work and how to properly setup the afl - american fuzzy lop fuzzer to find flaws in arbitrary projects.

Well known alternatives to afl (for the same or other purposes):

What is fuzzing?

In short, we can define fuzzing as the following

"Fuzzing is a Black Box software testing technique, which basically consists in finding implementation bugs using malformed/semi-malformed data injection in an automated fashion."

This approach can be done on the whole application, specific protocols and even single file formats. Depending on the attack vector the output changes obviously and can lead to a varying number of bugs.

Cool stuff about fuzzing

  • simple design, hence a basic fuzzer can be easily implemented from scratch
  • finds possible bugs/flaws via a random approach, which often are overlooked by human QA
  • Combinations of different input mutations and symbolic execution!

Not so cool stuff...

  • Often 'simple bugs' only
  • black box testing makes it difficult to evaluate impact of found results
  • Many fuzzers are limited to a certain protocol/architecture/...

How to set up afl for fuzzing with exploitable and gdb

Let's get right into setting up our environment... Not much else to say before that.
Juicy stuff ahead!

Get afl running by cloning the repos

git clone https://github.com/mirrorer/afl.git afl
cd afl
make && sudo make install
su root
echo core >/proc/sys/kernel/core_pattern
cd /sys/devices/system/cpu && echo performance | tee cpu*/cpufreq/scaling_governor
exit
sudo apt install gnuplot
# --------------------------------------------------------------------------- #
git clone https://github.com/rc0r/afl-utils.git afl-utils
cd afl-utils
sudo python setup.py install
# --------------------------------------------------------------------------- #
# -----------------------------------optional-------------------------------- #
# --------------------------------------------------------------------------- #
# check the official git repo for needed/supported architectures #
git clone https://github.com/shellphish/afl-other-arch.git afl-qemu-patch
cd afl-qemu-patch
./build.sh <list,of,arches,you,need>

Once installed you're ready to start fuzzing your favorite project. We'll come to this in the next paragraph by picking a random github project. I'll provide the used afl commands for the later shown results at the end of the article, but won't name the fuzzed repository for privacy reasons.


Instrument afl and  start pwning help to secure GitHub repositories

If the source code is available compile it with CC=afl-gcc make, or CC=afl-gcc cmake CMakeLists.txt && make to instrument afl.

$ cd targeted_application
CC=afl-gcc cmake CMakeLists.txt && make
-- The C compiler identification is GNU 5.4.0
-- Check for working C compiler: /usr/local/bin/afl-gcc
-- Check for working C compiler: /usr/local/bin/afl-gcc -- works
-- Detecting C compiler ABI info
-- Detecting C compiler ABI info - done
-- Detecting C compile features
-- Detecting C compile features - done
-- Configuring done
-- Generating done
-- Build files have been written to: /home/lab/Git/<target>
Scanning dependencies of target <target>
[ 14%] Building C object <target>
afl-cc 2.52b by <lcamtuf@google.com>
afl-as 2.52b by <lcamtuf@google.com>
[+] Instrumented 5755 locations (64-bit, non-hardened mode, ratio 100%).
[ 28%] Linking C static library <target>
[ 28%] Built target <target>
Scanning dependencies of target md2html
[ 42%] Building C object <target>
afl-cc 2.52b by <lcamtuf@google.com>
afl-as 2.52b by <lcamtuf@google.com>
[+] Instrumented 165 locations (64-bit, non-hardened mode, ratio 100%).
[ 57%] Building C object <target>
afl-cc 2.52b by <lcamtuf@google.com>
afl-as 2.52b by <lcamtuf@google.com>
[+] Instrumented 8 locations (64-bit, non-hardened mode, ratio 100%).
[ 71%] Building C object <target>
afl-cc 2.52b by <lcamtuf@google.com>
afl-as 2.52b by <lcamtuf@google.com>
[+] Instrumented 58 locations (64-bit, non-hardened mode, ratio 100%).
[ 85%] Building C object <target>
afl-cc 2.52b by <lcamtuf@google.com>
afl-as 2.52b by <lcamtuf@google.com>
[+] Instrumented 407 locations (64-bit, non-hardened mode, ratio 100%).
[100%] Linking C executable <target>
afl-cc 2.52b by <lcamtuf@google.com>
[100%] Built target <target>

To start local application fuzzing we can execute afl via the following command chain:

$ afl-fuzz -i input_sample_dir -o output_crash_dir ./binary @@
-i  defines a folder which holds sample data for the fuzzer to use
-o defines a folder where afl will save the fuzzing results
./binary describes the targeted application

If you have the resources to start more processes of afl keep in mind that each process takes up one CPU core and pretty much leverages 100% of its power. To do so a change up of the afl command chain is needed!

$ afl-fuzz -i input_sample_dir -o output_crash_dir -M master ./binary @@
$ afl-fuzz -i input_sample_dir -o output_crash_dir -S slaveX ./binary @@

The only difference between the master and slave modes is that the master instance will still perform deterministic checks. The slaves will proceed straight to random tweaks. If you don't want to do deterministic fuzzing at all you can straight up just spawn slaves. For statistic- and behavior-research having one master process is always a nice thing tho.

Note: For programs that take input from a file, use '@@' to mark the location in the target's command line where the input file name should be placed. The fuzzer will substitute this for you.
Note2: You can either provide an empty file in the input_sample_dir and let afl find some fitting input,  or give some context specfic input for the program you're fuzzing that is parsable!

To instrument afl-QEMU for blackbox fuzzing install needed dependencies sudo apt-get install libtool libtool-bin automake bison libglib2.0-dev zlib1g-dev and execute ./build_qemu_support.sh within the afl repo ~/afl/qemu_mode/.

Next up compile target program without CC=afl-gcc and change the afl-fuzz command chain to:

$ afl-fuzz -Q -i input_sample_dir -o output_crash_dir -M master ./binary @@

The emulation should work on its own already at this point. To support different, more exotic architectures in afl apply said patch from the prep work above!

Fuzzing projects with american fuzzy lop (AFL)

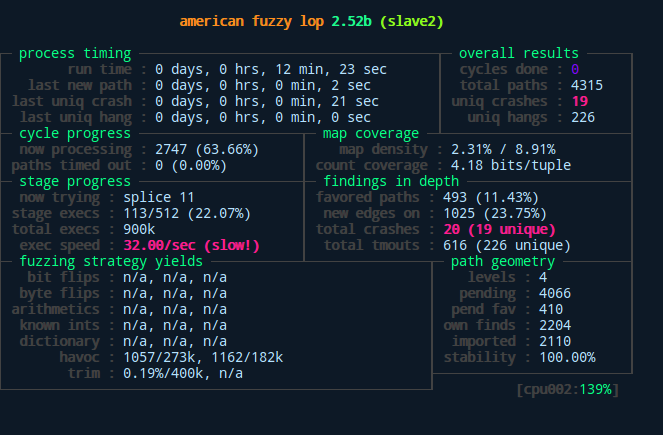
Above we can see the difference between master and slaves as well as the general interface of afl after starting the fuzzing process. As displayed here, our slave found a bunch of unique crashes after only measly 12 minutes with its random fuzzing behavior. The master slave on the other hand didn't quite catch up to that yet...

The crashes and hangs can be manually examined within the output_crash_dir/process_name/crashes and  output_crash_dir/process_name/hangs folders. Since this manual labor is neither interesting nor effective some smart people offered us the afl-utils package, which automatizes the crash analysis and pairs it with a sweet output from a gdb script.


Automatic analysis of produced crashes

To automatically collect and analysis crashes with afl-collect + exploitable from the afl-utils package do the following while the fuzzing processes are still up and running:

$ afl-collect -d crashes.db -e gdb_script -r -rr ./output_crash_dir_from_afl_fuzz ./afl_collect_output_dir -j 8 -- /path/to/target

The only two parameters to change here  are the ./output_crash_dir_from_afl_fuzz, which is the folder where the afl-fuzz process stores its output. Next up is the /path/to/target, which is the fuzzed application. Depending on your hardware you can adjust the -j 8 parameters, which is used to specify the amount of threads to analyze the output. If everything works accordingly you'll stumble upon an output like this:

afl-collect -d crashes.db -e gdb_script -r -rr ./out ./output_aflc -j 8 -- ./path/to/target
afl-collect 1.33a by rc0r <hlt99@blinkenshell.org> # @_rc0r
Crash sample collection and processing utility for afl-fuzz.

[*] Going to collect crash samples from '/home/lab/Git/code/path/to/target/out'.
[!] Table 'Data' not found in existing database!
[*] Creating new table 'Data' in database '/home/lab/Git/code/path/to/target/crashes.db' to store data!
[*] Found 3 fuzzers, collecting crash samples.
[*] Successfully indexed 56 crash samples.
*** Error in `/home/lab/Git/code/path/to/target': double free or corruption (out): 0x000000000146c5a0 ***
======= Backtrace: =========
/lib/x86_64-linux-gnu/libc.so.6(+0x777e5)[0x7f0acaeb67e5]
/lib/x86_64-linux-gnu/libc.so.6(+0x8037a)[0x7f0acaebf37a]
/lib/x86_64-linux-gnu/libc.so.6(cfree+0x4c)[0x7f0acaec353c]
/home/lab/Git/code/path/to/target(<func_a>+0x93fd)[0x4627ed]
/home/lab/Git/code/path/to/target(<func_b>+0xaa)[0x40e75a]
/home/lab/Git/code/path/to/target(main+0x4c4)[0x4017f4]
/lib/x86_64-linux-gnu/libc.so.6(__libc_start_main+0xf0)[0x7f0acae5f830]
/home/lab/Git/code/path/to/target(_start+0x29)[0x402169]
======= Memory map: ========
00400000-00401000 r--p 00000000 fd:00 38669039                           /home/lab/Git/code/path/to/target/
00401000-00476000 r-xp 00001000 fd:00 38669039                           /home/lab/Git/code/path/to/target/l
00476000-0048a000 r--p 00076000 fd:00 38669039                           /home/lab/Git/code/path/to/target/
0048a000-0048b000 r--p 00089000 fd:00 38669039                           /home/lab/Git/code/path/to/target
0048b000-0048c000 rw-p 0008a000 fd:00 38669039                           /home/lab/Git/code/path/to/target
01461000-0148a000 rw-p 00000000 00:00 0                                  [heap]
7f0ac4000000-7f0ac4021000 rw-p 00000000 00:00 0
7f0ac4021000-7f0ac8000000 ---p 00000000 00:00 0
7f0acac29000-7f0acac3f000 r-xp 00000000 fd:00 40899039                   /lib/x86_64-linux-gnu/libgcc_s.so.1
7f0acac3f000-7f0acae3e000 ---p 00016000 fd:00 40899039                   /lib/x86_64-linux-gnu/libgcc_s.so.1
7f0acae3e000-7f0acae3f000 rw-p 00015000 fd:00 40899039                   /lib/x86_64-linux-gnu/libgcc_s.so.1
7f0acae3f000-7f0acafff000 r-xp 00000000 fd:00 40895232                   /lib/x86_64-linux-gnu/libc-2.23.so
7f0acafff000-7f0acb1ff000 ---p 001c0000 fd:00 40895232                   /lib/x86_64-linux-gnu/libc-2.23.so
7f0acb1ff000-7f0acb203000 r--p 001c0000 fd:00 40895232                   /lib/x86_64-linux-gnu/libc-2.23.so
7f0acb203000-7f0acb205000 rw-p 001c4000 fd:00 40895232                   /lib/x86_64-linux-gnu/libc-2.23.so
7f0acb205000-7f0acb209000 rw-p 00000000 00:00 0
7f0acb209000-7f0acb22f000 r-xp 00000000 fd:00 40895230                   /lib/x86_64-linux-gnu/ld-2.23.so
7f0acb401000-7f0acb404000 rw-p 00000000 00:00 0
7f0acb42d000-7f0acb42e000 rw-p 00000000 00:00 0
7f0acb42e000-7f0acb42f000 r--p 00025000 fd:00 40895230                   /lib/x86_64-linux-gnu/ld-2.23.so
7f0acb42f000-7f0acb430000 rw-p 00026000 fd:00 40895230                   /lib/x86_64-linux-gnu/ld-2.23.so
7f0acb430000-7f0acb431000 rw-p 00000000 00:00 0
7ffd1292a000-7ffd1294b000 rw-p 00000000 00:00 0                          [stack]
7ffd129c9000-7ffd129cc000 r--p 00000000 00:00 0                          [vvar]
7ffd129cc000-7ffd129ce000 r-xp 00000000 00:00 0                          [vdso]
ffffffffff600000-ffffffffff601000 r-xp 00000000 00:00 0                  [vsyscall]

As you can see we are getting a memory map and a backtrace for every crash. Since 56 crash samples were shown here I shortened the output to make it more easy to follow, but I hope it visualizes the point well enough. The real beefy part follows now tho!

Fuzzing projects with american fuzzy lop (AFL)

We're getting a complete overview about which process and what algorithm produced the error. Additionally, we can see the type of error coupled with an estimate on if it is exploitable or not. This gives us the chance dig deeper into the /afl_out/process_name/crash_id/, which is the used input to generate certain crash. We can then analyze it and try to conclude why crash occurred and maybe even produce one or multiple PoCs to abuse this behavior! A big disadvantage as of right now is that the exploitable script can only handle the most common architectures (x86 and ARM)! If you want to fuzz MIPS and PowerPC you need to fork the official repository and write your own logic for this!

Creating a PoC for our target application gets even easier, since  we can directly jump into gdb and execute the crash on our fuzzed program! Simply run the following from the command line:

$ gdb ./fuzzed_application
gdb> run /path/to/crash_folder/crash_id

If we have a gdb extension like pwndbg, or gdb-peda inspecting what went wrong makes it a breeze!

Fuzzing projects with american fuzzy lop (AFL)

We can see the state of the register at one glance, while also getting an overview of which function crashed from the generated input. Now we could dig through the actual source code and find an answer on why the heck it crashed there. Why did the used input make the program go haywire? When finding an answer to this you can manually create a malformed input yourself and write a PoC for this.

To show you an overview on how much afl managed to deform my actual input for this crash I'll show you a side by side comparison of the original input and the one afl managed to produce to crash the target at the shown state:

Fuzzing projects with american fuzzy lop (AFL)

Green bytes indicate that the files are still identical in that exact location. Red bytes indicate a difference, meaning afl mutated these bytes on its own accord (the ones on the right are the afl mutated ones).


Plotting the results from afl

For those among us, who are number and statistic nerds, afl provides a great feature for us! For every spawned process we get plottable data!

$ ls
crashes  fuzz_bitmap  fuzzer_stats  hangs  out  plot_data  queue

$ afl-plot --help
progress plotting utility for afl-fuzz by <lcamtuf@google.com>

This program generates gnuplot images from afl-fuzz output data. Usage:

/usr/local/bin/afl-plot afl_state_dir graph_output_dir

$ afl-plot . out
progress plotting utility for afl-fuzz by <lcamtuf@google.com>

[*] Generating plots...
[*] Generating index.html...
[+] All done - enjoy your charts!

This generates 3 plots:

  • One for the execution speed/sec,
  • One for the path coverage,
  • And one for the found crashes and hangs.

For my particular fuzzing example for the sake of this article they look like this:

Fuzzing projects with american fuzzy lop (AFL)

Final note on this: The stats shown in the afl fuzzing interface during the process fuzzing up until termination are stored for each process in a separate file too!


Conclusion

Fuzzing creates a powerful way to test projects on faults and flaws within the code. Depending on the used fuzzer the generated output can directly be used to deduct a possible exploit or PoC.

In the case of american fuzzy lop the base functionality already is great and definitely one of the faster fuzzing tools out there. The possible combination with afl-utils and the exploitable gdb script makes it even more awesome.

Last but not least it would be nice to test OSS, boofuzz or other not mentioned fuzzing frameworks to see how they can compete against each other.

I hope this quick and dirty overview showed that fuzzing is a strong approach to try to harden an application by finding critical flaws one could easily overlook with human QA. Please keep in mind that his demo presented here was done using a fairly broken repository.. If you start fuzzing things and not many crashes come around that's a good thing and you should not be sad about that, especially if it is your code, or widely used one :) !

With that in mind: Happy fuzzing!

Open, Closed and Broken: Prompt Fuzzing Finds LLMs Still Fragile Across Open and Closed Models

17 de Março de 2026, 07:00

Unit 42 research unveils LLM guardrail fragility using genetic algorithm-inspired prompt fuzzing. Discover scalable evasion methods and critical GenAI security implications.

The post Open, Closed and Broken: Prompt Fuzzing Finds LLMs Still Fragile Across Open and Closed Models appeared first on Unit 42.

Auditing the Gatekeepers: Fuzzing "AI Judges" to Bypass Security Controls

10 de Março de 2026, 07:00

Unit 42 research reveals AI judges are vulnerable to stealthy prompt injection. Benign formatting symbols can bypass security controls.

The post Auditing the Gatekeepers: Fuzzing "AI Judges" to Bypass Security Controls appeared first on Unit 42.

  • ✇GitHub Security Lab Archives - The GitHub Blog
  • Bugs that survive the heat of continuous fuzzing Antonio Morales
    Even when a project has been intensively fuzzed for years, bugs can still survive. ​​OSS-Fuzz is one of the most impactful security initiatives in open source. In collaboration with the OpenSSF Foundation, it has helped to find thousands of bugs in open-source software. Today, OSS-Fuzz fuzzes more than 1,300 open source projects at no cost to maintainers. However, continuous fuzzing is not a silver bullet. Even mature projects that have been enrolled for years can still contain serious vu
     

Bugs that survive the heat of continuous fuzzing

Even when a project has been intensively fuzzed for years, bugs can still survive.

​​OSS-Fuzz is one of the most impactful security initiatives in open source. In collaboration with the OpenSSF Foundation, it has helped to find thousands of bugs in open-source software.

Today, OSS-Fuzz fuzzes more than 1,300 open source projects at no cost to maintainers. However, continuous fuzzing is not a silver bullet. Even mature projects that have been enrolled for years can still contain serious vulnerabilities that go undetected. In the last year, as part of my role at GitHub Security Lab, I have audited popular projects and have discovered some interesting vulnerabilities.

Below, I’ll show three open source projects that were enrolled in OSS-Fuzz for a long time and yet critical bugs survived for years. Together, they illustrate why fuzzing still requires active human oversight, and why improving coverage alone is often not enough.

Gstreamer

GStreamer is the default multimedia framework for the GNOME desktop environment. On Ubuntu, it’s used every time you open a multimedia file with Totem, access the metadata of a multimedia file, or even when generating thumbnails for multimedia files each time you open a folder.
In December 2024, I discovered 29 new vulnerabilities, including several high-risk issues.

To understand how 29 new vulnerabilities could be found in a software that has been continuously fuzzed for seven years, let’s have a look at the public OSS-Fuzz statistics available here. If we look at the GStreamer stats, we can see that it has only two active fuzzers and a code coverage of around 19%. By comparison, a heavily researched project like OpenSSL has 139 fuzzers (yes, 139 different fuzzers, that is not a typo).

Comparing OSS-Fuzz statistics for OpenSSL and GStreamer.

And the popular compression library bzip2 reports a code coverage of 93.03%, a number that is almost five times higher than GStreamer’s coverage.

OSS-Fuzz project statistics for the bzip2 compression library.

Even without being a fuzzing expert, we can guess that GStreamer’s numbers are not good at all.

And this brings us to our first reason: OSS-Fuzz still requires human supervision to monitor project coverage and to write new fuzzers for uncovered code. We have good hope that AI agents could soon help us fill this gap, but until that happens, a human needs to keep doing it by hand.

The other problem with OSS-Fuzz isn’t technical. It’s due to its users and the false sense of confidence they get once they enroll their projects. Many developers are not security experts, so for them, fuzzing is just another checkbox on their security to-do list. Once their project is “being fuzzed,” they might feel it is “protected by Google” and forget about it. Even if the project actually fails during the build stage and isn’t being fuzzed at all (which happens to more than one project in OSS-Fuzz).

This shows that human security expertise is still required to maintain and support fuzzing for each enrolled project, and that doesn’t scale well with OSS-Fuzz’s success!

Poppler

Poppler is the default PDF parser library in Ubuntu. It’s the library used to render PDFs when you open them with Evince (the default document viewer in Ubuntu versions prior to 25.04) or Papers (the default document viewer for GNOME desktop and the default document viewer from newer Ubuntu releases).

If we check Poppler stats in OSS-Fuzz, we can see it includes a total of 16 fuzzers and that its code coverage is around 60%. Those are quite solid numbers; maybe not at an excellent level, but certainly above average.

That said, a few months ago, my colleague Kevin Backhouse published a 1-click RCE affecting Evince in Ubuntu. The victim only needs to open a malicious file for their machine to be compromised. The reason a vulnerability like this wasn’t found by OSS-Fuzz is a different one: external dependencies.

Poppler relies on a good bunch of external dependencies: freetype, cairo, libpng… And based on the low coverage reported for these dependencies in the Fuzz Introspector database, we can safely say that they have not been instrumented by libFuzzer. As a result, the fuzzer receives no feedback from these libraries, meaning that many execution paths are never tested.

Coverage report table showing line coverage percentages for various Poppler dependencies.

But it gets even worse: Some of Evince’s default dependencies aren’t included in the OSS-Fuzz build at all. That’s the case with DjVuLibre, the library where I found the critical vulnerability that Kevin later exploited.

DjVuLibre is a library that implements support for the DjVu document format, an open source alternative to PDF that was popular in the late 1990s and early 2000s for compressing scanned documents. It has become much less widely used since the standardization of the PDF format in 2008.

The surprising thing is that while this dependency isn’t included among the libraries covered by OSS-Fuzz, it is shipped by default with Evince and Papers. So these programs were relying on a dependency that was “unfuzzed” and at the same time, installed on millions of systems by default.

This is a clear example of how software is only as secure as the weakest dependency in its dependency graph.

Exiv2

Exiv2 is a C++ library used to read, write, delete, and modify Exif, IPTC, XMP, and ICC metadata in images. It’s used by many mainstream projects such as GIMP and LibreOffice among others.

Back in 2021, my teammate Kevin Backhouse helped improve the security of the Exiv2 project. Part of that work included enrolling Exiv2 in OSS-Fuzz for continuous fuzzing, which uncovered multiple vulnerabilities, like CVE-2024-39695, CVE-2024-24826, and CVE-2023-44398.

Despite the fact that Exiv2 has been enrolled in OSS-Fuzz for more than three years, new vulnerabilities have still been reported by other vulnerability researchers, including CVE-2025-26623 and CVE-2025-54080.

In that case, the reason is a very common scenario when fuzzing media formats: Researchers always tend to focus on the decoding part, since it is the most obviously exploitable attack surface, while the encoding side receives less attention. As a result, vulnerabilities in the encoding logic can remain unnoticed for years.

From a regular user perspective, a vulnerability in an encoding function may not seem particularly dangerous. However, these libraries are often used in many background workflows (such as thumbnail generation, file conversions, cloud processing pipelines, or automated media handling) where an encoding vulnerability can be more critical.

The five-step fuzzing workflow

At this point it’s clear that fuzzing is not a magic solution that will protect you from everything. To assure minimum quality, we need to follow some criteria.

In this section, you’ll find the fuzzing workflow I’ve been using with very positive results in the last year: the five-step fuzzing workflow (preparation – coverage – context – value – triaging).

Five-step fuzzing workflow diagram. (preparation - coverage - context - value - triaging)

Step 1: Code preparation

This step involves applying all the necessary changes to the target code to optimize fuzzing results. These changes include, among others:

  • Removing checksums
  • Reducing randomness
  • Dropping unnecessary delays
  • Signal handling

If you want to learn more about this step, check out this blog post

Step 2: Improving code coverage

From the previous examples, it is clear that if we want to improve our fuzzing results, the first thing we need to do is to improve the code coverage as much as possible.

In my case, the workflow is usually an iterative process that looks like this:

Run the fuzzers > Check the coverage > Improve the coverage > Run the fuzzers > Check the coverage > Improve the coverage > …

The “check the coverage” stage is a manual step where i look over the LCOV report for uncovered code areas and the “improve the coverage” stage is usually one of the following:

  • Writing new fuzzing harnesses to hit new code that would otherwise be impossible to hit
  • Creating new input cases to trigger corner cases

For an automated, AI-powered way of improving code coverage, I invite you to check out the Plunger module in my FRFuzz framework. FRFuzz is an ongoing project I’m working on to address some of the caveats in the fuzzing workflow. I will provide more details about FRFuzz in a future blog post.

Another question we can ask ourselves is: When can we stop increasing code coverage? In other words, when can we say the coverage is good enough to move on to the next steps?

Based on my experience fuzzing many different projects, I can say that this number should be >90%. In fact, I always try to reach that level of coverage before trying other strategies, or even before enabling detection tools like ASAN or UBSAN.

To reach this level of coverage, you will need to fuzz not only the most obvious attack vectors such as decoding/demuxing functions, socket-receivers, or file-reading routines, but also the less obvious ones like encoders/muxers, socket-senders, and file-writing functions.

You will also need to use advanced fuzzing techniques like:

  • Fault injection: A technique where we intentionally introduce unexpected conditions (corrupted data, missing resources, or failed system calls) to see how the program behaves. So instead of waiting for real failures, we simulate these failures during fuzzing. This helps us to uncover bugs in execution paths that are rarely executed, such as:
    • Failed memory allocations (malloc returning NULL)
    • Interrupted or partial reads/writes
    • Missing files or unavailable devices
    • Timeouts or aborted network connections

A good example of fault injection is the Linux kernel Fault injection framework

  • Snapshot fuzzing: Snapshot fuzzing takes a snapshot of the program at any interesting state, so the fuzzer can then restore this snapshot before each test case. This is especially useful for stateful programs (operating systems, network services, or virtual machines). Examples include the QEMU mode of AFL++ and the AFL++ Nyx mode.

Step 3: Improving context-sensitive coverage

By default, the most common fuzzers (aka AFL++, libfuzzer, and honggfuzz) track the code coverage at the edge level. We can define an “edge” as a transition between two basic blocks in the control-flow graph. So if execution goes from block A to block B, the fuzzer records the edge A → B as “covered.” For each input the fuzzer runs, it updates a bitmap structure marking which edges were executed as a 0 or 1 value (currently implemented as a byte in most fuzzers).

In the following example, you can see a code snippet on the left and its corresponding control-flow graph on the right:

Edge coverage explanation.
Edge coverage = { (0,1), (0,2), (1,2), (2,3), (2,4), (3,6), (4,5), (4,6), (5,4) }

Each numbered circle corresponds to a basic block, and the graph shows how those blocks connect and which branches may be taken depending on the input. This approach to code coverage has demonstrated to be very powerful given its simplicity and efficiency.

However, edge coverage has a big limitation: It doesn’t track the order in which blocks are executed. 

So imagine you’re fuzzing a program built around a plugin pipeline, where each plugin reads and modifies some global variables. Different execution orders can lead to very different program states, while the edge coverage can still look identical. Since the fuzzer thinks it has already explored all the paths, the coverage-guided feedback won’t keep guiding it, and the chances of finding new bugs will drop.

To address this, we can make use of context-sensitive coverage. Context-sensitive coverage not only tracks which edges were executed, but it also tracks what code was executed right before the current edge.

For example, AFL++ implements two different options for context-sensitive coverage:

  • Context- sensitive branch coverage: In this approach, every function gets its own unique ID. When an edge is executed, the fuzzer takes the IDs from the current call stack, hashes them together with the edge’s identifier, and records the combined value.

You can find more information on AFL++ implementation here

  • N-Gram Branch Coverage: In this technique, the fuzzer combines the current location with the previous N locations to create a context-augmented coverage entry. For example:
    • 1-Gram coverage: looks at only the previous location
    • 2-Gram coverage: considers the previous two locations
    • 4-Gram coverage: considers the previous four

You can see how to configure it in AFL++ here

In contrast to edge coverage, it’s not realistic to aim for a coverage >90% when using context-sensitive coverage. The final number will depend on the project’s architecture and on how deep into the call stack we decide to track. But based on my experience, anything above 60% can be considered a very good result for context-sensitive coverage.

Step 4: Improving value coverage

To explain this section, I’m going to start with an example. Take a look at the following web server code snippet:

Example of a simple webserver code snippet.

Here we can see that the function unicode_frame_size has been executed 1910 times. After all those executions, the fuzzer didn’t find any bugs. It looks pretty secure, right?

However, there is an obvious div-by-zero bug when r.padding == FRAME_SIZE * 2:

Simple div-by-zero vulnerability.

Since the padding is a client-controlled field, an attacker could trigger a DoS in the webserver, sending a request with a padding size of exactly 2156 * 2 = 4312 bytes. Pretty annoying that after 1910 iterations the fuzzer didn’t find this vulnerability, don’t you think?

Now we can conclude that even having 100% code coverage is not enough to guarantee that a code snippet is free of bugs. So how do we find these types of bugs? And my answer is: Value Coverage.

We can define value coverage as the coverage of values a variable can take. Or in other words, the fuzzer will now be guided by variable value ranges, not just by control-flow paths. 

If, in our earlier example, the fuzzer had value-covered the variable r.padding, it could have reached the value 4312 and in turn, detected the divide-by-zero bug.

So, how can we make the fuzzer to transform variable values in different execution paths? The first naive implementation that came to my mind was the following one:

inline uint32_t value_coverage(uint32_t num) {

   uint32_t no_optimize = 0;
  
   if (num < UINT_MAX / 2) {
       no_optimize += 1;
       if(num < UINT_MAX / 4){
           no_optimize += 2;
           ...
       }else{
           no_optimize += 3
           ...
       }

   }else{
       no_optimize += 4;
       if(num < (UINT_MAX / 4) * 3){
           no_optimize += 5;
           ...
       }else{
           no_optimize += 6;
           ...
       }
   }

   return no_optimize;
}

In this code, I implemented a function that maps different values of the variable num to different execution paths. Notice the no_optimize variable to avoid the compiler from optimizing away some of the function’s execution paths.

After that, we just need to call the function for the variable we want to value-cover like this:

static volatile uint32_t vc_noopt;

uint32_t webserver::unicode_frame_size(const HttpRequest& r) {

   //A Unicode character requires two bytes
   vc_noopt = value_coverage(r.padding); //VALUE_COVERAGE
   uint32_t size = r.content_length / (FRAME_SIZE * 2 - r.padding);

   return size;
}

Given the huge number of execution paths this can generate, you should only apply it to certain variables that we consider “strategic.” By strategic, I mean those variables that can be directly controlled by the input and that are involved in critical operations. As you can imagine, selecting the right variables is not easy and it mostly comes down to the developers and researchers experience.

The other option we have to reduce the total number of execution paths is by using the concept of “buckets”: Instead of testing all 2^32 possible values of a 32 bits integer, we can group those values into buckets, where each bucket transforms into a single execution path. With this strategy, we don’t need to test every single value and can still achieve good results.

These buckets also don’t need to be symmetrically distributed across the full range. We can emphasize certain subranges by creating smaller buckets or, create bigger buckets for ranges we are not so interested in.

Now that I’ve explained the strategy, let’s take a look at what real-world options we have to get value coverage in our fuzzers:

  • AFL++ CmpLog / Clang trace-cmp: These focus on tracing comparison values (values used in calls to ==, memcmp, etc.). They wouldn’t help us find our divide-by-zero bug, since they only track values used in comparison instructions.
  • Clang trace-div + libFuzzer -use_value_profile=1: This one would work in our example, since it traces values involved in divisions. But it doesn’t give us variable-level granularity, so we can only limit its scope by source file or function, not by specific variable. That limits our ability to target only the “strategic” variables.

To overcome these problems with value coverage, I wrote my own custom implementation using the LLVM FunctionPass functionality. You can find more details about my implementation by checking the FRFuzz code here.

The last mile: almost undetectable bugs

Even when you make use of all up-to-date fuzzing resources, some bugs can still survive the fuzzing stage. Below are two scenarios that are especially hard to tackle with fuzzing.

Big input cases

These are vulnerabilities that require very large inputs to be triggered (on the order of megabytes or even gigabytes). There are two main reasons they are difficult to find through fuzzing:

  • Most fuzzers cap the maximum input size (for example 1 MB in the case of AFL), because larger inputs lead to longer execution times and lower overall efficiency.
  • The total possible input space is exponential: O(256ⁿ), where n is the size in bytes of the input data. Even when coverage-guided fuzzers use heuristic approaches to tackle this problem, fuzzing is still considered a sub-exponential problem, with respect to input size. So the probability of finding a bug decreases rapidly as the input size grows.

For example, CVE-2022-40303 is an integer overflow bug affecting libxml2 that requires an input larger than 2GB to be triggered.

Bugs that require “extra time” to be triggered

These are vulnerabilities that can’t be triggered within the typical per-execution time limit used by fuzzers. Keep in mind that fuzzers aim to be as fast as possible, often executing hundreds or thousands of test cases per second. In practice, this means per-execution time limits on the order of 1–10 milliseconds, which is far too short for some classes of bugs.

As an example, my colleague Kevin Backhouse found a vulnerability in the Poppler code that fits well in this category: the vulnerability is a reference-count overflow that can lead to a use-after-free vulnerability.

Reference counting is a way to track how many times a pointer is referenced, helping prevent vulnerabilities such as use-after-free or double-free. You can think of it as a semi-manual form of garbage collection.

In this case, the problem was that these counters were implemented as 32-bit integers. If an attacker can increment the counter up to 2^32 times, it will wrap the value back to 0 and then trigger a use-after-free in the code.

Kevin wrote a proof of concept that demonstrated how to trigger this vulnerability. The only problem is that it turned out to be quite slow, making exploitation unrealistic: The PoC took 12 hours to finish.

That’s an extreme example of a bug that needs “extra time” to manifest, but many vulnerabilities require at least seconds of execution to trigger. Even that is already beyond the typical limits of existing fuzzers, which usually set per-execution timeouts well under one second.

That’s why finding vulnerabilities that require seconds to trigger is almost a chimera for fuzzers. And this effectively discards a lot of real-world exploitation scenarios from what fuzzers can find.

It’s important to note that although fuzzer timeouts frequently turn out to be false alarms, it’s still a good idea to inspect them. Occasionally they expose real performance-related DoS bugs, such as quadratic loops.

How to proceed in these cases?

I would like to be able to give you a how-to guide on how to proceed in these scenarios. But the reality is we don’t have effective fuzzing strategies for these case corners yet.

At the moment, mainstream fuzzers are not able to catch these kinds of vulnerabilities. To find them, we usually have to turn to other approaches: static analysis, concolic (symbolic + concrete) testing, or even the old-fashioned (but still very profitable) method of manual code review.

Conclusion

Despite the fact that fuzzing is one of the most powerful options we have for finding bugs in complex software, it’s not a fire-and-forget solution. Continuous fuzzing can identify vulnerabilities, but it can also fail to detect some attack vectors. Without human-driven work, entire classes of bugs have survived years of continuous fuzzing in popular and crucial projects. This was evident in the three OSS-Fuzz examples above.

I proposed a five-step fuzzing workflow that goes further than just code coverage, covering also context-sensitive coverage and value coverage. This workflow aims to be a practical roadmap to ensure your fuzzing efforts go beyond the basics, so you’ll be able to find more elusive vulnerabilities.

If you’re starting with open source fuzzing, I hope this blog post helped you better understand current fuzzing gaps and how to improve your fuzzing workflows. And if you’re already familiar with fuzzing, I hope it gives you new ideas to push your research further and uncover bugs that traditional approaches tend to miss.

Want to learn how to start fuzzing? Check out our Fuzzing 101 course at gh.io/fuzzing101 >

The post Bugs that survive the heat of continuous fuzzing appeared first on The GitHub Blog.

  • ✇GitHub Security Lab Archives - The GitHub Blog
  • Uncovering GStreamer secrets Antonio Morales
    In this blog post, I’ll show the results of my recent security research on GStreamer, the open source multimedia framework at the core of GNOME’s multimedia functionality. I’ll also go through the approach I used to find some of the most elusive vulnerabilities, generating a custom input corpus from scratch to enhance fuzzing results. GStreamer GStreamer is an open source multimedia framework that provides extensive capabilities, including audio and video decoding, subtitle parsing, and media
     

Uncovering GStreamer secrets


In this blog post, I’ll show the results of my recent security research on GStreamer, the open source multimedia framework at the core of GNOME’s multimedia functionality.

I’ll also go through the approach I used to find some of the most elusive vulnerabilities, generating a custom input corpus from scratch to enhance fuzzing results.

GStreamer

GStreamer is an open source multimedia framework that provides extensive capabilities, including audio and video decoding, subtitle parsing, and media streaming, among others. It also supports a broad range of codecs, such as MP4, MKV, OGG, and AVI.

GStreamer is distributed by default on any Linux distribution that uses GNOME as the desktop environment, including Ubuntu, Fedora, and openSUSE. It provides multimedia support for key applications like Nautilus (Ubuntu’s default file browser), GNOME Videos, and Rhythmbox. It’s also used by tracker-miners, the Ubuntu’s metadata indexer–an application that my colleague, Kev, was able to exploit last year.

This makes GStreamer a very interesting target from a security perspective, as critical vulnerabilities in the library can open numerous attack vectors. That’s why I picked it as a target for my security research.

It’s worth noting that GStreamer is a large library that includes more than 300 different sub-modules. For this research, I decided to focus on only the “Base” and “Good” plugins, which are included by default in the Ubuntu distribution.

Results

During my research I found a total of 29 new vulnerabilities in GStreamer, most of them in the MKV and MP4 formats.

Below you can find a summary of the vulnerabilities I discovered:

GHSL CVE DESCRIPTION
GHSL-2024-094 CVE-2024-47537 OOB-write in isomp4/qtdemux.c
GHSL-2024-115 CVE-2024-47538 Stack-buffer overflow in vorbis_handle_identification_packet
GHSL-2024-116 CVE-2024-47607 Stack-buffer overflow in gst_opus_dec_parse_header
GHSL-2024-117 CVE-2024-47615 OOB-Write in gst_parse_vorbis_setup_packet
GHSL-2024-118 CVE-2024-47613 OOB-Write in gst_gdk_pixbuf_dec_flush
GHSL-2024-166 CVE-2024-47606 Memcpy parameter overlap in qtdemux_parse_theora_extension leading to OOB-write
GHSL-2024-195 CVE-2024-47539 OOB-write in convert_to_s334_1a
GHSL-2024-197 CVE-2024-47540 Uninitialized variable in gst_matroska_demux_add_wvpk_header leading to function pointer ovewriting
GHSL-2024-228 CVE-2024-47541 OOB-write in subparse/gstssaparse.c
GHSL-2024-235 CVE-2024-47542 Null pointer dereference in id3v2_read_synch_uint
GHSL-2024-236 CVE-2024-47543 OOB-read in qtdemux_parse_container
GHSL-2024-238 CVE-2024-47544 Null pointer dereference in qtdemux_parse_sbgp
GHSL-2024-242 CVE-2024-47545 Integer underflow in FOURCC_strf parsing leading to OOB-read
GHSL-2024-243 CVE-2024-47546 Integer underflow in extract_cc_from_data leading to OOB-read
GHSL-2024-244 CVE-2024-47596 OOB-read in FOURCC_SMI_ parsing
GHSL-2024-245 CVE-2024-47597 OOB-read in qtdemux_parse_samples
GHSL-2024-246 CVE-2024-47598 OOB-read in qtdemux_merge_sample_table
GHSL-2024-247 CVE-2024-47599 Null pointer dereference in gst_jpeg_dec_negotiate
GHSL-2024-248 CVE-2024-47600 OOB-read in format_channel_mask
GHSL-2024-249 CVE-2024-47601 Null pointer dereference in gst_matroska_demux_parse_blockgroup_or_simpleblock
GHSL-2024-250 CVE-2024-47602 Null pointer dereference in gst_matroska_demux_add_wvpk_header
GHSL-2024-251 CVE-2024-47603 Null pointer dereference in gst_matroska_demux_update_tracks
GHSL-2024-258 CVE-2024-47778 OOB-read in gst_wavparse_adtl_chunk
GHSL-2024-259 CVE-2024-47777 OOB-read in gst_wavparse_smpl_chunk
GHSL-2024-260 CVE-2024-47776 OOB-read in gst_wavparse_cue_chunk
GHSL-2024-261 CVE-2024-47775 OOB-read in parse_ds64
GHSL-2024-262 CVE-2024-47774 OOB-read in gst_avi_subtitle_parse_gab2_chunk
GHSL-2024-263 CVE-2024-47835 Null pointer dereference in parse_lrc
GHSL-2024-280 CVE-2024-47834 Use-After-Free read in Matroska CodecPrivate

Fuzzing media files: The problem

Nowadays, coverage-guided fuzzers have become the “de facto” tools for finding vulnerabilities in C/C++ projects. Their ability to discover rare execution paths, combined with their ease of use, has made them the preferred choice among security researchers.

The most common approach is to start with an initial input corpus, which is then successively mutated by the different mutators. The standard method to create this initial input corpus is to gather a large collection of sample files that provide a good representative coverage of the format you want to fuzz.

But with multimedia files, this approach has a major drawback: media files are typically very large (often in the range of megabytes or gigabytes). So, using such large files as the initial input corpus greatly slows down the fuzzing process, as the fuzzer usually goes over every byte of the file.

There are various minimization approaches that try to reduce file size, but they tend to be quite simplistic and often yield poor results. And, in the case of complex file formats, they can even break the file’s logic.

It’s for this reason that for my GStreamer fuzzing journey, I opted for “generating” an initial input corpus from scratch.

The alternative: corpus generators

An alternative to gathering files is to create an input corpus from scratch. Or in other words, without using any preexisting files as examples.

To do this, we need a way to transform the target file format into a program that generates files compliant with that format. Two possible solutions arise:

  1. Use a grammar-based generator. This category of generators makes use of formal grammars to define the file format, and subsequently generate the input corpus. In this category, we can mention tools like Grammarinator, an open source grammar-based fuzzer that creates test cases according to an input ANTLR v4 grammar. In this past blog post, I also explained how I used AFL++ Grammar-Mutator for fuzzing Apache HTTP server.
  2. To create a generator specifically for the target software. In this case, we rely on analyzing how the software parses the file format to create a compatible input generator.

Of course, the second solution is more time-consuming, as we need not only to understand the file format structure but also to analyze how the target software works.

But at the same time, it solves two problems in one shot:

  • On one hand, we’ll generate much smaller files, drastically speeding up the fuzzing process speed.
  • On the other hand, these “custom” files are likely to produce better code coverage and potentially uncover more vulnerabilities.

This is the method I opted for and it allowed me to find some of the most interesting vulnerabilities in the MP4 and MKV parsers–vulnerabilities that until then, had not been detected by the fuzzer.

Implementing an input corpus generator for MP4

In this section, I will explain how I created an input corpus generator for the MP4 format. I used the same approach for fuzzing the MKV format as well.

MP4 format

To start, I will show a brief description of the MP4 format.

MP4, officially known as MPEG-4 Part 14, is one of the most widely used multimedia container formats today, due to its broad compatibility and widespread support across various platforms and devices. It supports packaging of multiple media types such as video, audio, images, and complex metadata.

MP4 is basically an evolution of Apple’s QuickTime media format, which was standardized by ISO as MPEG-4. The .mp4 container format is specified by the “MPEG-4 Part 14: MP4 file format” section.

MP4 files are structured as a series of “boxes” (or “atoms”), each containing specific multimedia data needed to construct the media. Each box has a designated type that describes its purpose.

These boxes can also contain other nested boxes, creating a modular and hierarchical structure that simplifies parsing and manipulation.

Each box/atom includes the following fields:

  • Size: A 32-bit integer indicating the total size of the box in bytes, including the header and data.
  • Type: A 4-character code (FourCC) that identifies the box’s purpose.
  • Data: The actual content or payload of the box.

Some boxes may also include:

  • Extended size: A 64-bit integer that allows for boxes larger than 4GB.
  • User type: A 16-byte (128-bit) UUID that enables the creation of custom boxes without conflicting with standard types.

Mp4 box structure

An MP4 file is typically structured in the following way:

  • ftyp (File Type Box): Indicates the file type and compatibility.
  • mdat (Media Data Box): Contains the actual media data (for example, audio and video frames).
  • moov (Movie Box): Contains metadata for the entire presentation, including details about tracks and their structures:
  • trak (Track Box): Represents individual tracks (for example, video, audio) within the file.
  • udta (User Data Box): Stores user-defined data that may include additional metadata or custom information.

Common MP4 file structure

Once we understand how an MP4 file is structured, we might ask ourselves, “Why are fuzzers not able to successfully mutate an MP4 file?”

To answer this question, we need to take a look at how coverage-guided fuzzers mutate input files. Let’s take AFL–one of the most widely used fuzzers out there–as an example. AFL’s default mutators can be summarized as follows:

  • Bit/Bytes mutators: These mutators flip some bits or bytes within the input file. They don’t change the file size.
  • Block insertion/deletion: These mutators insert new data blocks or delete sections from the input file. They modify the file size.

The main problem lies in the latter category of mutators. As soon as the fuzzer modifies the data within an mp4 box, the size field of the box should be also updated to reflect the new size. Furthermore, if the size of a box changes, the size fields of all its parent boxes must also be recalculated and updated accordingly.

Implementing this functionality as a simple mutator can be quite complex, as it requires the fuzzer to track and update the implicit structure of the MP4 file.

Generator implementation

The algorithm I used for implementing my generator follows these steps:

Step 1: Generating unlabelled trees

Structurally, an MP4 file can be visualized as a tree-like structure, where each node corresponds to an MP4 box. Thus, the first step in our generator implementation involves creating a set of unlabelled trees.

In this phase, we create trees with empty nodes that do not yet have a tag assigned. Each node represents a potential MP4 box. To make sure we have a variety of input samples, we generate trees with various structures and different node counts.

3 different 9-node unlabelled trees

In the following code snippet, we see the constructor of the RandomTree class, which generates a random tree structure with a specified total nodes (total_nodes):

RandomTree::RandomTree(uint32_t total_nodes){
uint32_t curr_level = 0;

//Root node
new_node(-1, curr_level);
curr_level++;

uint32_t rem_nodes = total_nodes - 1;
uint32_t current_node = 0;

while(rem_nodes > 0){

uint32_t num_children = rand_uint32(1, rem_nodes);
uint32_t min_value = this->levels[curr_level-1].front();
uint32_t max_value = this->levels[curr_level-1].back();

for(int i=0; i<num_children; i++){
uint32_t parent_id = rand_uint32(min_value, max_value);
new_node(parent_id, curr_level);
}

curr_level++;
rem_nodes -= num_children;
}
}

This code traverses the tree level by level (Level Order Traversal), adding a random number (rand_uint32) of children nodes (num_children). This approach of assigning a random number of child nodes to each parent node will generate highly diverse tree structures.

Random generation of child nodes

After all children are added for the current level, curr_level is incremented to move to the next level.

Once rem_nodes is 0, the RandomTree generation is complete, and we move on to generate another new RandomTree.

Step 2: Assigning tags to nodes

Once we have a set of unlabelled trees, we proceed to assign random tags to each node.

These tags correspond to the four-character codes (FOURCCs) used to identify the types of MP4 boxes, such as moov, trak, or mdat.

In the following code snippet, we see two different fourcc_info structs: FOURCC_LIST which represents the leaf nodes of the tree, and CONTAINER_LIST which represents the rest of the nodes.

The fourcc_info struct includes the following fields:

  • fourcc: A 4-byte FourCC ID
  • description: A string describing the FourCC
  • minimum_size: The minimum size of the data associated with this FourCC
const fourcc_info CONTAINER_LIST[] = {

{FOURCC_moov, "movie", 0,},
{FOURCC_vttc, "VTTCueBox 14496-30", 0},
{FOURCC_clip, "clipping", 0,},
{FOURCC_trak, "track", 0,},
{FOURCC_udta, "user data", 0,},
…

const fourcc_info FOURCC_LIST[] = {

{FOURCC_crgn, "clipping region", 0,},
{FOURCC_kmat, "compressed matte", 0,},
{FOURCC_elst, "edit list", 0,},
{FOURCC_load, "track load settings", 0,},

Then, the MP4_labeler constructor takes a RandomTree instance as input, iterates through its nodes, and assigns a label to each node based on whether it is a leaf (no children) or a container (has children):

…

MP4_labeler::MP4_labeler(RandomTree *in_tree) {
…
for(int i=1; i < this->tree->size(); i++){

Node &node = this->tree->get_node(i);
…
if(node.children().size() == 0){
//LEAF
uint32_t random = rand_uint32(0, FOURCC_LIST_SIZE-1);
fourcc = FOURCC_LIST[random].fourcc;
…
}else{
//CONTAINER
uint32_t random = rand_uint32(0, CONTAINER_LIST_SIZE-1);
fourcc = CONTAINER_LIST[random].fourcc;
…
}
…
node.set_label(label);
}
}

After this stage, all nodes will have an assigned tag:

Labeled trees with MP4 box tags

Step 3: Adding random-size data fields

The next step is to add a random-size data field to each node. This data simulates the content within each MP4 box.
In the following code, at first we set the minimum size (min_size) of the padding specified in the selected fourcc_info from FOURCC_LIST. Then, we append padding number of null bytes (\x00) to the label:

if(node.children().size() == 0){
//LEAF
…
padding = FOURCC_LIST[random].min_size;
random_data = rand_uint32(4, 16);
}else{
//CONTAINER
…
padding = CONTAINER_LIST[random].min_size;
random_data = 0;
}
…
std::string label = uint32_to_string(fourcc);
label += std::string(padding, '\x00');
label += std::string(random_data, '\x41');

By varying the data sizes, we make sure the fuzzer has sufficient space to inject data into the box data sections, without needing to modify the input file size.

Step 4: Calculating box sizes

Finally, we calculate the size of each box and recursively update the tree accordingly.

The traverse method recursively traverses the tree structure serializing the node data and calculating the resulting size box (size). Then, it propagates size updates up the tree (traverse(child)) so that parent boxes include the sizes of their child boxes:

std::string MP4_labeler::traverse(Node &node){
…
for(int i=0; i < node.children().size(); i++){ Node &child = tree->get_node(node.children()[i]);

output += traverse(child);
}

uint32_t size;
if(node.get_id() == 0){
size = 20;
}else{
size = node.get_label().size() + output.size() + 4;
}

std::string label = node.get_label();
uint32_t label_size = label.size();

output = uint32_to_string_BE(size) + label + output;
…
}

The number of generated input files can vary depending on the time and resources you can dedicate to fuzzing. In my case, I generated an input corpus of approximately 4 million files.

Code

You can find my C++ code example here.

Acknowledgments

A big thank you to the GStreamer developer team for their collaboration and responsiveness, and especially to Sebastian Dröge for his quick and effective bug fixes.

I would also like to thank my colleague, Jonathan Evans, for managing the CVE assignment process.

References

The post Uncovering GStreamer secrets appeared first on The GitHub Blog.

❌
❌