As part of my role as Service Architect here at SpecterOps, one of the things I’m tasked with is exploring all kinds of technologies to help those on assessments with advancing their engagement.
Not long after starting this new role, I was approached with an interesting problem. A SQL Server database backup for a ManageEngine’s ADSelfService Plus product had been recovered and, while the team had walked through the database recovery, SQL Server database encryption was in use. With a ticking clock, the request was clear… can we do anything to recover sensitive information from the database with only a .bak file available?
One of the things that I love about this job is getting to dig into various technologies and seeing the resulting research being used in real-time. After some research, we had decryption keys, a method of decrypting sensitive data, and DA credentials extracted and ready to go!
This post will explore how this was done, look at how SQL Server encryption works, introduce some new methods of brute-forcing database encryption keys, and show a mistake in ManageEngine’s ADSelfService product which allows compromised database backups to reveal privileged credentials.
Manage Engine Protected Data
Let’s start with Manage Engine’s ADSelfService product. Documentation shows that Domain Admin credentials are likely present:
If we setup this tool in a lab environment, we find encrypted fields such as the below USER_NAME column:
Further, if we review the configuration of the database, we see that this is SQL Server’s builtin encryption functionality that is being used to protect these fields. So the mission is clear: we need to understand SQL Server Encryption before we can hope to retrieve this data in cleartext.
SQL Server Encryption Overview
The root of the cryptography chain in SQL Server is the Service Master Key (SMK). This key is associated and stored in the master database for the server.
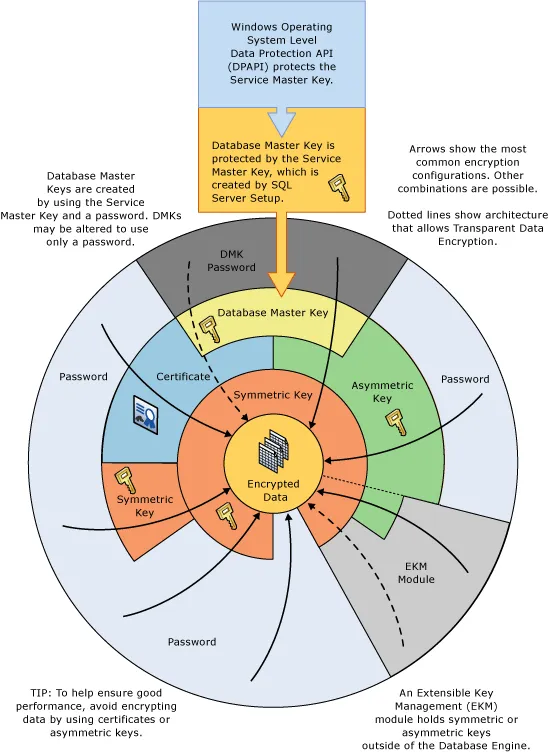
At a database layer, the Database Master Key (DMK) is the start of the encryption chain for each database. This diagram from Microsoft gives a brilliant visualisation of this in action:
For us to explore this encryption functionality, let’s run a few TSQL commands on a lab instance of SQL Server 2019.
First up, we create a new database and master key:
USE CryptoDB;
CREATE MASTER KEY ENCRYPTION BY PASSWORD='Password123'
We can then view our created master key with:
SELECT * FROM sys.symmetric_keys
Now this doesn’t show the actual content of the master key. Instead, to see this, we can use the query to list encryption keys in a database:
SELECT * FROM sys.key_encryptions
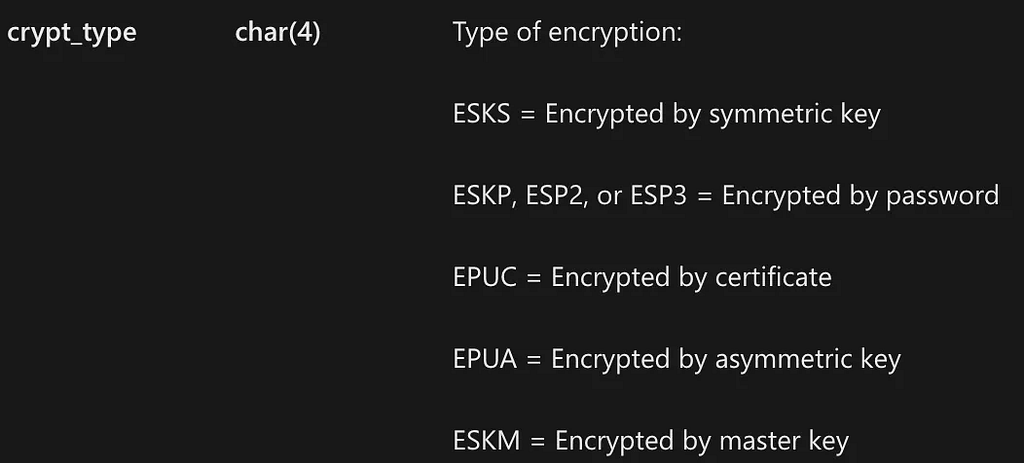
The crypt_property field shows our newly created master key in some form. We can also see that the crypt_type and crypt_type_description fields give a good indication as to each key’s type.
After searching Microsoft’s documentation for how these keys are actually stored, or ways that we can extract them, I found a few snippets of information:
Unfortunately none of this is useful for our purpose, so into the disassembler and debugger I needed to go.
Strap In Peeps.. We’re Going Low Level!
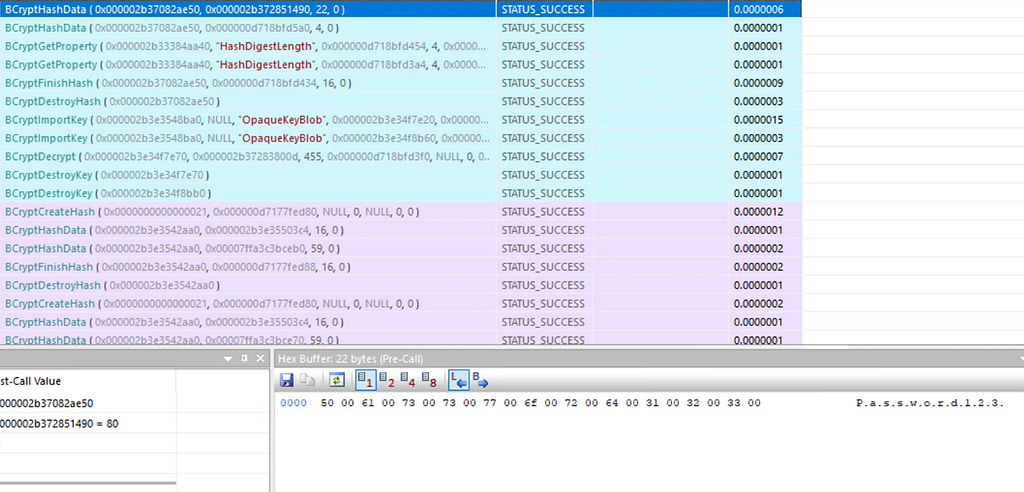
For this exercise, it usually makes sense to try and find a good lead as to the APIs that Microsoft SQL Server may use to handle encryption/decryption. My lab ran SQL Server 2017 on Microsoft Windows Server 2019 and installing WinDBG Preview was too much of a pain without access to the Windows Store, so I spun up API Monitor and hooked the Crypto APIs to see if anything indicated their use during cryptographic operations on SQL Server. We execute the TSQL to open the master key and:
As far as indicators go, this was a good one. We see that BCryptHashData was used along with a password provided during the opening of the database master key.
The important part for us is the call stack, which showed sqllang.dll and sqlmin.dll were prime candidates for reversing:
Symbols were available for both of these dynamic-link libraries (DLLs) are grabbed using symchk.exe:
Service Master Key Encryption
Let’s look at how the Service Master Key is generated and stored on SQL Server. This is the root of the encryption chain as shown in Microsoft’s diagram, so if we can find a vulnerability here, or some method of cracking this key, everything else will fall!
We know that a Database Master Key is encrypted using the Service Master Key. We also know from Microsoft’s documentation that this is likely protected using the data protection APIs (DPAPIs), which means that if we add a breakpoint on CryptUnprotectData / CryptProtectData and create a new DMK, we are in with a shot of seeing where in SQL Server is responsible for using the SMK.
To create the new key we use:
CREATE MASTER KEY ENCRYPTION BY PASSWORD='Password123'
And we hit a breakpoint with a valuable stack trace:
Here we see two method calls which tell us a story:
CSECDBMasterKey::Decrypt
CSECServiceMasterKey::Initialize
This makes sense, because we know that the SMK is used to decrypt the DMK and the DPAPI should protect the SMK.
We can pull out the arguments to CryptoUnprotectData and find the following value being decrypted:
And if we use the following TSQL query:
SELECT * FROM master.sys.key_encryptions
We find that the encrypted SMK matches the encrypted key stored in the master database:
Another caveat is a value passed to CryptUnprotectData as the optional entropy value. After a bit of digging, we find that this value is taken from the registry key:
Unfortunately with only the database backup that we hold for ADSelfService, this isn’t an option, so we move onto the next crypto layer, the Database Master Key.
Database Master Key Encryption
With DPAPI being used to protect the SMK, next up we tackle the DMK to see what we can unearth here.
We know from our TSQL that when we initialized the DMK, we used a password:
CREATE MASTER KEY ENCRYPTION BY PASSWORD='Password123'
This password is surely a weak link in the chain, but there are a few questions that come up:
How is this password stored in the database?
Is all of the keying material for this password stored in a database backup?
Can we bruteforce this key?
First up, we need to understand how this key is actually stored in the database. We attach a debugger to SQLServr.exeand use a password to attempt to open the DMK:
OPEN MASTER KEY DECRYPTION BY PASSWORD='ABCDE'
We add breakpoints to the previously observed BCrypt suite of APIs and we find that, after being executed, we land on a method called BCryptHashData:
The call stack shows where this is invoked:
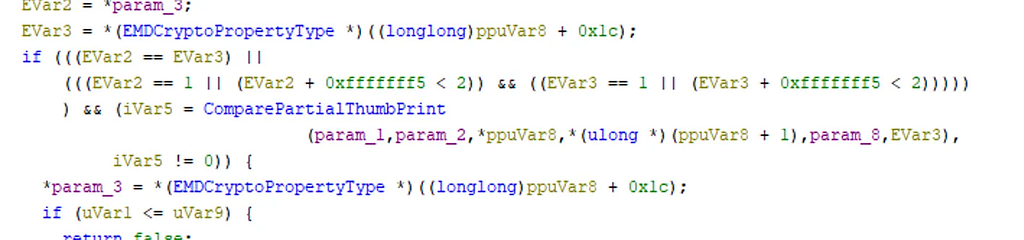
What’s interesting is the use of the word Obfus in the method CMEDProxyObfusKey::SearchEncryptionByUserData . Obfuscation usually means something fishy is going on, so we dig into this method a bit more and we find reference to a key thumbprint:
Add a breakpoint to ComparePartialThumbPrint and attempt to open the master key again with an invalid password using:
OPEN MASTER KEY DECRYPTION BY PASSWORD='password123'
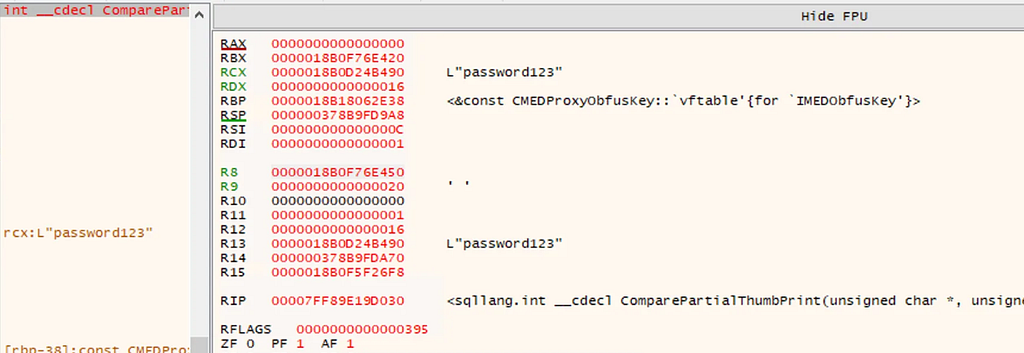
This time we find that our password is passed to this method as an argument, along with the unicode byte length:
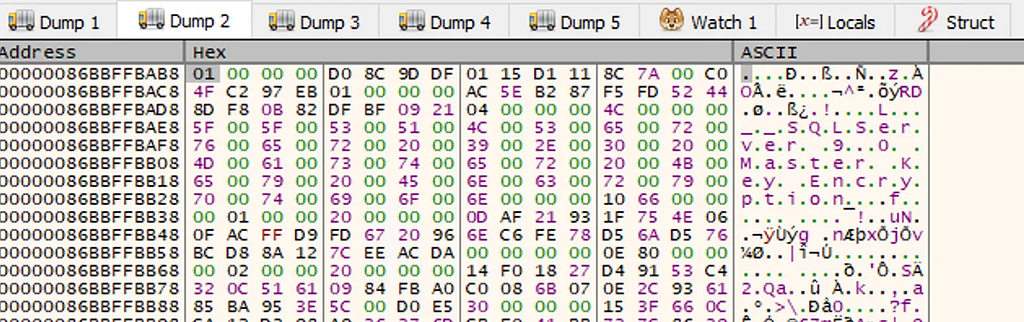
But what is this being compared to? Dumping the third argument to this method call shows the following memory content:
This is not something that we’ve seen so far, but a bit of digging in SQL reveals the following table (requires DAC / diagnostic connection on a live database):
SELECT * FROM sys.sysobjkeycrypts
This looks similar to the previous sys.key_encryptions table; however, the thumbprint value is populated this time. What is going on here?
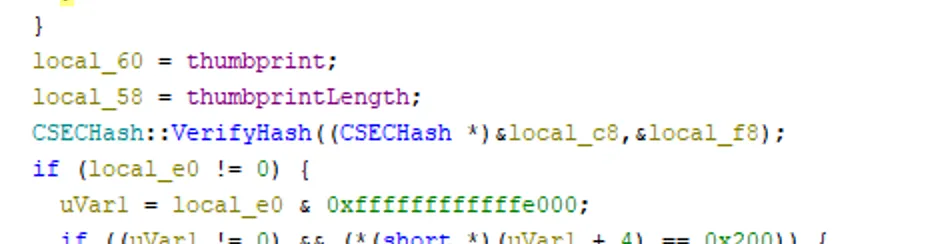
At this point, we know that the thumbprint is being used alongside our plaintext password. Let’s look in ComparePartialThumbPrint to see what the comparison is doing.
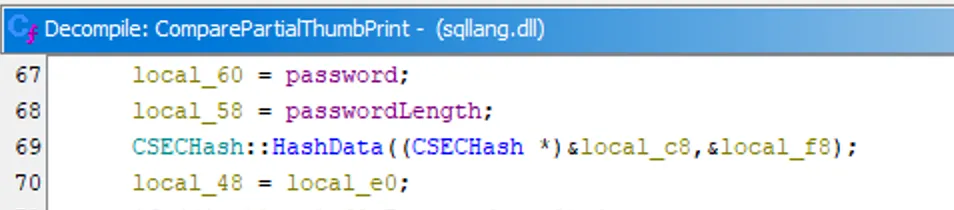
First the provided password is hashed:
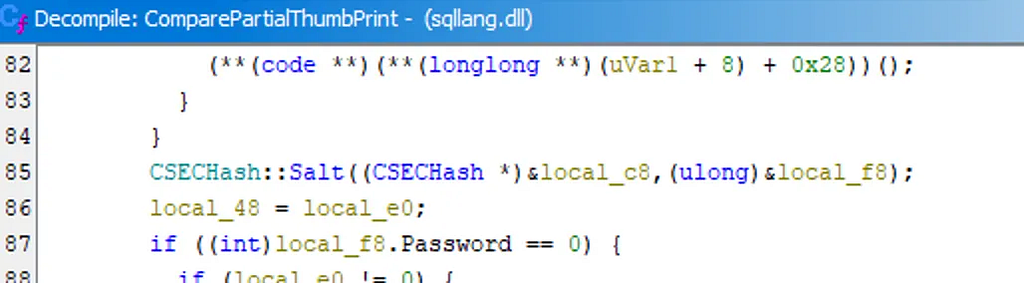
Then the hash is salted:
And then the result is compared to the thumbprint:
If this is the case, this gives us a brilliant opportunity to create a brute-force method for our target database. After all:
All of the keying material is stored in the database (and therefore the database backup)
Nothing relates to the SMK and, therefore, DPAPI
But what are the algorithms used to hash the password? Well, in the type field of sys.key_encryptions we have a number of values:
ESKP - Observed in databases starting at SQL Server 2008
ESP2 - Observed in databases starting at SQL Server 2012
Starting with ESP2, if we add a breakpoint to BCryptHashData, we find that this is SHA-512 salted with 8 bytes. The resulting hash is then truncated to 24 bytes and then compared to the thumbprint.
Unfortunately for us, there is an additional step that SQL Server takes when storing the SHA-512 hash of the DMK: the hash truncates to 24 bytes.
This step alone appears to put it out of the reach of stock Hashcat rules; however, if we turn to John The Ripper, we have the option of Dynamic Rules.
A warning in advance: this is going to be slow, but we can add the following dynamic rule which will crack ESP2 keys:
Brute-Forcing the ManageEngine Hashed Database Master Key
So now we have a technique to hopefully recover database encryption keys. We cross our fingers and look in our target database backup and we find ESKP. This means that we have a DMK protected using MD5 and, thankfully, a GPU cracking rig just waiting for us to feed it hashes!
Adding our hash to a file, we fire up our cracking job and…nothing.
The key hasn’t been rotated in a long time. Experience tells us that something is wrong here, so I did what I should have done in the first place. I spun up a local instance of ManageEngine to take a look at what was happening.
After reviewing, I found a file named product-config.xml, which looks like this:
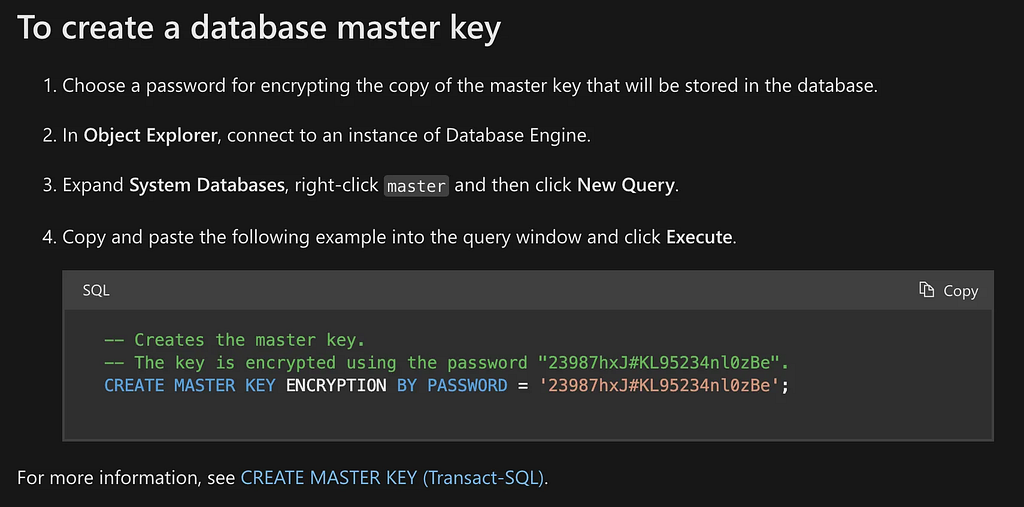
The masterkey.password property has a value of 23987hxJ#KL95234nl0zBe, and if we throw this into our new method of cracking database encryption keys, we find that it cracks.
More concerningly, I then try this against the provided .bak file from the client environment and it cracks!
So what is this key: just a hardcoded value? A quick throw of this password into Google and…
The key is the example key used in Microsoft’s documentation for setting up a DMK!
TADA, dopamine hit! Using the database backup, we can now unseal the certificate and symmetric keys ManageEngine uses for decryption and pull out those sensitive credentials:
use DATABASE_NAME_HERE -- Update to contain the restored database name
OPEN MASTER KEY DECRYPTION BY PASSWORD = '23987hxJ#KL95234nl0zBe'
OPEN SYMMETRIC KEY ZOHO_SYMM_KEY DECRYPTION BY CERTIFICATE ZOHO_CERT;
And we can use this to decrypt any sensitive data contained within:
SELECT CONVERT(NVARCHAR(MAX), DecryptByKey((SELECT [Password] FROM ADSMDomainConfiguration))) as Password, CONVERT(NVARCHAR(MAX), DecryptByKey((SELECT [USER_NAME] FROM ADSMDomainConfiguration))) as UserName
Here’s what we’ve learned during this exercise:
ManageEngine ADSelfService backups created use an example key Microsoft provides
If you find a database backup that uses a DMK with the ESKP type, you can brute-force the decryption password with the speed of MD5
Always lab your target product before spending so much time in a disassembler
This blog post was presented at SOCON 2025. Stay tuned for the video!
During red team operations, stealth is a critical component. We spend a great deal of time ensuring our payloads will evade any endpoint detection and response (EDR) solution, our traffic is obfuscated and hard to trace, and our commands will interact with a system in a way that limits the number of possible detection opportunities based on our actions that could thwart our operation; however, even when tiptoeing around a client environment, we have likely all experienced a scenario where we happen to list the wrong directory, read the wrong file, or access the wrong registry key and set off an alert to the Security Operations Center (SOC) to get an investigation rolling. I am, of course, talking about that pesky system access control list (SACL) that made a simple Windows event to let the SOC know someone tried to access something they should not.
DACL vs. SACL
If you have spent some time in the field, you are likely familiar with DACLs and SACLs, but I will do a quick recap to refresh some minds and educate the rest. We will start with the securable object. From Microsoft’s documentation: “A securable object is an object that can have a security descriptor. All named Windows objects are securable. Some unnamed objects, such as process and thread objects, can have security descriptors too.” So, any securable object can have a security descriptor applied to it that can contain access control lists (ACLs). We are talking about files, registry keys, processes, pipes, services, etc. The ACLs within the security descriptor come in two flavors: discretionary access control lists (DACLs) and SACLs.
Most people are more familiar with the DACL, which determines whether a security principal attempting to access a securable object in question is allowed to do so based on allow or deny entries. This is done based on several factors in the access token, but in short, we can equate it to the doorman at a bar. A user attempts to access the bar and presents their ID to the doorman, then the doorman checks their ID and allows or denies them entry based on the information provided. SACLs, on the other hand, are more like a logbook. They are not determining access; they only log whether the security principal succeeded or failed to access the securable object. We can think of this as a scribe standing next to the doorman at the bar, writing down the names of every person who attempts to access the bar and whether the doorman allows or denies them.
We have seen the use of these technological trip flares increasing lately. While the increase in SACL usage is not bad, it does mean that we need to be even more careful about what we access in an environment. Honeypot accounts in Active Directory (AD) can catch the use of tools like BloodHound when it tries to read an AD object that no one was intended to read, the registry could be watched to see if an attacker tries to access local security authority (LSA) registry keys, or it could be as simple as a “password” file on a share set to let defenders know if someone tries to access some suspiciously sweet administrator credentials. As organizations and defenses mature, it is becoming more crucial for red teamers to know what we should not risk touching.
Enter SACL Scanner
To help with this, and learn C along the way, I created a simple C program called SACL_Scanner to aid fellow red teamers in identifying the configured trip flares so we can avoid them. Currently, it will scan for SACLs on three local Windows securable objects and AD: registry keys, services, files/directories, and AD objects. It is also compiled to run with execute_pe in most C2 frameworks since it is much more likely that a red teamer will be in that scenario rather than directly on a host running programs.
Before we get into the demos, we need to talk about the obvious barrier to what we are trying to achieve: privileges. We will need the SE_SECURITY_NAME privilege corresponding to the objects we are trying to read. This means that we must be at least an administrator or have the SE_SECURITY_NAME privilege assigned to our access token. It is likely that when you are really worried about SACLs on other users’ files, registry keys for the security account manager (SAM), or mucking with services on the local host, you are already an administrator; ergo, it should not be too much of an issue there. However, when trying to read the SACLs on AD objects, we run into a bit of a catch-22 in that we might want to know what objects we should not touch so we can execute an attack path in AD to elevate our access therein, but we need elevated permissions to read the SACLs on AD objects to know which objects we should not touch. Sadly, I do not have a solution for that as that is AD working correctly. Nevertheless, we can still obtain additional information once we have elevated our access, tread lightly, and limit our indicators of compromise (IOCs).
Additionally, something the tool is not going to do is let you know the status of whether auditing itself is enabled. SACLs are two parts that combine to make event logs for detection: the SACL itself on the securable object and the computer audit policy settings determine whether the logs themselves are generated. Both of these must be enabled for a SACL to provide any value. If the SACL is set on an object but auditing is not enabled, the SACL does not really matter. Conversely, if auditing is enabled but nothing has a SACL set, then auditing is not generating anything. One could argue this is only partially true as there are objects such as LSASS that have SACLs set by default, but we will not get into that list here as Microsoft does not make it readily available. In our case, to reiterate, we are only checking for SACLs themselves on securable objects here; not whether auditing is enabled.
For demo purposes, I am running a simple Windows environment with a single workstation and domain controller (DC). For my command and control (C2) framework, I am using the Mythic framework with a Merlin agent running on the workstation. In this case, the agent runs under the context of an elevated user to show the output. Also, forewarning, I will not be covering covert techniques themselves but rather a down-the-middle use case to focus on the tool and output itself.
Alright; now that the background, summary, and requirements are complete, let’s get into the simple demos. We will start with the registry. There is so much information available to us in the registry that we are almost guaranteed to interact with it in some way during an assessment, whether it is intentional or not. But where do we want to start our testing to see which important registry (sub)keys defenders might be watching? Thankfully, one of my defensive cohorts, Luke Paine, already made a sample list in his post of The Defender’s Guide — The Defender’s Guide to the Windows Registry. Included in his detailed coverage of registry SACLs, he provided a .csv file with a list of keys and the registry operation to watch: Highly Targeted Registry Keys.csv. Let’s start with a few items in this list to test our SACL setup in a lab.
The following few pictures show the setup of the audit policies and SACLs so we can conduct testing. If you are unfamiliar with setting this up, you can think of it as a little guide to setting SACLs in your environment. First, for our local host, we go into Local Security Policy, then Local Policies > Audit Policy, and ensure that Audit object access is enabled (Figure 1).
Figure 1 — Audit Object Access Enabled
Next, we can start setting up some SACLs. We will use the HKLM\SYSTEM\CurrentControlSet\Services registry key referenced in the Defender’s Guide. For simplicity, open regedit.exe, browse to the key, right-click, and select Permissions (Figure 2).
Select “Advanced” in the security permissions window (Figure 3).
Figure 3 — Security Permissions Window
Next, select auditing. If you are unfamiliar with the basic setup of the advanced security window, the permissions tab will show and set DACLs, auditing handles SACLs, and effective access is, as it sounds, testing the access of the account you ask it. In my case, you will see that I have set a SACL to audit anyone in Authenticated Users accessing this registry key (Figure 4).
Figure 4 — Advanced Security Settings
If we select the SACL, we can see the principal again; the type is set to success auditing, applies to this key and subkeys (inheritance set), and audits on Set Value and Create Subkey (Figure 5).
Figure 5 — SACL Settings on Registry Key
Now that we have our test SACLs set, we can pick a service to modify and ensure it works. In my case, I went with the OneSyncSvc and decided to change the ImagePath to set up some simple persistence (Figure 6).
Figure 6 — OneSyncSvc Registry Keys
Before we start the SACL testing, we open the Windows Event Viewer, navigate to Windows Logs > Security, and set a filter on Windows event ID (EID) 4663: “An attempt was made to access an object” (Figure 7). I just cleared them up to make sure we have a fresh list.
Figure 7 — Event Viewer Filtered
In our elevated Merlin agent, we use a simple run sc config command to modify the binPath of the service OneSyncSvc to instead point to a payload (Figure 8).
Figure 8 — Service Modification
After the command, we can double-check that the service changed by refreshing our regedit and see that the ImagePath has changed for OneSyncSvc (Figure 9).
Figure 9 — ImagePath Changed
In Event Viewer, we now have a new EID 4663 (i.e., “An attempt was made to access an object”) stating that NT AUTHORITY/SYSTEM accessed the registry key HKLM\SYSTEM\CurrentControlSet\Services\OneSyncSvc (Figure 10). This event is our expected result since we had the SACL set to audit any access and inherit it from Services, so we catch modifications on all services. Opening the event, we see that the requested access was Set key value, corresponding to our modification (Figure 11).
Figure 10 — Event 4663 LoggedFigure 11 — Access Requested: Set Key Value
We can double-check things like this ahead of time to prevent tripping the SACL with this simple SACL_Scanner tool. It works with execute_pe (and Octoberfest7’s inline-execute-pe). Running this tool with the “-r” flag followed by the key we want to target will give us the desired information. It will scan the entire hive if we target a hive itself (HKEY_LOCAL_MACHINE, HKEY_CURRENT_USER). We check whether an item has any SACLs, if it is a direct or inherited SACL, and the SACL info we desire to let us know what is being audited (Figure 12). Now, depending on how the SACL is set up, this is not full proof to check without being detected, but I will go into further details on this in the detection section.
Figure 12 — Registry Services SACL_Scanner Result
Now, let’s check OneSyncSvc directly. It tells us there is a SACL applied to the key but does not give us details on it (Figure 13). This is intentional since it is an inherited SACL. It will display direct SACLs when requested, but inherited SACLs will only display when the verbose flag (-v) is added so we do not get too much information when scanning multiple items.
Figure 13 — Registry OneSyncSvc SACL_Scanner Result
Rerunning the command with the “-v” flag gives us the complete information we want and some additional security identifier (SID) information (Figure 14).
Figure 14 — Verbose Registry Key Check
Adding the “-opsec” flag allows us to run an additional check to determine if the SIDs within the SACL match any SIDs applied to our current access token. We can see that we have a detected match in this case, which lets us know that we should avoid modifying this registry key further, or we would trip the SACL (Figure 15). Note: a known limitation of this is that the tool compares the SIDs in the access token to the SACL, which means any nested groups that would not be added to the access token will not come back as detected since we are not unrolling groups here.
Figure 15 — SACL OPSEC Check
Now, let’s check the SAM SACL to see if dumping the SAM would get us burned. We can start by setting a SACL on HKLM\SAM with the same steps. When we try to access a key under HKLM\SAM, an event log lets us know someone has tried to access those keys (Figure 16).
Figure 16 — HKLM\SAM SACL Event
When checking HKEY_LOCAL_MACHINE\SAM with SACL_Scanner, we get the info we want to see, letting us know there is a SACL set and that we should avoid dumping the SAM (Figure 17).
Figure 17 — HKLM\SAM SACL_Scanner Check
I will run through some of the other flags pretty quickly as they should be understood pretty easily. Using the “-f” flag followed by a file on the host or share will similarly check the SACLs (Figure 18).
Figure 18 — File SACL Check
Next, we can use “-d” to instead feed it a directory to check the files therein. Notice that we have multiple files here and only one has SACLs applied (Figure 19). Sometimes we can judge based on names and settings. In our example below, we can see that there is a SACL directly applied to my tongue-in-cheek mock honeypot file to alert on reading the file; however, the server_PWs.txt file right above it has none. We can infer that I might not want to touch the more tempting file if I can avoid it.
Figure 19 — SACL_Scanner Directory Check
If we throw the “-opsec” flag into the directory listing, we first check the directory itself to see if we should list files. If we trip a SACL while enumerating file SACLs, we will skip it (Figure 20). This check is nice with a targeted directory but even more important when we use just “-d” without a supplied directory, which will scan the entire C:\ drive.
Figure 20 — Directory SACL Check
Also, while I have not seen it much, we can scan services with “-s.” The flag by itself will check all services, or we can add a specific service to target (Figure 21).
Figure 21 — SACL_Scanner Service Check
Now, on to some AD checks. We start by ensuring the Audit Policy on the domain controller has “Audit directory service objects” enabled (Figure 22). We do not necessarily need it for our SACL checks, but it is good to include it if anyone needs the extra step to help turn on SACL eventing.
Figure 22 — Enabled Directory Object Auditing
As I stated earlier in the post, the major blocker in reading the AD SACLs is simply having the privilege to read the SACLs objects. I know it’s a bit counterproductive and, sadly, this means that we cannot collect them like we do DACLs with a tool like SharpHound. As such, it will likely be of better use if you try to establish domain persistence versus finding an attack path to rise to the top. The flags should make sense based on what we covered. We add the “-a” flag to target AD followed by the “LDAP://{distinguished name}” of the object we want to target. Adding the “-opsec” flag will again check our SIDs to see if we would trip the SACL, and there is a hash map (the reason the file is a bit big) with the GUIDs mapped to user object class attributes. In our case below, we can see that there is a SACL applied to specterDA, which will trigger on writing to the msDS-KeyCredentialLink attribute (Figure 23). If we have not done shadow credentials so far during our assessment, we know we should not try to do that as our persistence on this DA account.
Figure 23 — Domain Admin Check
While the hash map covers those user object class attributes, we can still obtain the SACLs on other objects, like the data protection API (DPAPI) domain backup key. Running the scanner targeting that in my little test lab provides a sample output of no SACLs applied, so we should be fine in a SACL sense to backup that key and do what we need to from there (Figure 24).
Figure 24 — Domain Backup Key Check
Detections
When dealing with SACLs, there will be some fallibility in interacting with a securable object to get the information. The SACLs I commonly see on objects are auditing either modifications of an object or reading the data in a file or registry key. The event log this generates on a host is EID 4663 (i.e., “An attempt was made to access an object”). While this event is the primary log SACL_Scanner is designed to identify in the hope of avoiding generating it, you can use additional logs to detect the tool. For example, we can use EID 4656 (i.e., “A handle to an object was requested”) to get the precursor information to EID 4663. We will still need to obtain the handle to interact with it and read the permissions when reading the object information. We can add “Read Permissions” or “Read Attributes” checks to the SACL to identify SACL_Scanner obtaining the handle to read the SACLs (Figure 25). There are pros and cons to this, as with anything in security, as adding these checks to the SACL will create many more events as standard Windows programs like explorer.exe do their essential functions.
Figure 25 — Event Generated by SACL_Scanner
Similarly, in AD, we try to avoid writing the wrong properties by identifying them first, but other SACLs can detect our access attempts. By setting SACLs on reading object properties, specifically the Public-Information property set’s Object-Class attribute containing the NT-Security-Descriptor, we can detect SACL_Scanner looking at the SACLs on an AD object. We can see the GUIDs in an EID 4662 log, showing that we are reading those properties (Figure 26) and comparing them to the Microsoft documentation (Figure 27 and Figure 28). Auditing reading AD objects will generate an immense amount of traffic, so going that route will need to be severely tuned to gain any real value from it.
Figure 26 — Event Generate by SACL_Scanner Reading AD ObjectFigure 27 — Public-Information Property Set GUIDFigure 28 — Object-Class Attribute GUID
I am not a detection engineer, but to help with this I have made a basic Sigma rule that should help with detecting this tool and hopefully similar techniques.
That’s all for today. I hope this gives you a deeper understanding of how defenders are leveraging SACLs to detect unauthorized access attempts and how you can use SACL_Scanner to adapt your tradecraft accordingly. By being aware of these audit tripwires, you can fine-tune your enumeration, privilege escalation, and other techniques to remain stealthy.
Remember, effective red teaming isn’t just about bypassing defenses — it’s about continuously evolving alongside them. Stay proactive in researching new detection mechanisms, refining your OPSEC, and understanding the blue team’s perspective.
My goal for this blog is to provide a high level overview of our recruiting process for consultants. I’ll explain what each step entails but I will not provide specific technical details or hints for any challenges. I want to demystify our recruiting process and make it less intimidating and hopefully encourage those of you who have considered taking that next step but haven’t yet.
Process Overview
Step 1: Application Review
This step may seem obvious. The first thing we do after receiving your application is review your resume and the questions you answered on the submission form. Our recruiters are excellent and will determine if an application meets the requisite criteria to advance (depending on the position and level). Everyone has a unique story, background, and experience; therefore, we give the application a holistic review. Thoughtful responses to the application questions will receive extra attention compared to applications that ignore them.
The requisite criteria for each level is outlined in the respective job postings. On a broader level, we’re looking for prior technical (offensive or defensive, depending on the role) security and consulting experience. Do you have security experience but no consulting experience? That’s OK, but it may affect the level at which we interview you (e.g., Associate, Consultant, or Senior). Sometimes we target specific levels, such as Consultant or Senior Consultant. During such periods, we may reject Associate-level applications or hold onto them until we hire Associates again in the future.
We like to see community involvement and sharing. We’re looking for candidates that share our commitment to transparency. Do you publish blogs, research, and/or tools? What has your learning and development journey been like through your career? That does not mean you have to write the next Rubeus or BloodHound. Any level of contribution goes a long way. Contributions can be blog posts, walkthroughs, notes from a course, PoC or helper scripts from a training, experimental tools, or contributions to other people’s repos. Make sure to include links to your contributions and accomplishments on your resume!
Note: Be prepared to discuss your resume content and community contributions.
Step 2: Scripting Challenge
We liked your resume and application and want to get to know you better.
The next step is a scripting challenge, where you will enter a challenge on a coding platform and solve a solution in a language of your choice. The environment is recorded but we do not set a strict time limit (e.g., one hour). We encourage you to take your time, pay attention to detail, and consult appropriate references. It is pass/fail and the solution must be exactly correct.
The challenge should be doable for anyone with fundamental scripting skills. If you’ve written automation, PoC scripts, or open-source contributions, you should be able to pass this challenge. If you are a clear senior-level candidate and have extensive open-source software contributions, we may waive the scripting challenge.
Basic scripting/programming ability is a requirement to be a successful red team operator. Therefore, this challenge identifies those that meet that minimum requirement.
Step 3: Preliminary Interview
Great! You passed the scripting challenge and made it through to the next phase. Now our recruiters will get to know you better on a video conference where they will talk about your background, experience, career aspirations, salary expectations, etc. This is also an opportunity for you to ask the recruiters questions about the position and company. This step is fairly straightforward and where the real interview process begins.
All of our interviews will be conducted virtually via video conference and we expect you to be on camera.
Step 4: Technical Challenge
After the preliminary interview, you’ll receive the prompt for a technical challenge that varies based on the role. The primary goal of the challenge is to gauge your technical depth, writing ability, and creativity. Rather than taking a pass/fail approach to assessing your response, we gauge where your submission is on a capability spectrum. We’re looking to see how deep you can go and how well you convey technical information in a clear and concise manner.
Disclaimer: Of course, there is a minimum bar. Not all submissions will advance past this round, especially when we’re seeking only more senior candidates.
The technical challenge will inform us on where your technical capabilities are in preparation for the technical interview. If your submission reads like Senior-level work, then your technical interview will be anchored at that level. There is no hard timeline on the technical challenge but you should submit it within approximately one week.
Step 5: Technical Interview
If we like your technical challenge submission, we’ll advance to the technical interview. This interview is 60 minutes and will be conducted by three senior members of our consulting staff. Similar to the previous round, we’re not looking to stump you. We will ask you about experiences and seed some topics with questions and see how deep you can go.
It is absolutely okay to say you don’t know something. It is also encouraged to talk through your thought process so the interviewers get a glimpse of how you think. Please don’t try to cover up a knowledge gap. It will be obvious. No one knows everything, and we understand that. It’s OK. Be humble and keep it real!
We’ll leave some time at the end of the interview for you to ask us questions. After all, a job interview is as much about you interviewing us as it is the converse.
Step 6: Peer Interview
Congratulations! You’ve survived the technical portions of the process. Now, you’ll meet with three of your potential Specter peers. At this stage, we want to get to know you as a person. Do you match our core values? Will you get along with the team? Will the team enjoy traveling with you for several weeks at a time? There’s no script here and not much to prepare for. Bring your genuine self, have a conversation, and have fun!
Step 7: Management Interview
At this point, you’ve almost made it. You would not have made it this far if you weren’t a good fit. Now, management will meet with you for 60 minutes to discuss your experience, professional development, career growth, etc. This is not a technical interview. If we ask how you did something or how you handled a situation, we’re not looking for technical depth. As always, we’re gauging your alignment with our core values and at what level you should be hired.
As with every previous step, bring your genuine self. Dishonesty and resume discrepancies are commonly identified at this stage.
Why So Many Steps?
The interview process may seem like a lot, and it is, but we pride ourselves on building the right teams with the right people. As much as we want to welcome you into our ranks, we also want to focus on candidates that want to be here. Those candidates will understand the seven steps and work through them to earn their spot on the team.
We’re not looking to stump you or fail you out of the process. We take a holistic view of you as a person, red team operator, and consultant. Inherently, this requires more steps.
You’re interviewing us too. Choosing a company to work with is not a decision to be taken lightly. You spend eight hours per day, five days per week with your colleagues. Through our process, you’ll directly interface with at least 10 Specters, which should help you gain a solid understanding of who we are and what we’re all about.
We strive to complete the entire process in less than four weeks and we’ve completed it in as little as two weeks. However, we understand life happens and we are flexible with scheduling.
Still Unsure?
Don’t think you’re “ready” to join the SpecterOps team? To be honest, a lot of us felt the same way before applying. We all suffer from imposter syndrome and we empathize with you. We will keep this in mind throughout the interviews and will do our best to alleviate those concerns. As you progress through the process, just remember: you’ve made it that far for a reason. To quote an excellent talk from Billy Boatright (and Babe Ruth) at the Social Engineering Village several years ago, “If you’re good enough to have a bat in your hands, you’re good enough to swing it.” So, swing for the fences!
We will help you reach your technical goals. What’s most important to us is aptitude, attitude, and alignment with our core values. Don’t wait for the “right time.” We want to talk to you now!
Next Steps
We will grow steadily throughout 2025 and we’d love to have you apply!
We are hiring consultants at various levels. The job posting (including salary bands) can be found under the Consultant openings here: https://specterops.io/careers/#careers
Please feel free to reach out to me on Bluesky, X, LinkedIn, or BloodHound Slack if you have any questions about SpecterOps or the role, or directly to careers@specterops.io.
Over the years, I’ve noticed that we have a difficult time describing a specific tool’s functionality. I participated in conversations or listened to lectures where someone inevitably attempts to describe the techniques or behavior that they associate with a given tool. Someone might say “mimikatz is used for Credential Dumping” which is technically true, but does not provide a comprehensive description of mimikatz’s capabilities. In these interactions, I’ve often found this problem to be obvious, even to the speaker, but it has been difficult to pin down exactly what to do about it.
In this article, I plan to demonstrate WHY this problem exists. We will dig into two examples, the first shows that a single sample can implement multiple, independent techniques, while the second shows that changing a parameter can cause a different procedure to be executed. In reality, the problem is that a tool is an arbitrary bucket for tradecraft. Some tools are purpose built for one purpose and one purpose only, while others are frameworks that facilitate many different capabilities. Our analysis must go deeper than the tool layer to really discern what we are attempting to detect and I hope that this post provides a perspective on that topic.
One Tool, Multiple Techniques
This section dissects a sample that appears to implement a single technique, Token Impersonation, but upon a deeper review we find that the functionality of the tool can be broken apart. Specifically, we find that the tool builds in a design decision that causes two related but independent techniques to be combined in one chain. Depending on the execution context, the first half of the chain could be omitted completely, or it could have been implemented by a separate, purpose built, tool.
Dependency Graph Review
I want to start with a review of the Dependency Graph. This is a topic that I described in detail in Part 11 of this series, but a quick review will help this article stand on its own.
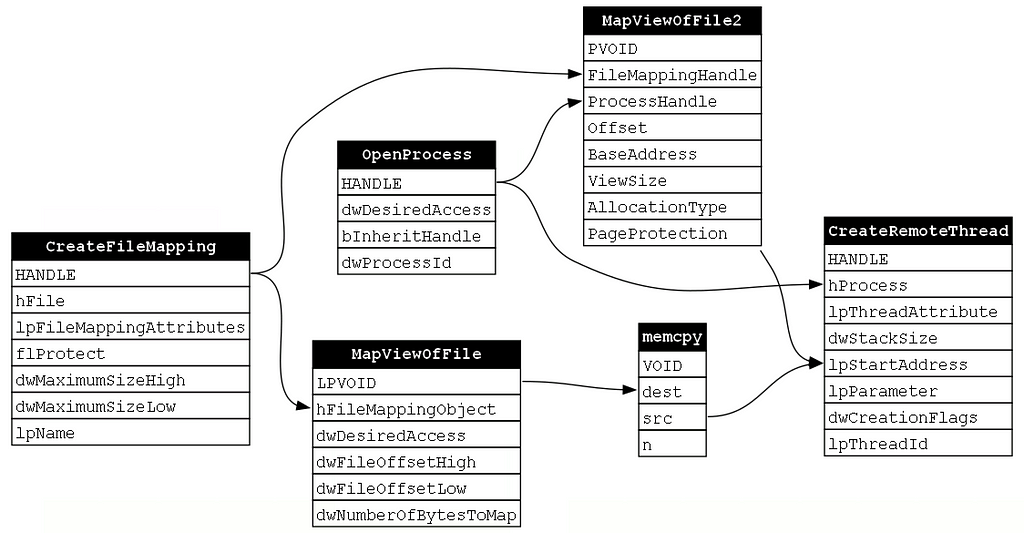
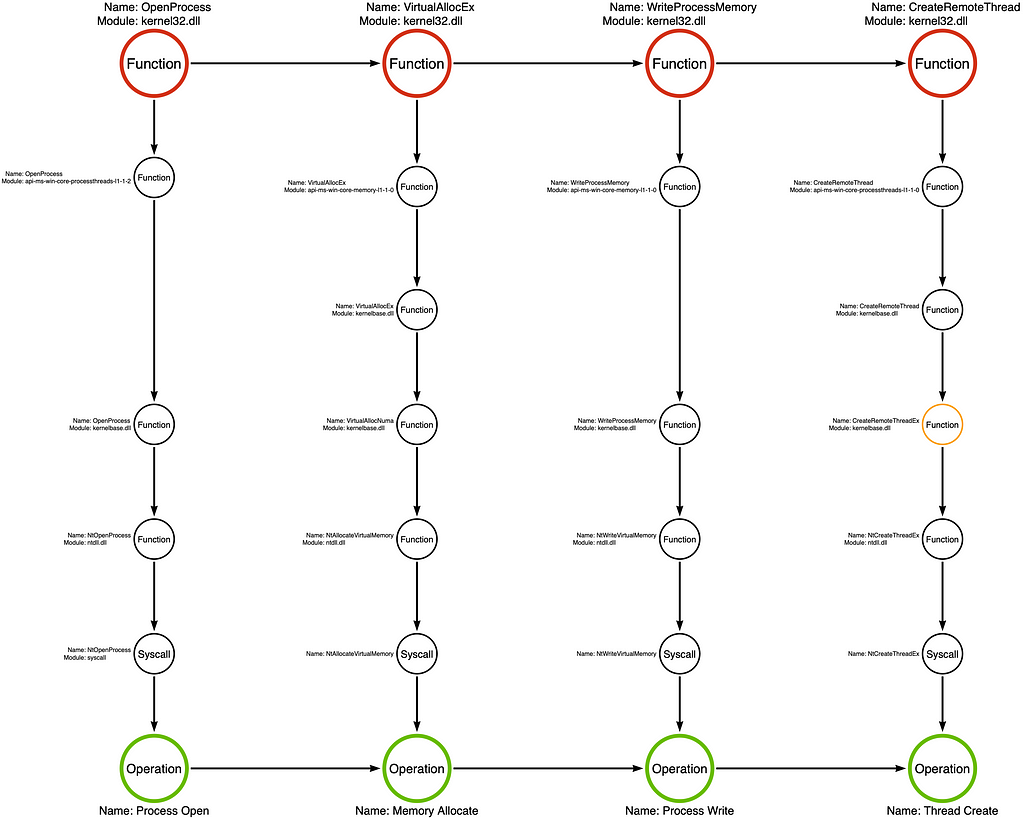
While the function chain is helpful in describing the actual sequence of functions that were called by the sample, a single function chain does not always tell the entire story. In my previous post I introduced functional composition which we then used as a mechanism for evaluating whether two function chains were equivalent. At the end of the post we showed two function chains that ostensibly implemented the same Process Injection variant (seen below).
The two samples called the same functions, however, the samples called the functions in a different order. An obvious question that might arise is “how important is the order of the functions in the chain?” These chains are not literally the same due to the difference in their function order, but are they equivalent? We were able to answer that question using functional composition because both function chains produced the same dependency graph (shown below):
This analysis shows that dependency graphs can be used to evaluate equivalency between samples, but is that the only use case for dependency graphs? In this post, I want to explore a different use case for this analytical tool that will put another tool in our tool belt for understanding how to describe and categorize adversary tradecraft.
Can a single tool implement multiple techniques?
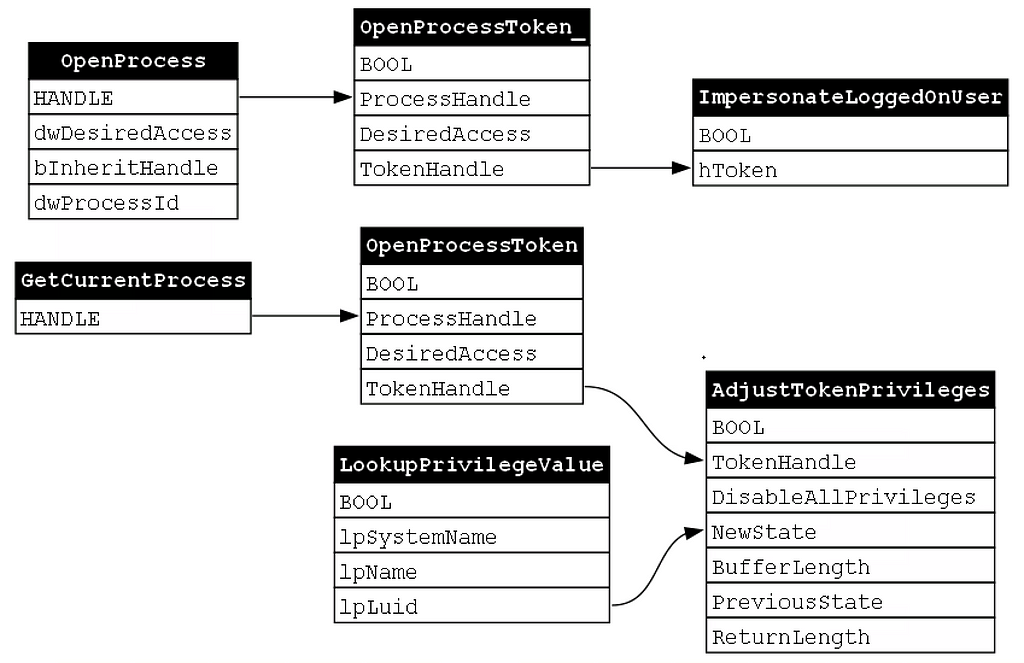
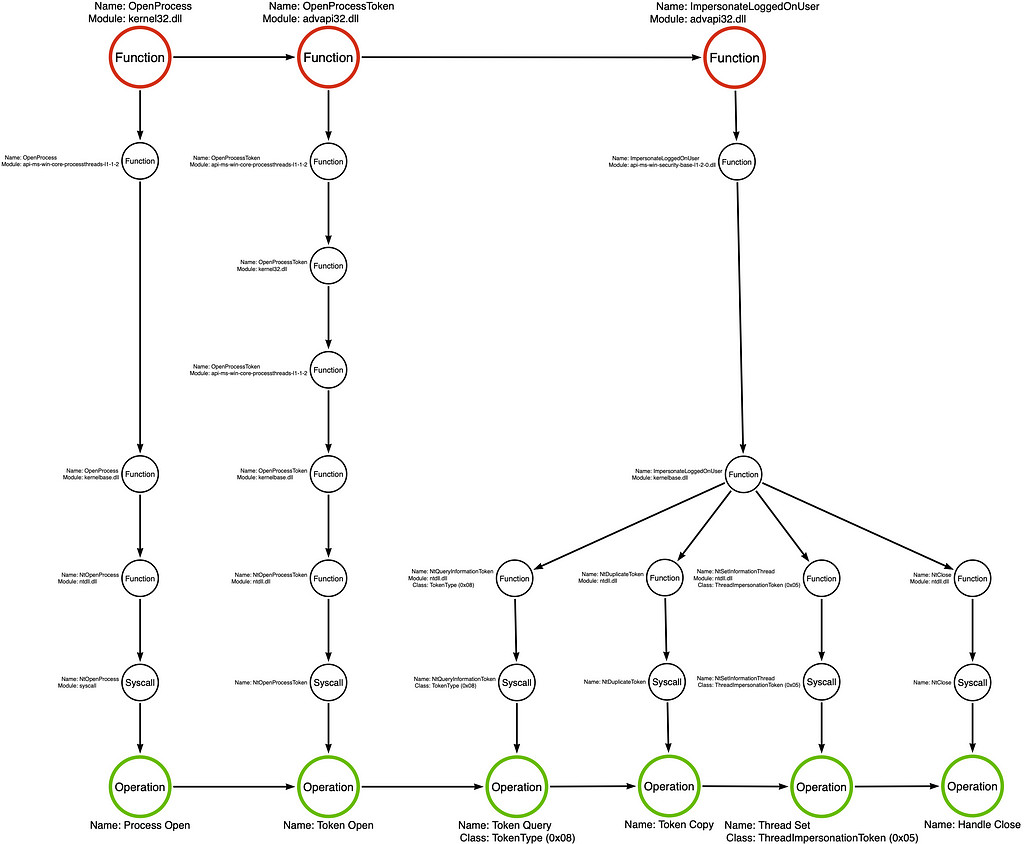
For this section we will assess the function chain implemented in Justin Bui’s PrimaryTokenTheft tool. I’ve included a diagram showing the layout of the code implementation.
Note: I highly recommend spending some time comparing the code itself to this diagram, especially if you are are relatively new to programming or operating system APIs.
The function chain
The result of analyzing the tool is a function chain as shown below:
Function Chain for PrimaryTokenTheft
If we were working towards building a robust behavioral detection rule, we would work to derive the corresponding operation chain. However, in this post, we are interested in looking at the function chain from a different direction. Our goal is to understand how the functions in the function chain are interconnected and what the implications of those relationships are.
Dependency as Techniques
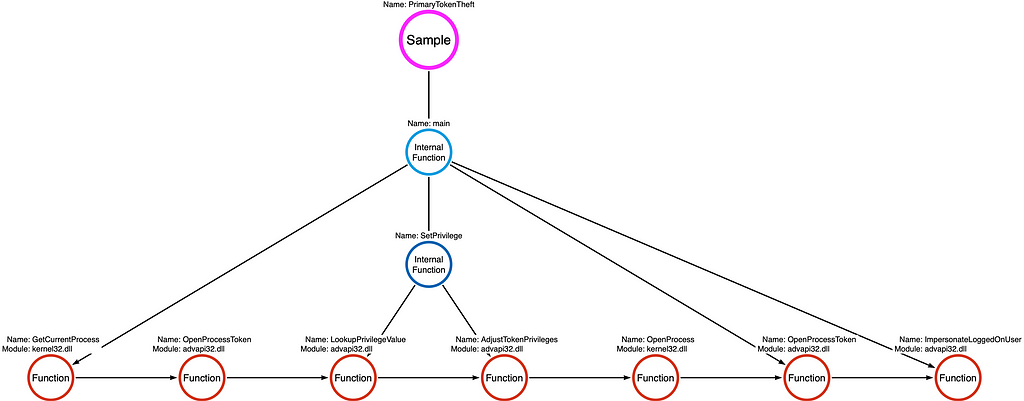
While the function chain is a useful analytical tool, it leaves out a lot of details. For example, it is impossible to tell from the function chain alone how the different functions interact with one another and what the implications of those interactions are. I think of the function chain as viewing the sample in 2D. We are able to derive a general gist of what the sample does, but we are missing something. So what happens when we add an extra dimension, composition, to the mix? I’ve included the dependency graph for the PrimaryTokenTheft sample below:
Dependency Graph for PrimaryTokenTheft
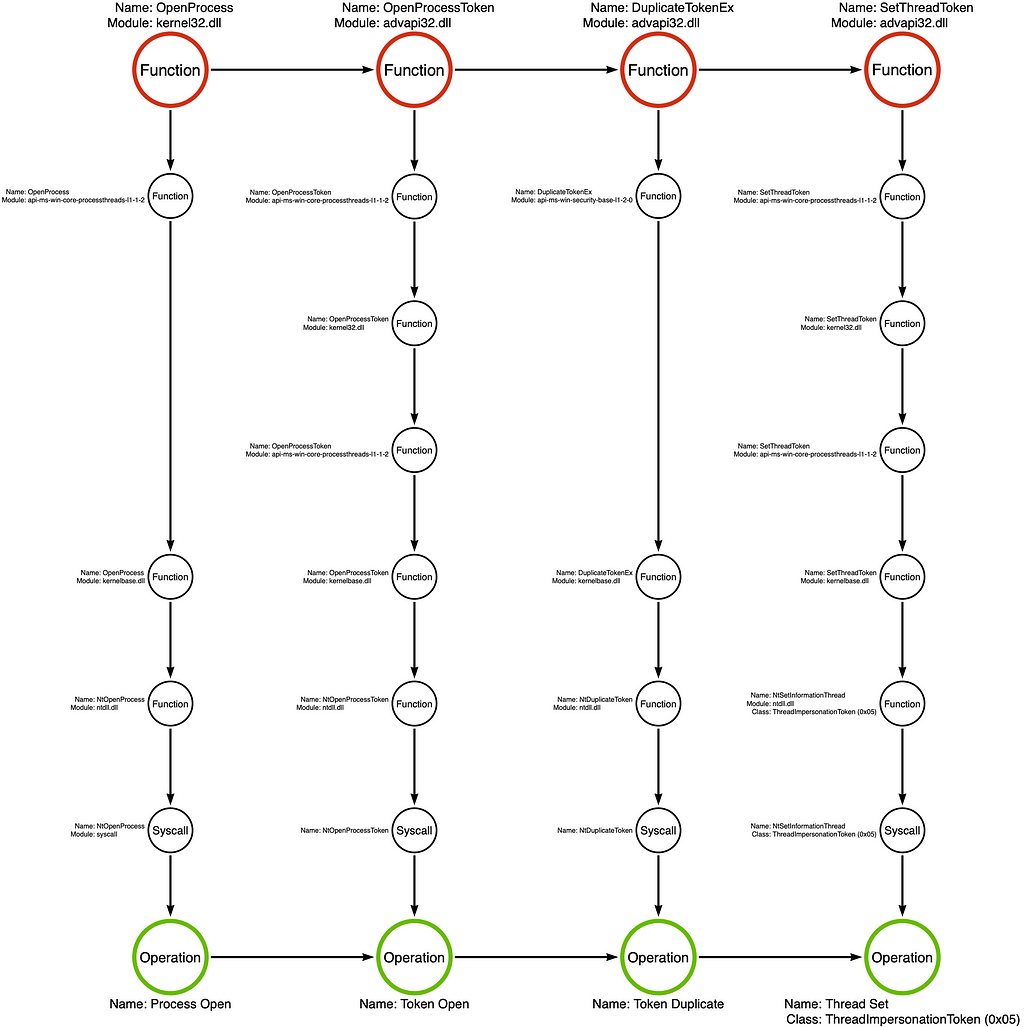
Notice that the functions break out into two discrete/disconnected dependency graphs. The top dependency graph, which I will label as “token impersonation”, is composed of OpenProcess, OpenProcessToken, and ImpersonateLoggedOnUser. The bottom dependency graph, which I will label as “privilege enablement”, is composed of GetCurrentProcess, OpenProcessToken, LookupPrivilegeValue, and AdjustTokenPrivilege. We can then analyze the two dependency graphs to understand what sub-functionality each performs. For example, the token impersonation dependency graph opens a handle to a target process (OpenProcess), opens a handle to the target process’s primary token (OpenProcessToken), applies that token to the calling thread (ImpersonateLoggedOnUser). Thus we can say that the purpose of this dependency graph is to perform token impersonation. Hmmm, token impersonation is the purpose of the tool itself, so what is this second dependency graph responsible for? Let’s take a look! It appears that this second dependency graph opens a handle to calling process (GetCurrentProcess), it opens a handle to its own primary token (OpenProcessToken), it then looks up the value associated with the SeDebugPrivilege (LookupPrivilegeValue), it then enables the SeDebugPrivilege privilege (AdjustTokenPrivileges). If we refer back to the function chain, we can see that the functions that make up the second dependency graph are called first. This is because the SeDebugPrivilege ensures that the calling process is able to perform token impersonation without any issues. For this reason I will refer to this dependency graph as Privilege Enablement for the remainder of this post.
So what are the takeaways from this analysis? An interesting observation is that each dependency graph seems to represent some minimum viable capability. While it is technically possible to create a program that simply calls OpenProcess with no follow on functions, the resulting program will not behave in a consequential way. In order for the program to do anything useful, it must implement the full dependency graph.
Another important observation is that multiple dependency graphs can be implemented within the same sample or tool. We can imagine many situations where the a tool is not required to implement Privilege Enablement as part of its Token Impersonation workflow. If the tool is run as a high privilege context, it would be able to perform the token impersonation without enabling SeDebugPrivilege first.
One Tool, Multiple Procedures
In this section I want to explore an idea that was first pointed out to me by Nathan Davis. He worked with me to learn this methodology and made an interesting finding while applying the ideas from this series to a component of PowerSploit’s PowerUp module. He was building a function chain for PowerUp’s Get-ProcessTokenPrivilege function, when he noticed that the function chain would change slightly depending on whether a specific parameter were specified by the caller or not.
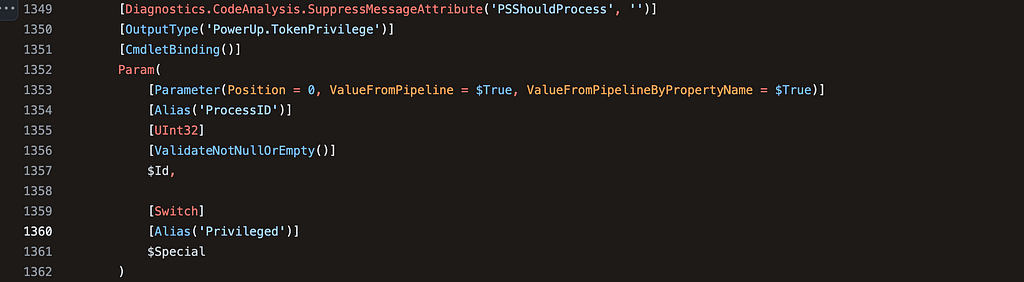
Nathan specifically noticed that the the Get-ProcessTokenPrivilege function took two optional parameters, Id and Special, as shown in the image below:
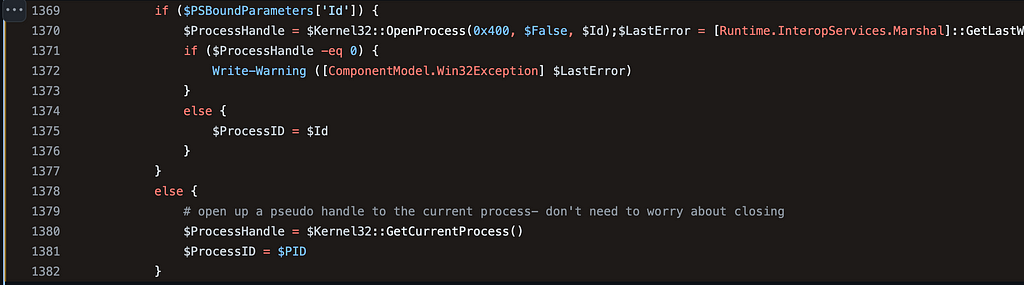
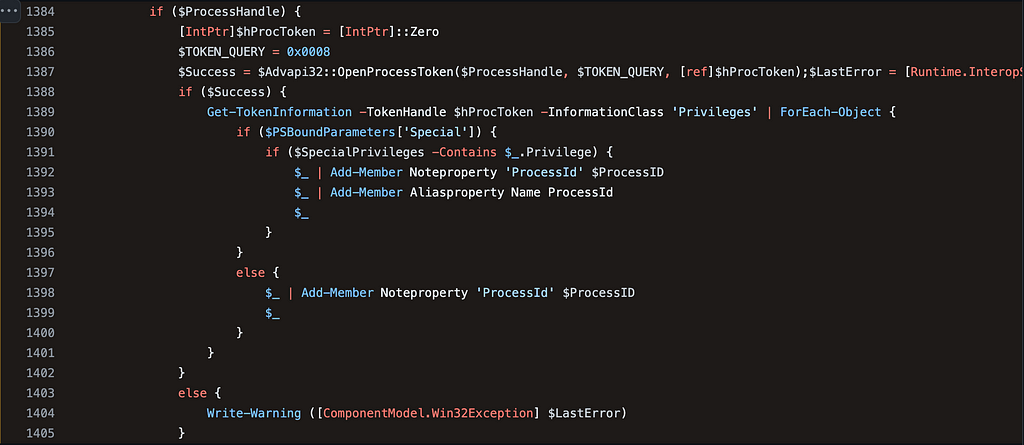
It is quite common for PowerShell functions or command line applications to accept arguments via the command line, but I had not properly considered how different parameters can affect what happens when the application or function is executed. The primary example that Nathan found is shown in the image below.
Notice that the snippet begins with an if statement which specifically checks whether the Id parameter was specified on the command line. PSBoundParameters is a special variable that contains a dictionary of the parameters that were passed to the function. Checking whether a parameter exists within the dictionary is a standard way of checking whether a parameter was specified in when the function was called. This means that the condition for the if statement is checking whether the caller passed the Id parameter. If the Id parameter was passed, then the kernel32!OpenProcess function would be called. However, the else statement indicates that if the Id parameter was not specified, the kernel32!GetCurrentProcess function would be called instead. This means that there are, at least, two paths that might manifest as a result of calling this one function.
Note: This seems obvious in retrospect, but I still think this is valuable exercise for folks to see as they delve into applying the On Detection model to their analysis of attacker tools and behaviors.
OpenProcess vs. GetCurrentProcess
At this point, we know that there are two possible functional variations depending on the Id parameter, but if you’ve made it this far into the series and are like me you are probably wondering just how different those two functional variations might be. Do both functions abstract to the same operation? If so, this function-level difference does not really affect our description of the tool. We see that the output of both functions is stored in the ProcessHandle variable, so they probably are not terribly different. Well, the only way to definitively answer that question is to dig into the function call stacks for both kernel32!OpenProcess and kernel32!GetCurrentProcess.
Note: This next section walks through the generation of function call stacks for both kernel32!OpenProcess and kernel32!GetCurrentProcess. For those that have read the entire series, this is probably repetitive. However, this provides necessary context for those readers that are just joining us AND it never hurts to get another repetition of analysis under our belt.
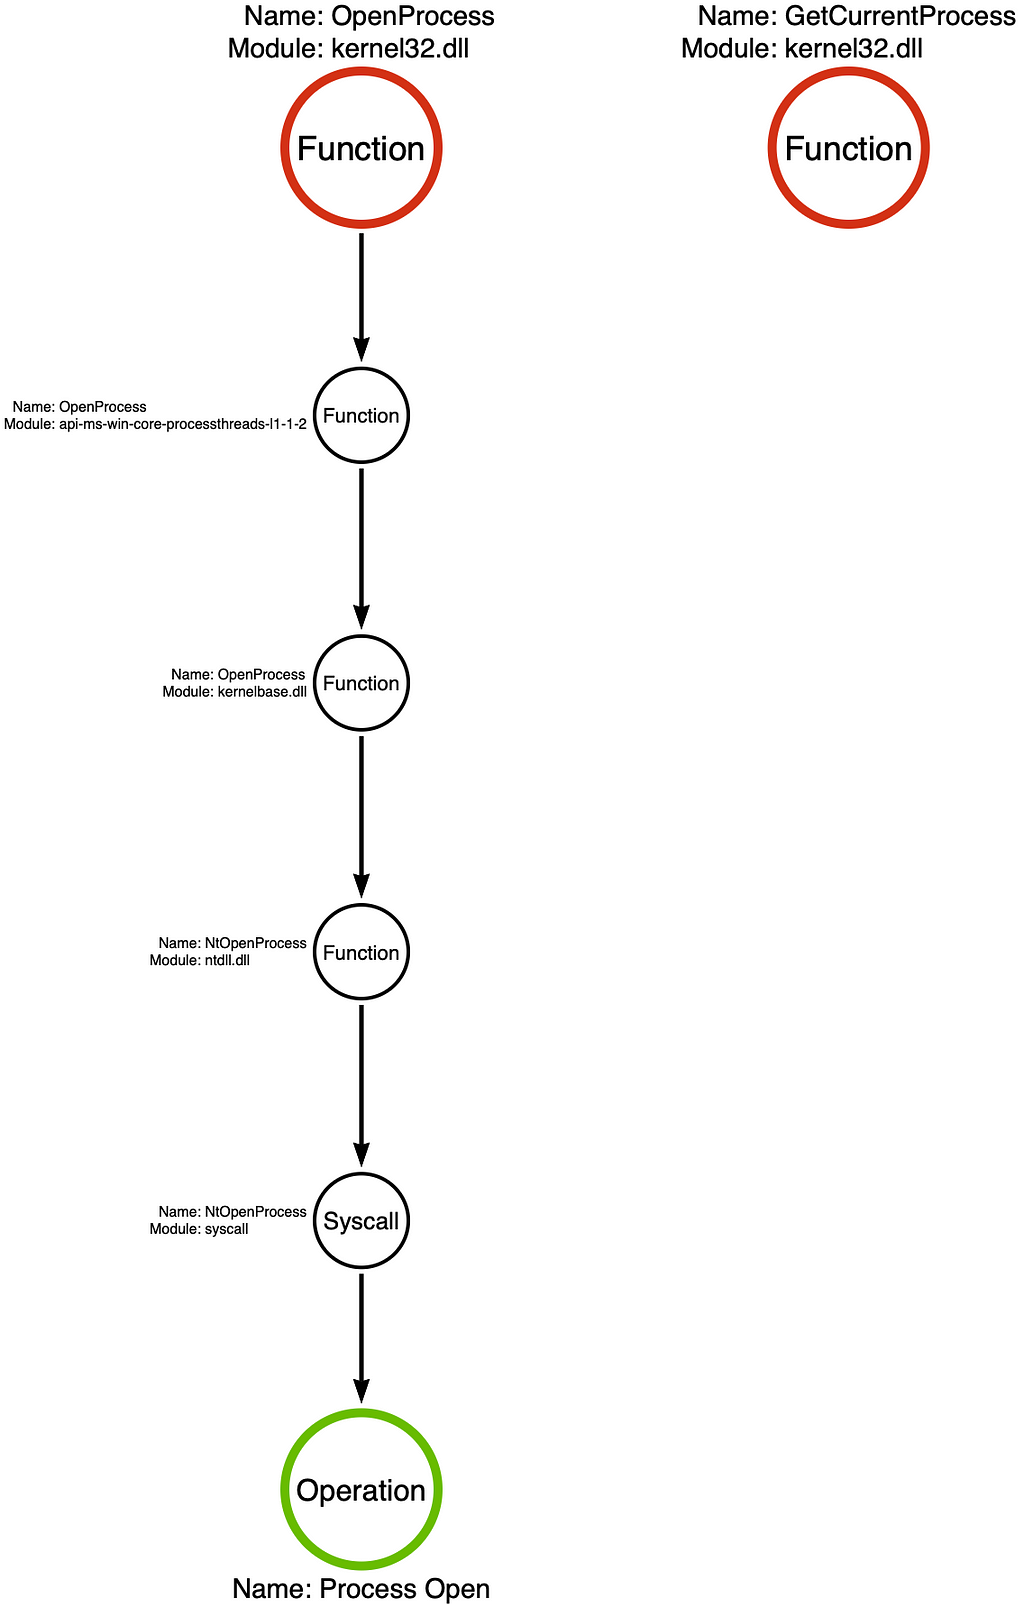
kernel32!OpenProcess
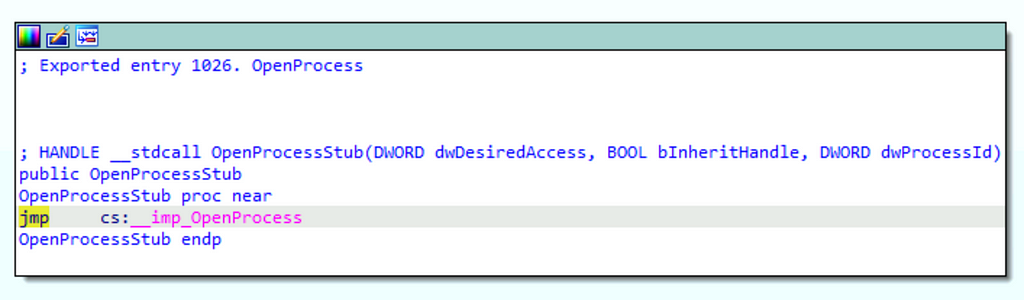
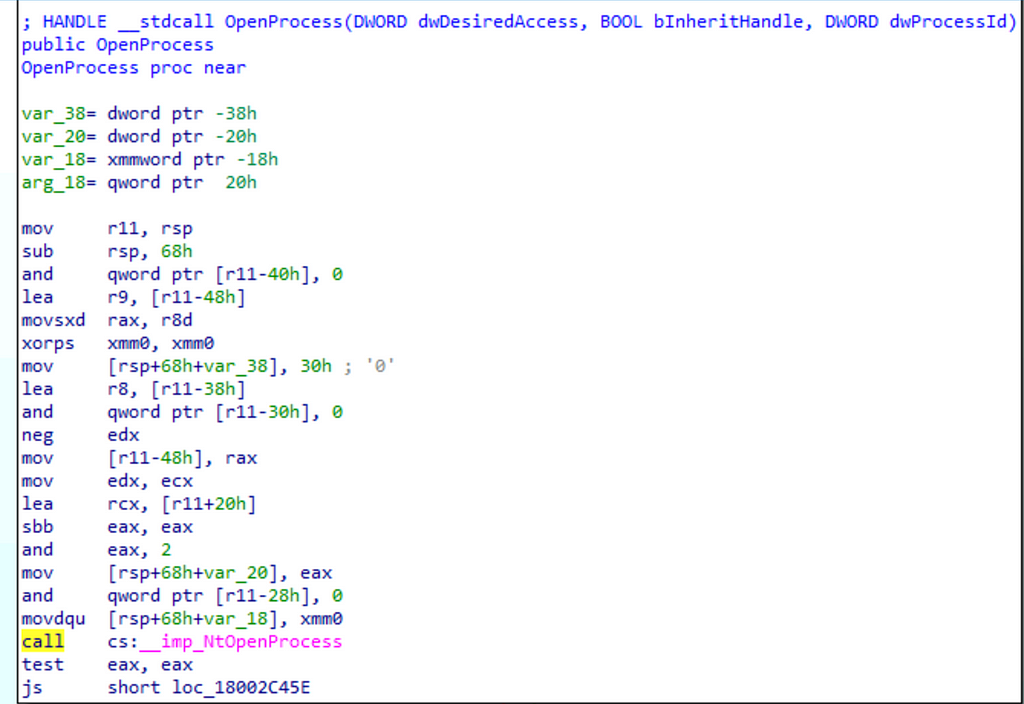
The first step to analyzing a function call stack is to open the specified DLL file in a disassembler (we are using IDA Free in this post). We derive the DLL file from the code on line 1370 in the proceeding image. It specifically refers to $Kernel32::OpenProcess which indicates that it calls the version of OpenProcess that kernel32.dll implements (otherwise known as kernel32!OpenProcess). I’ve included an image of the kernel32!OpenProcess function’s implementation below:
Implementation of kernel32!OpenProcess
Notice the jmp cs:__imp_OpenProcess instruction. This indicates that execution should be redirected to an imported function (indicated by __imp_) named OpenProcess. The import table indicates that kernel32!OpenProcess redirects to api-ms-win-core-processthreads-l1–1–2!OpenProcess.
We can use the Get-NtApiSet function from James Forshaw’s NtObjectManager module to resolve the api-ms-win-core-processthreads-l1–1–2 ApiSet. In doing so, we find that the OS will redirect any calls to api-ms-win-core-processthreads-l1–1–2!OpenProcess to kernelbase!OpenProcess.
Using Get-NtApiSet to resolve api-ms-win-core-processthreads-l1–1–2
Next we can open kernelbase.dll in our disassembler and browse to its implementation of OpenProcess which is shown below:
Implementation of kernelbase!OpenProcess
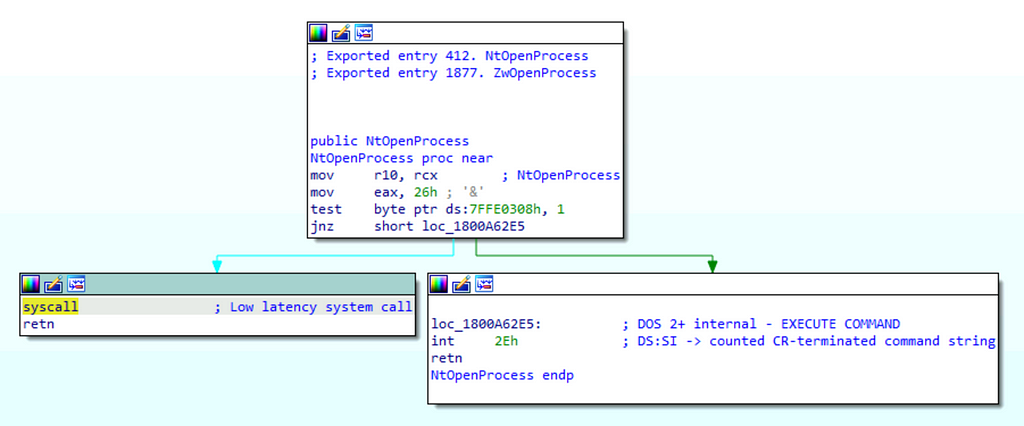
While kernelbase!OpenProcess appears to do a bit more work than kernel32!OpenProcess, we find that it very quickly calls another imported function (__imp_NtOpenProcess). After consulting the imports table, we find that NtOpenProcess is implemented in ntdll.dll. Finally we open ntdll.dll in the disassembler and browse to the implementation of NtOpenProcess, shown below:
Implementation of ntdll!NtOpenProcess
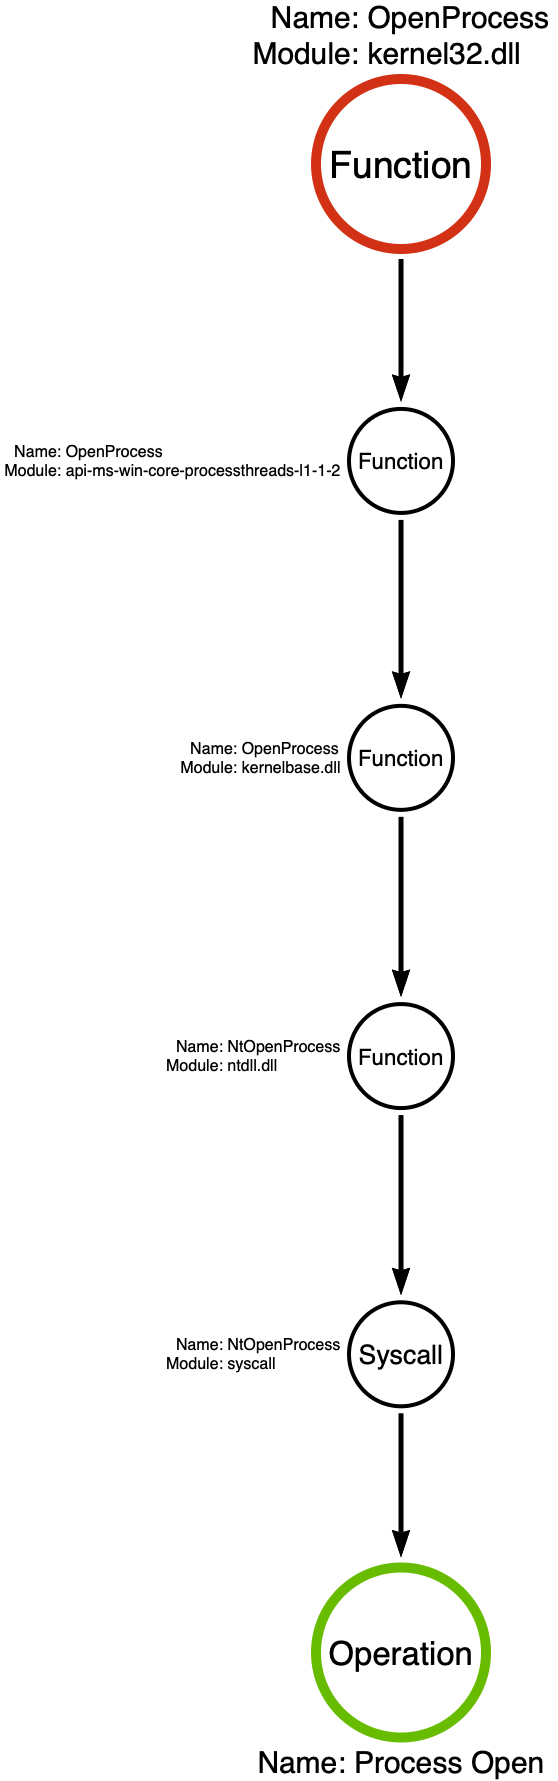
We see that ntdll!NtOpenProcess makes a syscall to a kernel-mode function that we will call NtOpenProcess. We can now use the syscall rule which allows us to summarize a function call stack that ends in a syscall using a single operation, in this case the Process Open operation. With our analysis complete, we can graph the relationship between these functions using a “function call stack” which is shown below. For more information about function call stack, I recommend reading Part 2 of this series.
Function Call Stack for kernel32!OpenProcess
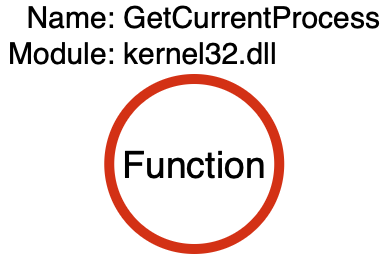
kernel32!GetCurrentProcess
Next we will analyze GetCurrentProcess which, according to line 1380 of the Get-ProcessTokenPrivilege code snippet that is shared above, is implemented by kernel32.dll. We’ve already loaded kernel32.dll into our disassembler, so we can use the Exports tab to view the GetCurrentProcess function’s implementation.
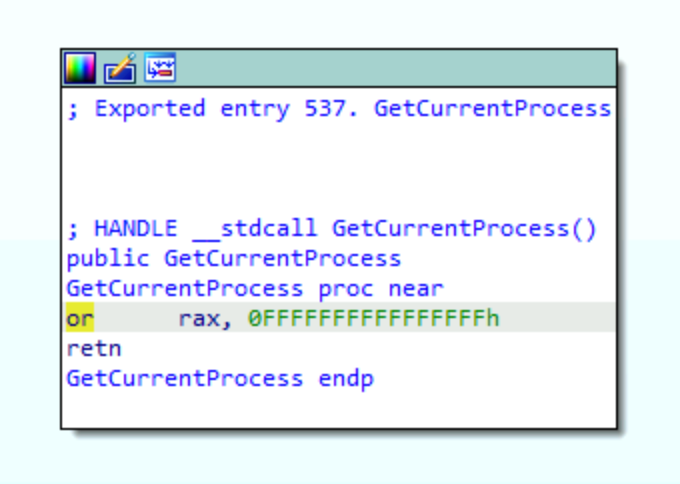
Implementation of kernel32!GetCurrentProcess
The first thing you should notice is that kernel32!GetCurrentProcess does not make a call or jmp of any kind. Instead, it sets the rax register, which is implicitly set to 0, to 0xFFFFFFFFFFFFFFFF (hex) or -1 (decimal) and returns the value. This means it does not make a syscall or remote procedure call, and therefore does not seem to implement an operation within the construct of our model. It turns out that -1 is considered a special “pseudo-handle” by Microsoft. Microsoft describes this pseudo-handle in the Remarks section of the GetCurrentProcess function documentation, “[it] is a special constant, currently (HANDLE)-1, that is interpreted as the current process handle.” This description indicates that it is possible for a developer to skip the call to kernel32!GetCurrentProcess altogether. If the developer is interacting with the calling process’s handle they can pass (HANDLE)-1 directly to the subsequent function call, which will be advapi32!OpenProcessToken in this case. However, the documentation states that Microsoft reserves the right to change this value, so kernel32!GetCurrentProcess provides a mechanism for programmer to avoid a breaking change.
This means that the “function call stack” for kernel32!GetCurrentProcess is quite simple as shown below:
Function Call Stack for kernel32!GetCurrentProcess
If you are like me, you might be wondering, “if all kernel32!GetCurrentProcess does is return -1, then how am I supposed to observe that?” We don’t see a syscall. We don’t see a Remote Procedure Call. What should we be looking for? Unfortunately, the answer is that this activity will likely fly below the proverbial EDR radar. Of course one could hook the kernel32!GetCurrentProcess function, but that would probably be quite noisy and attackers can simply skip the call and pass (HANDLE)-1 directly. This is an example, though, that not all functions correspond to operations, and in those cases where they do not we can basically ignore them with respect to our model.
Comparison
Now that we’ve created the respective function call stacks for kernel32!OpenProcess and kernel32!GetCurrentProcess we can compare them to understand the difference between the two routes that Get-ProcessTokenPrivilege affords us. When a Process Identifier is specified to the Id parameter, the Process Open operation is executed, however, if the Id parameter is not specified then the function focuses on the calling process which can be done without a full operation.
OpenProcessToken and GetTokenInformation
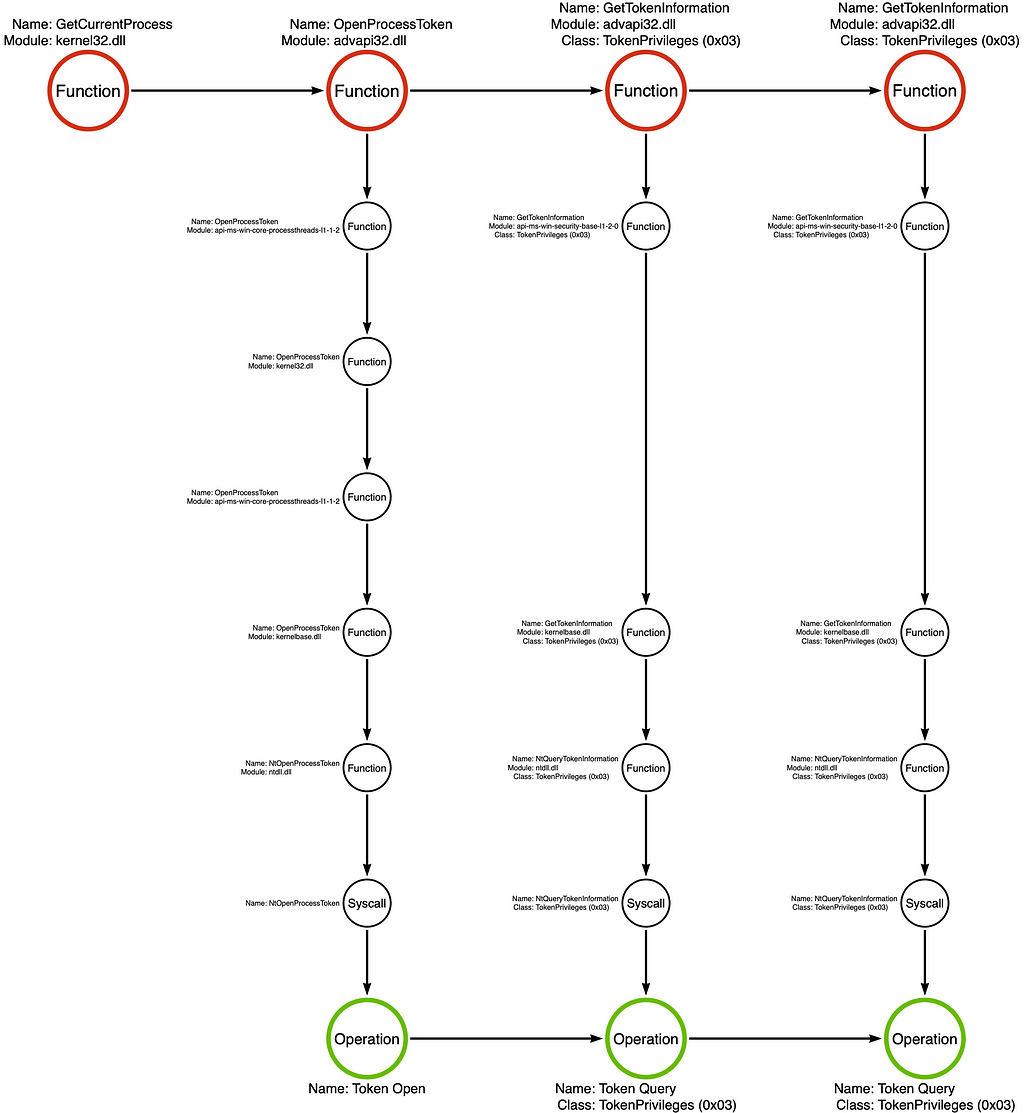
After obtaining the handle, both paths converge. We first see, on line 1387, the ProcessHandle that was returned from either OpenProcess or GetCurrentProcess passed as a parameter to advapi32!OpenProcessToken. This is a simple function that opens a handle to the process’s primary token.
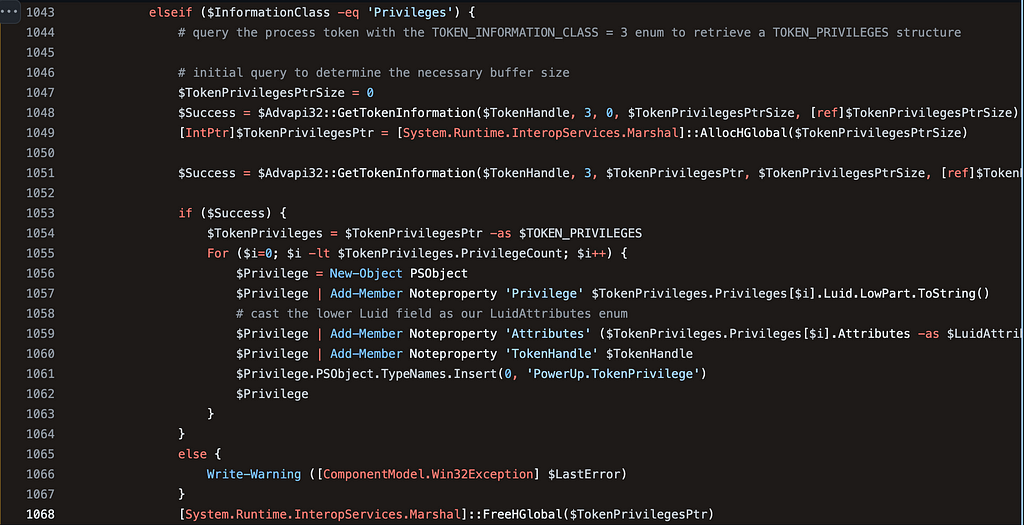
Next, on line 1389, we see a call to an internal function called Get-TokenInformation. Notice that the InformationClass parameter is set to “Privileges.” To learn more about the Get-TokenInformation function, we can browse to its source code which is located in the same file, but on line 936. If we look through the functions implementation, we eventually find some conditional branching that is interested in the InformationClass parameter. Remember that Get-ProcessTokenPrivilege passed the string “Privilege” to this parameter? Well on line 1043 we find the section of code that is executed when InformationClass equals “Privileges.”
We immediately see two calls to advapi32!GetTokenInformation. This behavior of calling the function twice may seem strange at first, but it is following the function’s intended use case. The problem is that the size of the TOKEN_PRIVILEGES structure is variable, so the first call is to ascertain the size of the structure and the second call is to retrieve the values.
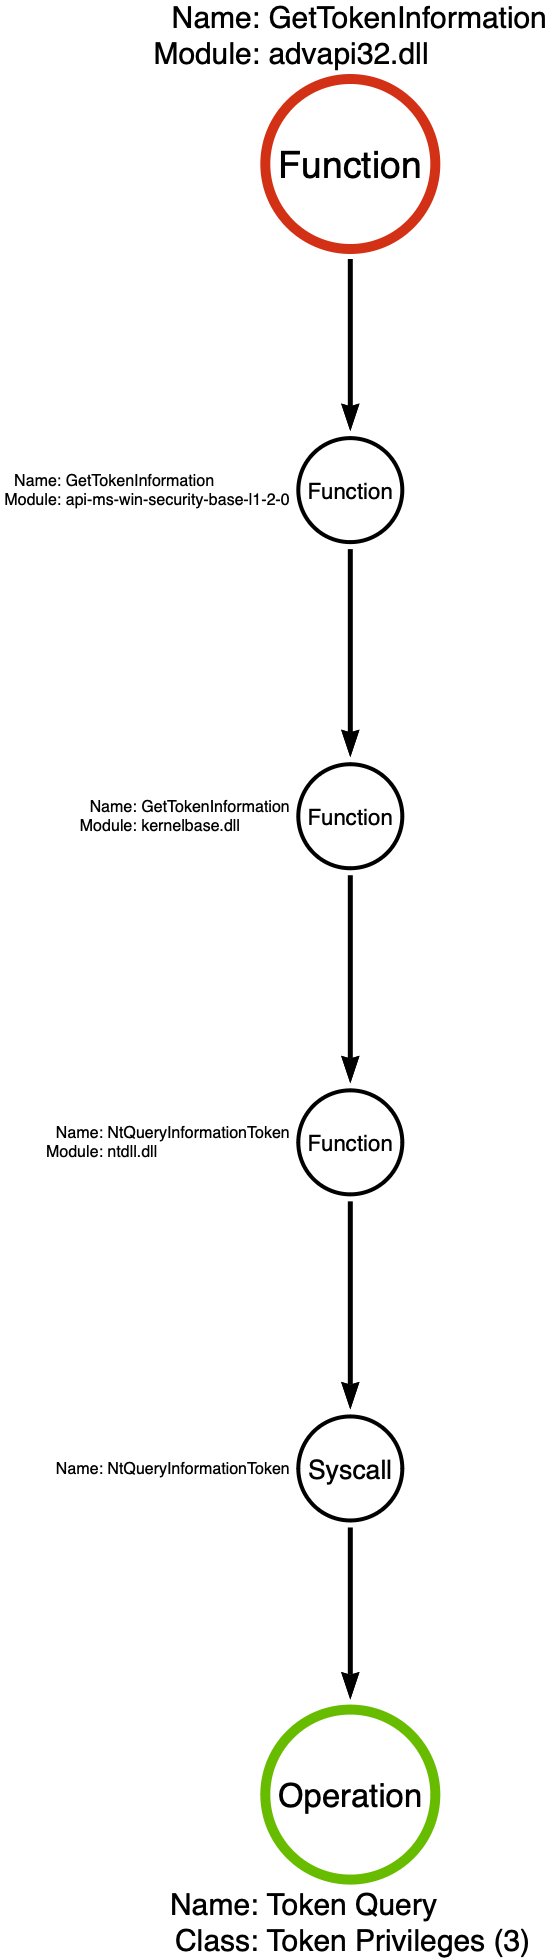
Notice that the second parameter passed to advapi32!GetTokenInformation is 3. This is the information class that corresponds with TokenPrivileges. When you hear information class, you should immediately start thinking about sub-operations. When we dig into advapi32!GetTokenInformation, we find that it eventually calls the NtQueryInformationToken syscall, as expected. This means that we would want to focus on the sub-operation which would be Token Query — TokenPrivileges. I’ve included the function call stack for those following along.
CloseHandle
Finally, we have another fork in the road based on the use of the Id parameter. If the Id parameter was specified by the caller kernel32!CloseHandle is called by the function. If not, the function does not call kernel32!CloseHandle. The reason for this is that the pseudo-handle does not have to be closed explicitly, while the real handle, opened with kernel32!OpenProcess should be.
Operation Chain Comparison
We can now compare the operation chains for the two routes that are afforded to us by Get-ProcessTokenPrivilege. The first path, top, occurs when a Process Identifier is passed to the function via the Id parameter. The Id is meant to specify a target process for whom’s token privileges should be checked. The second path, bottom, more or less represents the default behavior which is focused on the calling process. Notice that these two chains are identical for the middle three operations with the second chain missing the first, Process Open, and last, Handle Close, operations. We know from prior analysis that these differences are minimal in practice, so we should be able to design a detection strategy that handles both situations, given necessary telemetry.
Conclusion
While there are almost certainly better examples of a single parameter drastically changing the function/operation chains that are executed, this is a simple example that demonstrates that a tool cannot simply be described using a single chain. This is why questions like “What does mimikatz do?” are so difficult to answer. The proper response is that mimikatz is a tool that has numerous modules (i.e., sekurlsa, kerberos, dpapi, etc.) which have numerous commands (i.e., logonPasswords, tickets, pth, minidump), which have numerous parameters. Of course these parameters may or may not affect the function chain that is executed, but the idea stands. It is often not possible to describe what a tool does in one succinct answer. Given a specific command line, it is possible to produce the function chain that would be executed. It is also possible to use the module, command, parameter options to map all possible function chains that mimikatz might execute. It is, however, important to understand that using this approach we would be using the command line to derive the function chain which is a more abstract description and is therefore generalizable to many non-mimikatz implementations as well. So we should think of a command line as the beginning of a path to understanding the behavior rather than the end of the detection road.
Welcome back to Part 15 of the On Detection: Tactical to Functional blog series. I wrote this article to serve as a resource for those attempting to create tool graphs to describe the capabilities of the attacker tools or malware samples they encounter. Throughout this series, I’ve analyzed many API functions and summarized my analysis through function call stacks. As I expanded the range of functions I’ve analyzed, I noticed that there is not a one-size-fits-all solution when creating function call stacks.
Overall, I’ve found that there are, at least, seven different types of functions:
Standard Functions (Syscalls)
Sub-operations (NtQueryInformation* or NtSetInformation*)
Remote Procedure Calls (NdrClientCall*)
Local Security Authority Functions (LsaCallAuthenticationPackage)
Driver IOCTLs (DeviceIoControl or NtFsControlFile)
Compound Functions (Multiple operations)
Local Functions
In this article, I work to categorize functions based on their function type. To do so, I will introduce the category and what makes its functions unique, share a sample whose critical function exemplifies the category, provide the sample’s tool graph and explain how it works, and finally break down the specific function call stack that demonstrates the category in question. Ultimately, you should have the toolset to identify the category to which a given function belongs based on a few heuristics I will share along the journey. This knowledge will empower you to better understand and categorize the attacker tools or malware samples you encounter.
This article is broken down into sections that describe and demonstrate the categories. I subdivide each section further into a “category introduction,” where I will explain the category at a high level; the “sample,” where I will introduce the tool or malware sample that we will analyze to learn about the category; the “tool graph,” where I will explain how the sample implements its functionality; and the “function call stack,” where I will focus on the sample’s critical function which exemplifies the category of focus.
While this article follows several relevant articles that examine individual function types in depth, I consider it more of a preamble to such deep dives. Here, I will introduce two or three new function-type categories I have not previously discussed, but I plan to write a subsequent deep dive on each eventually.
1. Standard Function (syscall)
The first and most common category is the so-called standard functions. These functions are standard because they represent the most common construction and serve as excellent starting points for anyone interested in gaining experience building function call stacks. Standard functions typically involve multiple layers of redirection between DLLs but will inevitably pass the caller-supplied arguments to a system call (syscall) for execution in the kernel. If you’ve followed this series, you will be highly familiar with standard functions and know that we use the syscall as an abstraction layer, which I call an operation. As we progress into other categories, we will see that the operation will remain, but we will derive it differently.
Sample
Our standard function sample comes from DGRonpa’s excellent Process_Injection repository. I enjoy this repo because they have created simple proof-of-concept implementations for the Process Injection technique’s diverse set of procedures. If you are just getting started with implementing the analytical process I present in this series, I recommend you check out this project. It demonstrates how slight implementation changes can have a massive impact on the mutual detectability of malware samples. This article will focus on the Shellcode_Injection.cpp sample, which implements the canonical process injection procedure. For those unfamiliar with process injection, it is primarily a defense evacuation technique used by attackers to inject or migrate their malicious code into an otherwise legitimate process, thus making them less susceptible to detection.
We can construct the tool graph by analyzing the source code at the link in the previous section. In doing so, we see that the sample begins by opening a handle to the target process, the process that the attacker intends to inject their code into, by calling the kernel32!OpenProcess function. Next, the code passes the process handle to kernel32!VirtualAllocEx. VirtualAllocEx is a function that allows an application to allocate a buffer in the memory of a different or remote process. The memory buffer will hold the attacker’s shellcode. Next, the sample writes shellcode to the newly allocated buffer via the kernel32!WriteProcessMemory function. Finally, the sample calls kernel32!CreateRemoteThread to execute the shellcode in the target process, thus finalizing the injection routine.
Function Call Stack
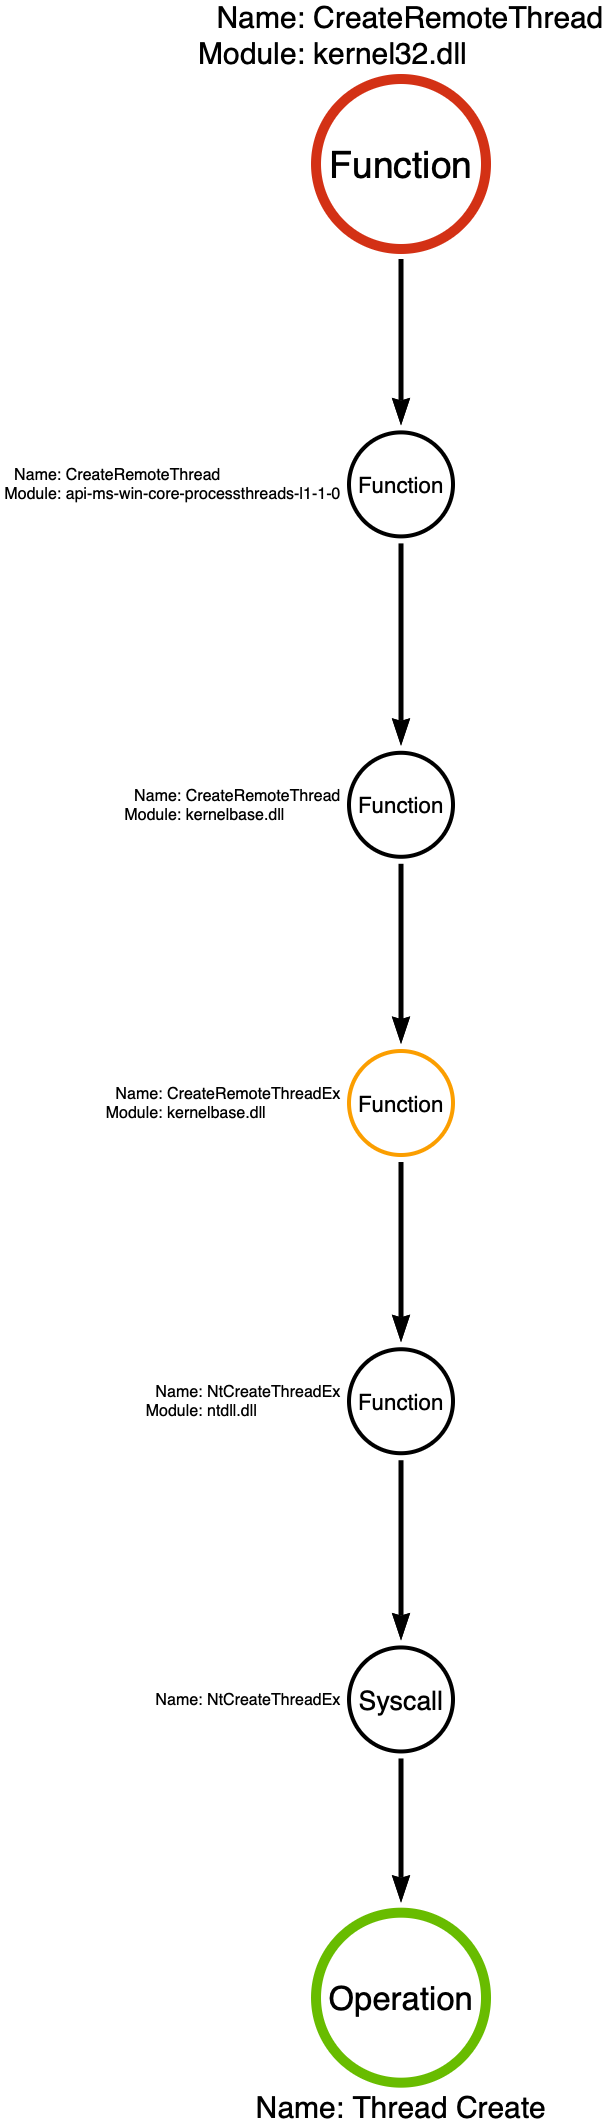
Function Call Stack: kernel32!CreateRemoteThread
Based on my analysis of this sample, it appears that kernel32!CreateRemoteThread is the sample’s critical function. I attribute this choice to the fact that CreateRemoteThread is the function that causes the injection. When the sample calls CreateRemoteThread, we can say that process injection has occurred. Let’s take a look at the function call stack for kernel32!CreateRemoteThread. It is worth understanding the general flow we expect in standard functions.
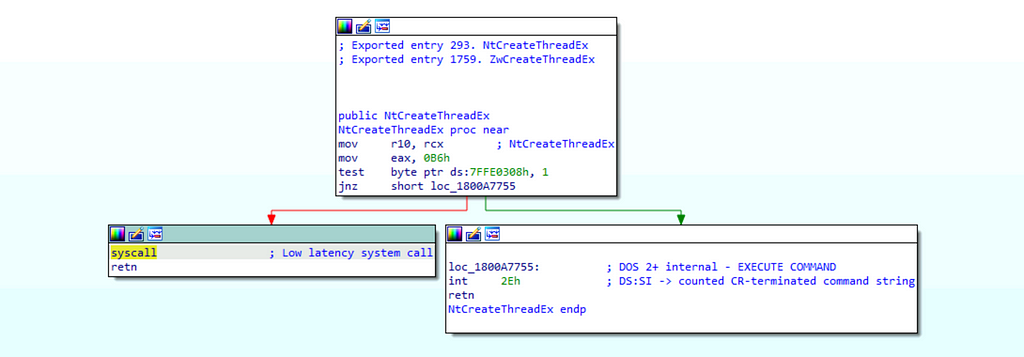
By analyzing the function call stack, we find that the final function, before the Operation, is a system call (syscall) named NtCreateThreadEx. Syscalls, like NtCreateThreadEx, are responsible for transitioning execution from user-mode to kernel-mode. This transition serves as a boundary whereby analysts can treat the kernel-side functionality as opaque, as it is not standard for a user-mode application to interact with kernel code except through very specific windows like syscalls.
2. Sub-Operations
Now that we have built the foundation, we can look at functions that offer a slight variation. Like Standard functions, this next function-type category is also based around a syscall but provides a bit more variation that must be accounted for by analysts. I call this group of functions Sub-Operations. These functions are often difficult to discern at the Win32 API layer but become evident at the Native API or Syscall layers due to a unique naming convention where the Native API and Syscall are referred to by Nt(Query/Set)Information* where the * represents a specific object type such as Process, File, etc.
For more detailed information on functions in the sub-operation category, I recommend reading Part 14 of this series.
Sample
To demonstrate the Sub-Operation category, we will investigate a sample that Jonathan Johnson wrote for our Malware Morphology workshop. This sample, called Sample 1, implements a simple version of Token Impersonation, and we will find that its critical function is a Sub-Operation.
I encourage you to check out the full workshop to see how attackers can change their approach when facing different constraints or circumstances. The slides and labs are available in the linked GitHub repository, and a video recording of the workshop lecture is available on NorthSec’s YouTube channel.
Tool Graph
Tool Graph: Malware Morphology Sample 1
Let’s analyze Sample 1’s source code to build the tool graph. This sample starts by calling kernel32!OpenProcess to open a handle to the target process. In this case, the target process is the process from whom the attacker wants to impersonate. Next, it passes the process handle to advapi32!OpenProcessToken and opens a handle to the target process’s primary token. The primary token represents the user context the attacker is after. While the attacker now has access to their target token, Windows does not allow a process to impersonate the primary token of a different process, so Jonny calls advapi32!DuplicateToken to make a fresh copy of the token. Finally, he passes the duplicated token to advapi32!SetThreadToken to execute the impersonation. Finally, Jonny follows good programming practice by cleaning up the handles he opened by calling kernel32!CloseHandle three times. It is important to note that these calls to CloseHandle are purely optional, so it is plausible that a malicious implementation may exclude them.
Function Call Stack
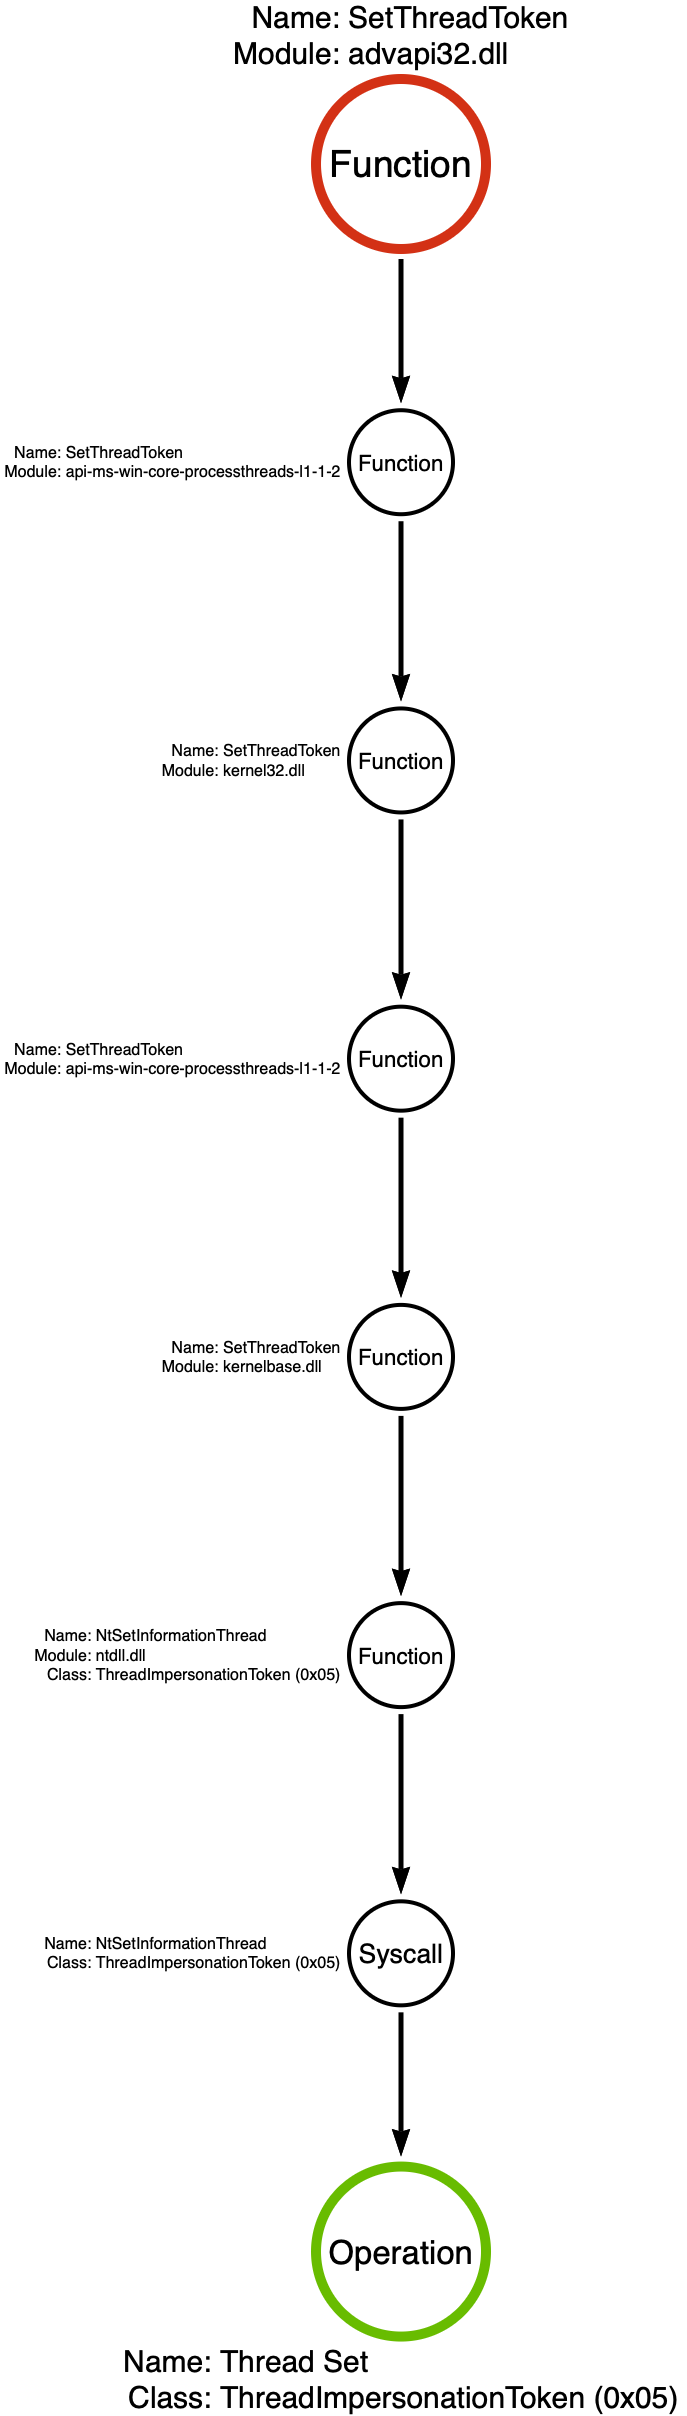
Function Call Stack: advapi32!SetThreadToken
When it comes to Token Impersonation, the moment of impersonation represents the critical point in the function chain. As a result, we can identify advapi32!SetThreadToken as the crucial function in the function chain.
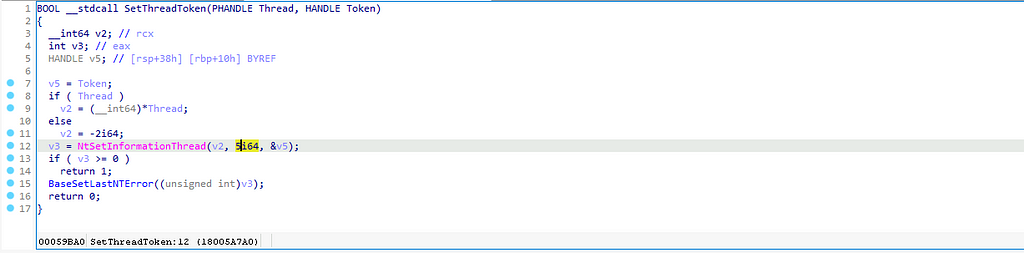
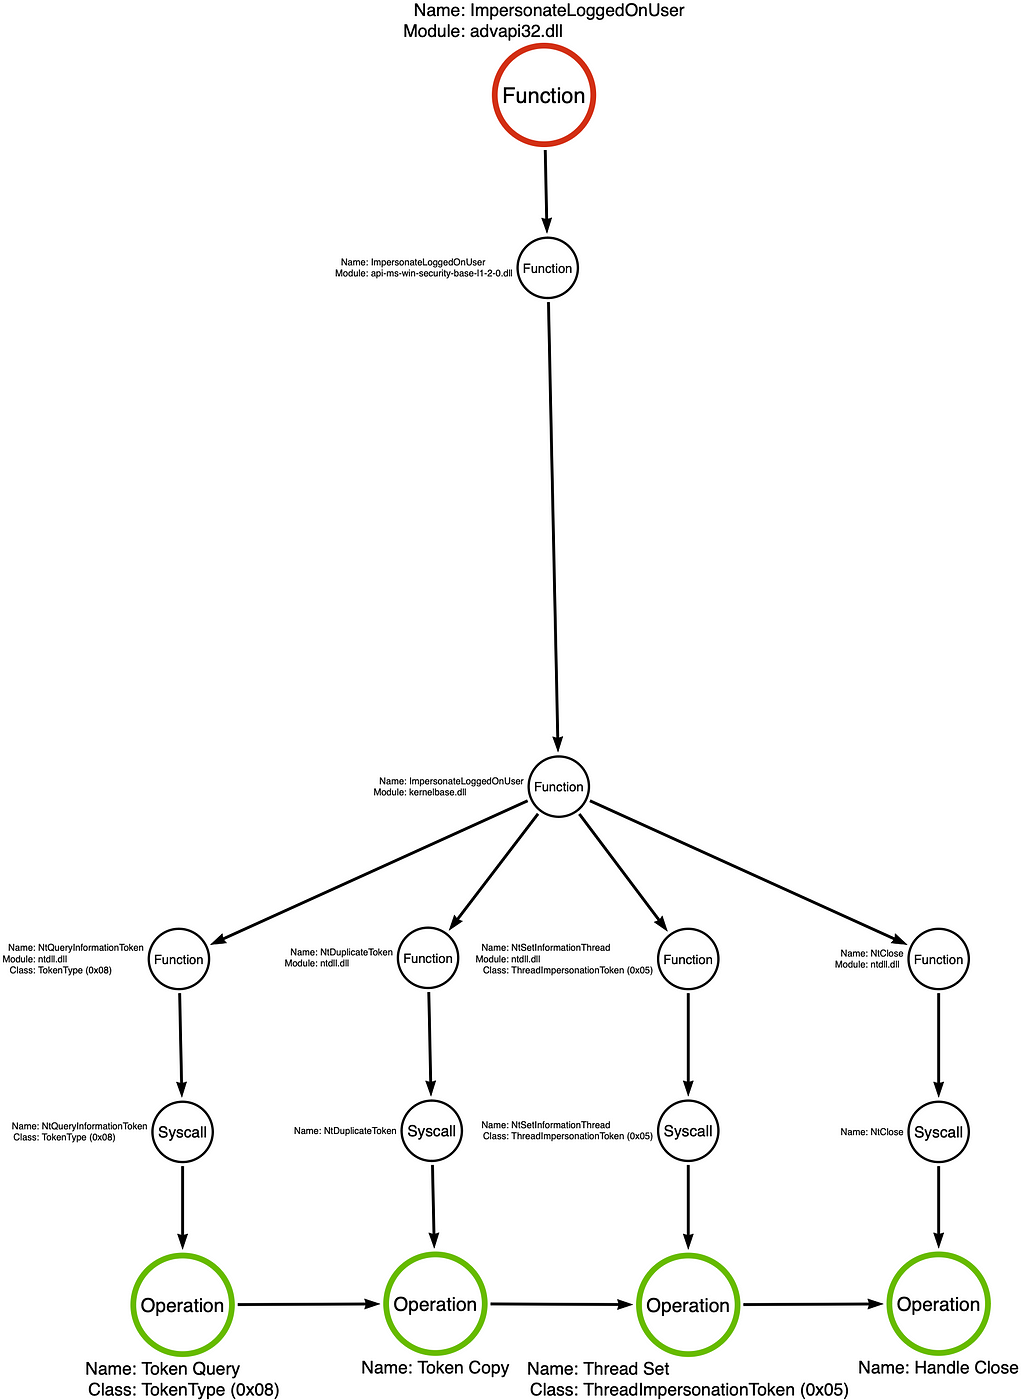
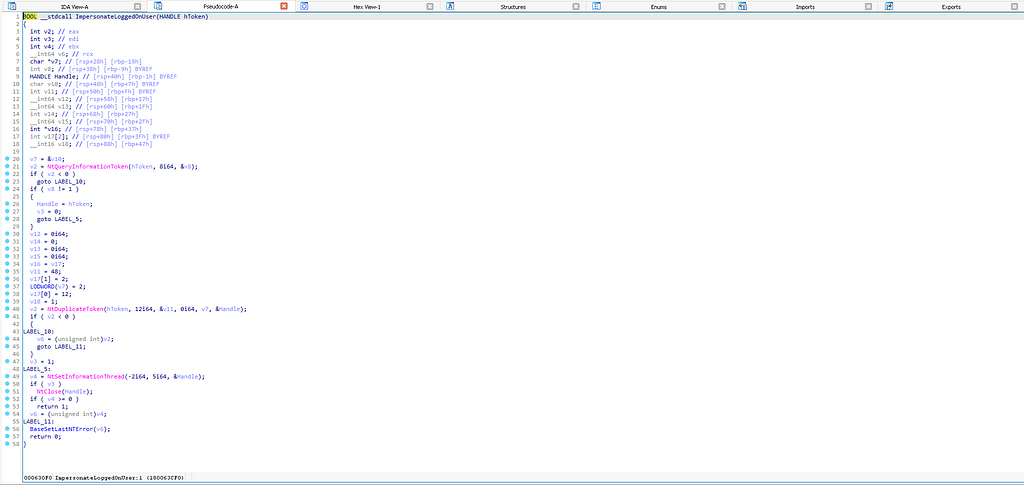
The function call stack, shown below, appears to follow a similar pattern to the Standard Function. However, the implementation diverges when the code reaches kernelbase.dll. In this case, the high-level function, advapi32!SetThreadToken is a wrapper around a more generic low-level function called ntdll!NtSetInformationThread. In Part 14 of this series, I discussed a class of functions called Nt(Set/Query)Information* that facilitate the setting (writing) or querying (reading) of metadata properties for the target object specified by the *, which in this case happens to be a Thread. The caller specifies which specific metadata property to query or set via an information class.” Each object type has a unique set of information classes. You can see in the screenshot below that SetThreadToken specifies information class 5 via the second parameter, which corresponds to ThreadImpersonationToken.
For this category of functions, the information class is critical for properly assigning the operation. If we treated advapi32!SetThreadToken as if it were a Standard Function, we would derive the operation from the syscall, NtSetInformationThread, meaning the operation would be Thread Set. The problem is that the Thread Set operation covers ALL of the Thread’s metadata properties, including properties irrelevant to token impersonation, such as ThreadIoPriority. While it may be interesting to know whether someone changed a thread’s IO priority, that change does not indicate Token Impersonation. All said, there are 41 Thread information classes (metadata properties), and only one is relevant to this particular procedure. Therefore, we require a way to differentiate between Thread Set operations, and the most natural option for doing so is using the information class as an additional indicator. Thus, the resulting operation is Thread Set: ThreadImpersonationToken.
3. Remote Procedure Calls (NdrClientCall4)
Now, we’ve reached the categories I have not yet covered in this series. The first is related to remote procedure call (RPC) procedures. Functions built on RPC Procedures do not result in syscalls, at least not directly. Instead, they implement the client component of the RPC client/server relationship. In the RPC model, the client and server can exist within different processes or even on different systems. Previously, I mentioned that syscalls are responsible for transferring execution from user mode to kernel mode. Similarly, an RPC procedure transfers execution from the client application, the Win32 API function, to the server application. This process is commonly referred to as Interprocess Communication (IPC). Especially in cases where the client and server exist on separate systems, this boundary is at least as robust as the user mode/kernel mode boundary. A key feature of RPC is that the server component generally constrains the set of sub-routines a client can execute on the server. This constraint creates an opportunity to establish our operation abstraction layer.
Sample
For this third class of functions I decided to use a BOF called sc_create that is included in the TrustedSec CS-Remote-OPs-BOF project. Based on the commit history, it appears that it was originally written by Christopher Paschen. The BOF’s name indicates that Christopher reimplemented the functionality of the sc.exe create command. I’ve found that BOFs provide a great starting point for analysts that are trying to get their feet wet in this typeof analysis. Their simplicity can primarily be attributed to the fact that BOF often implement very discrete capabilities which limits the amount of digging that one must do.
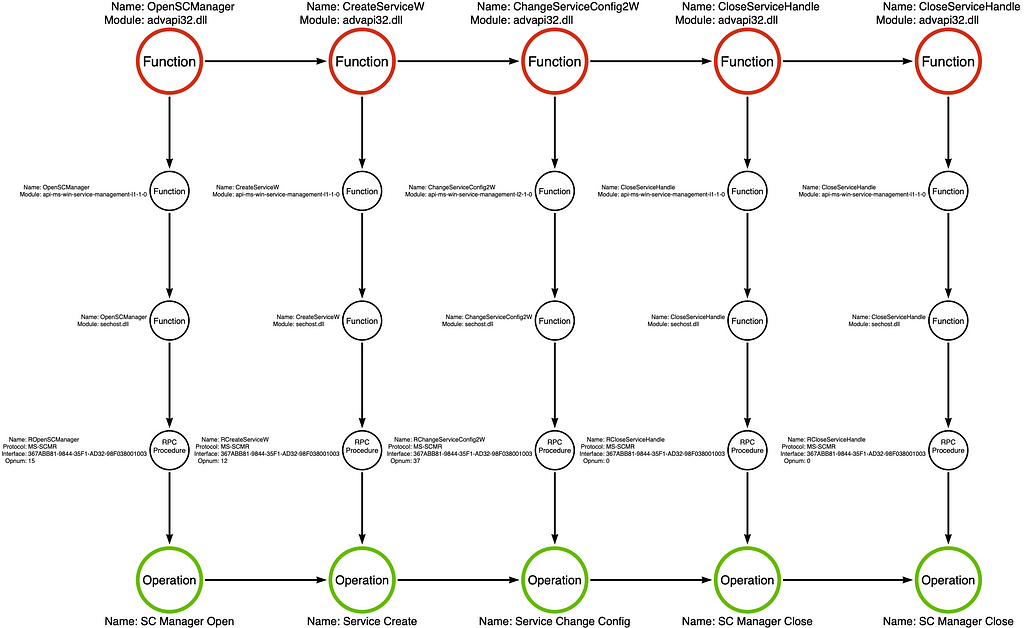
Our analysis of the sc_create BOF found that it first opened a handle to the Service Control Manager (SCM) via the advapi32!OpenSCManagerW function. Next, the BOF creates the target service via the advapi32!CreateServiceW function. While the operator can specify specific service details such as its name, binary path, and start type during creation, some other features must be added after the fact. To make these additional changes, the tool calls the advapi32!ChangeServiceConfig2W function. Finally, we see the tool close the handles to the newly created service and the SCM by calling the advapi32!CloseServiceHandle function twice.
Function Call Stack
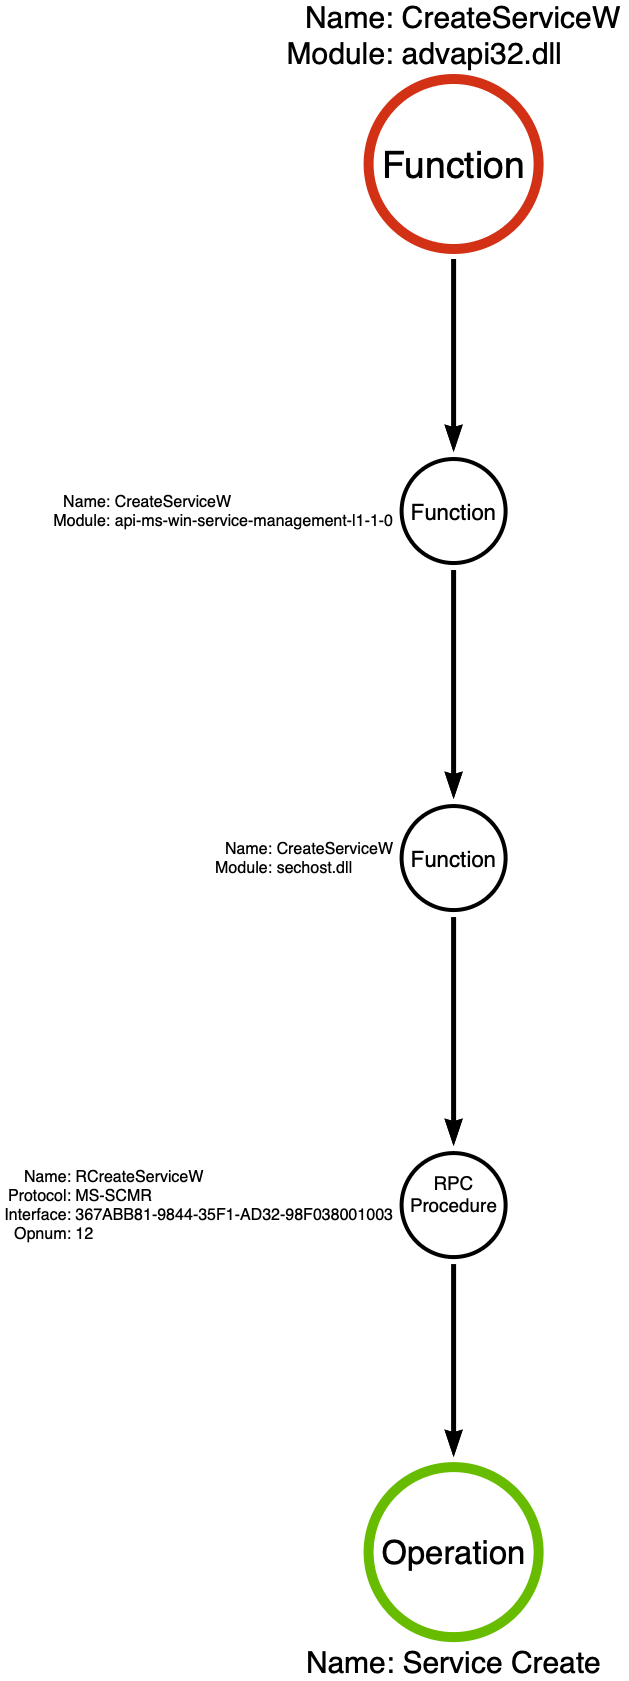
Function Call Stack: advapi32!CreateServiceW
Since the technique in this example is Service Creation, it makes sense to choose advapi32!CreateServiceW as the sample’s critical function for investigation.
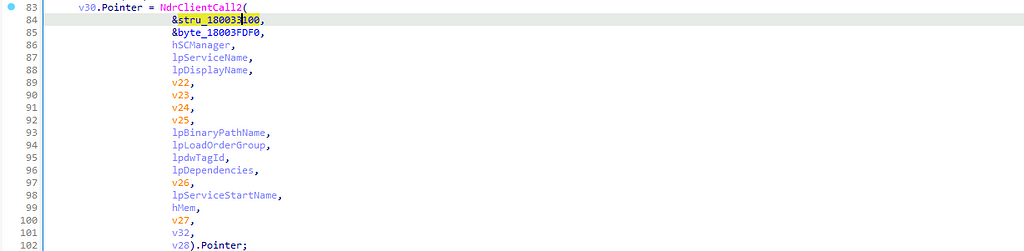
CreateServiceW is the first function category that does not make a syscall. Technically, it does EVENTUALLY, but there is an important caveat. You see, advapi32!CreateServiceW is an API function wrapper around an RPC Procedure. In the image below, we see the kernelbase!CreateServiceW function call the rpcrt4!NdrClientCall2 function. NdrClientCall2 is one of a set of functions, represented by NdrClientCall*, that RPC clients can use to make requests. Analysis of the NdrClientCall2’s first and second parameters, which is outside the scope of this article, allows us to identify that kernelbase!CreateServiceW invokes the RCreateServiceW procedure from the Microsoft Service Control Manager Remote Protocol (MS-SCMR).
The Service Control Manager (services.exe) implements its API via RPC, allowing other applications to interact with it. Applications can query, create (as we see here), delete, or modify services through the MS-SCMR RPC interface. Now, we need to understand that the relationship between the calling application and the Service Control Manager is a client/server relationship where clients can make local AND remote requests. The remote aspect is why service creation is a powerful lateral movement technique. Given sufficient permissions, attackers can create malicious services on remote systems. The client/server relationship is essential in our analysis because it acts like a boundary where interaction is constrained to a finite set of RPC procedures like RCreateServiceW. This constraint allows for the application of the operation abstraction layer, which is labeled Service Create in this specific case.
Note: This is not to say that it is not valuable to understand what happens on the server side of the interaction because, in some cases, like this one, an understanding of the server-side component can reveal an alternative procedure to achieve the same outcome (lateral movement via service creation). That said, the ability to implement the server-side implementation, especially remotely, has shown in my analysis to be the exception, not the rule. I will write more about this in a future post.
4. LSA Functions (LsaCallAuthenticationPackage)
Next, we encounter a function type category that took me a while to understand, the LSA Function. Eventually, I discovered that LSA Functions are to RPC Procedures as Sub-Operations are to Standard Functions. That is, LSA Functions rely on a specific RPC Procedure called SspirCallRpc, which the Microsoft Security Support Provider Interface (MS-SSPI) implements. MS-SSPI offers an extensible framework for authentication whereby Microsoft and third-party vendors can extend how users authenticate to the system. As a result, all interactions with “Authentication Packages” flow through the same RPC Procedure. However, the Local Security Authority (LSA) determines how to handle each request based on the specified Authentication Package and AP function. These additional variables indicate that it will not be enough to observe the invocation of SspirCallRpc. Instead, more precise monitoring is necessary, but unfortunately, I am not aware of any vendor that supports this level of monitoring as of this writing.
I highly recommend checking out Evan McBroom’s excellent LSA Whisper project to learn more about the Authentication Packages and LSA.
Sample
This category of functions is the one that inspired me to write this post. I struggled to integrate functions that interact with the Local Security Authority (LSA) into my model for an extended period. When I finally understood how they fit, I realized I had incorrectly conceptualized other categories, like RPC functions. This category is essential when considering modern tradecraft, as shown by my colleagues Will Schroeder in his work on Rubeus and Evan McBroom in his work on LSA Whisperer. Many modern workflows manipulate an agent’s identity context through interactions with LSA, so modern detection approaches must understand these underlying mechanisms. With that in mind, we will look at the inner workings of the pass-the-ticket (ptt) argument in many of Rubeus’ commands.
At this point, each sample we have investigated supported one use case. Rubeus is a full-featured tool suite that supports many Kerberos-related attacks. The pass-the-ticket feature assumes the operator has a Kerberos ticket and facilitates adding that ticket to the ticket cache of the specified logon session.
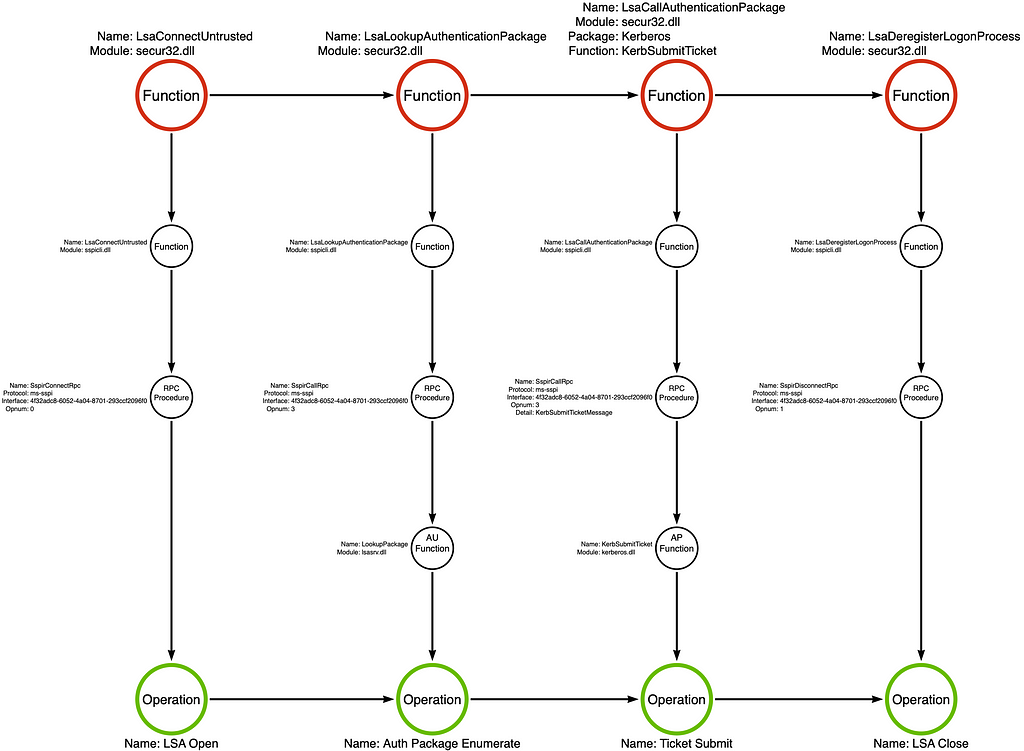
The tool graph below shows that Rubeus begins by connecting to the Local Security Authority (LSA) server using the secur32!LsaConnectUntrusted function. This results in an LSA handle that the tool uses in subsequent calls. Next, the application finds the Kerberos authentication package (AP) by calling the secur32!LsaLookupAuthenticationPackage function. Rubeus then calls secur32!LsaCallAuthenticationPackage specifying the Kerberos authentication package’s KerbSubmitTicket function. The KerbSubmitTicket AP function adds the supplied ticket to the specified logon session’s ticket cache. Finally, Rubeus releases the LSA handle by calling secur32!LsaDeregisterLogonProcess.
Function Call Stack
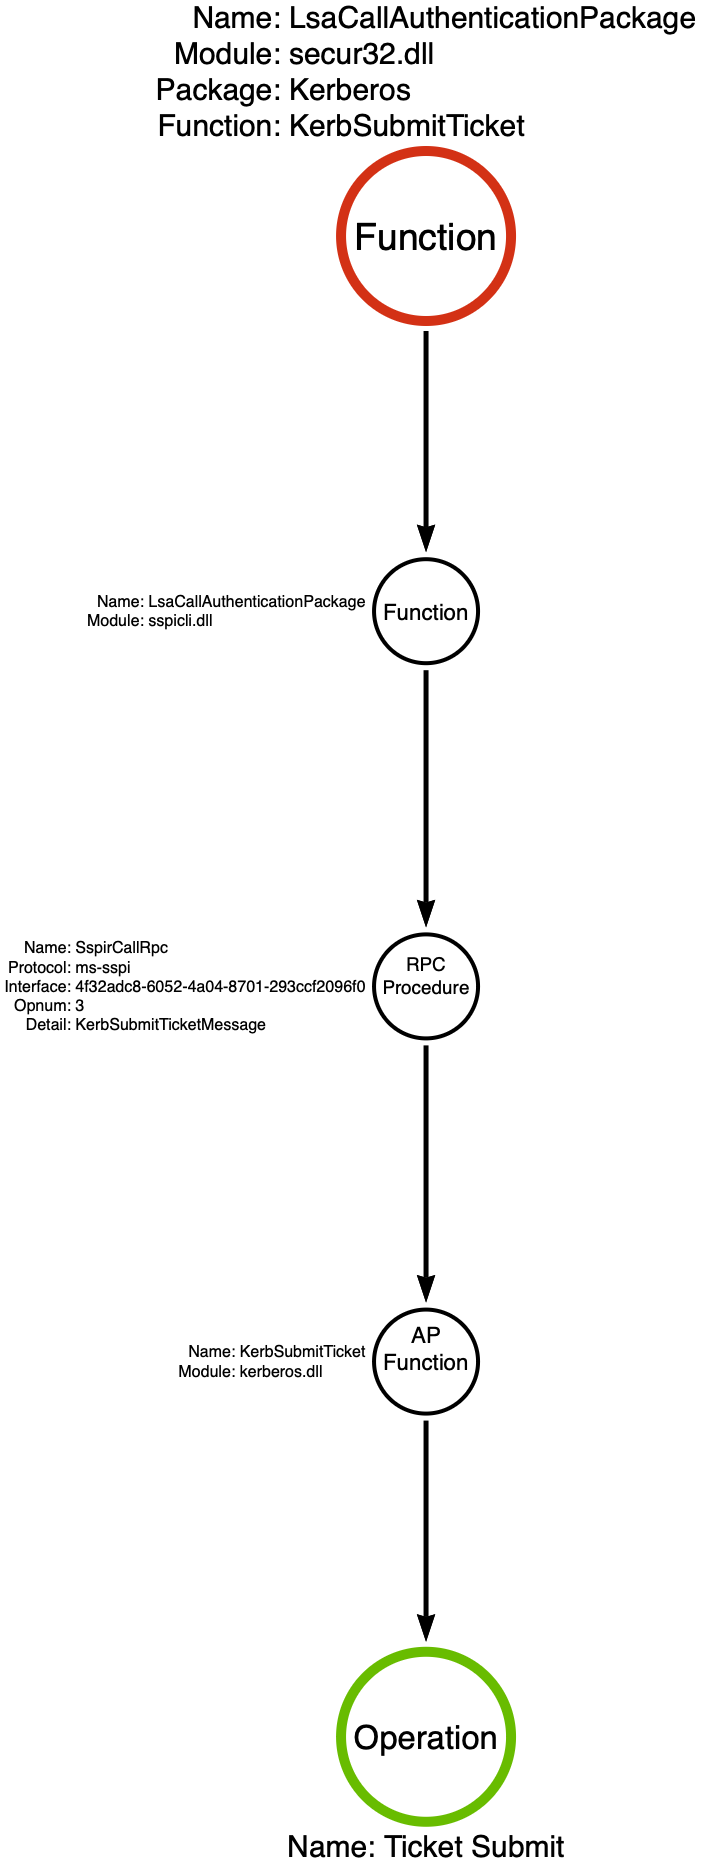
Function Call Stack: secur32!LsaCallAuthenticationPackage (Kerberos KerbSubmitTicket)
The secur32!LsaCallAuthenticationPackage function is responsible for “passing-the-ticket” in the sense that it is the function that adds the ticket to the ticket cache. For that reason, let’s dig a bit deeper into it to understand how it works.
When we open secur32!LsaCallAuthenticationPackage in our disassembler, we see that it eventually makes an RPC Procedure call to the SspirCallRpc procedure implemented by the Microsoft Security Support Provider Interface (MS-SSPI). You might immediately think that I’m crazy because we just covered RPC Procedures in the previous section, but it turns out that this particular case is more complicated than that. That’s because there is an additional layer or two of abstraction. The SspirCallRpc procedure acts as a gateway for applications to interact with LSA regardless of the authentication package and function that the caller specifies. Behind the scenes, MS-SSPI (loaded in lsass.exe) handles these calls and passes execution to the appropriate authentication package, such as kerberos.dll. As a result, observing a call to the SspirCallRpc procedure only indicates that some authentication-related operation has occurred. However, it does not provide the necessary level of detail to determine whether the operation is the one you are interested in, such as adding a Kerberos ticket to the ticket cache, in this case via KerbSubmitTicket. Like Sub-Operations, this category requires that we operate at a more granular level if we can hope to use this signal in any meaningful detection strategy.
It is also worth noting that these LSA-related operations function based on the same client/server relationship as RPC but are often constrained to the local machine only. The lsass.exe application runs as a protected process on modern operating systems, so LsaCallAuthenticationPackage or SspirCallRpc, more specifically, acts as an interface for applications to interact with LSA. This constraint allows us, again, to treat the LSA side of this interaction opaquely. I’ve found it helpful to label the resulting operation using the AP function, which in this example is KerbSubmitTicket.
5. Driver IOCTLs
Another important category I have not extensively written about is Driver IOCTLs. These functions rely on making specific Input/Output Control calls to kernel drivers via API functions like kernel32!DeviceIOControl and ntdll!NtfsControlFile. IOCTLs facilitate direct interaction with a kernel driver and represent something between a Syscall and an RPC Procedure. In this case, we treat the transfer of execution from the client application to the kernel driver as the boundary for abstraction.
Sample
To demonstrate Driver IOCTLs in practice, I will use Matt Graeber’s Get-System implementation from the PowerSploit project. Get-System provides two approaches to Token Theft. The first follows the traditional Token Impersonation approach, while the second relies on a trick with named pipes. For this analysis, I will focus on the named pipe approach.
Thanks to Jonathan Johnson for helping to identify a function that embodies this category. He pointed me to one of his blog posts focused on advapi32!ImpersonateNamedPipeClient, which inspired me to find a sample that leverages that function. If you want to understand how I constructed the function call stack, I recommend you read his post.
After consulting the source code for our sample, I found that the named pipe impersonation trick is a bit complicated. It starts with a call to advapi32!CreatePipe, which generates a new pipe with a fairly permissive DACL. Next, we interact with the Service Control Manager (SCM) via advapi32!OpenSCManagerW. This call results in a handle to the local SCM. Matt passes the SCM handle to advapi32!CreateServiceW to create a new service that the attack will eventually use to connect to the named pipe. Services can run as the NT AUTHORITY\SYSTEM user, resulting in the “named pipe client” being SYSTEM. We then see a call to advapi32!CloseServiceHandle to close the service handle. Next, Get-System calls advapi32!OpenServiceW to open a new handle to the service. The service handle is passed to advapi32!StartServiceW to execute the service, thus connecting to the named pipe. After the service is executed, the sample is cleaned up via advapi32!DeleteService and two calls to advapi32!CloseServiceHandle. Finally, advapi32!ImpersonateNamedPipeClient is called to steal the SYSTEM account token.
Function Call Stack
Function Call Stack: advapi32!ImpersonateNamedPipeClient
As mentioned earlier, I selected this sample to highlight the advapi32!ImpersonateNamedPipeClient function.
Like many other functions, ImpersonateNamedPipeClient flows to kernelbase.dll, where it makes a call to a Native API function called ntdll!NtFsControlFile. The Microsoft documentation for the NtFsControlFile function states that “[it] sends a control code directly to a specified file system or file system filter driver, causing the corresponding driver to perform the specified action.” We can see from the arguments passed to NtFsControlFile that the handle is to the specified named pipe, which, in the case of Matt’s Get-System implementation, is the dummy named pipe created via the CreatePipe function call. We also see that kernelbase!ImpersonateNamePipeClient hardcodes the sixth parameter, representing the FsControlCode, to 0x11001C.
Implementation of kernelbase!ImpersonateNamedPipeClient
The FsControlCode tells the driver which sub-routine to execute. In his blog post analyzing the function, Jonny explains that this control code is known as FSCTL_PIPE_IMPERSONATE and that the components of the control code indicate that this is function number 7 for named pipes (FILE_DEVICE_NAMED_PIPE). We can, therefore, use the control code as the abstraction layer for our operation, which we will call Pipe Impersonate.
6. Compound Functions
A special category is the Compound Function. A Compound Function is a function that, at the Win32 API level, appears as a single function but, lower in the function call stack, breaks down into many more specific functions and, thus, operations. We typically find that Compound Functions implement logic to execute an everyday routine that would normally require multiple individual function calls. A great example of a compound function is dbghelp!MiniDumpWriteDump, which creates process crash dumps. It is built on top of kernel32!ReadProcessMemory. However, a crash dump requires numerous specific memory reads to occur. MiniDumpWriteDump implements this logic, so the application developer is not required to understand the details of the crash dump or process memory structures.
Sample
We will look at Justin Bui’s Primary Token Theft sample for this category. Justin wrote this program to evaluate which processes would be the best targets for System Token Theft. It is a relatively simple program, but it allows us to see a third implementation of Token Impersonation. I challenge you to analyze this sample’s operation chain and compare it to the sample we used to dig into Sub-Operations.
The tool graph for the PrimaryTokenTheft sample is relatively straightforward compared to some of our other examples. In all, we see that there were three function calls kernel32!OpenProcess, advapi32!OpenProcessToken, and advapi32!ImpersonateLoggedOnUser. The first function, kernel32!OpenProcess is used to open a handle to the target process. This process typically runs in the context of a user with desirable access, such as the NT AUTHORITY/SYSTEM account or a Domain Administrator account. The resulting handle is then passed to advapi32!OpenProcessToken, which opens a handle to the desired access token. Finally, Justin passes the token handle to advapi32!ImpersonateLoggedOnUser, where all the magic happens.
Function Call Stack
Function Call Stack: advapi32!ImpersonateLoggedOnUser
Digging into the advapi32!ImpersonateLoggedOnUser function’s call stack, everything progresses normally, like a standard function, until we reach kernelbase.dll. As shown in the image below, we see calls to ntdll!NtQueryInformationToken, ntdll!NtDuplicateToken, ntdll!NtSetInformationThread, and ntdll!NtClose.
Implementation of kernelbase!ImpersonateLoggedOnUser
As a result, the function call stack splits at kernelbase!ImpersonateLoggedOnUser. The end effect is that rather than a one-to-one relationship between the function and the operation, we find that advapi32!ImpersonateLoggedOnUser has a one-to-four relationship, which has massive implications for our detection engineering efforts. Each underlying function will fit within one of the categories covered in this article. For example, NtQueryInformationThread and NtSetInformationThread belong to the Sub-Operation category, while NtDuplicateToken and NtClose belong to the Standard Function category.
You will notice that the resulting operation chain for this particular sample is not much different from that of the sample used in the Sub-Operation section. This similarity means that these two samples are likely to be mutually detectable, or, put another way, they can both be detected using the same analytic.
7. Local Functions (memcpy or GetCurrentProcess)
The final category is probably the least important from the detection engineering perspective. However, understanding how to spot functions from this set will empower you to separate the wheat from the chaff. Local Functions is the name I’ve given to the functions that never cross a relevant boundary. They often, if not always, are resolved within the initial implementation DLL and perform local tasks. You will find that as you begin to analyze complicated functions, you will encounter many local functions, so you must understand how to spot these functions so you can be sure that you can safely ignore them.
Sample
In this example, we will rely on the Get-ProcessTokenPrivilege PowerShell function from Will Schroeder’s PowerUp module. This function is a helper function that implements something similar to whoami /priv.
The tool graph shows that this PowerShell function is meant to check which privileges are enabled for the current user context. We see kernel32!GetCurrentProcess emits a handle to the calling process. That handle is then passed to advapi32!OpenProcessToken, which returns a handle to the calling process’s primary token. Finally, the advapi32!GetTokenInformation function is called to return a list of the token’s enabled privileges.
Note: Can you identify which categories advapi32!OpenProcessToken and advapi32!GetTokenInformation fit into?
Function Call Stack
Function Call Stack: kernel32!GetCurrentProcess
In this sample, the kernel32!GetCurrentProcess function represents the Local Function category. After opening kernel32.dll in IDA, we can browse to the implementation of the GetCurrentProcess function. We see that this function does not do much. It returns -1, which functions as a pseudo-handle for the calling process.
Implementation of kernel32!GetCurrentProcess
As a result, the function call stack is essentially non-existent, as shown below. Since kernel32!GetCurrentProcess does not cross a client/server boundary like that of user-mode/kernel-mode, RPC client/server, or LSA client/auth package it does not have a corresponding operation.
Conclusion
For as long as I can remember, we have used API functions to describe a particular malware sample’s functionality. These function chains have proven helpful to Detection Engineers as they provide a blueprint for observation. However, not all functions are created equally. In our analysis, we’ve identified seven function categories, each requiring a different analytical approach. I hope the descriptions in this article help you determine which type of function you have encountered so you can ensure you are collecting data with an adequate level of granularity.

 Entrar