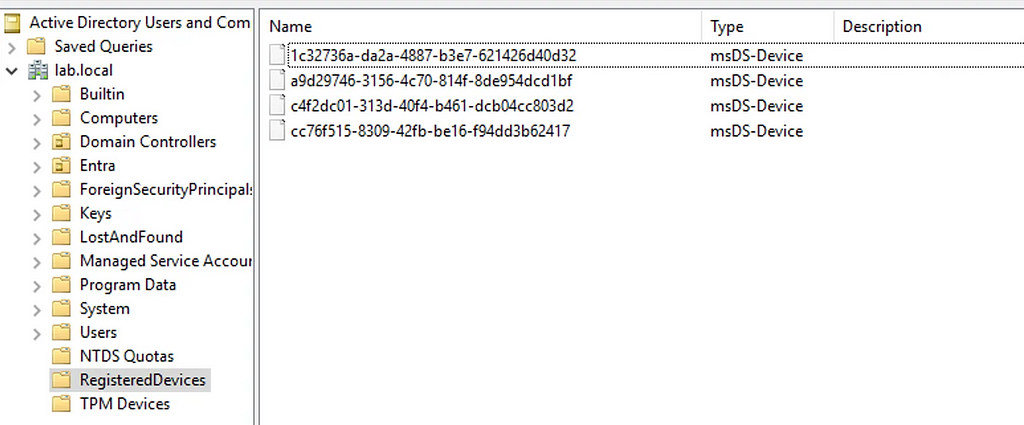
Prior to the change, an “AAD Connector” account would be created upon Entra Connect sync install. Upon creation, a randomized password would be generated and set for the connector account. The AAD Connector account was a user principal that would be assigned a special sync role, and it would authenticate just like any old user. You may have seen these before; they look like this:
In this instance, ENTRACONNECT is the hostname on which the agent is running. There are a wide variety of attack paths that can stem from compromising this account, so it is a very advantageous target for attackers.
Old Attacker Tradecraft
Thanks to AADInternals, it was simple to obtain the sync password of the AAD Connector Account used to import and export data from Entra ID. Some decryption steps are documented here, but that mostly focuses on the on-premises accounts. If you are an AADInternals user, you would need to impersonate the context of the Entra Connect sync account and run the command:
Get-AADIntSyncCredentials
And that’s it! You could use your creds to do all sorts of sync mischief. Under the hood, the ADSync service account would connect to a SQL database where it would obtain a key to decrypt an “AAD configuration” blob. The plaintext password of the AAD Connector Account (Connects to Entra ID) would be in that blob. If an attacker got privileged access to a host running Entra Connect Sync, they could obtain this plaintext password and authenticate off-host, conditional access policies (CAPs) permitting. The theft of such a credential would have a huge impact on any organization, so I presume that Microsoft moved over to an application registration to reduce such a risk.
The Client Credentials Flow
If you are new to Entra ID, you can read how the Client Credentials flow works here. In a nutshell, an application registration can authenticate as itself utilizing the app roles assigned to it. To authenticate and obtain access tokens, it needs credentials provisioned to it. These credential types aren’t exclusive, and an application can have multiple. They can be in the form of:
Secrets (plaintext password)
Certificates
Federated Credentials
If the application uses a certificate, it will sign an attestation when authenticating to obtain an access token. Here is an example:
POST /{tenant}/oauth2/v2.0/token HTTP/1.1               // Line breaks for clarity
Host: login.microsoftonline.com:443
Content-Type: application/x-www-form-urlencoded

scope=https%3A%2F%2Fgraph.microsoft.com%2F.default
&client_id=11112222-bbbb-3333-cccc-4444dddd5555
&client_assertion_type=urn%3Aietf%3Aparams%3Aoauth%3Aclient-assertion-type%3Ajwt-bearer
&client_assertion=eyJhbGciOiJSUzI1NiIsIng1dCI6Imd4OHRHeXN5amNScUtqRlBuZDdSRnd2d1pJMCJ9.eyJ{a lot of characters here}M8U3bSUKKJDEg
&grant_type=client_credentials
How It Works Now
The new Entra Connect Sync agent moved from a “user” centric authentication mechanism to an app registration, which uses the client credentials flow. Since app registrations support certificate authentication, a self-signed certificate is generated on install and saved in the NGC Crypto Provider store. The installer will use the login information you provided (which must be a Global Administrator or Hybrid Identity Administrator) to create a new application registration with the self-signed certificate as an authentication certificate. Once Entra Connect sync completes installation, an application will exist in Entra ID that looks like this:
And the configured app roles:
New Tradecraft
In a perfect world, an attacker could no longer dump plaintext credentials (because there are none) and the private key that corresponds to the certificate is sitting on a TPM. It would appear that any AD Connector account abuses must be performed on-host from here on out, forcing an attacker to persist on a Tier Zero asset. If there is no TPM support, we may be able to export the certificate private key, but I don’t want to rely on that. To the red teamer, it may seem all is lost–but fret not; there is still hope.
After examining the .NET assemblies provided in the new release, it appeared that a graph token of a Global Administrator or Hybrid Identity Administrator was not required to add a new key to the application registration.
This came off as strange because the application was not provisioned with either Application.ReadWrite.All or Application.ReadWrite.OwnedBy. Let’s take a look at the decompiled code in Microsoft.Azure.ActiveDirectory.AdsyncManagement.Server:
if (!string.IsNullOrEmpty(graphToken))
{
    httpClient.DefaultRequestHeaders.Authorization = new AuthenticationHeaderValue("Bearer", graphToken);
    string text2;
    if (!ServicePrincipalHelper.CheckUserRole(azureInstanceName, httpClient, out text2))
    {
        Tracer.TraceError(text2, Array.Empty<object>());
        throw new AccessDeniedException(text2);
    }
}
else
{
    azureAuthenticationProvider = AzureAuthenticationProviderFactory.CreateAzureAuthenticationProvider(aadCredential.UserName, aadCredential.Password, InteractionMode.Desktop);
    string text4;
    string text3 = azureAuthenticationProvider.AcquireServiceToken(AzureService.MSGraph, out text4, false);
    if (string.IsNullOrEmpty(text3))
    {
        Tracer.TraceError("ServicePrincipalHelper: Failed to acquire an access token for graph. {0}", new object[]
        {
            text4
        });
        throw new AccessDeniedException(text4);
    }
    httpClient.DefaultRequestHeaders.Authorization = new AuthenticationHeaderValue("Bearer", text3);
    azureInstanceName = azureAuthenticationProvider.AzureInstanceName;
}
That whole else block is handling the case for when a graph token (presumably that of a Global Administrator or Hybrid Identity Administrator) is not provided. How interesting!
The aadCredential username and password is a bit misleading, as it’s actually holding the UUID of the application registration and the sha256 hash of the existing certificate, as this function call shows:
So what we need is the cert hash of the existing certificate credential and the ability to load it into our AzureAuthenticationProviderFactory. Once we do, we can use that certificate to do two things:
Obtain a graph token to make the addKey API call
Obtain a proof of possession (POP) assertion proving that we are currently in possession of the private key
Further down in the function, the following code executes if no graph token is provided:
public KeyCredentialModel AddKey(Guid appId, KeyCredentialModel keyCredential, string proof) { if (appId == Guid.Empty) { throw new ArgumentException("appId"); } if (keyCredential == null) { throw new ArgumentNullException("keyCredential"); } if (string.IsNullOrEmpty(proof)) { throw new ArgumentNullException("proof"); } string requestUri = string.Format(this.graphEndpoint + "/v1.0/applications(appId='{0}')/addKey", appId); string passwordCredential = null; string content = JsonConvert.SerializeObject(new { keyCredential, proof, passwordCredential }, ODataResponse.JsonSettings.Value); KeyCredentialModel result; using (HttpRequestMessage httpRequestMessage = new HttpRequestMessage(HttpMethod.Post, requestUri) { Content = new StringContent(content, Encoding.UTF8, "application/json") }) { using (HttpResponseMessage httpResponseMessage = base.SendRequest(httpRequestMessage)) { result = JsonConvert.DeserializeObject<KeyCredentialModel>(httpResponseMessage.Content.ReadAsStringAsync().GetAwaiter().GetResult()); } } return result; }
We now know what is needed to add a new key. As an attacker, we can generate a new private key, build a certificate, obtain a POP token, and register it with the application registration. This provides us persistent, off-host, access to the application registration. To do this, we can build out a .NET assembly that performs the necessary steps in the context of the ADSync account.
Proof of Concept
Our goal is to prove that we can still persist our access to a compromised AAD connector account, even if a TPM protects the private key. We can accomplish this by generating our own certificate and adding it to the service principal.
First, we need to obtain an access token and a signed POP assertion. We can do this with the certificate that is installed on the host and can be performed by running this program here:
Our graph token looks like this:
And the POP assertion looks like this:
According to the documentation here, this should be enough to add credentials to our application registration, given that we have at least Application.ReadWrite.OwnedBy.
However, our application does not have any required app roles!
How can this be? Well, if you are an astute reader, or simply have an attention span past the first paragraph of Graph documentation, you’ll see this banger on the addKeys page:
As it turns out, if you have access to an existing key, you can just add your own with no permissions needed!
How have I missed this?!
Mystery solved, and our path is clear for how we can persist our access to the AAD connector account off-host.
If we run our AddKey binary (posted here) with just our access token and POP assertion, you can see that we successfully added our key.
And the updated key is reflected here:
Red team crisis averted; we can keep our sync tradecraft, albeit a bit more “detectable”. Also, as a general takeaway, the ability to sign POP assertions equals the ability for any application to add new certificates to itself, which is pretty cool.
New Opportunities
Here is a list of users who could compromise the sync account previously:
Previously, a privileged auth administrator or higher could change the password of the Sync account; however, since the sync agent would no longer successfully authenticate, it would break the functionality of the sync agent. This left only Global Administrator and Hybrid Identity Administrator as viable attack paths for a red teamer. Let’s look at the new pseudo-graph:
This update presents an attacker with the opportunity to add credentials without interrupting the normal day-to-day flow of the sync agent. In addition, it is far more common to have principals assigned the Application/Cloud Application administrator, making the attack surface larger for sync attacks. While tradecraft may have shifted for on-premises attackers, the Entra ID attack surface has expanded. In addition, Conditional Access typically doesn’t affect service principals, so the likelihood of being able to use these credentials off-target is significantly higher. Ultimately, this is a cleaner yet more abuse-prone implementation.
Detections
Here is the good news. Detecting a new credential on an Application Registration is easy and a dead giveaway that something interesting is happening. Since the normal flow of UpdateADSyncApplicationKey removes the old key, the existence of more than one certificate on the Entra Connect application registration is a good indication that something is amiss. Should an attacker choose to be stealthy and actually replace the certificate that the Entra Connect Sync agent uses, then there are still detections for credential manipulation on an application registration. Here is a KQL query that surfaced all of my key additions:
AuditLogs
| where ActivityDisplayName has_any ("Add service principal credentials", "Update application", "Add key credential")
| where TargetResources[0].type =~ "Application"
| extend AppName = tostring(TargetResources[0].displayName)
| extend ChangedProps = TargetResources[0].modifiedProperties
| extend Initiator = tostring(InitiatedBy.user.displayName)
| project TimeGenerated, AppName, ActivityDisplayName, Initiator, ChangedProps
| where ChangedProps has_any ("keyCredentials", "passwordCredentials")
Takeaways
This is a brand-new update for Entra Connect Sync, so I don’t expect to see it in the wild for some time. I’m not quite sure I’m sold on the ability for an application to “roll its own keys”, as the documentation states. If access to a key is equivalent to the ability to produce more keys, then what’s the point of an expiration date?
NTLM relay attacks have been around for a long time. While many security practitioners think NTLM relay is a solved problem, or at least a not-so-severe one, it is, in fact, alive and kicking and arguably worse than ever before. Relay attacks are the easiest way to compromise domain-joined hosts nowadays, paving a path for lateral movement and privilege escalation.
NTLM relay attacks are more complicated than many people realize. There are a lot of moving parts that operators have to track using different tools, but we have recently introduced NTLM relay edges into BloodHound to help you keep on thinking in graphs with new edges that represent coercion and relay attacks against domain-joined computers, originating from Authenticated Users and leading into the computer that could be compromised via SMB, LDAP/LDAPS, and ADCS ESC8. Each of these edges is composed of different components and prerequisites, but they all follow the same “Zero to Hero” pattern from Authenticated Users to the would-be compromised computer.
While there are many great resources on this old attack, I wanted to consolidate everything you need to know about NTLM into a single post, allowing it to be as long as needed, and I hope everyone will be able to learn something new.
Once Upon a Time
NTLM is a legacy authentication protocol that Microsoft introduced in 1993 as the successor to LAN Manager. NTLM literally stands for New Technology LAN Manager, a name that didn’t age well. While Kerberos is the preferred authentication protocol in Active Directory environments (and beyond), NTLM is still widely used whenever Kerberos isn’t viable or, more commonly, when NTLM usage is hard-coded.
NTLM Fundamentals
My favorite research area is authentication protocols, and over the years, I’ve noticed that every authentication protocol is designed to thwart one or two primary threats. For NTLM, I believe it is replay attacks. Not relay attacks (obviously, given the title), but replay attacks, where an attacker intercepts a valid authentication exchange and replays the packets/messages later to impersonate the victim. NTLM prevents such attacks using a challenge-response exchange: the server generates a random challenge, and the client produces a cryptographic response that proves possession of the client’s credentials.
The NTLM authentication exchange involves a three-message exchange:
The Negotiate (type 1) message is sent from the client to the server to initiate authentication and negotiate session capabilities, such as a session key exchange and signing (more on those later), through a set of flags indicating the client’s supported/preferred security attributes for the session.
The Challenge (type 2) message is sent from the server to the client. It contains a corresponding set of flags indicating the server’s supported/preferred session capabilities and an 8-byte randomly generated nonce, known as the server challenge.
The Authenticate (type 3) message is sent from the client to the server. It contains a set of flags indicating the determined session capabilities based on the client’s and server’s preferences and a cryptographically generated response to the server challenge. There are two major NTLM response generation algorithm versions: NTLMv1 and NTLMv2.
The server then validates the response to authenticate the client. Local accounts are validated against the NT hashes stored in the local SAM, and domain accounts are sent to a domain controller for validation via the Netlogon protocol.
NTLMv1
NTLMv1 is the original response algorithm. It was developed in 1993, in the unfortunate days when DES was the standard encryption algorithm, so that’s what Microsoft used to generate the response, as described in the diagram below:
As shown above, the client’s password is transformed into an NT hash, which is the MD4 hash of the Unicode-encoded password, to be used as the DES encryption key. However, there was a little hiccup: the NT hash was 16 bytes, while the effective DES key length was 7 bytes. Microsoft came up with a creative solution — split the NT hash into three keys: the first seven bytes, the following seven bytes, and the last two bytes padded with zeros. Each of these keys encrypts the server challenge three times independently, and the ciphertexts are concatenated to produce a 24-byte-long response.
NTLMv1 is Bad
NTLMv1 turned out to be a bad idea for three main reasons:
First, DES encryption is… not great, as it can be cracked relatively easily.
Second, the response isn’t “salted”, meaning that the same password and server-challenge combination always produces the same response, making it susceptible to rainbow table attacks.
Third, combining the two previous reasons makes one of my all-time favorite attacks, discovered by Moxie Marlinspike and David Hulton. They managed to recover the raw NT hash by cracking each of the three ciphertexts individually, using rainbow tables and custom hardware. Why should we care about the NT hash? After all, it’s not a password, right? We’ll discuss the infamous Pass the Hash attack soon.
“NTLM2” Precedes NTLMv2
Just for completeness, I’ll mention “NTLM2”, also known as “NTLM2 Session Response” or “NTLMv1 with Enhanced Session Security”. This interim version between NTLMv1 and NTLMv2 introduced an 8-byte client-generated nonce, known as the client challenge. The client challenge was concatenated with the server challenge, and then the combined value was MD5-hashed and, finally, DES-encrypted as in NTLMv1. This enhancement ensured every response was unique and thwarted rainbow table attacks. However, the algorithm is still fundamentally flawed, and the NT hash can be recovered with modern GPUs within less than 24 hours, on average, at a cost of about $30.
NTLM2 is just a distraction, though. Feel free to forget you ever read the paragraph above.
NTLMv2
Shortly after, still in the ’90s, Microsoft released NTLMv2, replacing DES encryption with HMAC-MD5, as described below. This algorithm is still in use today.
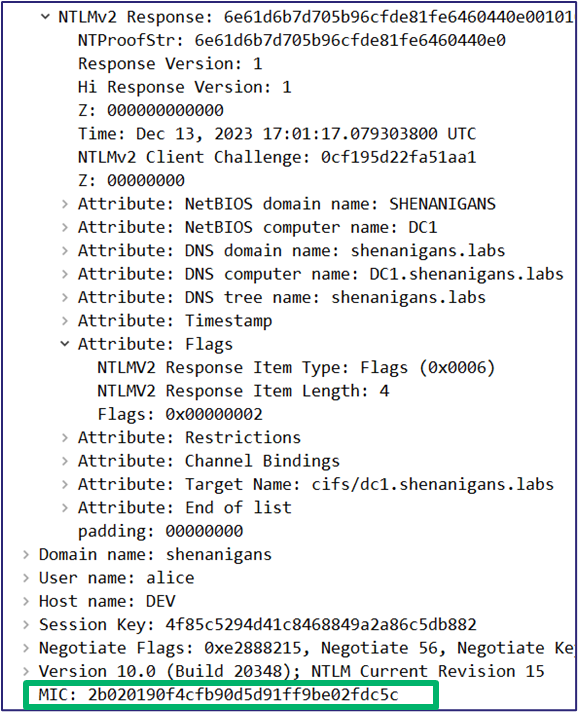
The NT hash is used as the key to generate an HMAC of the client’s domain name and username. It is called the “NT One Way Function v2” or NTOWFv2. The NTOWFv2 HMAC value is then used as the key to generate another HMAC, this time of the server challenge, along with additional information, such as a random client challenge and a timestamp to thwart rainbow table attacks, and additional session attributes, which we will discuss later. This HMAC value is the NT Proof String or NTProofStr. Many people mistakenly think that the NTProofStr is the NTLMv2 response, but it is only part of it. All the additional information used to generate the NTProofStr is also included in the NTLMv2 response to allow the server to generate the same HMAC and validate the client’s response.
LM Compatibility Level
Every Windows host acts as both a server, when someone authenticates to it, and a client, when it authenticates to another host. A single registry value controls both the server and client NTLM version support, located at HKLM\System\CurrentControlSet\Control\Lsa\LmCompatibilityLevel. It allows enabling/disabling NTLMv1 and NTLMv2 for the entire host as a server and as a client, as described in the table below:
When a client authenticates to a member server using a domain account, the server sends the response to a DC for validation. Therefore, the DC’s LmCompatibilityLevel is the one that determines whether NTLMv1 is accepted or not. Note that different DCs can technically have different configurations. However, it is very uncommon to see DCs with LmCompatibilityLevel set to 5 (I’ve never seen that outside of lab environments), so it’s safe to assume the DC will support both NTLMv1 and NTLMv2, as a server, for domain accounts.
It is not uncommon to see DCs with a lower LmCompatibilityLevel. I believe the reason is that some sysadmins mistakenly think that a lower LmCompatibilityLevel is required to support NTLMv1 clients in the domain, while, in fact, they just enable NTLMv1 on the DCs as clients, which can have dire consequences, as we will explain soon.
Looking at the table above, we can make a few observations:
As a client, a Windows host can have either NTLMv1 or NTLMv2 enabled but not both.
As a server, a Windows host will likely enable both NTLMv1 and NTLMv2.
If a Windows host enables NTLMv1 as a client, it must also enable it as a server.
A Windows host doesn’t have to enable NTLMv1 as a client to enable it as a server.
Additional settings allow restricting or auditing outgoing or incoming NTLM authentication or requiring session security settings, but we won’t elaborate on those.
Password Cracking is a Problem
There are different tools for capturing NTLM responses for cracking. Responder is the most well-known and widely used tool, but Inveigh and Farmer deserve an honorable mention, too.
An attacker can potentially crack a captured NTLM exchange, whether it’s NTLMv1 or NTLMv2, to recover the password if it is not sufficiently strong. In the case of NTLMv1, the NT hash can always be recovered, and it can be abused in a couple of ways. If it is a computer/service account, the attacker can forge an RC4-encrypted Kerberos silver ticket and impersonate a privileged account to the host or the service. The NT hash can also be used for NTLM authentication, without cracking the cleartext password, through the infamous Pass the Hash attack.
Pass the Hash
When taking a closer look at the NTLMv1 and NTLMv2 flows, you may notice that, technically, we don’t need the cleartext password to produce a valid NTLM response. If we skip the first step in the flow, the NT hash is all we need.
Who Needs to Crack Passwords Anyway?
The real problem with NTLM is relay attacks. An attacker can simply relay the NTLM messages between a client and server, back and forth, until the server establishes a session for the client, allowing the attacker to perform any operation the client could perform on the server. For clarity, we will refer to the client as the “victim” and the server as the “target”.
Relay attacks allow authenticating as the victim to the target without spending time and resources on password cracking and without depending on weak passwords.
Not an Opportunistic Attack
Some defenders belittle relay attacks because they seem to be somewhat opportunistic. However, relay attacks can be executed with intention and precision when combined with authentication coercion attacks.
Generally, the mechanics of computer account authentication coercion and user account authentication coercion are different.
Computer Account Authentication Coercion
Computer account authentication coercion typically involves an RPC call to a vulnerable function on a remote host (the relay victim). Specifically, we’d try to call a function that would attempt to access an arbitrary path we can control. Then, when the remote service attempts to access the specified path, we’d require authentication and kick off a relay attack. The remote service would authenticate as the relay victim computer account if the service runs as SYSTEM or NETWORK SERVICE and if it doesn’t impersonate a different context before attempting to access the resource.
The two most notable computer authentication coercion primitives are the Printer Bug and PetitPotam. The Printer Bug abuses the function RpcRemoteFindFirstPrinterChangeNotification[Ex] in the Print Spooler service, which establishes a connection to an arbitrary path to send notifications about print object status changes. PetitPotam abuses several functions in the Encrypting File System (EFS) service, such as EfsRpcOpenFileRaw, which opens a file in an arbitrary path for backup/restore. These techniques result in an immediate authentication attempt from the victim computer account without user interaction.
Authenticated Users are permitted to trigger these computer account authentication coercion attack primitives, allowing almost anyone to initiate the relay attack.
User Account Authentication Coercion
User account authentication coercion is more complicated and, in some cases, somewhat opportunistic. The classic user account authentication coercion primitives involve planting a reference to an external resource in a document, email, or even a web page. When the victim renders the document, the client attempts to load the resource, sometimes without their knowledge or consent, and initiates an authentication attempt with the user’s credentials. These primitives require one to three clicks and can be sent directly to the victim or strategically planted in a high-traffic shared folder or website for a watering hole attack.
Dominic Chell highlighted a more sophisticated, well-known approach that abuses Windows Shell. Windows Shell is the operating system’s user interface. It has extensions and handlers that enrich the user experience, for example, by generating thumbnails/previews or customizing icons. Specially crafted files can manipulate these mechanisms to access arbitrary paths as soon as the operating system “sees” them, without any user interaction. The most common way to abuse it is to pass to the icon handler a reference to an attacker-controlled path, which would result in a user authentication attempt as soon as the user browses the folder in which the file is located, even if the user doesn’t even click or highlight the file. The most notable file types that support this kind of manipulation are:
Windows Search Connectors (.searchConnector-ms)
URL files (.url)
Windows Shortcuts (.lnk)
Windows Library Files (.library-ms)
For example, the following URL file would try to load its icon from the path \\attackerhost\icons\url.icon from the user’s security context, so it authenticates with the user’s credentials.
Attackers can drop these files in strategic file shares, such as high-traffic file shares or those frequently used by privileged users, and then kick off a relay attack as soon as an authentication attempt comes through.
Credential Abuse Without Lateral Movement
Traditionally, when attackers gain admin access to a host with an interesting logged-on user, they would move laterally to that host and then attempt one of many credential abuse techniques to impersonate the user and continue maneuvering toward their objectives. However, as EDRs and other endpoint security solutions improve, the detection risk of lateral movement and credential abuse TTPs increases.
Instead, attackers can reduce the detection risk by accessing the remote file system via an administrative share, such as C$, and dropping an authentication coercion file on the logged-on user’s desktop. The moment the file is dropped, Windows Shell starts processing it, and an authentication attempt to the attacker-controlled host is initiated. It works even if the file is hidden, the workstation is locked, or the RDP session is disconnected. More specifically, it works as long as explorer.exe runs in a suitable security context, meaning it is associated with a logon session with credentials cached in the MSV1_0 authentication package.
The attacker can try to crack the NTLM response to recover the password or establish a session on a target server by relaying it.
Taking Over 445
In case you missed it, it is possible to bind a listener to port 445 on Windows hosts without loading a driver, loading a module into LSASS, or requiring a reboot of the Windows machine, as Nick Powers discovered last year.
Too Good to Be True?
So far, NTLM relay attacks may seem very powerful and somewhat simple. However, over the years, Microsoft introduced several mitigations to complicate things.
Session Security
NTLM supports signing (integrity) and sealing (encryption/confidentiality) to secure the session. It is achieved by exchanging a session key in the NTLM Authenticate message. The client generates a session key and RC4-encrypts it using a key generated, in part, from the client’s NT hash. A common misunderstanding is that when signing is negotiated, NTLM relay attacks fail to establish a session (authenticate). However, even with signing, authentication is successful. The problem is that the attacker can’t recover the session key without possessing either the victim’s NT hash or the target’s credentials. But if the attacker possessed either of them, there would be no need for relaying anyway. Therefore, if the target indeed requires all the subsequent messages in the session to be signed with the session key, the attacker would not be able to use the session. Luckily for the attackers, not all servers implement such a requirement, as we will see soon.
The screenshot below shows a portion of a typical NTLM Authenticate message in which a session key is exchanged and signing is negotiated.
The premise of an NTLM relay attack is a man-in-the-middle position. Therefore, the attacker’s obvious next step should be tampering with this Authenticate message in flight to remove the session key and reset the Negotiate Key Exchange and Negotiate Sign flags, pretending the victim never negotiated those.
Message Integrity Code (MIC)
Microsoft anticipated such attempts and introduced an integrity check to the NTLM messages. An HMAC is added to the Authenticate message to protect all three NTLM messages with the session key. The server validates the MIC upon receiving the message, and if a single bit in any of the three NTLM messages is flipped, authentication fails.
Drop the MIC?
The MIC is a later addition to the NTLM protocol. Windows XP and Windows Server 2003 and older, as well as some 3rd party platforms, don’t support it. So, can’t the attacker drop the MIC and pretend the client never added it?
Microsoft anticipated that, too, and added an attribute to the NTLMv2 response indicating the MIC’s presence.
Therefore, an attacker would have to remove/reset that attribute before removing the MIC, but because this attribute is part of the NTLMv2 response, changing it would invalidate the NTProofStr, and authentication would fail.
Those of you who are paying attention should realize that NTLMv1 does not incorporate any additional information into the NTLMv1 response, meaning that NTLMv1 is always susceptible to MIC removal and tampering with the Negotiate flags and the session key.
A Blast From the Past
In 2019, Yaron Zinar and Marina Simakov discovered a couple of vulnerabilities in the NTLM implementation, allowing attackers to Drop the MIC even in NTLMv2. However, we will not delve into those because Microsoft released patches, and it is extremely rare to encounter Windows hosts affected by these vulnerabilities nowadays.
Channel Binding
Channel binding, also commonly referred to as Extended Protection for Authentication (EPA), is a mechanism that prevents man-in-the-middle attacks by incorporating a token from the secure channel (TLS), that is, the server certificate hash, into the NTLM Authenticate message. The server can compare the channel binding token to its own certificate hash and reject the authentication attempt if there is a mismatch. Any service running over TLS, such as HTTPS and LDAPS, can support channel binding.
Just like session security and the MIC, channel binding is not mandatory, but it is part of the NTLMv2 response, and therefore, it is protected by the NTProofStr, so the attacker can’t remove it and pretend it was never there. However, NTLMv1 does not support channel binding.
Backward Compatibility
All these mitigations are later additions to the protocol, so some older or 3rd party platforms may not support them. Therefore, they may not be required by the target server. The server behavior depends on its configuration, whether it is configured to support or even require session security or channel binding, and whether it is designed or implemented to honor the session capabilities negotiated in the NTLM exchange. Given that this is just about the midpoint of this post, you can assume it is not uncommon for targets not to require or enforce these mitigations.
Protected Users
Microsoft introduced the Protected Users security group in the Windows Server 2012R2 functional level to mitigate several attacks that can lead to credential material theft. Members of this group are not permitted to perform NTLM, and hosts running Windows Server 2012R2/Windows 8.1 or later do not cache the NT hash in LSA memory. These protections and others may have usability issues, so only privileged/sensitive accounts should be added to this group. Unfortunately, this group is too often left empty.
Not Too Good to Be True
Given everything discussed above, what are the conditions for relay attacks?
A relay attack should be viable if the target does not support these mitigations by design/implementation or configuration (disabled) or the target supports these mitigations (enabled) but does not require them, and one of the following applies:
The victim does not negotiate session security and channel binding
The victim’s session negotiation is unprotected (NTLMv1)
The target implementation ignores the negotiated capabilities
Relaying is only half the story, though. A successful relay satisfies authentication and establishes a session. However, authorization, meaning what the attacker can do afterward, depends on the victim’s permissions.
Targeting SMB
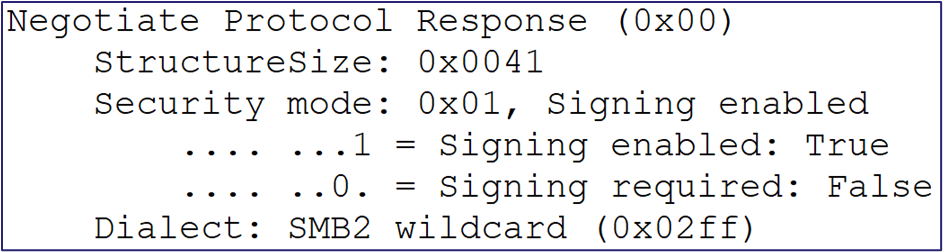
The first and simplest scenario we introduced into BloodHound is relaying NTLM to SMB. SMB servers don’t support channel binding with NTLM, and they negotiate signing at the SMB protocol level, outside the NTLM exchange, meaning that even if the victim negotiates signing in the NTLM Authenticate message, the target will disregard it and only consider what’s negotiated in the SMB headers, which the attacker can control. To be clear, configuring SMB clients to require SMB signing does not affect NTLM relay attacks.
Below is an excerpt from a typical SMB2 negotiate response message with SMB signing enabled but not required. The server is vulnerable to relay attacks if the signing required bit is not set.
Domain controllers starting with Windows Server 2008 and all Windows hosts starting with Windows Server 2025 and Windows 11 require SMB signing by default. In practice, it means that nowadays, most Windows hosts out there, especially Windows servers, don’t require SMB signing by default. Unfortunately, many organizations don’t change these defaults for the unjustified fear of backward compatibility or a myth about performance impact.
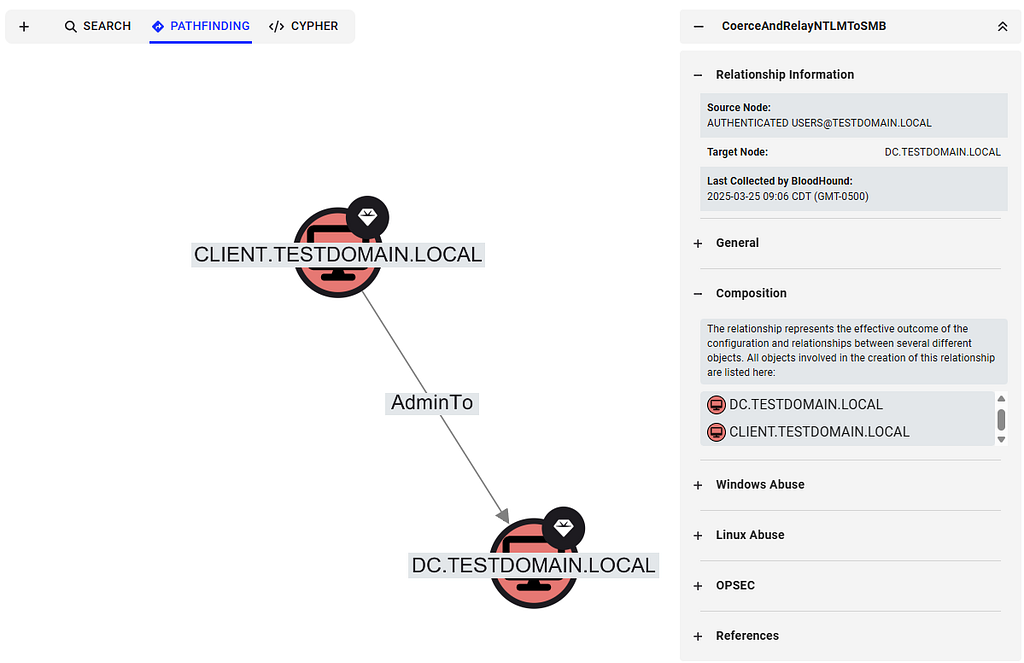
Introducing the CoerceAndRelayNTLMToSMB Edge
The new CoerceAndRelayNTLMToSMB edge is the simplest of the new NTLM relay edges. The edge always comes out of the Authenticated Users node and leads into the target computer node. It represents a combination of computer account authentication coercion against the relay victim and an NTLM relay attack against the relay target.
Collection
SharpHound collects all the required information as follows:
SMB signing status collection does not require authentication. It is collected from the relay target by actively establishing a connection with the host over SMB and parsing the SMB negotiation response messages.
Local admin rights are collected from the relay target. They can be collected from the host directly over RPC, which may or may not require admin rights, depending on the OS version and configuration, or from the DC via GPO analysis.
Outgoing NTLM restriction is collected from the relay victim via WMI or Remote Registry, which requires admin rights.
Edge Creation
BloodHound creates the edge if the following criteria are met:
SMB signing on the target computer is not required — this is the relay target. The edge will not be created if the SMB signing status is not collected/ingested into BloodHound.
At least one computer account in the environment has local admin access to the target computer — this is the relay victim.
There is no outgoing NTLM restriction on the victim host. In BloodHound Community Edition, if this data wasn’t collected/ingested, it will be assumed to be false (not restricted), as per the default configuration. In BloodHound Enterprise, this assumption is not made, and the edge will not be created.
If the domain functional level is Windows Server 2012R2, the relay victim must not be a member of the Protected Users group.
The edge is always created from Authenticated Users to the computer node representing the relay target.
Expanding the Coercion Targets accordion lists the relay victims, and expanding the Composition view shows a visual representation.
Abuse
An attacker can traverse this edge to gain access to the C$ or ADMIN$ share on the relay target, dump LSA secrets from Remote Registry, including the computer account password, or move laterally via the Service Control Manager.
A very common scenario captured by this new edge is SCCM TAKEOVER 2, coercing authentication from the SCCM site server and relaying it to the SCCM database server to take over the entire hierarchy.
SMB-Specific Limitations
The CoerceAndRelayNTLMToSMB edge only covers scenarios in which a computer (victim) has admin access to another computer (target) that does not require SMB signing. It doesn’t cover user accounts as the relay victim, and it doesn’t cover access to resources that a relay victim might be able to access via SMB without admin rights, such as non-administrative file shares.
Other limitations that apply to all new NTLM relay edges will be discussed later.
Targeting ADCS (ESC8)
The new CoerceAndRelayNTLMToADCS edge is much more complicated than relaying to SMB because certificate abuse has a lot of requirements. However, the relaying logic is still relatively simple. Relaying to ADCS web enrollment allows obtaining a certificate for the relay victim and using it for authentication to impersonate the victim. This is the infamous ADCS ESC8 that Will Schroeder and Lee Chagolla-Christensen disclosed in their Certified Pre-Owned white paper.
The ADCS Certificate Authority Web Enrollment endpoint and Certificate Enrollment Web Service run on IIS. IIS does not support session security, but it does support Extended Protection for Authentication (EPA), also known as channel binding. EPA is supported over HTTPS, but not HTTP because HTTP has no secure channel to bind. So, if web enrollment is available over HTTP or over HTTPS with EPA disabled, then relay is viable. This is the default configuration on Windows Server 2022 and older, but no longer the default on Windows Server 2025. Note that it applies to any site served on IIS with NTLM authentication, not just ADCS web enrollment.
As mentioned, relaying is all about authentication. Once authenticated, the attacker can do whatever the relay victim is permitted to do. This attack is viable only if the relay victim is permitted to enroll a client authentication certificate (requires EKUs that allow performing Kerberos PKINIT authentication or Schannel authentication to LDAP) and the CA is trusted by the domain controller and added to the domain’s NTAuthCertificates. Jonas Bülow Knudsen explains these requirements in detail in this blog post.
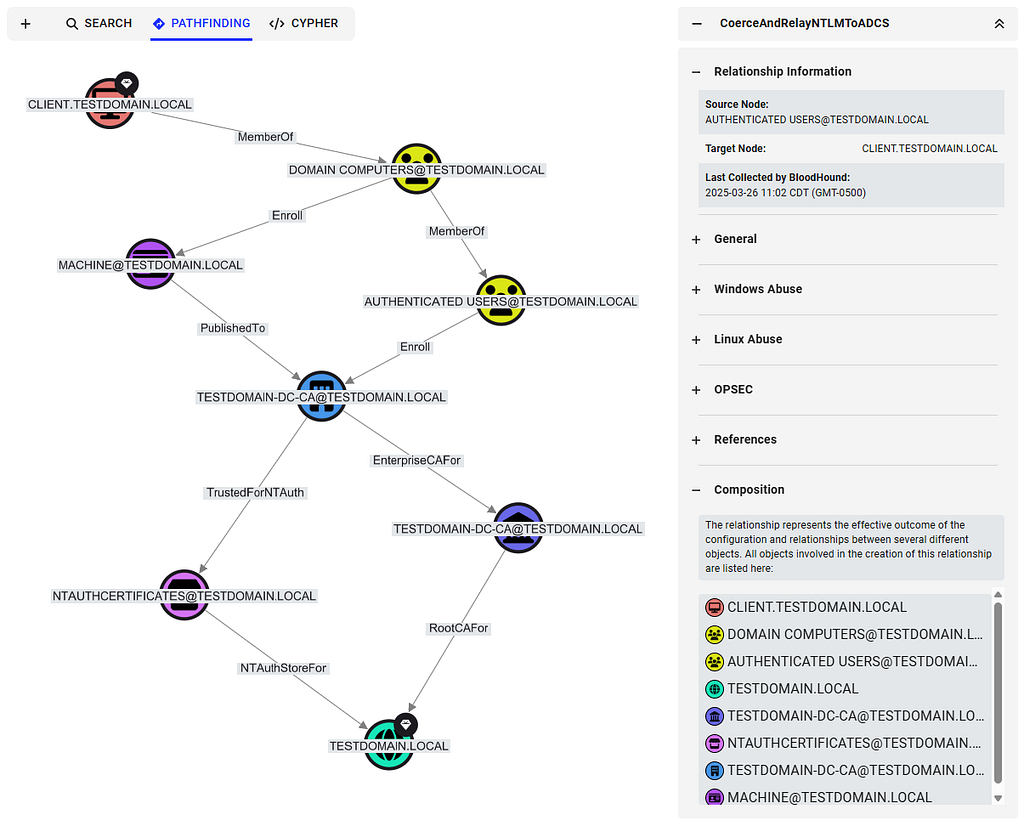
Introducing the CoerceAndRelayNTLMToADCS Edge
The new CoerceAndRelayNTLMToADCS edge comes out of the Authenticated Users node and leads into the victim computer node, unlike CoerceAndRelayNTLMToSMB, which leads into the relay target computer node. The reason for the difference is that the attack compromises the relay victim rather than the relay target.
Collection
SharpHound collects all the required information as follows:
Connect to the ADCS enrollment endpoints and attempt to perform NTLM authentication with and without EPA to determine if it’s enabled, required, or disabled. This can be collected without admin access.
All the ADCS certificate enrollment requirements are collected via LDAP, as done for all existing ADCS edges. This can be collected without admin access.
Outgoing NTLM restriction is collected from the relay victim via WMI or Remote Registry, which requires admin rights.
Edge Creation
BloodHound creates the edge if the following criteria are met:
The relay victim is a computer permitted to enroll a certificate with a template that meets the requirements listed below. The relay victim must have the enroll permission on the enterprise CA and the certificate template.
The certificate template has (1) EKUs that enable PKINIT/Schannel authentication, (2) manager approval disabled, and (3) no authorized signatures required.
The enterprise CA is trusted for NT authentication, and its certificate chain is trusted by the domain controller.
The enterprise CA published the certificate template.
The enterprise CA that published the certificate has a web enrollment endpoint available over HTTP or HTTPS with EPA disabled.
There is no outgoing NTLM restriction on the victim host. In BloodHound Community Edition, if this data wasn’t collected/ingested, it will be assumed to be false (not restricted), as per the default configuration. In BloodHound Enterprise, this assumption is not made, and the edge will not be created.
If the domain functional level is Windows Server 2012R2, the relay victim must not be a member of the Protected Users group.
The edge is always created from Authenticated Users to the computer node representing the relay victim.
Expanding the composition view shows all the components involved, including the certificate template and enterprise CA to target.
Abuse
After enrolling a certificate, the attacker can perform PKINIT authentication as the computer account using Rubeus to obtain a Kerberos Ticket Granting Ticket (TGT) and even the NT hash for the computer account through the UnPAC the Hash attack. With these, the attacker can compromise the relay victim host via S4U2Self abuse or a silver ticket, or use the TGT or the NT hash to access any resource that the computer account is permitted to access.
If the CA is susceptible to relay attacks, all the computers that can enroll a suitable certificate are exposed. Note that the default “Machine” certificate template meets the above criteria and exposes all the computers in the domain.
ADCS-Specific Limitations
The CoerceAndRelayNTLMToADCS edge only covers scenarios in which a computer (victim) can enroll a domain authentication certificate and the certificate authority web enrollment (target) that is vulnerable to relay attacks. It doesn’t cover user accounts as the relay victim, and it does not cover certificate templates incompatible with domain authentication.
Other limitations that apply to all new NTLM relay edges will be discussed later.
Targeting LDAP or LDAPS
The new CoerceAndRelayNTLMToLDAP and CoerceAndRelayNTLMToLDAPS edges are by far more complicated to abuse. Unlike SMB and IIS, LDAP servers are implemented to require the capabilities negotiated with the client in the NTLM exchange, meaning that if the client negotiates session security with signing, the LDAP server will require all the subsequent messages in the session to be signed with the session key.
Computer account authentication coercion can trigger authentication from the SMB client, but the SMB client always negotiates session security with signing in the NTLM Authenticate message, so SMB can’t be relayed to LDAP. The exception to this rule is clients that have NTLMv1 enabled because, in NTLMv1, the MIC can be dropped, and the Negotiate Sign flag can be reset.
But that’s not a dead end. Some authentication coercion primitives, including the Printer Bug and PetitPotam, accept WebDAV paths simply by adding the at sign followed by a port number to the hostname, e.g., “\\attackerhost@80\icons\url.icon”.
WebDAV is encapsulated in HTTP messages sent by the Web Client service, which doesn’t negotiate signing and is, therefore, compatible with relaying to LDAP. However, by default, the Web Client would only authenticate to targets in the Intranet Zone, as per the default Internet Settings.
Getting in the (Intranet) Zone
HTTP clients in Windows should call the MapUrlToZoneEx2 function to determine which zone a given URL belongs to. The function determines that a URL maps to the Intranet Zone based on the following rules:
Direct Mapping: URLs manually added to the Intranet Zone
The PlainHostName Rule (aka “The Dot Rule”): If the URL’s hostname does not contain any dots
Fixed Proxy List Bypass: Sites added to the fixed proxy bypass list
WPAD Proxy Script: URLs for which the proxy script returns “DIRECT”
If you use the host’s “shortname” (the hostname portion of the FQDN, e.g., hostname.contoso.local) or NetBIOS name, the underlying name resolution mechanisms will resolve the name to an IP address, even though the URL is “dot-less”, because DNS automatically appends a suffix based on the client’s DNS search list, which is typically configured via DHCP or GPO.
But how can we get DNS resolution for our attacker-controlled host?
Bring Your Own DNS Record
By default, Active Directory Integrated DNS allows all Authenticated Users to create DNS records via LDAP or Dynamic DNS (DDNS), as discussed in this blog post by Kevin Robertson, and can be done with his tools Powermad and Sharpmad.
WebDAV Is a Hit or Miss
Authentication coercion can trigger WebDAV traffic only if the Web Client service is installed on the host, which it is by default on Windows desktops but requires the Desktop Experience or the WebDAV Redirector feature on Windows servers. Even if it is installed, it also needs to be running, which is not the default on desktops. Most user account authentication coercion primitives will automagically trigger the Web Client service to start. However, computer accounts are more tricky. While most computer account authentication coercion primitives support WebDAV paths, they will not start the Web Client service. Therefore, when we target computer accounts, which is what we do here, we are limited to computers that currently have the Web Client service already running.
When the Web Client service starts, it opens a named pipe called DAV RPC SERVICE, so we can determine whether it is running remotely without admin rights.
One important thing to note is that when the Web Client service runs, it affects all processes running on the host in any context, not just the user who started it. Therefore, if we trigger the service to start via user account authentication coercion, for example, by dropping an authentication coercion file into a high-traffic shared folder, any user that browses the share potentially exposes the host they logged in on to NTLM relay to LDAP.
LDAP Relay Mitigations
LDAP servers support mitigating relay attacks with LDAP signing and LDAP channel binding. Each can be configured individually, and both must be enforced to prevent relay attacks. If either one isn’t, there is a bypass:
If LDAP signing is required and LDAP channel binding is disabled, the attacker can relay to LDAPS instead of LDAP, and because LDAPS encapsulates the traffic in a TLS channel, the domain controller considers the signing requirement to be met.
If LDAP channel binding is enforced and LDAP signing is disabled, the attacker can relay to LDAP with StartTLS, as discussed in this blog post, because the TLS channel is established only post-authentication.
These settings are DC-level settings, not domain-level settings, meaning that you may find different domain controllers with different configurations in the same environment.
Up until Windows Server 2025, domain controllers did not enforce these by default, and given that most organizations have not yet changed both of these settings, at this time, most domain controllers out there are vulnerable to NTLM relay attacks. However, as of Windows Server 2025, domain controllers enforce encryption (sealing) via session security on LDAP SASL bind by default, and with that new configuration, relaying to LDAP or LDAPS is no longer viable. But at this time, domain controllers running on Windows Server 2025 are still few and far between.
Note that enabling LDAP client signing does not mitigate relay attacks, as we’re not abusing LDAP clients; we are abusing web clients.
Viability Criteria
All things considered, relaying to LDAP is viable under the following conditions.
For the relay target, there is at least one domain controller that:
Is running on Windows Server 2022 or older and does not require LDAP signing or LDAPS turned on without channel binding.
Is running on Windows Server 2025 with LDAP signing explicitly disabled.
For the relay victim, the computer must either have the Web Client installed and running or have NTLMv1 enabled.
I Successfully Relayed to LDAP. Now What?
As I reiterated several times, relaying gets you through the authentication step. What you can do with the session afterward depends on the permission of the relay victim. A successful relay to LDAP would allow you to perform any action that the relay victim is permitted to perform in Active Directory, with one caveat — password change/reset must happen over an encrypted channel, so that action is possible only when relaying to LDAPS.
In this scenario, we coerce and relay a computer account to LDAP or LDAPS. In this case, it is very unlikely that the relay victim, a computer account, would have high privileges in the domain. However, computers are allowed to change some attributes of their own computer account, including:
msDS-AllowedToActOnBehalfOfOtherIdentity, which would allow taking over the host via Resource-Based Constrained Delegation (RBCD), as explained in detail in this post.
msDS-KeyCredentialLink, which would allow taking over the host via the Shadow Credentials attack, as explained in detail in this post. Note that a computer account is permitted to add a new value to the msDS-KeyCredentialLink attribute as a validated write, only if there isn’t an existing key credential already present. However, even if there is already a key credential present, the computer account is allowed to delete it and then add a new one, which would require relaying twice: once for deletion and a second time for the Shadow Credentials attack.
Introducing the CoerceAndRelayNTLMToLDAP and CoerceAndRelayNTLMToLDAPS Edges
The new CoerceAndRelayNTLMToLDAP and CoerceAndRelayNTLMToLDAPS edges come out of the Authenticated Users node and lead into the victim computer node, just like the CoerceAndRelayNTLMToADCS edge, because here, too, the attack compromises the relay victim rather than the relay target.
Collection
SharpHound collects all the required information as follows:
Connect to the domain controllers via LDAP and LDAPS and attempt to perform NTLM authentication with and without signing and channel binding to determine if they’re enabled, required, or disabled. This can be collected without admin access.
Connect to the relay victim via SMB to check whether the DAV RPC SERVICE named pipe is open. This can be collected without admin access.
Outgoing NTLM restriction is collected from the relay victim via WMI or Remote Registry, which requires admin rights.
Edge Creation
BloodHound creates the CoerceAndRelayNTLMToLDAP edge if the following criteria are met:
There is at least one domain controller running on Windows 2022 or older, and LDAP signing is not required.
The relay victim has the Web Client service running.
There is no outgoing NTLM restriction on the victim host. In BloodHound Community Edition, if this data wasn’t collected/ingested, it will be assumed to be false (not restricted), as per the default configuration. In BloodHound Enterprise, this assumption is not made, and the edge will not be created.
BloodHound creates the CoerceAndRelayNTLMToLDAPS edge if the following criteria are met:
There is at least one domain controller running on Windows 2022 or older, and LDAPS is available without channel binding required.
The relay victim has the Web Client service running.
There is no outgoing NTLM restriction on the victim host. In BloodHound Community Edition, if this data wasn’t collected/ingested, it will be assumed to be false (not restricted), as per the default configuration. In BloodHound Enterprise, this assumption is not made, and the edge will not be created.
If the domain functional level is Windows Server 2012R2, the relay victim must not be a member of the Protected Users group.
The edge is always created from Authenticated Users to the computer node representing the relay victim.
Expanding the Relay Targets section in the information panel lists all the affected domain controllers that can be targeted.
Abuse
As mentioned above, following a successful relay, the relay victim can configure RBCD or Shadow Credentials against its own computer account to compromise the host. In addition to that, if the computer account happens to have any abusable permissions in Active Directory, those will be viable as well, with the caveat that the ForcePasswordChange edge (password reset) is only abusable via LDAPS and not via LDAP.
In the real world, it is very common to find domain-joined workstations with the Web Client running, and domain controllers are very rarely configured to require both LDAP signing and channel binding or run on Windows Server 2025, so this is a very rel(a)yable way to compromise domain-joined hosts. It is even more common to abuse this technique for local privilege escalation on domain-joined workstations due to the ease of turning the Web Client service on and coercing authentication from SYSTEM as a low-privileged user.
LDAP-Specific Limitations
You may have noticed that BloodHound currently doesn’t take NTLMv1 into consideration for edge creation.
Another important limitation to note is that the CoerceAndRelayNTLMToLDAP and CoerceAndRelayNTLMToLDAPS edges are created based on the current Web Client service status, but it is very dynamic. The fact that the service was not running on a host during collection does not mean it will remain that way and that the host is not exposed.
General Limitations
So far, we have mentioned some limitations affecting specific edge types. There are also limitations affecting all the new NTLM relay edges:
Only computer account authentication coercion scenarios are considered. User authentication coercion is out of scope at this time.
Only coercion scenarios are considered. Opportunistic relay attacks, i.e., waiting for a suitable relay victim to authenticate to an attacker-controlled host, such as authenticated vulnerability scanners, are out of scope.
Firewalls or sorts and network restrictions are out of scope and not taken into consideration for these new relay edges, just as they were not taken into consideration for any of the previous BloodHound edges.
We also make a general assumption that computer account authentication coercion can be triggered by Authenticated Users, as explained earlier.
Future Work
We plan to introduce additional relay edges in the future. We already have relay to MS SQL and WinRM on our roadmap. We are always open to suggestions if you have additional ideas/requests.
NTLM Abuse Strategy
Let’s take everything covered in this post and put together an NTLM abuse strategy.
First, let’s make some observations and assumptions:
NTLM challenge-response capture is less noisy than NTLM relay, but cracking depends on the strength of the password.
User authentication coercion can trigger the Web Client service to start, but computer authentication coercion can’t.
Scanning for hosts with the Web Client service running can be noisy. Similarly, collecting session information is noisy or even impossible without local admin rights.
NTLM relay attacks should be precise on red team operations. The “Spray and Pray” approach should be avoided.
Given the above, I propose the following approach:
At the beginning of an op/assessment, cast a wide net for user authentication coercion through watering hole attacks on high-traffic file shares or web pages. Try to coerce and capture both WebDAV and SMB traffic if you can. SMB is sometimes more likely to succeed, but this is your opportunity to start the Web Client service on every affected client.
As you capture NTLM responses, keep track of where users authenticate from — it tells you where they have a session. It is, in a way, passive session collection.
Attempt to crack passwords of interesting accounts that can help you escalate privileges or achieve your objectives. Don’t waste your GPU on meaningless accounts.
If you identify an interesting user but can’t crack the password, it’s time to relay.
Target the computer on which the user was active and compromise it via relay to ADCS (ESC8) or via relay to LDAP/LDAPS (RBCD or Shadow Credentials).
Once you gain admin access to the host, you can potentially avoid the risk involved in lateral movement and credential abuse by placing an authentication coercion file on the user’s desktop via the C$ share and relaying the NTLM exchange to the target resource.
What is Microsoft Doing About It?
Microsoft has been making efforts to mitigate these attacks. As I mentioned, relaying to LDAP is no longer possible against domain controllers running Windows Server 2025, and all Windows 11 and Windows Server 2025 hosts now require SMB signing by default. It’s a good start.
Microsoft has been working on a much more significant initiative to deprecate NTLM altogether. They’ve identified the following reasons why Windows hosts still use NTLM and have started working on solutions:
Until recently, the only option for local account authentication was NTLM. Microsoft is in the process of rolling out a “local KDC” to support Kerberos authentication for local accounts.
When clients don’t have a line of sight to a domain controller, they can’t obtain Kerberos tickets and have to fall back to NTLM. Microsoft is in the process of rolling out IAKERB, which will turn every Windows host into a Kerberos proxy.
Kerberos authentication requires mapping the resource that the client is trying to access to a service account. This is done through service principal names (SPN). SPNs usually use hostnames rather than IP addresses, so when a client attempts to access a resource by IP address, Kerberos authentication typically fails. However, as of Windows Server 2016, SPNs support SPNs with IP addresses.
Most NTLM usage is a result of software hard-coded to call the NTLM authentication package instead of the Negotiate package, which wraps Kerberos and NTLM and negotiates the most suitable option. Microsoft has been working on fixing these hard-coded issues in its own software, and, rumor has it, they have also been working with 3rd parties to fix their code.
Microsoft intends to have NTLM disabled by default (not completely removed), which means that even when the day finally comes, we will likely still find organizations that turn it back on, just as we still find hosts with NTLMv1 enabled. Last I heard, Microsoft had plans to have it done by 2028, but I believe they are already behind schedule, and, if history has taught us anything, we should expect it will take much longer than that.
Kerberos is NOT the Solution
For many years, people thought that Kerberos was not susceptible to relay attacks because it is based on tickets, and every ticket is issued to a specific service, so you can’t relay it to arbitrary targets. But that’s no longer the case. As James Forshaw discovered and Andrea Pierini weaponized, there are authentication coercion primitives that allow the attacker to control the service name for which the relay victim obtains a Kerberos ticket. These coercion primitives negotiate session security with signing, so they can’t be relayed to LDAP/LDAPS. However, they are compatible with relaying to SMB and ADCS.
Therefore, disabling NTLM is not the solution. Ensuring all servers enforce signing and channel binding is the right way to mitigate relay attacks.
We may add Kerberos relay edges to BloodHound in the future. Until then, you can be confident that whenever you see CoerceAndRelayNTLMToADCS or CoerceAndRelayNTLMToSMB edges, you can relay either NTLM or Kerberos.
Why Are We Releasing It Now?
There are many misconceptions about the problem and the solution for the NTLM relay problems. The new edges we introduced into BloodHound will hopefully bring clarity and put it in the spotlight, helping organizations prioritize one of the most significant yet underestimated risks affecting Active Directory environments.
Better Remediation Strategies
The remediation guidance for NTLM relay attacks is often “enforce everything, everywhere”, which is not very practical in a large environment that requires backward compatibility. However, BloodHound now helps defenders see what’s actually viable in their environments and prioritize high-impact/exposure targets. BloodHound has a set of pre-built cypher queries that can get you started with that.
Conclusion
NTLM relay attacks are far from dead. In fact, they’re often easier to execute and more effective than many security practitioners realize. This old technique remains one of the paths of least resistance in modern Active Directory environments, routinely enabling trivial pivots to high-value targets. The introduction of NTLM relay edges in BloodHound has made identifying and visualizing these attack paths remarkably simple: with just a few clicks, an operator can see how Authenticated Users can relay their way from zero to hero. In other words, BloodHound now depicts, with clear, intuitive edges, what once required stitching together information from multiple tools, showing defenders the real risks they face while allowing attackers to, once again, think in graphs.
Mythic provides flexibility to agent developers for how they want to describe and execute techniques. While this is great, it also means that when operators hop from agent to agent, they can have issues with slight differences between similar commands. Because of this, there have been some requests within the Mythic community to provide a feature similar to Sliver’s amazing Armory project so that, if desired, there can be a more standardized way of executing beacon object files (BOFs) and .NET assemblies.
Introducing Forge
Forge in Mythic
Mythic uses Docker to provide a plug-and-play framework of adding/removing agents and communication profiles dynamically. This means that adding a new Docker container to Mythic simply adds that new agent. You can use that agent to build payloads, get callbacks, and run commands, but that’s all specific to that one agent. The commands from Apollo are not available to another agent like Poseidon, so how can Mythic provide some standardized command across multiple agents?
Mythic 3.3 introduced the concept of a “Command Augmentation” container that in many ways acts the same as a normal agent container. This container brings along new commands to Mythic; however, instead of having them tied to a specific agent, they’re automatically added to all callbacks that meet certain criteria. This criteria can be callbacks on certain operating systems or callbacks based on certain other agents. These “Command Augmentation” containers process the command like normal, but instead of handing that finished command to the agent for execution, it’s handed to another agent’s container for further processing.
Forge is the first “Command Augmentation” container released on the MythicAgents GitHub organization. The Forge Docker image is built with all of Flangvik’sSharpCollection compiled assemblies and Sliver’s Armory of compiled BOFs. Forge offers a few management commands that allow you to list out collections of commands, register assemblies/BOFs within your callbacks, add support for other agents, and more. Let’s look at two examples of what Forge can do.
.NET Assembly Support
Forge Collections SharpCollection
The forge_collections command allows you to list out the available commands that are part of a collection. The SharpCollection and SliverArmory collections exist by default, but you can add new ones at any time. In the output above, we can see the ability to re-download the command (this fetches the .NET versions again from GitHub and can be helpful if there’s a new version released), to register the command (make it available to execute), and some information about the command name and what the assembly does. Clicking the download or register buttons will register the command within this callback and all callbacks that have support with Forge. Let’s say we click the register button for the Rubeus entry. We’ll get a new command we can issue called forge_net_Rubeus; the name of this command allows you to easily identify commands added as part of Forge and if this is a .NET command or a BOF command.
New assembly commands always have the same arguments: the argument string that’s passed to the .NET assembly, the version of the assembly to use, and if this should be executed via execute_assembly (fork-and-run) or inline_assembly (in process).
Forge .NET Parameters
These parameters are always the same for each .NET assembly because in the offensive security community, .NET assemblies are made to take in a single string and do the parsing themselves instead of using named parameters.
BOF Support
Forge Collections Sliver Armory
BOF support in Forge works a little differently thanks to the amazing work that the Sliver team did for their Armory plugins. Unlike .NET assemblies, BOFs have a very specific set of arguments they take, in a specific order, and with specific formats. Many people use BOFs with Cobalt Strike, so they have Aggressor Scripting files created for them that describe these parameters. Unfortunately, this format isn’t usable outside of Cobalt Strike, but the Sliver team went above and beyond to convert many of these to JSON. As part of this, the Sliver team has forked versions many common BOF projects (e.g., https://github.com/sliverarmory/CS-Situational-Awareness-BOF) where they store compiled versions of the BOFs and this converted JSON data in tagged releases.
Forge hooks into their work by fetching the latest tagged release for the command you want to register and extracts the object files along with the extension.json file that describes the BOF’s arguments. Since Mythic already supports defining commands with named parameters, their types, and their orders, Mythic can use the extension.json file to dynamically create Mythic styled parameters.
BOF Argument Support
In this example, the BOF command forge_bof_sa-netgroup , takes three parameters: a number (0 or 1 based on the description) and two strings. Due to Sliver’s format, we can even identify which arguments are required and which ones are optional. Unfortunately, we miss additional context about default values that could be pre-populated, so that’s still up to the individual BOFs or for them to call out in their parameter descriptions.
When an operator submits this task, Forge looks up the associated extension.json file and converts these named parameters back into a normal Mythic TypedArray format that is then passed to a supporting agent’s command (like Apollo’s execute_coff ) for processing before a callback picks it up.
Normally, BOF execution requires an operator to upload the right object file, know the exact types and orderings of parameters for the bof (ex: zisZZZ), and provide the right values in that order. This would require execution like some_bof_command zisZZZ test 3 0 bob testing.com Mozilla. Naturally, this is error prone and not very operator friendly. With Forge, you could instead issue a task like forge_bof_myBof -location test -loops 3 -useAdmin 0 -user bob -domain testing.com -useragent Mozilla. Notice how, especially with all of the parameters being tab-completable, it’s much more operator friendly, especially if you don’t already know all of the parameters needed for the BOF.
Forging Forward
Forge is based on a series of JSON files on disk that describe things like what agents work with Forge, what collections are available, and what commands are available in each collection. You aren’t limited to SharpCollection and SliverArmory though. With the forge_create command, you can upload your own .NET assembly or BOF files (including extension.json) and have those turned into new commands on the fly. If you want to set this up ahead of time though, you can always edit the JSON files directly on disk or through the Mythic UI.
Forge comes with default support for the Apollo and Athena agents, but pull requests are always welcome to provide default support for other agents as well. Additionally, only Flangvik’s SharpCollection and Sliver’s Armory are pre-installed in the container. If the community has other sources of tooling they’d like to see pre-installed, PRs are also welcome.
Mythic has many different kinds of containers and features available, so hopefully Forge will inspire the community about other kinds of “Command Augmentation” containers they can make.
If you aren’t already aware, the BloodHound slack has open invites with a thriving community that discusses Mythic in the #mythic channel. I’m also available on Twitter, BlueSky, and Mastodon if you want to reach out.
TLDR: SlackPirate has been defunct for a few years due to a breaking change in how the Slack client interacts with the Slack API. It has a new PR by yours truly to let you loot Slack again out of the box, and a BOF exists to get you all the credential material you need to do it. I recommend you let Nemesis do the heavy lifting of finding interesting data in what you pull back.
This all started because I noticed that my brilliant colleague Matt Creel had added a new BOF to TrustedSec’s CS-Remote-OPs-BOF collection that pulled Slack cookies from the memory of either a browser or Slack client process. This would allow an operator to then utilize the stolen cookies to proxy browser traffic through a compromised machine and access the target organization’s Slack instance. He released a great blog about it if you want to learn more.
Slack is awesome, and full of valuable data about an organization. There’s the obvious stuff like people being lax and pasting credentials, but don’t forget that is also a comprehensive directory of who works there, and probably more valuable than their internal documentation (when was the last time you actually searched Confluence? Exactly.)
I was stoked to start using Matt’s BOF, since there hasn’t been an assessment where I got access to Slack where it didn’t prove useful. That said, something was nagging at me… This is the age of Nemesis! We don’t need to read anymore, reading is for squares! We have computers to do that for us while we watch short-form videos of animals with funny things on their heads (see below). Reading Slack was no exception.
A classic.
So I set out to find a good Slack looter. I quickly stumbled upon SlackPirate, created by Mikail Tunç, which seemed to be the defacto choice. And for good reason! It is simple, fairly comprehensive, and also quite modular; you can change what is being searched for with relative ease. By default though it does a lot, such as:
Scraping all messages for private keys, passwords, and cloud provider credentials
Grabbing a list of all Slack users
Downloading hosted files en-masse
Pulling important Slack-specific data, such as pinned messages
Great! I plugged in my cookie and… no dice. I was unable to authenticate to any of the API endpoints I should be able to. I knew the Slack cookie I had was valid, so it was time to investigate.
Troubleshooting
Figuring out what was the matter was pretty breezy! Slack is an Electron app, so you can still access the Chrome dev tools. Slack used to allow this by exporting a particular environment variable:
SET SLACK_DEVELOPER_MENU=TRUE && start C:\Users\<USER>\AppData\Local\slack\slack.exe
You could then access the developer tools by pressing ctrl + alt + i. This no longer works for me, so I instead opted to use Chrome remote debugging, which was successful.
(NOTE: If you’re reading this blog, there’s a good chance your security team will have an alert in place for Chrome remote debugging to prevent cookie crimes. You may want to check with them before doing this on a work computer.)
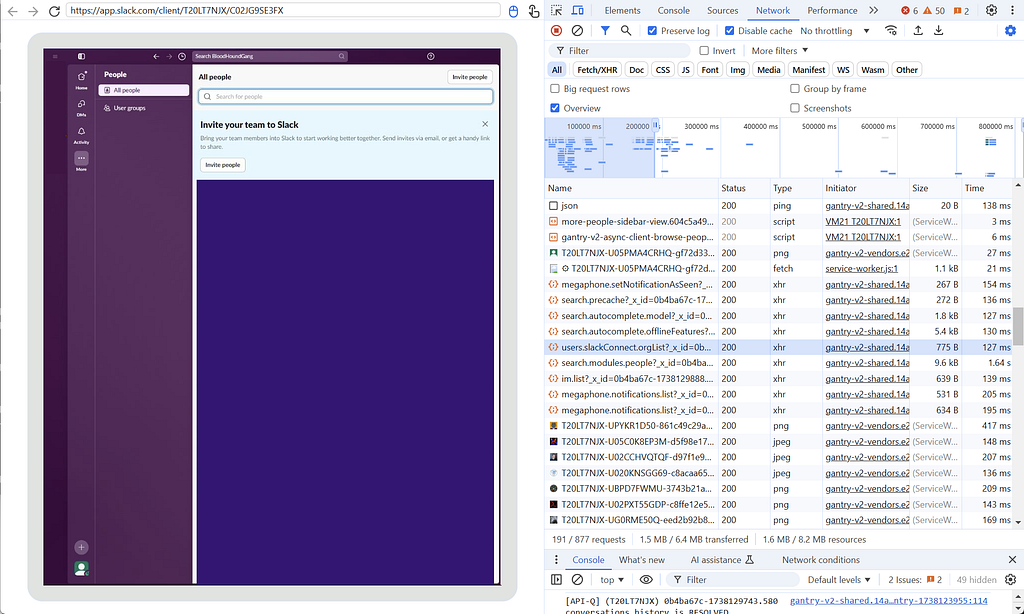
Then when you browse to chrome://inspect/ you will be able to see Slack as with option to inspect:
Chrome remote debugging
By pressing “inspect” you get your dev tools, plus a neat window of the Electron app you are debugging! I have never tried to use this to screen-peek on an Electron app over a proxy, but wouldn’t that be neat.
Inspecting Slack network traffic
My strategy at this point was to record network traffic while performing actions that seemed like they would have to be hitting a defined API endpoint from the client and seeing what the network traffic looked like. For example, going to the “users” page and finding what endpoint got hit to retrieve them. That’s what I am doing in the screenshot above for the BloodHoundGang slack (which you should join if you haven’t).
This allowed me to compare the requests with what was being performed in SlackPirate and determine what had changed to break it.
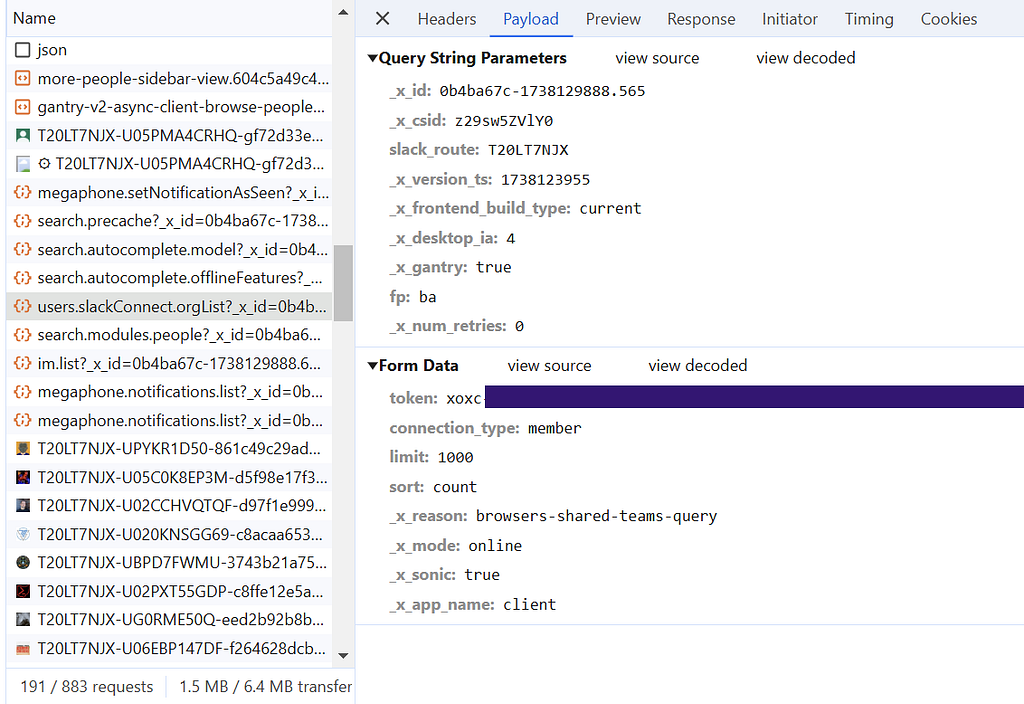
Turns out, not much! The APIs ended up being the same as before, the only piece that was missing what that now requests were made with a token included in the request payload itself, in addition to the cookie in the headers we already knew about.
An API request for user data containing an API token
As you can see, this token is also in a nice searchable format, starting with “xoxc”, so the same technique used by Matt’s BOF to pull the cookie from memory can be used for the token. Now the BOF pulls both, and can be used not only get the credential material needed to browse a target organization’s Slack via a proxy, but also interact with it programmatically.
With these two pieces of information, you can hit the Slack API just as if you were the client when a user clicks around and types. You can even make your own janky Slack bots that post out of your account… which of course I did. But you already knew that from the title. So here’s screenshots of my fellow Specters suffering while I posted the entire Bee Movie into our group chat, each line as its own message. We all know it’s what you’re here for.
🐝The aftermath
Quick aside — you may be thinking: Why go through all the trouble of doing this with the Electron client? Why not just open Slack in a web browser and inspect that traffic?
Anecdotally, I see people using the client way more often, so I wanted to make sure whatever I looked at would be representative of that. Also developers seem to trust dedicated clients more, so the tokens and cookies you snoop from them last much longer. For instance my buddy Jesko got tired of having to reauth to Slack, so he snagged a token from his phone’s client that never expires. My janky Slack bots haven’t had to reauth yet either.
SlackPirate Updates
So with our new programmatic access, it is time to loot! For the most part all of my changes to SlackPirate were updating the script to utilize the new token in addition to a cookie. There are a few other changes I threw in though that you may want to be aware of:
There was an “interactive mode” that let you interact with multiple workspaces. This functionality has been removed and you will always need to provide the appropriate token and cookie for the individual workspace you want to target as arguments to the script
The list of what files and strings are searched for by default is more focused on finding credential material, especially in file formats that are easy for Nemesis to parse
And there you have it. With these new updates, you are ready to get back to a nice easy life of not reading and letting Nemesis read your target’s whole Slack for you. So kick back and let your reading comprehension regress to a third-grade level with another classic animal-with-thing-on-head video from the cellar. It is a fine vintage.
My goal for this blog is to provide a high level overview of our recruiting process for consultants. I’ll explain what each step entails but I will not provide specific technical details or hints for any challenges. I want to demystify our recruiting process and make it less intimidating and hopefully encourage those of you who have considered taking that next step but haven’t yet.
Process Overview
Step 1: Application Review
This step may seem obvious. The first thing we do after receiving your application is review your resume and the questions you answered on the submission form. Our recruiters are excellent and will determine if an application meets the requisite criteria to advance (depending on the position and level). Everyone has a unique story, background, and experience; therefore, we give the application a holistic review. Thoughtful responses to the application questions will receive extra attention compared to applications that ignore them.
The requisite criteria for each level is outlined in the respective job postings. On a broader level, we’re looking for prior technical (offensive or defensive, depending on the role) security and consulting experience. Do you have security experience but no consulting experience? That’s OK, but it may affect the level at which we interview you (e.g., Associate, Consultant, or Senior). Sometimes we target specific levels, such as Consultant or Senior Consultant. During such periods, we may reject Associate-level applications or hold onto them until we hire Associates again in the future.
We like to see community involvement and sharing. We’re looking for candidates that share our commitment to transparency. Do you publish blogs, research, and/or tools? What has your learning and development journey been like through your career? That does not mean you have to write the next Rubeus or BloodHound. Any level of contribution goes a long way. Contributions can be blog posts, walkthroughs, notes from a course, PoC or helper scripts from a training, experimental tools, or contributions to other people’s repos. Make sure to include links to your contributions and accomplishments on your resume!
Note: Be prepared to discuss your resume content and community contributions.
Step 2: Scripting Challenge
We liked your resume and application and want to get to know you better.
The next step is a scripting challenge, where you will enter a challenge on a coding platform and solve a solution in a language of your choice. The environment is recorded but we do not set a strict time limit (e.g., one hour). We encourage you to take your time, pay attention to detail, and consult appropriate references. It is pass/fail and the solution must be exactly correct.
The challenge should be doable for anyone with fundamental scripting skills. If you’ve written automation, PoC scripts, or open-source contributions, you should be able to pass this challenge. If you are a clear senior-level candidate and have extensive open-source software contributions, we may waive the scripting challenge.
Basic scripting/programming ability is a requirement to be a successful red team operator. Therefore, this challenge identifies those that meet that minimum requirement.
Step 3: Preliminary Interview
Great! You passed the scripting challenge and made it through to the next phase. Now our recruiters will get to know you better on a video conference where they will talk about your background, experience, career aspirations, salary expectations, etc. This is also an opportunity for you to ask the recruiters questions about the position and company. This step is fairly straightforward and where the real interview process begins.
All of our interviews will be conducted virtually via video conference and we expect you to be on camera.
Step 4: Technical Challenge
After the preliminary interview, you’ll receive the prompt for a technical challenge that varies based on the role. The primary goal of the challenge is to gauge your technical depth, writing ability, and creativity. Rather than taking a pass/fail approach to assessing your response, we gauge where your submission is on a capability spectrum. We’re looking to see how deep you can go and how well you convey technical information in a clear and concise manner.
Disclaimer: Of course, there is a minimum bar. Not all submissions will advance past this round, especially when we’re seeking only more senior candidates.
The technical challenge will inform us on where your technical capabilities are in preparation for the technical interview. If your submission reads like Senior-level work, then your technical interview will be anchored at that level. There is no hard timeline on the technical challenge but you should submit it within approximately one week.
Step 5: Technical Interview
If we like your technical challenge submission, we’ll advance to the technical interview. This interview is 60 minutes and will be conducted by three senior members of our consulting staff. Similar to the previous round, we’re not looking to stump you. We will ask you about experiences and seed some topics with questions and see how deep you can go.
It is absolutely okay to say you don’t know something. It is also encouraged to talk through your thought process so the interviewers get a glimpse of how you think. Please don’t try to cover up a knowledge gap. It will be obvious. No one knows everything, and we understand that. It’s OK. Be humble and keep it real!
We’ll leave some time at the end of the interview for you to ask us questions. After all, a job interview is as much about you interviewing us as it is the converse.
Step 6: Peer Interview
Congratulations! You’ve survived the technical portions of the process. Now, you’ll meet with three of your potential Specter peers. At this stage, we want to get to know you as a person. Do you match our core values? Will you get along with the team? Will the team enjoy traveling with you for several weeks at a time? There’s no script here and not much to prepare for. Bring your genuine self, have a conversation, and have fun!
Step 7: Management Interview
At this point, you’ve almost made it. You would not have made it this far if you weren’t a good fit. Now, management will meet with you for 60 minutes to discuss your experience, professional development, career growth, etc. This is not a technical interview. If we ask how you did something or how you handled a situation, we’re not looking for technical depth. As always, we’re gauging your alignment with our core values and at what level you should be hired.
As with every previous step, bring your genuine self. Dishonesty and resume discrepancies are commonly identified at this stage.
Why So Many Steps?
The interview process may seem like a lot, and it is, but we pride ourselves on building the right teams with the right people. As much as we want to welcome you into our ranks, we also want to focus on candidates that want to be here. Those candidates will understand the seven steps and work through them to earn their spot on the team.
We’re not looking to stump you or fail you out of the process. We take a holistic view of you as a person, red team operator, and consultant. Inherently, this requires more steps.
You’re interviewing us too. Choosing a company to work with is not a decision to be taken lightly. You spend eight hours per day, five days per week with your colleagues. Through our process, you’ll directly interface with at least 10 Specters, which should help you gain a solid understanding of who we are and what we’re all about.
We strive to complete the entire process in less than four weeks and we’ve completed it in as little as two weeks. However, we understand life happens and we are flexible with scheduling.
Still Unsure?
Don’t think you’re “ready” to join the SpecterOps team? To be honest, a lot of us felt the same way before applying. We all suffer from imposter syndrome and we empathize with you. We will keep this in mind throughout the interviews and will do our best to alleviate those concerns. As you progress through the process, just remember: you’ve made it that far for a reason. To quote an excellent talk from Billy Boatright (and Babe Ruth) at the Social Engineering Village several years ago, “If you’re good enough to have a bat in your hands, you’re good enough to swing it.” So, swing for the fences!
We will help you reach your technical goals. What’s most important to us is aptitude, attitude, and alignment with our core values. Don’t wait for the “right time.” We want to talk to you now!
Next Steps
We will grow steadily throughout 2025 and we’d love to have you apply!
We are hiring consultants at various levels. The job posting (including salary bands) can be found under the Consultant openings here: https://specterops.io/careers/#careers
Please feel free to reach out to me on Bluesky, X, LinkedIn, or BloodHound Slack if you have any questions about SpecterOps or the role, or directly to careers@specterops.io.
It’s no secret that Microsoft have been trying to move customers away from ADFS for a while. Short of slapping a “deprecated” label on it, every bit of documentation I come across eventually explains why Entra ID should now be used in place of ADFS.
And yet… we still encounter it everywhere! Even in organisations that have embraced Entra ID, we have Hybrid Joined environments which often mix federated authentication in with cloud management. So while it’s nice to chase the shiny new thing, building knowledge around ADFS is still a worthwhile way to spend an evening.
So in this post we’re going to focus on some ADFS internals. We’ll be staying clear of the SAML areas which have been beaten to death, and instead we’re going to look at OAuth2, and how it underpins the analogues to Entra ID security features like Device Registration and Primary Refresh Tokens.
I’m honestly not sure how useful any of this post will be in a practical sense. I’ve tried to gather data on internet facing ADFS servers to see what configurations are out there to help hone my research, but I found this area way too interesting to leave on my Notion notebook to rot.
So if a single person is able to make use of this content to achieve their objective in a future assessment, or just to understand why the msDS-Device object exists, it was worth posting.
ADFS and OAuth2
You’d be forgiven for thinking that ADFS is primary a SAML token generator. After all, most post-ex techniques focus on areas like Golden SAML, having been used with success on countless engagements over the years.
But the other side to ADFS is OAuth2. Of course there is a coating of “Microsoft Stank” (as my colleague @hotnops likes to call it when presenting research into some Entra ID madness) applied to the terms that Microsoft use, but it’s very much an OAuth2 provider under the hood.
I’ll begin by giving a very quick overview of OAuth2 on ADFS to set the stage for what we will discuss later on.
Let’s start with how to set up a simple OAuth2 integration. In the ADFS management console we have “Application Groups”:
This is where ADFS allows configuration of OAuth2 clients and servers. We’ll set up a new Application Group and call it “Test App Group”, where we’ll be presented with a number of templates:
Microsoft provide an overview of each template via the “More information” button, but this table from the documentation provides a useful set of translations to understand Microsoft’s OAuth2 terminology:
For now, let’s choose the “Web browser accessing a web application” template. We’ll use the ClaimsXRay.net web application as our target, which is a nice application used to test IdP integrations (modelled after Microsoft’s own deprecated ClaimsXRay service).
On the next screen we need to assign the Client Identifier and redirect URI which we’ll set to https://claimsxray.net/token:
Take note of the Client Identifier which will be used to identify our client configuration later.
The next dialog determines who can access the OAuth2 resource provider. Again we’ll just go with “Permit Everyone” here to allow all authenticated ADFS users to access the application, but there are multiple options to restrict which accounts are permitted access:
One additional thing we need to do is configure CORS. This allows ClaimsXRay to make a XHR request to ADFS when exchanging a code for an access token.
As is often the case with ADFS, there isn’t a management console option to do this and instead we need to use PowerShell:
# Enable CORS support Set-AdfsResponseHeaders -EnableCORS $true Set-AdfsResponseHeaders -CORSTrustedOrigins https://claimsxray.net
And with that we’re done. We can test that things work by kicking off the flow on ClaimsXRay.net, providing our Client ID that was generated above, as well as the URL’s to our lab ADFS instance:
If you click Login, you should see that an access token is returned. We’ll also get an identity token due to the openid scope requested:
Now we have some insight into how ADFS handles OAuth2 registration at a very high level, let’s start taking a look at some of the less documented features.
Device Registration Services
While reversing ADFS, I came across a number of “hidden” OAuth2 Client ID’s embedded in the binaries:
The one that grabbed my attention was DrsClientIdentitier. If the DRS term looks familiar, it’s likely because you’ve encountered it in the Entra ID world as Device Registration. But for those organisations that like to manage device registration themselves, DRS is also supported on-prem in various forms. Now when I say “supported”, it takes a lot of messing around to get DRS to actually work standalone, so I think it’s been left by Microsoft to die. You are much more likely to encounter this within an organisation which has previously enabled DRS before Entra ID, or as part of the Entra ID Hybrid Join scenarios we’ll explore later.
To enable DRS on ADFS, you use the “Device Registration” feature which will deploy the pre-reqs required to support this in Active Directory:
If we query ADFS via the /EnrollmentServer/contract?api-version=1.2 path, we get a list of DRS descriptors:
These point to various DRS API services which we will explore later, but before we get too ahead of ourselves, let’s take a quick detour into ADFS authentication methods so we can set the scene for device authentication later on.
Authentication Methods
ADFS has a concept of “extranet” and “intranet”. For most organisations, ADFS is exposed on the perimeter via a web proxy, and internal network users typically interact with the ADFS service directly.
You can see that this split is populated down to the configuration of ADFS, with the endpoints being distinctly listed (in this case as “Enabled” and “Proxy Enabled”, because consistent terminology in Microsoft world is hard):
This distinction is also surfaced via the authentication methods supported by ADFS, allowing different methods of validating credentials per “Extranet” and “Intranet” (told you Microsoft consistent terminology was hard):
You have likely come across a few of these options during your engagements. For example, “Forms Authentication” is the presentation of the ADFS login form:
“Windows Authentication” is the NTLM/Kerberos WIA methods that you’ve no doubt tried to relay to in the past, and is only supported on the Intranet.
For DRS to function properly, there is the “Device Authentication” option, which needs to be enabled and be accessible via the Extranet/Intranet zones you have access to.
Device Authentication requires DRS to be enabled, and it isn’t enabled by default unfortunately for us attackers. So again, you are much more likely to see this in either legacy environments, or environments using Hybrid Join.
There are multiple ways that Device Authentication can function depending on the configuration. In ADFS ≥ 2016, we have:
ClientTLS
PRT
PKeyAuth
The method of Device Authentication is controlled in part by the Set-AdfsGlobalAuthenticationPolicy PowerShell commandlet:
Set-AdfsGlobalAuthenticationPolicy –DeviceAuthenticationMethod All
Out of the box, ADFS 2012 only supports ClientTLS. However ADFS ≥ 2016 uses SignedToken
So how can we enumerate a tenant to determine the enabled device authentication method? Well it’s mostly a game of elimination. If we want to see if ClientTLS Device Authentication is enabled for ADFS without having access to the configuration, a curl request for the endpoint with the trace argument would reveal this:
curl -k 'https://adfs.lab.local/adfs/ls/idpinitiatedsignon.aspx?client-request-id=77de249e-f9b5-4921-c301-0080000000b9' -v -X POST -d 'SignInIdpSite=SignInIdpSite&SignInSubmit=Sign+in&SingleSignOut=SingleSignOut' --trace out.txt
We’re looking for MS-Organization-Access as the CA in the client certificate request (13). If you see this, then ClientTLS Device Authentication is enabled for the network endpoint you are requesting. And this means if we have the appropriate Device Authentication certificate, we can authenticate to ADFS.
If we wanted to check if PKeyAuth is enabled, we need to make a request with the ;PKeyAuth/1.0 string within the User-Agent string:
curl -k 'https://adfs.lab.local/adfs/ls/idpinitiatedsignon.aspx?client-request-id=77de249e-f9b5-4921-c301-0080000000b1' -v -X POST -d 'SignInIdpSite=SignInIdpSite&SignInSubmit=Sign+in&SingleSignOut=SingleSignOut' --user-agent "Mozilla/5.0 (compatible; MSIE 8.0; Windows NT 6.1; Trident/4.0);PKeyAuth/1.0
If the response comes back with a 302 to urn:http-auth:PKeyAuth then we know that PKeyAuth is used:
If neither of the above are true, then PRT authentication is in use. We’ll review this option further in the post.
Now that we understand how Device Authentication works, the next question is… where is all this key, certificate, authentication information stored?
msDS-Device
You may have come across the msDS-Device LDAP class, which lives in the CN=RegisteredDevices,DC=domain,DC=com container:
The msDS-Device object is a representation of a registered device. Unlike a Computer object, it isn’t a security principal, but it does contain a number of familiar attributes, such as:
altSecurityIdentities
msDS-KeyCredentialLink
As the msDS-Device isn’t a security principal, things like “Shadow Credentials” aren’t going to work as there is no identity associated with the device. So what is being stored here?
In the case of msDS-Device, the altSecurityIdentities field is used to store the public key of the Device Authentication certificate we generate during Device Registration.
There is also another important field, msDS-RegisteredOwner which is associated with the SID of the user account used to create the device registration along with msDS-RegisteredUsers:
This is where things diverge slightly depending on the authentication method we commented on above. If ClientTLS is in use, and we authenticate with the certificate used during device registration, the user account that you are authenticated to ADFS as will be the SID of these fields. This isn’t the case if SignedToken is used, so I believe that this is an example of an older version of ADFS device registration before PRT’s become the norm.
This also means that if during your assessment you find yourself with write permission over a msDS-Device object (and Device Authentication is enabled with ClientTLS), you have the ability to authenticate to ADFS as any principal by updating both the msDS-RegisteredOwner and msDS-RegisteredUsers fields to point to the SID of any user.
As I mentioned above, the msDS-Device is created and fields are populated during Device Registration. Let’s take a look at the authentication process for how a device actually becomes registered.
Creating a DRS Access Token
To authenticate against DRS, we need an OAuth2 access token. The DRS client ID we observed in the disassembly at the start of the post is “public”, meaning that there aren’t any OAuth2 secrets to know when making a request.
We can validate this by using the Get-AdfsClient commandlet:
We can also see the supported RedirectUri required for authentication.
So if we are in a scenario where we have valid credentials for an account on ADFS, we can start the DRS client OAuth2 flow with:
GET /adfs/oauth2/authorize?response_type=code&
client_id=dd762716-544d-4aeb-a526-687b73838a22&
resource=urn:ms-drs:434DF4A9-3CF2-4C1D-917E-2CD2B72F515A&
redirect_uri=ms-app://windows.immersivecontrolpanel/ HTTP/1.1
Host: adfs.lab.local
This will start the authorisation code flow and, depending on the Authentication Methods enabled, we can login with credentials to create a OAuth2 auth code. If we successfully authenticate, we’ll see the code parameter passed back to our redirect URI:
This code is then exchanged for an access token using:
POST /adfs/oauth2/token HTTP/1.1 Host: adfs.lab.local User-Agent: Windows NT 1 Content-Type: application/x-www-form-urlencoded Content-Length: 536
One important caveat here however is that the DRS service has the following authentication policy assigned:
This means that MFA is required if we are authenticating as a user account to ADFS (or we can authenticate as a Computer Account and bypass this, but this isn’t so useful at the moment).
So what happens if we hit this ACL? Well during authentication, we’ll see the following error:
Unfortunately if this access control policy is in place, this stops us in our tracks of attempting to create a msDS-Device using stolen credentials, unless…
DRS OAuth2 Client Support Device Code Flow
To be honest, the fact that the Device Code Flow even exists in ADFS was news to me, but it does. And it’s enabled for the DRS client by default. In fact it’s enabled for every OAuth2 client on ADFS by default, which should make things fun when assessing other OAuth2 integrations.
So how does this work? Well to initiate this flow for DRS, you would first make a call to /adfs/oauth2/devicecode with our client ID and resource:
POST /adfs/oauth2/devicecode HTTP/1.1 Host: adfs.lab.local Content-Type: application/x-www-form-urlencoded Content-Length: 103
This will return your usual OAuth2 device code information:
HTTP/1.1 200 OK
...

{
"device_code":"8uODMKe4OEGu4[...]8fG640TTMxOQ",
"expires_in":899,
"interval":5,
"message":"To sign in, use a web browser to open the page https:\\/\\/adfs.lab.local\\/adfs\\/oauth2\\/deviceauth and enter the code SYGTLXSGB to authenticate.",
"user_code":"SYGTLXSGB",
"verification_uri":"https:\\/\\/adfs.lab.local\\/adfs\\/oauth2\\/deviceauth",
"verification_uri_complete":"https:\\/\\/adfs.lab.local\\/adfs\\/oauth2\\/deviceauth?user_code=SYGTLXSGB&client-request-id=b08b3ca6-6a56-4cf3-1b00-0080000000e3",
"verification_url":"https:\\/\\/adfs.lab.local\\/adfs\\/oauth2\\/deviceauth"
}
You would then direct your victim to the URL indicated (you can also pre-fill the code with the user_code parameter)
When the user authenticates (and hopefully completes the required MFA steps to validate the ACL above), you retrieve the access_token by making the following call to /adfs/oauth2/token:
POST /adfs/oauth2/token HTTP/1.1 Host: adfs.lab.local Content-Type: application/x-www-form-urlencoded Content-Length: 587
And with the access_token returned (and a refresh_token which we will need later), we have a authentication token scoped to the DRS service.
So once we have an Access Token, how do we turn this into a device registration?
DeviceEnrollmentWebService.svc
You may have seen earlier that DeviceEnrollmentWebService.svc was in the XML from the /EnrollmentServer/contract endpoint:
This web service can be used along with an Access Token for the urn:ms-drs:434DF4A9-3CF2-4C1D-917E-2CD2B72F515A resource to register a new msDS-Device resource.
The format of the SOAP request that we use to register a device using this endpoint is:
POST https://adfs.lab.local/EnrollmentServer/DeviceEnrollmentWebService.svc HTTP/1.1 Content-Type: application/soap+xml; charset=utf-8 ...
Unfortunately this isn’t going to be another ESC99 style attack as the CA used to sign the token is the ADFS internal CA rather than ADCS (I can read your mind). But we’ll need this when using Device Authentication later.
If we take this base64 encoded certificate and decode it we get something like this:
We take the EncodedCertificate value and base64 decode this to generate our signed public key certificate. Usually it’s best to combine this with the private key into a PFX with something like:
So once we have completed this SOAP request and we have our signed certificate, in Active Directory, we’ll find our new msDS-Device object:
If we are shooting for accessing ADFS using ClientTLS, this should be enough. However as we’ll see later on when looking at SignedToken, there are a few issues with this SOAP API method of creating a new msDS-Device. The big one for us is that the msDS-KeyCredentialLink attribute isn’t populated in AD (for anyone who has explored Entra ID before, you’ll likely know that this is required for the session transport key used during the PRT provisioning process).
As a side note, I “think” that this web service was actually used to support an earlier iteration of DRS, before Entra ID was so tightly integrated with Windows. During the Windows 8 days, DRS was a simpler method of generating certificates for device authentication and using ClientTLS, which makes sense as to why the msDS-KeyCredentialLink parameter was never used… but this is just a guess.
EnrollmentServer REST API
The second endpoint referenced in the /EnrollmentServer/contract endpoint is the /EnrollmentServer/device/ service:
This REST API is the more complete way to create a new msDS-Device as it allows us to provide values for the msDS-KeyCredentialLink (huge thanks to @DrAzureAD and the post “Deep-dive to Azure AD device join” which saved a lot of time and effort uncovering the structure of this request, you’re contributions to the infosec scene are always appreciated!):
We authenticate to this service using a more traditional Authorization header, providing our DRS Access Token as a bearer.
Again a few additional things to note with the body of this request. The first is the JoinType. This can be set to one of the following values (not all are actually supported unfortunately):
Again this results in a new msDS-Device object, but now with the msDS-KeyCredentialLink attribute populated to our TransportKey value:
So now we can enrol our devices, how do we actually go about authenticating ourselves using the Device Authentication methods explored earlier?
Well we’ve already discussed ClientTLS quite a bit in this post, which is your basic Certificate Authentication (I usually just use Burp Suite for this):
But what about if ClientTLS isn’t in use?
Enterprise Primary Refresh Token
Another new discovery for me, was that Primary Refresh Tokens are supported on ADFS. And as we saw earlier, this is the default method of Device Authentication supported after ADFS 2016 as SignedToken.
This works mostly in the same way as Entra ID, so it’s essential that I give a massive shout out to @_dirkjan and his epic work in this area with ROADTools,blog posts and training. His work and sharing of knowledge provided a huge portion of examples and code to work with while looking at this on ADFS.
So first we need a nonce value which is requested from /adfs/oauth2/token:
The required content of this JWT are documented in MS-OAPXBC. As with Entra ID, we can authenticate our user within the JWT using one of three methods:
Username / Password
Refresh Token
Signed JWT
For our purpose we’ll use a Refresh Token as we already have this from the earlier Device Code authentication flow:
The session_key_jwe field is needed for exchanging the PRT for an Access Token, which is in turn encrypted using the msDS-KeyCredentialLink value which we added earlier during Device Registration.
To decrypt these values, we can use the decrypt_jwe_with_transport_key from ROADTools code which looks something like:
Once we have the PRT and the session key, we then have a few options to use it. The first is the usual PRT to Access Token for a resource. This needs a JWT signed with the session token to be generated:
The response to this is (exactly like their Entra ID counterparts) encrypted using JWE and need to be decrypted. The code for this already exists in ROADTools decrypt_auth_response_derivedkey function so we can use this to cobble together:
The second use case is the familiar x-ms-RefreshTokenCredential header, which can be used to login to ADFS directly (useful for things like accessing /adfs/ls/idpinitiatedsignon.aspx):
If we inject this token to the header of a request to /adfs/ls/idpinitiatedsignon.aspx, we’ll see that we can be logged in:
To make this all a bit easier when playing around, I’ve created a few Python scripts which can be found at https://github.com/xpn/adfstoolkit:
register_device.py - Performs DRS registration to create msDS-Device
access_token.py - Requests Access Token from PRT
eprt.py - Generates a new Enterprise PRT
Then Along Came Azure Hybrid Join
So we have all of this DRS functionality.. what happens if the environment we are assessing uses Hybrid Join to Entra ID? In that case, we actually find that DRS turns itself off as we can see in the disassembly of ADFS:
But while this turns off the DRS HTTP services, it still allows Device Authentication. But why? Wouldn’t it makes sense to disable all device registration functionality? Well not quite, as Entra ID still supports ADFS Device Authentication in the form of Device Writeback.
Entra Connect Device Writeback
If Device Writeback has been enabled during the rollout of Entra Connect, msDS-Device objects are synced with their Entra ID device object counterparts.
In Entra Connect we see the option to enable Device Writeback:
When a new device is registered in Entra ID, we see that the ID is written to the CN=RegisteredDevices container exactly the same as our previous DRS registration examples, with the difference that the MSOL_ account will be the owner of the object rather than the ADFS service account:
And with the many attacks possible against Entra ID, this can provide an avenue to migrate your access to ADFS using the methods outlined in the post.
So with that said, let’s take a quick recap of the attack paths we’ve passed on the way to this point:
If an organisation has DRS enabled, and doesn’t have Hybrid Join in the Service Connection Point LDAP entry, you can potentially phish using Device Code OAuth2 flow for access to ADFS.
If an organisation has DRS enabled, but has enabled Hybrid Join in the Service Connection Point LDAP entry, DRS web services are disabled, but Device Writeback can provide a method of accessing ADFS if a new Entra ID device registration is performed.
Regardless, if ADFS uses OAuth2, Device Code auth is likely enabled, so again, phishing can be used to target other application integrations.
And if we can control a msDS-Device and Device Authentication is enabled, we can authenticate to ADFS as any user by modifying msDS-RegisteredOwner and msDS-RegisteredUsers and using a device certificate
Let’s finish things off by looking at the concept of a Golden JWT.
Golden JWT
This is similar to Golden SAML in that if we have the correct signing key, we can forge the appropriate JWT’s for third-party integrations.
Let’s use the previous ClaimsXRay lab that we previously setup to target:
As we see during the happy flow, the claims in the token are reflected back to us:
Now let’s see if we can spoof the claims in the JWT! If we analyse the contents of an existing access token, we get our hint about what is being used to sign the JWT:
The x5t header value is the thumbprint of the certificate used to sign. Decoding this we see:
If we look at the signing certificate for our ADFS instance:
This means that the same certificate we’ve been dumping for Golden SAML is also used for JWT signing, which makes life easier for us as the tooling and techniques for dumping this is already available here.
If we use the private key, we can craft a simple Python script to generate a new JWT with any claims we want:
import jwt from cryptography.hazmat.primitives import serialization from cryptography.hazmat.primitives.asymmetric import rsa from cryptography.hazmat.primitives import hashes from cryptography.hazmat.primitives.asymmetric import padding from cryptography.x509 import load_pem_x509_certificate import base64 import sys import json import hashlib import time
And again we can replace the generated access token delivered to ClaimsXRay and see that we can add any claims or scopes that we want:
Conclusion
So there we have it, a brain dump of ADFS OAuth2, DRS, Device Authentication, Device Writeback and some Golden JWT. Some useful bits, and some less useful (but equally interesting) bits.
If you’re the one Googling for a UUID having just stumbled across your clients ADFS deployment, hopefully this post provides something to make your life a bit easier.
And if that’s the case, give me a shout and share the story!
This is part one in a two (maybe three…) part series regarding attacker tradecraft around the syncing mechanics between Active Directory and Entra. This first blog post is a short one, and demonstrates how complete control of an Entra user is equal to compromise of the on-premises user. For the entire blog series the point I am trying to make is this:
The Entra Tenant is the trust boundary
That means that if your tenant consists of 100 domains, a compromise of one domain is likely to equal a compromise in all other domains, assuming line of sight to the targeted domain.
Intro to Entra Connect Sync
Entra Connect Sync is the software responsible for propagating changes between Active Directory and Entra (often still referred to as Azure Active Directory). For most cases, the changes are propagated from Active Directory to Entra. As a quick example, consider a new user created in an on-premises Active Directory. The next time Entra Connect Sync runs a sync cycle, a special Entra sync account will send a provisioning message to adminwebservice.onmicrosoft.com to create a new Entra user that represents that user. This process has been covered very well and tooling exists to manipulate this syncing mechanic in AADInternals. An interesting, and fairly unexplored, part of this mechanic is the “metaverse” within Entra Connect.
The metaverse is a virtual representation of multiple data sources. Think of it like a conflict manager for directories. Each data source (AD and Entra) are called “connected directories”. The connected directories are enumerated via remote protocol (LDAP, https, etc.) by a connected directory specific “connector”. Each connected directory has a virtual representation called a “connector space” that represents all of the desired data synced from the connected directory. Once a connected directory runs an “import”, all of the users/devices/groups/etc. exist in the connector space. After import, a synchronization is executed and the connector space objects are “projected” into the metaverse.
The metaverse object is the aggregation of all associated properties from multiple connected directories. Since this is an abundance of lingo, let’s walk through an example. In Active Directory, I’m going to create a user named “jack.burton@hybrid.hotnops.com”. Once the user is created, we run a “delta import” in the Synchronization Service
As you can see, we have one “Add” and the user Jack Burton now exists in the connector space, but not the Metaverse yet.
In order for the Jack Burton user to be projected into the metaverse, we need to run a sync. In this case, I’ll run a delta sync.
Clicking on the “Projections” link, we can see that a new user has been projected into the Metaverse.
There is also a new export attribute flow, which indicates that this user is to be provisioned to another connected directory (Entra). To trigger this provision, we lastly need to run an export on the Entra connector space.
Don’t worry about the export errors, I have been doing stuff. At this point, we have an end to end flow of an object being created in AD, projected into the metaverse, and then provisioned in Entra. But from the Entra Connect standpoint, there’s no special differentiator between Entra and Active Directory, they are both simply connector spaces.
So can attributes go from Entra to Active Directory?
Yes!
The flow of attributes are specified by the Entra Connect rules, which have a default setup that I will speak to in the next blog post. By default, there is one and only one attribute that is written from an Entra user to an Active Directory user and that is the searchableDeviceKey -> msDS-KeyCredentialLink attribute flow. If msDS-KeyCredentialLink sounds familiar, it’s because it has been covered extensively as an abuse primitive known as “Shadow Credentials”. Long story short, if we can add a public key to the msDS-KeyCredentialLink attribute of a user, we can obtain a TGT for that user with the private key. This means that if we can add a key to an Entra user, we can authenticate as them on-premises. This will prove to be a powerful primitive in the following blog posts when we do a deeper dive on Metaverse and cross domain attacks.
Abusing the WHFB key to gain access to on-premises account
Any key material (Window Hello For Buiness or FIDO2) key that is added to an Entra user will be synced down to the on-premises user to the msDS-KeyCredentialLink attribute. To perform this attack, we are assuming complete control of an Entra user account. This includes plaintext password and access to MFA methods. We will try to ease these assumptions later, but for now I simply want to prove-out the idea.
Here are the following commands that we can run to get an msDS-KeyCredentialLink set on the on premises user. As a high level overview, we are going to be registering a WHFB key. We could also do a FIDO2 key in theory, but this will be easier for demonstration. This attack, at the moment, requires knowledge of the plaintext password and possession of at least one MFA authenticator. To register a WHFB key, we are going to create a fake device, obtain a PRT, and enrich it with an ngcmfa claim. A lot of the heavy lifting for this has already been done by Dirjkan in the roadtools toolkit. The steps are as follows:
Obtain a token for the enterprise device registration resource server
roadtx winhello –access-token <token from previous step>
At this point, we have added a WHFB key to the Entra user and now need to wait up to 30 minutes for it to sync down to the on-premises user. For the sake of this writeup, I can manually trigger the sync, but note that this is not a normal order of operations for Entra Connect sync. In this image, we can see that a new property has been ingested into the Entra connector space.
The delta sync shows that the updated property has been projected onto the joined user in the metaverse.
Lastly, the export shows that the msDS-KeyCredentialLink has been provisioned to the Active Directory user, as shown in the msDS-KeyCredentialLink row.
We have shown that an attacker can add a public key to the msDS-KeyCredentialLink property, but now what?
We need to do some massaging with the key material to obtain a TGT for jack.burton.
First, we need to create a certificate signing request with the key we registered above
And there you have it, we obtained a TGT for a user by actions we took on the Entra side. You may be wondering
“If we have the user plaintext password, why would we need or even want to do this?”
I have three answers:
In the event that an attacker has the ability to modify a user password in Entra when password writeback is disabled, this will enable them to access the account on-premises.
The primitive of adding a key to a user may not necessarily require a password or access to an MFA authenticator. I am currently in search of better ways to do this, and I suspect that there are many ways to achieve the same result.
The primitive of adding a key to an Entra user will serve as a foundation for the cross domain attacks we will perform in the next two parts of this blog series. In many cases, we control the user, password, and MFA authenticators.