The primary goal for attackers in a phishing campaign is to bypass email security and trick the potential victim into revealing their data. To achieve this, scammers employ a wide range of tactics, from redirect links to QR codes. Additionally, they heavily rely on legitimate sources for malicious email campaigns. Specifically, we’ve recently observed an uptick in phishing attacks leveraging Amazon SES.
The dangers of Amazon SES abuse
Amazon Simple Email Service (Amazon SES) is a cloud-based email platform designed for highly reliable transactional and marketing message delivery. It integrates seamlessly with other products in Amazon’s cloud ecosystem, AWS.
At first glance, it might seem like just another delivery channel for email phishing, but that isn’t the case. The insidious nature of Amazon SES attacks lies in the fact that attackers aren’t using suspicious or dangerous domains; instead, they are leveraging infrastructure that both users and security systems have grown to trust. These emails utilize SPF, DKIM, and DMARC authentication protocols, passing all standard provider checks, and almost always contain .amazonses.com in the Message-ID headers. Consequently, from a technical standpoint, every email sent via Amazon SES – even a phishing one – looks completely legitimate.
Phishing URLs can be masked with redirects: a user sees a link like amazonaws.com in the email and clicks it with confidence, only to be sent to a phishing site rather than a legitimate one. Amazon SES also allows for custom HTML templates, which attackers use to craft more convincing emails. Because this is legitimate infrastructure, the sender’s IP address won’t end up on reputation-based blocklists. Blocking it would restrict all incoming mail sent through Amazon SES. For major services, that kind of measure is ineffective, as it would significantly disrupt user workflows due to a massive number of false positives.
How compromise happens
In most cases, attackers gain access to Amazon SES through leaked IAM (AWS Identity and Access Management) access keys. Developers frequently leave these keys exposed in public GitHub repositories, ENV files, Docker images, configuration backups, or even in publicly accessible S3 buckets. To hunt for these IAM keys, phishers use various tools, such as automated bots based on the open-source utility TruffleHog, which is designed for detecting leaked secrets. After verifying the key’s permissions and email sending limits, attackers are equipped to spread a massive volume of phishing messages.
Examples of phishing with Amazon SES
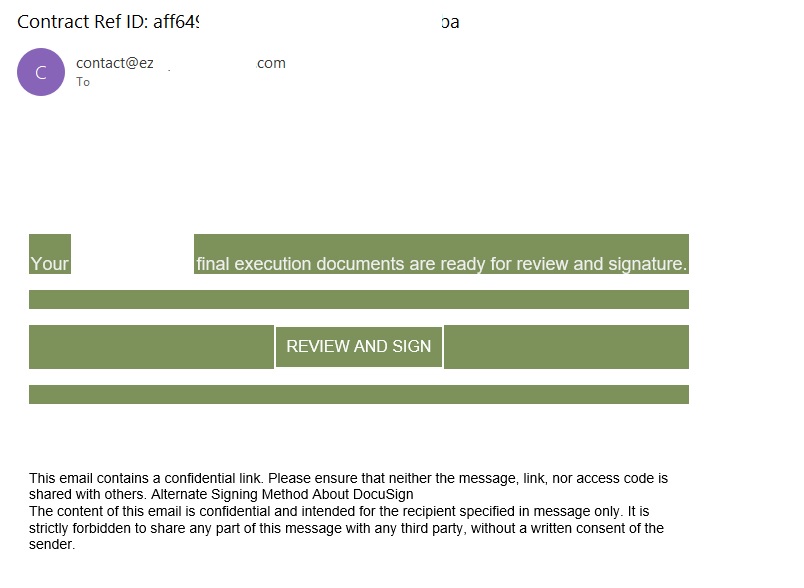
In early 2026, one of the most common themes in phishing emails sent with Amazon SES was fake notifications from electronic signature services.
Phishing email imitating a Docusign notification
The email’s technical headers confirm that it was sent with Amazon SES. At first glance, it all looks legitimate enough.
Phishing email headers
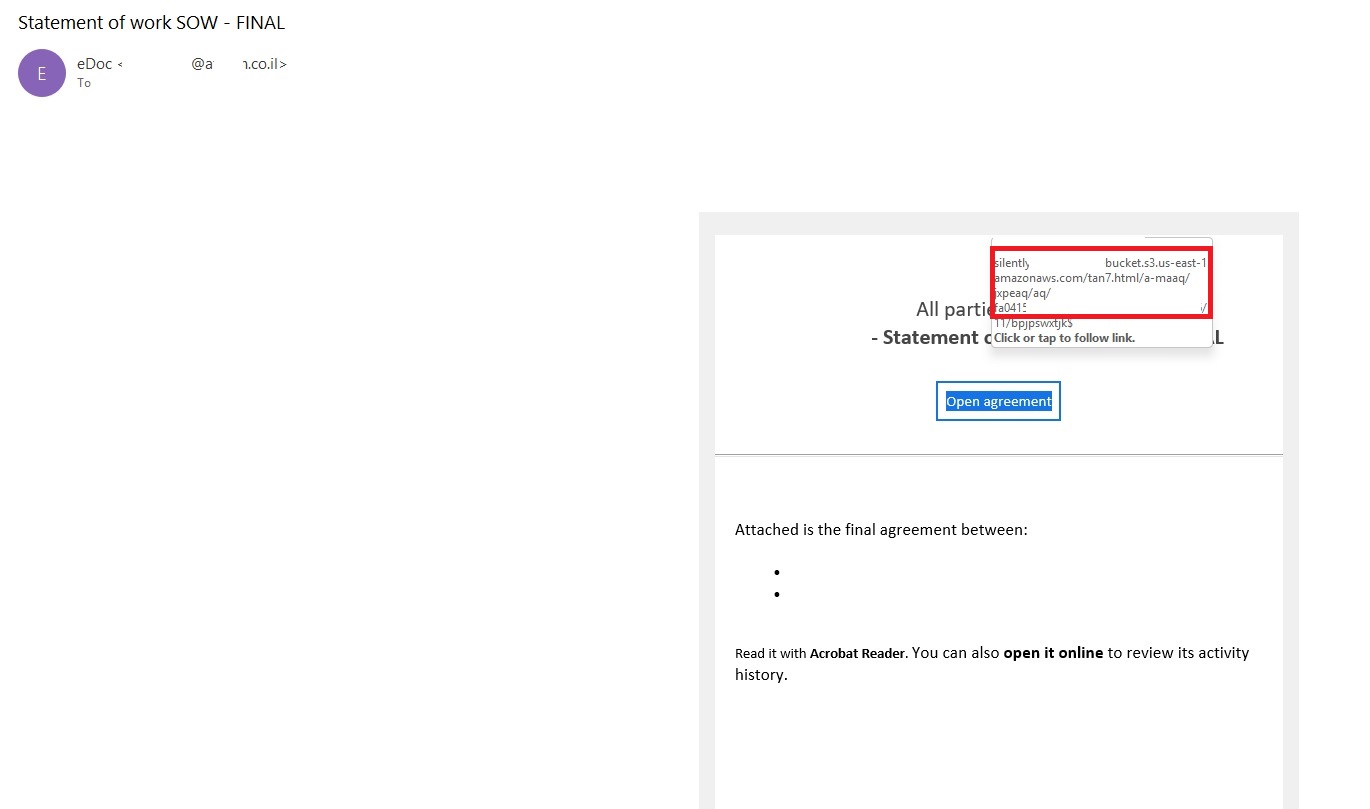
In these emails, the victim is typically asked to click a link to review and sign a specific document.
Phishing email with a “document”
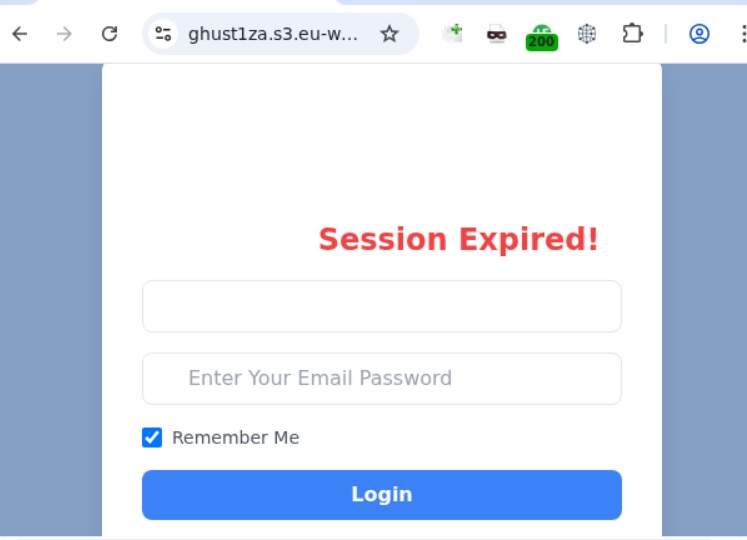
Upon clicking the link, the user is directed to a sign-in form hosted on amazonaws.com. This can easily mislead the victim, convincing them that what they’re doing is safe.
Phishing sign-in form
The resulting form is, of course, a phishing page, and any data entered into it goes directly to the attackers.
Amazon SES and BEC
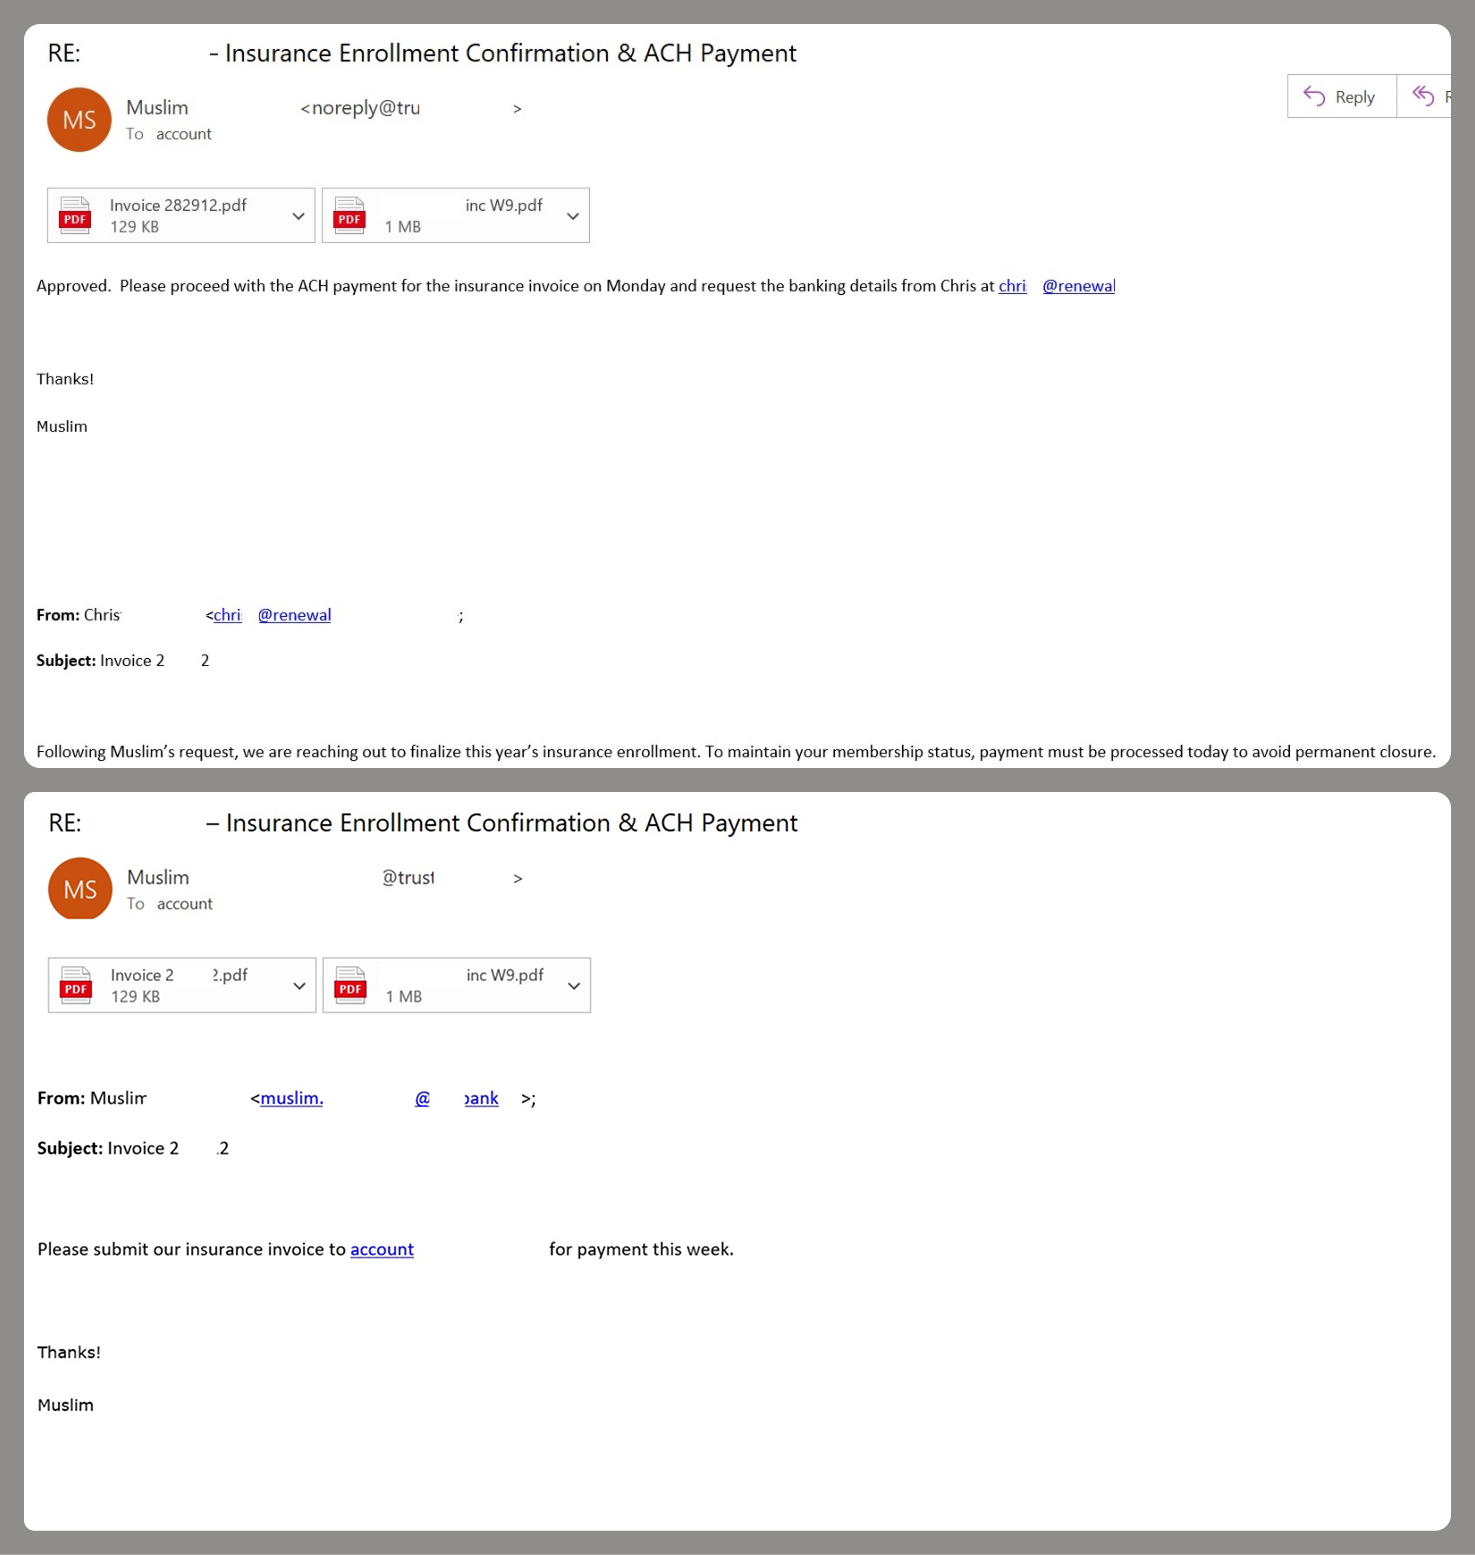
However, Amazon SES is used for more than just standard phishing; it’s also a vehicle for a very sophisticated type of BEC campaigns. In one case we investigated, a fraudulent email appeared to contain a series of messages exchanged between an employee of the target organization and a service provider about an outstanding invoice. The email was sent as if from that employee to the company’s finance department, requesting urgent payment.
BEC email featuring a fake conversation between an employee and a vendor
The PDF attachments didn’t contain any malicious phishing URLs or QR codes, only payment details and supporting documentation.
Forged financial documents
Naturally, the email didn’t originate with the employee, but with an attacker impersonating them. The entire thread quoted within the email was actually fabricated, with the messages formatted to appear as a legitimate forwarded thread to a cursory glance. This type of attack aims to lower the user’s guard and trick them into transferring funds to the scammers’ account.
Takeaways
Phishing via Amazon SES is shifting from isolated incidents into a steady trend. By weaponizing this service, attackers avoid the effort of building dubious domains and mail infrastructure from scratch. Instead, they hijack existing access keys to gain the ability to blast out thousands of phishing emails. These messages pass email authentication, originate from IP addresses that are unlikely to be blocklisted, and contain links to phishing forms that look entirely legitimate.
Since these Amazon SES phishing attacks stem from compromised or leaked AWS credentials, prioritizing the security of these accounts is critical. To mitigate these risks, we recommend following these guidelines:
Implement the principle of least privilege when configuring IAM access keys, granting elevated permissions only to users who require them for specific tasks.
Transition from IAM access keys to roles when configuring AWS; these are profiles with specific permissions that can be assigned to one or several users.
Enable multi-factor authentication, an ever-relevant step.
Configure IP-based access restrictions.
Set up automated key rotation and run regular security audits.
Use the AWS Key Management Service to encrypt data with unique cryptographic keys and manage them from a centralized location.
We recommend that users remain vigilant when handling email. Do not determine whether an email is safe based solely on the From field. If you receive unexpected documents via email, a prudent precaution is to verify the request with the sender through a different communication channel. Always carefully inspect where links in the body of an email actually lead. Additionally, robust email security solutions can provide an essential layer of protection for both corporate and personal correspondence.
I was scrolling through my feed one evening when I came across OpenClaw, an open source personal AI assistant that people were calling everything from “Jarvis” to “a portal to a new reality.” The idea is beautiful: an AI that lives on your machine or in the cloud, talks to you over WhatsApp or Telegram, clears your inbox, manages your calendar, browses the web, runs shell commands, and even writes its own plugins. Users were having it check them in for flights, build entire websites from their phones, and automate things they never thought possible.
My first reaction was the same as everyone else’s: this is incredible.
My second reaction was…different. I started thinking about what happens when that kind of power meets a malicious prompt. What if someone tricks the agent into reading files it should not access? What if a poisoned web page rewrites the agent’s instructions? What if one agent in a multi-agent chain passes bad data to another that blindly trusts it?
The Secure Code Game: Learn secure coding and have fun doing it
The Secure Code Game is a free, open source in-editor course where players exploit and fix intentionally vulnerable code. When I created the first season in March 2023, the goal was straightforward: make security training that developers would enjoy. Fix the vulnerable code, keep it functional, level up. That core philosophy has not changed across any season.
Season 2 expanded into multi-stack challenges with community contributions across JavaScript, Python, Go, and GitHub Actions. Season 3 took players into LLM security, where they learned to hack and then harden large language models. Along the way, over 10,000 developers across the industry, open source, and academia have played to sharpen their skills.
What has changed with each season is the landscape. When we launched Season 1, AI coding assistants were just starting to become mainstream. By Season 3, we were teaching players to craft malicious prompts and then defend against them. Now, with Season 4, we are tackling the security challenges of AI systems that can act autonomously. They can browse the web, call APIs, coordinate with other agents, and act on your behalf.
Why agentic AI security matters right now
The timing is not a coincidence. AI agents have moved from research prototypes to production tools at remarkable speed, and the security community is racing to keep up.
The OWASP Top 10 for Agentic Applications 2026, developed with input from over 100 security researchers, now catalogues risks like agent goal hijacking, tool misuse, identity abuse, and memory poisoning as critical threats. A Dark Reading poll found that 48% of cybersecurity professionals believe agentic AI will be the top attack vector by the end of 2026. And Cisco’s State of AI Security 2026 report highlighted that while 83% of organizations planned to deploy agentic AI capabilities, only 29% felt ready to do so securely.
The gap between adoption and readiness is exactly where vulnerabilities thrive. And the best way to close that gap is by learning to think like an attacker.
Meet ProdBot: your deliberately vulnerable AI assistant
Season 4 puts you inside ProdBot, your productivity bot, a deliberately vulnerable agentic coding assistant for your terminal. Inspired by tools like OpenClaw and GitHub Copilot CLI, ProdBot turns natural language into bash commands, browses a simulated web, connects to MCP (Model Context Protocol) servers, runs org-approved skills, stores persistent memory, and orchestrates multi-agent workflows.
Your mission across five progressive levels is simple: use natural language to get ProdBot to reveal a secret it should never expose. If you can read the contents of password.txt, you have found a security vulnerability.
No AI or coding experience is needed…just curiosity and willingness to experiment. Everything happens through natural language in the CLI.
Five levels, five upgrades, five vulnerabilities
Each level of the game mirrors a stage in how real AI-powered tools evolve. As ProdBot gains new capabilities, the upgrade opens a new attack surface for you to discover. Here is what ProdBot looks like as it grows:
Level 1 starts with the basics: ProdBot generates and executes bash commands inside a sandboxed workspace. Can you break out of the sandbox?
Level 2 gives ProdBot web access. It can now browse a simulated internet of news, finance, sports, and shopping sites. What could go wrong when an AI reads untrusted content?
Level 3 connects ProdBot to MCP servers…external tool providers for stock quotes, web browsing, and cloud backup. More tools, more power, more ways in.
Level 4 adds org-approved skills and persistent memory. ProdBot can now run pre-built automation plugins and remember your preferences across sessions. Trust is layered…but is it earned?
Level 5 is everything coming together: six specialized agents, three MCP servers, three skills, and a simulated open-source project web. The platform claims all agents are sandboxed and all data is pre-verified. Time to put that to the test.
Each level builds on the previous one, and that progression is the point.
We aren’t going to tell you exactly which vulnerabilities you will find at each level as that would ruin the fun. But we will say this: the attack patterns you will discover in Season 4 are not theoretical. They reflect the kinds of risks that security teams are grappling with right now as organizations deploy autonomous AI systems into production.
Think about CVE-2026-25253 (CVSS 8.8 – High): Known as “ClawBleed” or the one-click Remote Code Execution (RCE) vulnerability. It allowed attackers to steal authentication tokens via a malicious link and gain full control of the OpenClaw instance.
The goal is not just to learn a specific exploit. It is to build the instinct that helps you spot these patterns in the wild, whether you are reviewing an agent’s architecture, auditing a tool integration, or simply deciding how much autonomy to give the AI assistant that just landed on your team.
Get started in under 2 minutes
This entire experience runs in GitHub Codespaces, so there is nothing to install, nothing to configure, and it doesn’t cost you a penny (Codespaces offers up to 60 hours of free usage per month). You can be inside ProdBot’s terminal in under two minutes, and each season is self-contained, so you can jump straight into Season 4 without covering the earlier ones.
You may find Season 3 to be a helpful foundation since it builds the basics of AI security. But it is not required. Just bring your hacker mindset.
Special thanks to Rahul Zhade, Staff Product Security Engineer at GitHub, and Bartosz Gałek, creator of Season 3, for testing and improving Season 4.
FAQ
Do I need AI or coding experience to play Season 4?
No. Everything happens through natural language in the CLI. You type plain English, or any language, prompts and ProdBot responds. Curiosity and a willingness to experiment are all you need.
Do I need to complete previous seasons first?
No. Each season is self-contained. You can jump directly into Season 4 by running ProdBot and typing level <N>. That said, Season 3 builds a helpful foundation in AI security and takes about 1.5 hours.
How long does Season 4 take?
Approximately two hours, though it varies depending on how deeply you explore each level. Some players like to try multiple approaches per level.
Is this free?
Yes. The Secure Code Game is open source and free to play. It runs in GitHub Codespaces, which provides up to 60 hours of free usage per month.
As organizations race to deploy AI, securing the rapidly expanding ecosystem of models, data, and dependencies has become a critical priority, much of which can be addressed by Wiz’s CNAPP solution.
For the last few months, we’ve been using the GitHub Security Lab Taskflow Agent along with a new set of auditing taskflows that specialize in finding web security vulnerabilities. They also turn out to be very successful at finding high-impact vulnerabilities in open source projects.
As security researchers, we’re used to losing time on possible vulnerabilities that turn out to be unexploitable, but with these new taskflows, we can now spend more of our time on manually verifying the results and sending out reports. Furthermore, the severity of the vulnerabilities that we’re reporting is uniformly high. Many of them are authorization bypasses or information disclosure vulnerabilities that allow one user to login as somebody else or to access the private data of another user.
We’ll also explain how the taskflows work, so you can learn how to write your own. The security community moves faster when it shares knowledge, which is why we’ve made the framework open source and easy to run on your own project. The more teams using and contributing to it, the faster we collectively eliminate vulnerabilities.
How to run the taskflows on your own project
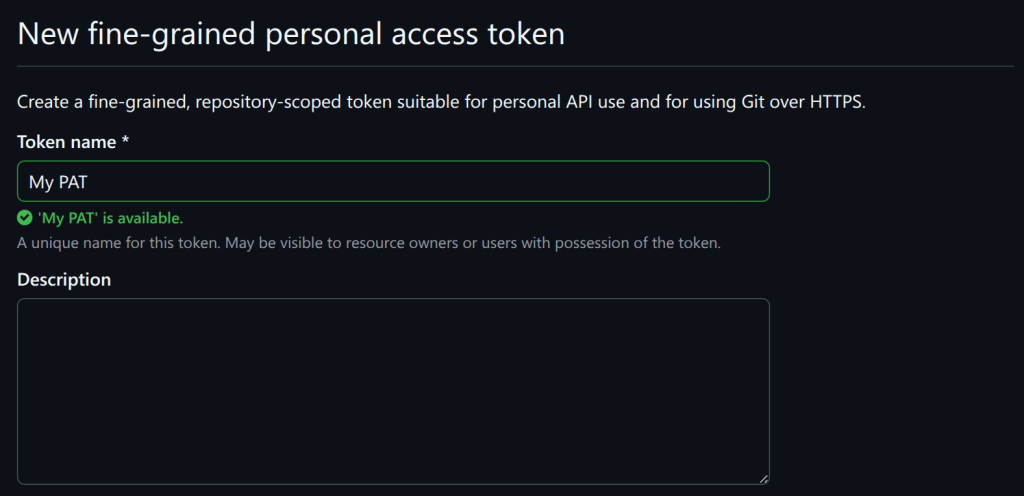
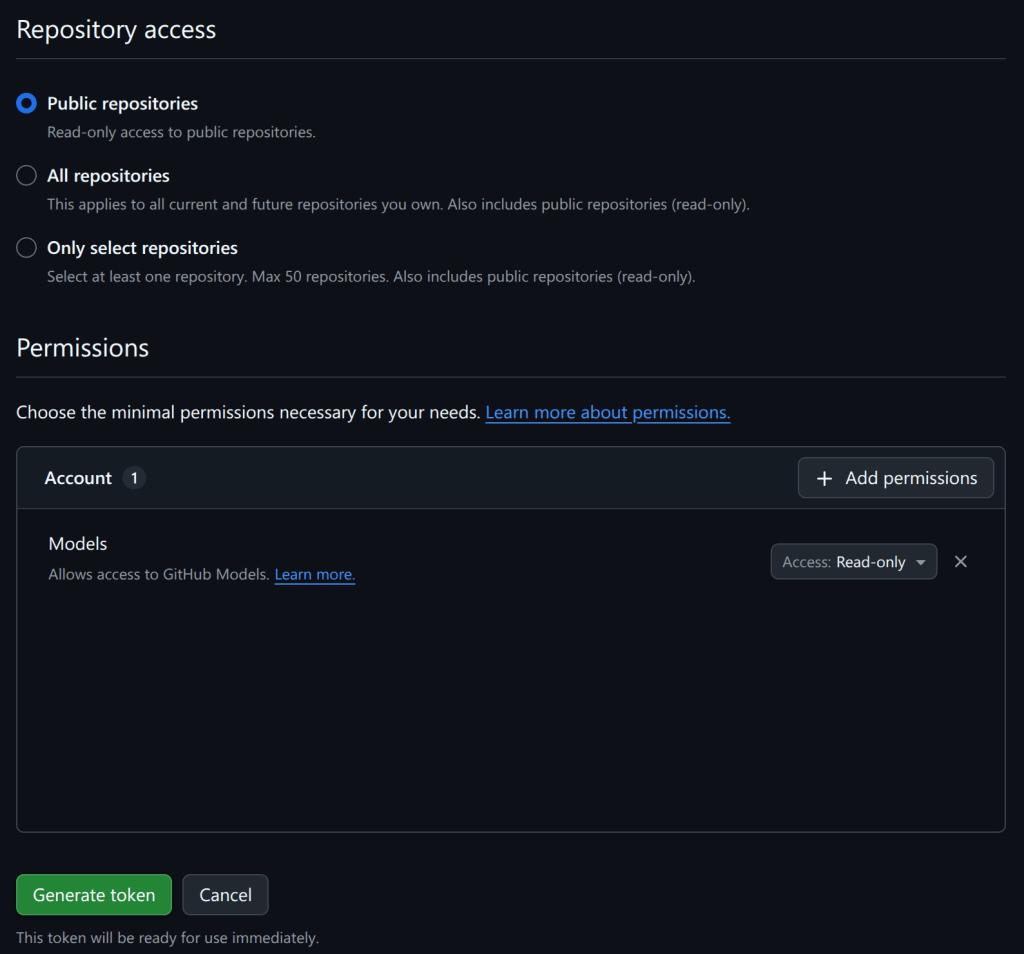
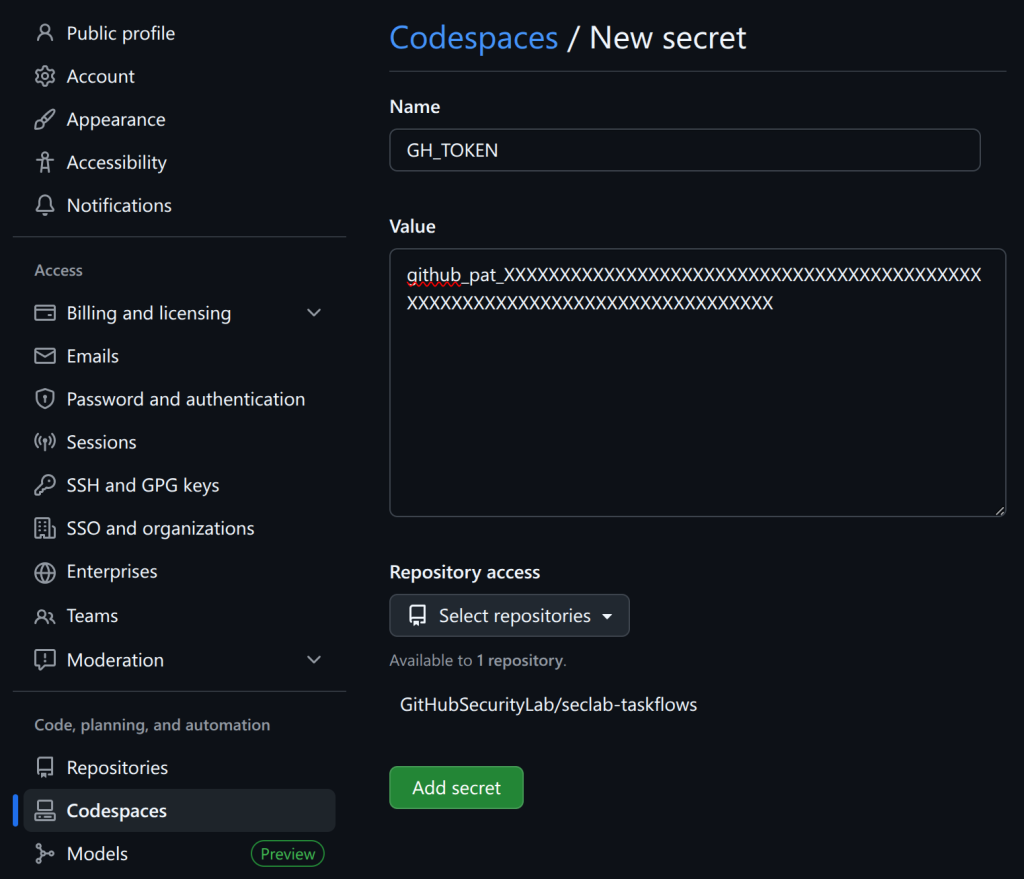
Want to get started right away? The taskflows are open source and easy to run yourself! Please note: A GitHub Copilot license is required, and the prompts will use premium model requests. (Note that running the taskflows can result in many tool calls, which can easily consume a large amount of quota.)
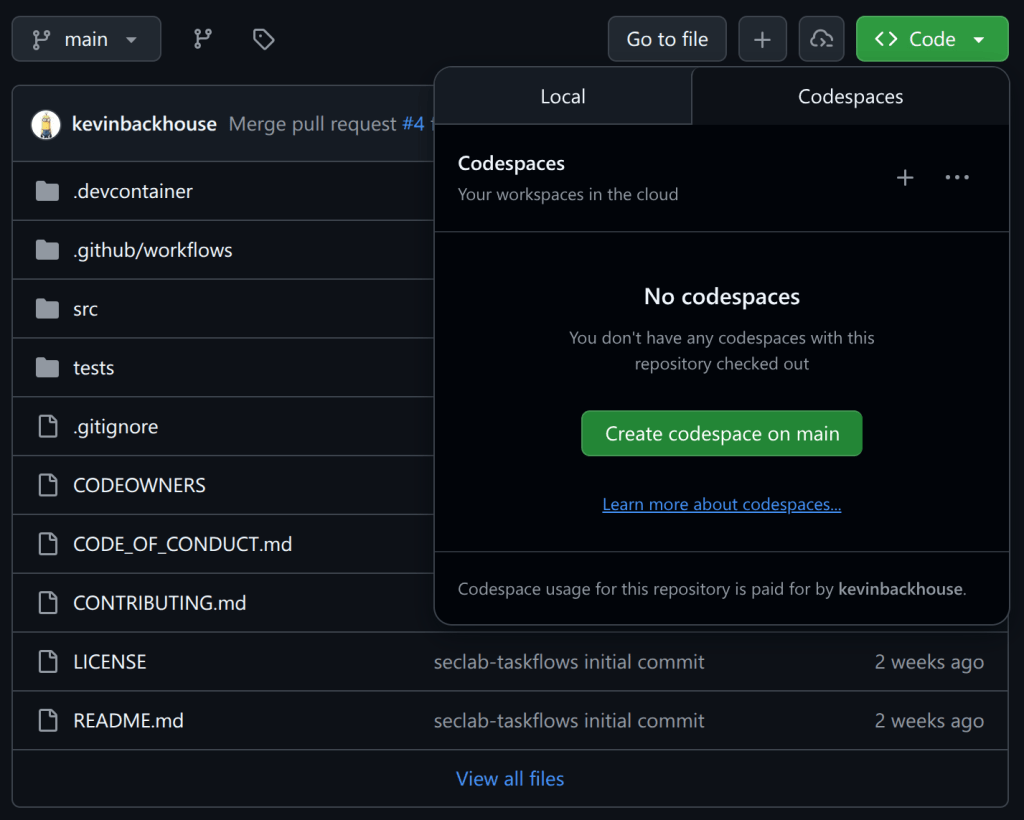
Wait a few minutes for the codespace to initialize.
In the terminal, run ./scripts/audit/run_audit.sh myorg/myrepo
It might take an hour or two to finish on a medium-sized repository. When it finishes, it’ll open an SQLite viewer with the results. Open the “audit_results” table and look for rows with a check-mark in the “has_vulnerability” column.
Tip: Due to the non-deterministic nature of LLMs, it is worthwhile to perform multiple runs of these audit taskflows on the same codebase. In certain cases, a second run can lead to entirely different results. In addition to this, you might perform those two runs using different models (e.g., the first using GPT 5.2 and the second using Claude Opus 4.6).
The taskflows also work on private repos, but you’ll need to modify the codespace configuration to do so because it won’t allow access to your private repos by default.
Introduction to taskflows
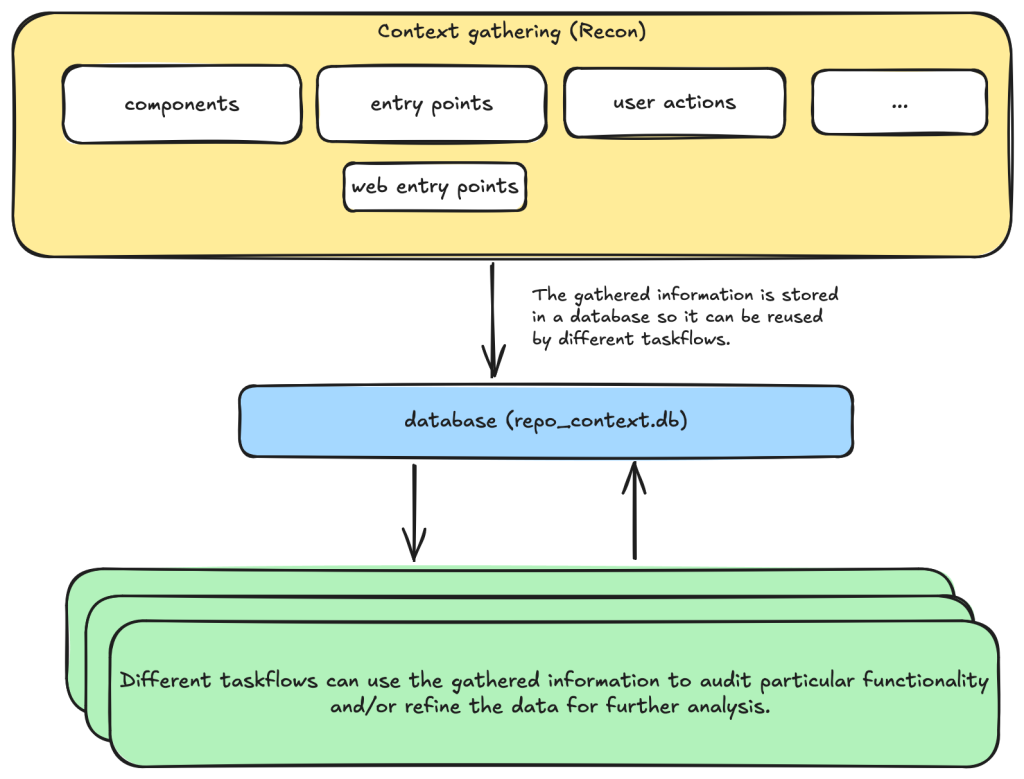
Taskflows are YAML files that describe a series of tasks that we want to do with an LLM. With them, we can write prompts to complete different tasks and have tasks that depend on each other. The seclab-taskflow-agent framework takes care of running the tasks sequentially and passing the results from one task to the next.
For example, when auditing a repository, we first divide the repository into different components according to their functionalities. Then, for each component, we may want to collect some information such as entry points where it takes untrusted input from, intended privilege, and purposes of the component, etc. These results are then stored in a database to provide the context for subsequent tasks.
Based on the context data, we can then create different auditing tasks. Currently, we have a task that suggests some generic issues for each component and another task that carefully audits each suggested issue. However, it’s also possible to create other tasks, such as tasks with specific focus on a certain type of issue.
These become a list of tasks we specify in a taskflow file.
We use tasks instead of one big prompt because LLMs have limited context windows, and complex, multi-step tasks are often not completed properly. For example, some steps can be left out. Even though some LLMs have larger context windows, we find that taskflows are still useful in providing a way for us to control and debug the tasks, as well as for accomplishing bigger and more complex projects.
The seclab-taskflow-agent can also run the same task across many components asynchronously (like a for loop). During audits, we often reuse the same prompt and task for every component, varying only the details. The seclab-taskflow-agent lets us define templated prompts, iterate through components, and substitute component-specific details as it runs.
Taskflows for general security code audits
After using seclab-taskflow-agent to triage CodeQL alerts, we decided we didn’t want to restrict ourselves to specific types of vulnerabilities and started to explore using the framework for more general security auditing. The main challenge in giving LLMs more freedom is the possibility of hallucinations and an increase in false positives. After all, the success with triaging CodeQL alerts was partly due to the fact that we gave the LLM a very strict and well-defined set of instructions and criteria, so the results could be verified at each stage to see if the instructions were followed.
So our goal here was to find a good way to allow the LLM the freedom to look for different types of vulnerabilities while keeping hallucinations under control.
We’re going to show how we used agent taskflows to discover high-impact vulnerabilities with high true positive rate using just taskflow design and prompt engineering.
General taskflow design
To minimize hallucinations and false positives at the taskflow design level, our taskflow starts with a threat modelling stage, where a repository is divided into different components based on functionalities and various information, such as entry points, and the intended use of each component is collected. This information helps us to determine the security boundary of each component and how much exposure it has to untrusted input.
The information collected through the threat modelling stage is then used to determine the security boundary of each component and to decide what should be considered a security issue. For example, a command injection in a CLI tool with functionality designed to execute any user input script may be a bug but not a security vulnerability, as an attacker able to inject a command using the CLI tool can already execute any script.
At the level of prompts, the intended use and security boundary that is discovered is then used in the prompts to provide strict guidelines as to whether an issue found should be considered a vulnerability or not.
You need to take into account of the intention and threat model of the component in component notes to determine if an issue is a valid security issue or if it is an intended functionality. You can fetch entry points, web entry points and user actions to help you determine the intended usage of the component.
Asking an LLM something as vague as looking for any type of vulnerability anywhere in the code base would give poor results with many hallucinated issues. Ideally, we’d like to simulate the triage environment where we have some potential issues as the starting point of analysis and ask the LLM to apply rigorous criteria to determine whether the potential issue is valid or not.
To bootstrap this process, we break the auditing task into two steps.
First, we ask the LLM to go through each component of the repository and suggest types of vulnerabilities that are more likely to appear in the component.
These suggestions are then passed to another task, where they will be audited according to rigorous criteria.
In this setup, the suggestions from the first step act as some inaccurate vulnerability alerts flagged by an “external tool,” while the second step serves as a triage step. While this may look like a self-validating process—by breaking it down into two steps, each with a fresh context and different prompts—the second step is able to provide an accurate assessment of suggestions.
We’ll now go through these tasks in detail.
Threat modeling stage
When triaging alerts flagged by automatic code scanning tools, we found that a large proportion of false positives is the result of improper threat modeling. Most static analysis tools do not take into account the intended usage and security boundary of the source code and often give results that have no security implications. For example, in a reverse proxy application, many SSRF (server-side request forgery) vulnerabilities flagged by automated tools are likely to fall within the intended use of the application, while some web services used, for example, in continuous integration pipelines are designed to execute arbitrary code and scripts within a sandboxed environment. Remote code execution vulnerabilities in these applications without a sandboxed escape are generally not considered a security risk.
Given these caveats, it pays to first go through the source code to get an understanding of the functionalities and intended purpose of code. We divide this process into the following tasks:
Identify applications: A GitHub repository is an imperfect boundary for auditing: It may be a single component within a larger system or contain multiple components, so it’s worth identifying and auditing each component separately to match distinct security boundaries and keep scope manageable. We do this with the identify_applications taskflow, which asks the LLM to inspect the repository’s source code and documentation and divide it into components by functionality.
Identify entry points: We identify how each entry point is exposed to untrusted inputs to better gauge risk and anticipate likely vulnerabilities. Because “untrusted input” varies significantly between libraries and applications, we provide separate guidelines for each case.
Identify web entry points: This is an extra step to gather further information about entry points in the application and append information that is specific to web application entry points such as noting the HTTP method and paths that are required to access a certain endpoint.
Identify user actions: We have the LLM review the code and identify what functionality a user can access under normal operation. This clarifies the user’s baseline privileges, helps assess whether vulnerabilities could enable privilege gains, and informs the component’s security boundary and threat model, with separate instructions depending on whether the component is a library or an application.
At each of the above steps, information gathered about the repository is stored in a database. This includes components in the repository, their entry points, web entry points, and intended usage. This information is then available for use in the next stage.
Issue suggestion stage
At this stage, we instruct the LLM to suggest some types of vulnerabilities, or a general area of high security risk for each component based on the information about the entry point and intended use of the component gathered from the previous step. In particular, we put emphasis on the intended usage of the component and its risk from untrusted input:
Base your decision on:
- Is this component likely to take untrusted user input? For example, remote web request or IPC, RPC calls?
- What is the intended purpose of this component and its functionality? Does it allow high privileged action?
Is it intended to provide such functionalities for all user? Or is there complex access control logic involved?
- The component itself may also have its own `README.md` (or a subdirectory of it may have a `README.md`). Take a look at those files to help understand the functionality of the component.
We also explicitly instruct the LLM to not suggest issues that are of low severity or are generally considered non-security issues.
However, you should still take care not to include issues that are of low severity or requires unrealistic attack scenario such as misconfiguration or an already compromised system.
In general, we keep this stage relatively free of restrictions and allow the LLM freedom to explore and suggest different types of vulnerabilities and potential security issues. The idea is to have a reasonable set of focus areas and vulnerability types for the actual auditing task to use as a starting point.
One problem we ran into was that the LLM would sometimes start auditing the issues that it suggested, which would defeat the purpose of the brainstorming phase. To prevent this, we instructed the LLM to not audit the issues.
Issue audit stage
This is the final stage of the taskflows. Once we’ve gathered all the information we need about the repository and have suggested some types of vulnerabilities and security risks to focus on, the taskflow goes through each suggested issue and audits them by going through the source code. At this stage, the task starts with fresh context to scrutinize the issues suggested from the previous stage. The suggestions are considered to be unvalidated, and this taskflow is instructed to verify these issues:
The issues suggested have not been properly verified and are only suggested because they are common issues in these types of application. Your task is to audit the source code to check if this type of issues is present.
To avoid the LLM coming up with issues that are non-security related in the context of the component, we once again emphasize that intended usage must be taken into consideration.
You need to take into account of the intention and threat model of the component in component notes to determine if an issue is a valid security issue or if it is an intended functionality.
To avoid the LLM hallucinating issues that are unrealistic, we also instruct it to provide a concrete and realistic attack scenario and to only consider issues that stem from errors in the source code:
Do not consider scenarios where authentication is bypassed via stolen credential etc. We only consider situations that are achievable from within the source code itself.
...
If you believe there is a vulnerability, then you must include a realistic attack scenario, with details of all the file and line included, and also what an attacker can gain by exploiting the vulnerability. Only consider the issue a vulnerability if an attacker can gain privilege by performing an action that is not intended by the component.
To further reduce hallucinations, we also instruct the LLM to provide concrete evidence from the source code, with file path and line information:
Keep a record of the audit notes, be sure to include all relevant file path and line number. Just stating an end point, e.g. `IDOR in user update/delete endpoints (PUT /user/:id)` is not sufficient. I need to have the file and line number.
Finally, we also instruct the LLM that it is possible that there is no vulnerability in the component and that it should not make things up:
Remember, the issues suggested are only speculation and there may not be a vulnerability at all and it is ok to conclude that there is no security issue.
The emphasis of this stage is to provide accurate results while following strict guidelines—and to provide concrete evidence of the findings. With all these strict instructions in place, the LLM indeed rejects many unrealistic and unexploitable suggestions with very few hallucinations.
The first prototype was designed with hallucination prevention as a priority, which raised a question: Would it become too conservative, rejecting most vulnerability candidates and failing to surface real issues?
The answer is clear after we ran the taskflow on a few repositories.
Three examples of vulnerabilities found by the taskflows
In this section, we’ll show three examples of vulnerabilities that were found by the taskflows and that have already been disclosed. In total, we have found and reported over 80 vulnerabilities so far. We publish all disclosed vulnerabilities on our advisories page.
Privilege escalation in Outline (CVE-2025-64487)
Our information-gathering taskflows are optimized toward web applications, which is why we first pointed our audit taskflows to a collaborative web application called Outline.
Outline is a multi-user collaboration suite with properties we were especially interested in:
Documents have owners and different visibility, with permissions per users and teams.
Access rules like that are hard to analyze with a Static Application Security Testing (SAST) tool, since they use custom access mechanisms and existing SAST tools typically don’t know what actions a normal “user” should be able to perform.
Such permission schemes are often also hard to analyze for humans by only reading the source code (if you didn’t create the scheme yourself, that is).
And success: Our taskflows found a bug in the authorization logic on the very first run!
The notes in the audit results read like this:
Audit target: Improper membership management authorization in component server (backend API) of outline/outline (component id 2).

Summary conclusion: A real privilege escalation vulnerability exists. The document group membership modification endpoints (documents.add_group, documents.remove_group) authorize with the weaker \"update\" permission instead of the stronger \"manageUsers\" permission that is required for user membership changes. Because \"update\" can be satisfied by having only a ReadWrite membership on the document, a non‑admin document collaborator can grant (or revoke) group memberships – including granting Admin permission – thereby escalating their own privileges (if they are in the added group) and those of other group members. This allows actions (manageUsers, archive, delete, etc.) that were not intended for a mere ReadWrite collaborator.
Reading the TypeScript-based source code and verifying this finding on a test instance revealed that it was exploitable exactly as described. In addition, the described steps to exploit this vulnerability were on point:
Prerequisites:
- Attacker is a normal team member (not admin), not a guest, with direct ReadWrite membership on Document D (or via a group that grants ReadWrite) but NOT Admin.
- Attacker is a member of an existing group G in the same team (they do not need to be an admin of G; group read access is sufficient per group policy).

Steps:
1. Attacker calls POST documents.add_group (server/routes/api/documents/documents.ts lines 1875-1926) with body:
   {
     "id": "<document-D-id>",
     "groupId": "<group-G-id>",
     "permission": "admin"
   }
2. Authorization path:
   - Line 1896: authorize(user, "update", document) succeeds because attacker has ReadWrite membership (document.ts lines 96-99 allow update).
   - Line 1897: authorize(user, "read", group) succeeds for any non-guest same-team user (group.ts lines 27-33).
   No \"manageUsers\" check occurs.
3. Code creates or updates GroupMembership with permission Admin (lines 1899-1919).
4. Because attacker is a member of group G, their effective document permission (via groupMembership) now includes DocumentPermission.Admin.
5. With Admin membership, attacker now satisfies includesMembership(Admin) used in:
   - manageUsers (document.ts lines 123-134) enabling adding/removing arbitrary users via documents.add_user / documents.remove_user (lines 1747-1827, 1830-1872).
   - archive/unarchive/delete (document.ts archive policy lines 241-252; delete lines 198-208) enabling content integrity impact.
   - duplicate, move, other admin-like abilities (e.g., duplicate policy lines 136-153; move lines 155-170) beyond original ReadWrite scope.
Using these instructions, a low-privileged user could add arbitrary groups to a document that the user was only allowed to update (the user not being in the possession of the “manageUsers” permission that was typically required for such changes).
In this sample, the group “Support” was added to the document by the low-privileged user named “gg.”
The Outline project fixed this and another issue we reported within three days! (Repo advisory)
The shopping cartocalypse (CVE-2025-15033, CVE-2026-25758)
We didn’t realize what systematic issues we’d uncover in the cart logic of ecommerce applications until we pointed our taskflows at the first online shop in our list. In the PHP-based WooCommerce project, the taskflows promptly found a way for normally signed-in shop users to view all guest orders—including personally identifiable information (including names, addresses, and phone numbers). After we reported this, Automattic (the company behind WooCommerce) quickly released an update (CVE-2025-15033) and accompanying blog post.
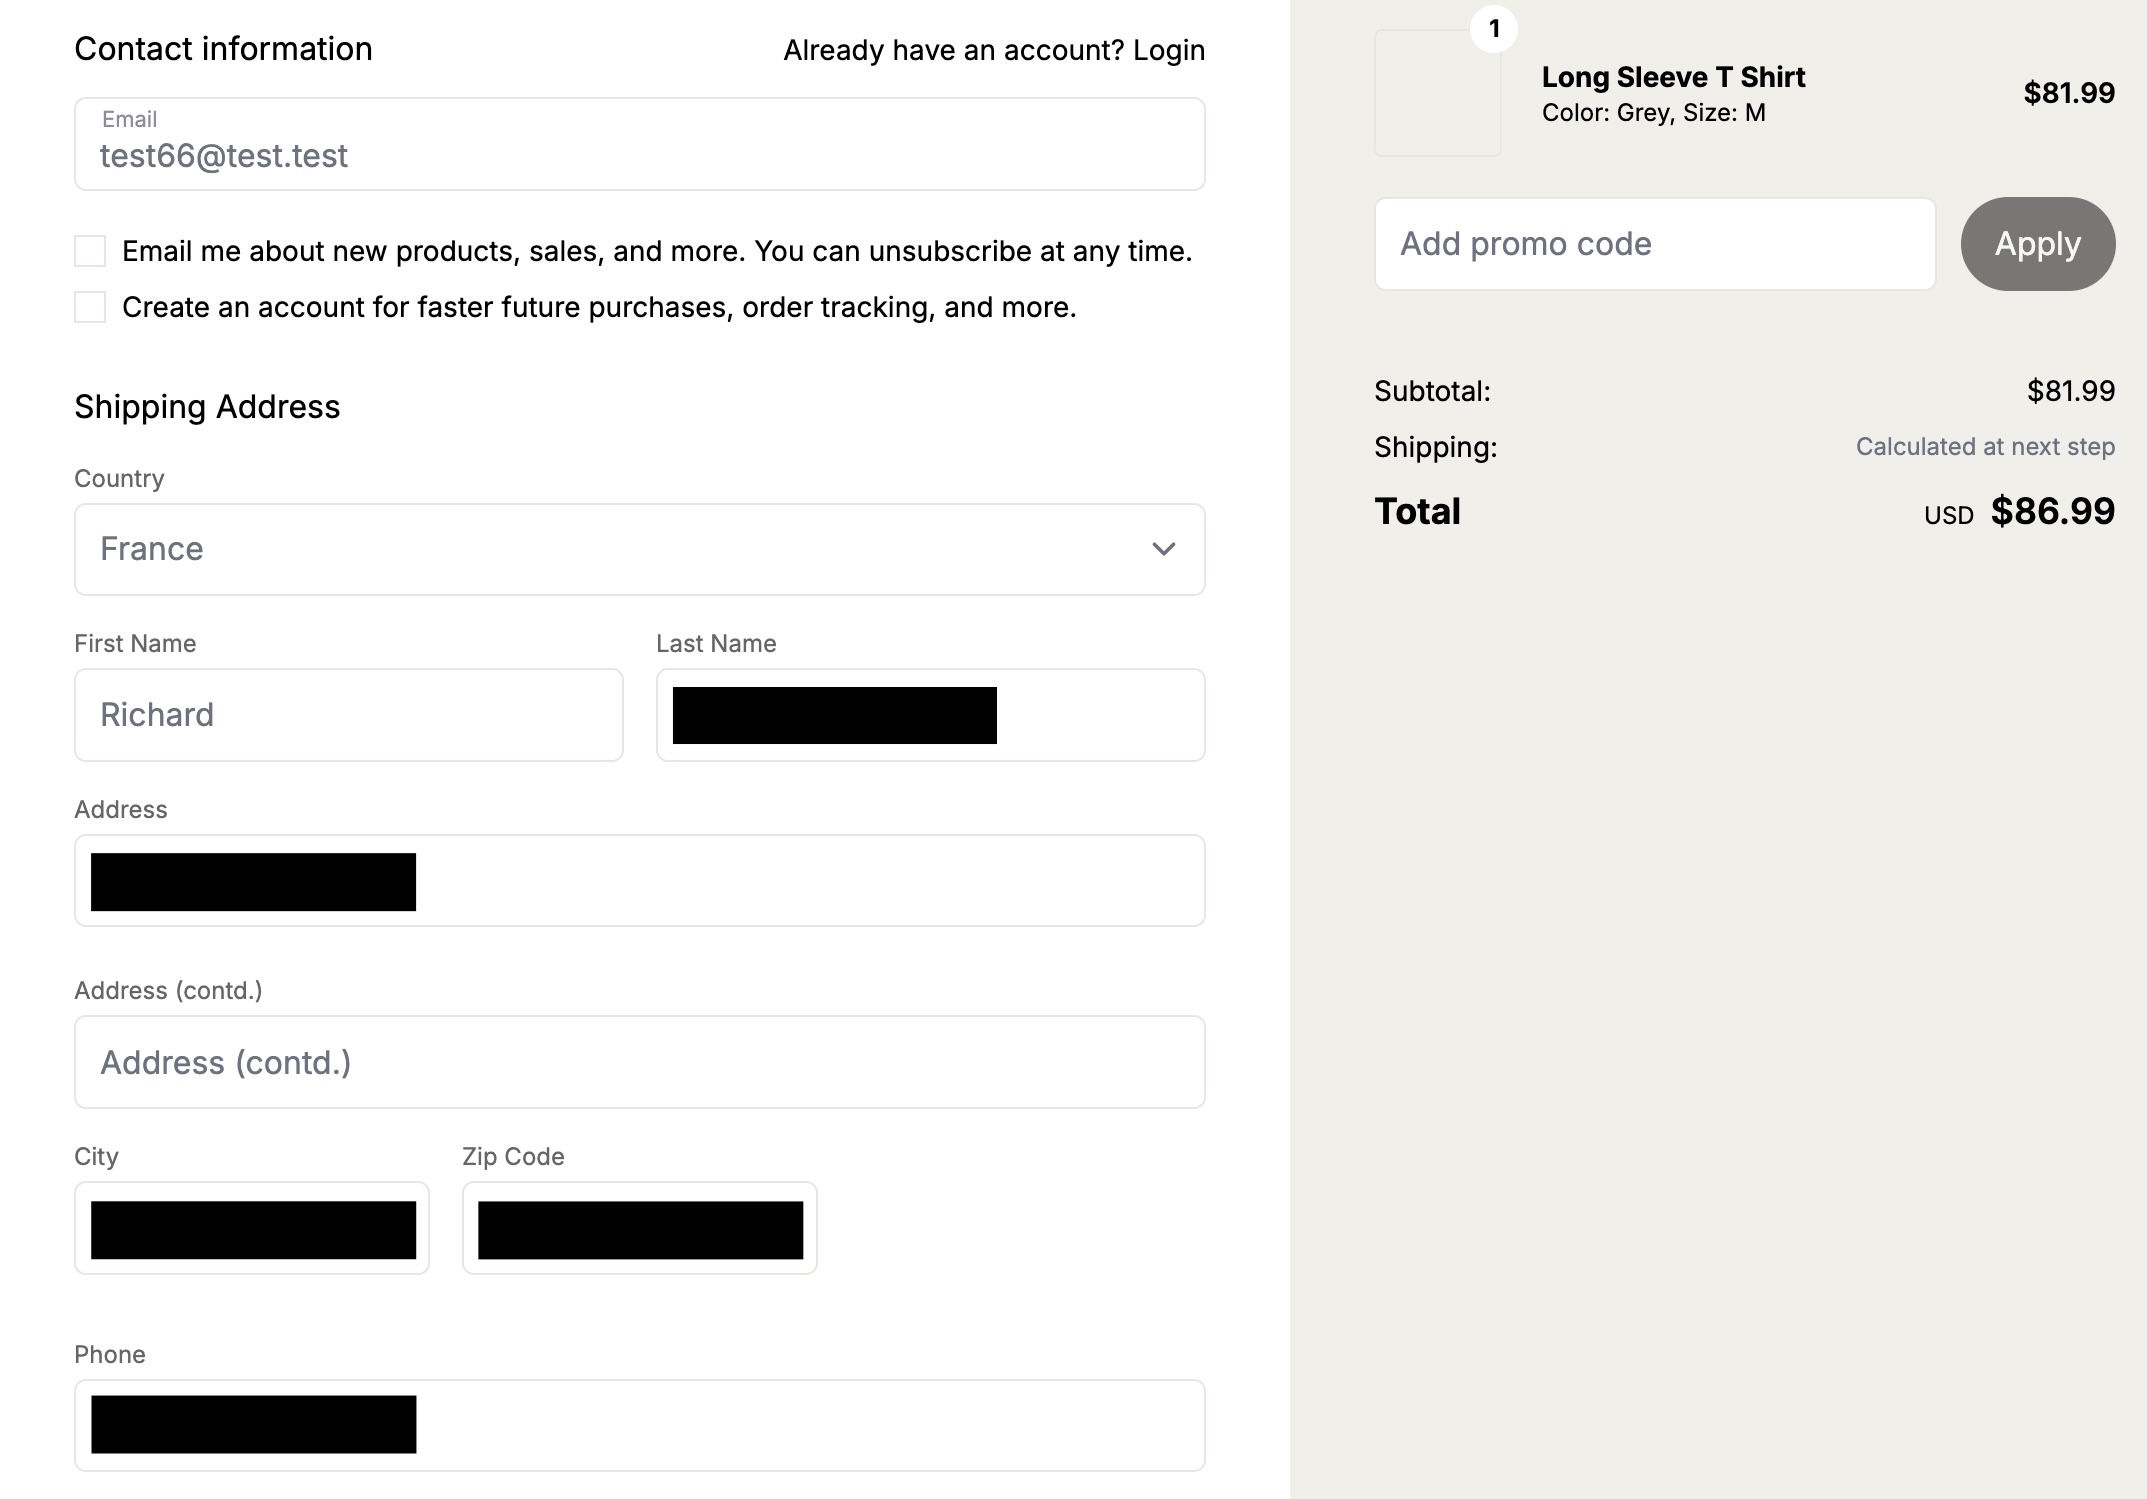
Intrigued by that vulnerability, we’ve added additional ecommerce applications to our list of applications to be audited by our agent. And sure enough, we found more vulnerabilities. The popular Ruby-based Spree commerce application contained two similar vulnerabilities (CVE-2026-25758 and CVE-2026-25757). The more critical one allowed unauthenticated users to simply enumerate the addresses (and phone numbers) of all guest orders by more or less incrementing a sequential number.
In this screenshot, the attacker “test66” linked their session to an existing address of a guest user, thus being able to view the full address and phone number.
Our bug-hunting spree didn’t stop with Spree. Our taskflows uncovered similar issues in two additional ecommerce applications.
These authorization logic bugs had been undiscovered for years.
Signing in to Rocket.Chat using any password (CVE-2026-28514)
(This is not what passwordless authentication should look like!)
Every so often you can’t believe your eyes. This finding reported by our taskflows in Rocket.Chat was one of those moments.
When your agent comes back with a note like this:
VULNERABILITY: password authentication bypass in account-service allows logging in as any user with a password set.
You might find it hard to believe at first.
When you then continue reading the output:
Root cause:
- ee/apps/account-service/src/lib/utils.ts:60-61: `validatePassword` returns `Promise<boolean>` (bcrypt.compare(...)).
- ee/apps/account-service/src/lib/loginViaUsername.ts:18-21: `const valid = user.services?.password?.bcrypt && validatePassword(password, user.services.password.bcrypt);` but does NOT `await` the Promise; since a Promise is truthy, `if (!valid) return false;` is never triggered when bcrypt hash exists.
- ee/apps/account-service/src/lib/loginViaUsername.ts:23-35: proceeds to mint a new login token and saves it, returning `{ uid, token, hashedToken, tokenExpires }`.
It might make more sense, but you’re still not convinced.
It turns out the suspected finding is in the micro-services based setup of Rocket.Chat. In that particular setup, Rocket.Chat exposes its user account service via its DDP Streamer service.
Rocket.Chat’s microservices deployment Copyright Rocket.Chat. (This architecture diagram is from Rocket.Chat’s documentation.)
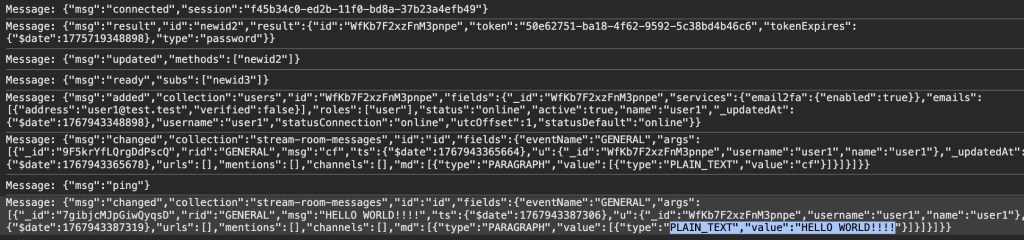
Once our Rocket.Chat test setup was working properly, we had to write proof of concept code to exploit this potential vulnerability. The notes of the agent already contained the JSON construct that we could use to connect to the endpoint using Meteor’s DDP protocol.
We connected to the WebSocket endpoint for the DDP streamer service, and yes: It was truly possible to login into the exposed Rocket.Chat DDP service using any password. Once signed in, it was also possible to perform other operations such as connecting to arbitrary chat channels and listening on them for messages sent to those channels.
Here we received the message “HELLO WORLD!!!” while listening on the “General” channel.
The technical details of this issue are interesting (and scary as well). Rocket.Chat, primarily a TypeScript-based web application, uses bcrypt to store local user passwords. The bcrypt.compare function (used to compare a password against its stored hash) returns a Promise—a fact that is reflected in Rocket.Chat’s own validatePassword function, which returns Promise<boolean>:
This led to the result of validatePassword being ANDed with true. Since a returned Promise is always “truthy” speaking in JavaScript terms, the boolean valid subsequently was always true when a user had a bcrypt password set.
Severity aside, it’s fascinating that the LLM was able to pick up this rather subtle bug, follow it through multiple files, and arrive at the correct conclusion.
What we learned
After running the taskflows over 40 repositories—mostly multi-user web applications—the LLM suggested 1,003 issues (potential vulnerabilities).
After the audit stage, 139 were marked as having vulnerabilities, meaning that the LLM decided they were exploitable After deduplicating the issues—duplicates happen because each repository is run a couple of times on average and the results are aggregated—we end up with 91 vulnerabilities, which we decided to manually inspect before reporting.
We rejected 20 (22%) results as FP: False Positives that we couldn’t reproduce manually.
We rejected 52 (57%) results as low severity: Issues that have very limited potential impact (e.g., blind SSRF with only a HTTP status code returned, issues that require malicious admin during installation stage, etc.).
We kept only 19 (21%) results that we considered vulnerabilities impactful enough to report, all serious vulnerabilities with the majority having a high or critical severity (e.g., vulnerabilities that can be triggered without specific requirements with impact to confidentiality or integrity, such as disclosure of personal data, overwriting of system settings, account takeover, etc.).
This data was collected using gpt-5.x as the model for code analysis and audit tasks.
Note that we have run the taskflows on more repositories since this data was collected, so this table does not represent all the data we’ve collected and all vulnerabilities we’ve reported.
If we divide the findings into two rough categories—logical issues (IDOR, authentication, security misconfiguration, business logic issues, sensitive data exposure) and technical issues (XSS, CSRF, path traversal, SSRF, command injection, remote code execution, template injection, file upload issues, insecure deserialization, open redirect, SQL injection, XXE, memory safety)—we get 439 logical issues and 501 technical issues. Although more technical issues were suggested, the difference isn’t significant because some broad categories (such as remote code execution and file upload issues) can also involve logical issues depending on the attacker scenario.
There are only three suggested issues that concern memory safety. This isn’t too surprising, given the majority of the repositories tested are written in memory-safe languages. But we also suspect that the current taskflows may not be very efficient in finding memory-safety issues, especially when comparing to other automated tools such as fuzzers. This is an interesting area that can be improved by creating more specific taskflows and making more tools, like fuzzers, available to the LLM.
This data led us to the following observations.
LLMs are particularly good at finding logic bugs
What stands out from the data is the 25% rate of “Business logic issue” and the large amount of IDOR issues. In fact, the total number of IDOR issues flagged as vulnerable is more than the next two categories combined (XSS and CSRF). Overall, we get the impression that the LLM does an excellent job of understanding the code space and following the control flow, while taking into account the access control model and intended usage of the application, which is more or less what we’d expect from LLMs that excel in tasks like code reviews. This also makes it great for finding logic bugs that are difficult to find with traditional tools.
LLMs are good at rejecting low-severity issues and false positives
Curiously, none of the false positives are what we’d consider to be hallucinations. All the reports, including the false positives, have sound evidence backing them up, and we were able to follow through the report to locate the endpoints and apply the suggested payload. Many of the false positives are due to more complex circumstances beyond what is available in the code, such as browser mitigations for XSS issues mentioned above or what we would consider as genuine mistakes that a human auditor is also likely to make. For example, when multiple layers of authentications are in place, the LLM could sometimes miss out some of the checks, resulting in false positives.
We have since tested more repositories with more vulnerabilities reported, but the ratio between vulnerabilities and repositories remains roughly the same.
To demonstrate the extensibility of taskflows and how extra information can be incorporated into the taskflows, we created a new taskflow to run after the audit stage, which incorporates our new-found knowledge to filter out low-severity vulnerabilities. We found that the taskflow can filter out roughly 50% of the low-severity vulnerabilities with a couple of borderline vulnerabilities that we reported also getting marked as low severity. The taskflow and the prompt can be adjusted to fit the user’s own preference, but for us, we’re happy to make it more inclusive so we don’t miss out on anything impactful.
LLMs are good at threat modeling
The LLM performs well in threat modeling in general. During the experiment, we tested it on a number of applications with different threat models, such as desktop applications, multi-tenant web applications, applications that are designed to run code in sandbox environments (code injection by design), and reverse proxy applications (applications where SSRF-like behavior is intended). The taskflow is able to take into account the intended usage of these applications and make sound decisions. The taskflow struggles most with threat modelling of desktop applications, as it is often unclear whether other processes running on the user’s desktop should be considered trusted or not.
We’ve also observed some remarkable reasoning by the LLM that excludes issues with no privilege gains. For example, in one case, the LLM noticed that while there are inconsistencies in access control, the issue does not give the attacker any advantages over a manual copy and paste action:
Security impact assessment:

A user possessing only read access to a document (no update rights) can duplicate it provided they also have updateDocument rights on the destination collection. This allows creation of a new editable copy of content they could already read. This does NOT grant additional access to other documents nor bypass protections on the original; any user with read access could manually copy-paste the content into a new document they are permitted to create (creation generally allowed for non-guest, non-viewer members in ReadWrite collections per createDocument collection policy)
We’ve also seen some more sophisticated techniques that were used in the reasoning. For example, in one application that is running scripts in a sandboxed nodejs environment, the LLM suggested the following technique to escape the sandbox:
In Node’s vm, passing any outer-realm function into a contextified sandbox leaks that function’s outer-realm Function constructor through the `constructor` property. From inside the sandbox:
  const F = console.log.constructor; // outer-realm Function
  const hostProcess = F('return process')(); // host process object
  // Bypass module allowlist via host dynamic import
  const cp = await F('return import("node:child_process")')();
  const out = cp.execSync('id').toString();
  return [{ json: { out } }];

The presence of host functions (console.log, timers, require, RPC methods) is sufficient to obtain the host Function constructor and escape the sandbox. The allowlist in require-resolver is bypassed by constructing host-realm functions and using dynamic import of built-in modules (e.g., node:child_process), which does not go through the sandbox’s custom require.
While the result turns out to be a false positive due to other mitigating factors, it demonstrates the LLM’s technical knowledge.
Get involved!
The taskflows we used to find these vulnerabilities are open source and easy to run on your own project, so we hope you’ll give them a try! We also want to encourage you to write your own taskflows. The results showcased in this blog post are just small examples of what’s possible. There are other types of vulnerabilities to find, and there are other security-related problems, like triaging SAST results or building development setups, which we think taskflows can help with. Let us know what you’re building by starting a discussion on our repo!
Overview On February 11, 2026, NSFOCUS CERT monitored Microsoft’s release of its February security update patches, addressing 59 security issues across widely used products such as Windows, Azure, Microsoft Office, and Visual Studio Code. These vulnerabilities include privilege escalation, remote code execution, and other high-risk vulnerabilities. In this monthly update, 5 vulnerabilities are rated as […]
Russia-linked APT28 reportedly exploited MSHTML zero-day CVE-2026-21513 before Microsoft patched it, a high-severity bypass flaw.
Akamai reports that Russia-linked APT28 may have exploited CVE-2026-21513 CVSS score of 8.8), a high-severity MSHTML vulnerability (CVSS 8.8), before Microsoft patched it in February 2026.
The vulnerability is an Internet Explorer security control bypass that can lead to code execution when a victim opens a malicious HTML page or LNK file. The flaw could be triggered by opening a malicious HTML or LNK file, allowing attackers to bypass protections and potentially execute code. While Microsoft shared few details
Microsoft confirmed CVE-2026-21513 was exploited in real-world zero-day attacks and credited MSTIC, MSRC, the Office Security Team, and Google’s GTIG for reporting it. Akamai found a malicious sample uploaded to VirusTotal on January 2026 tied to infrastructure linked to APT28.
Akamai researchers used PatchDiff-AI to analyze the root cause of the issue and traced CVE-2026-21513 to hyperlink navigation logic in ieframe.dll. They found that poor URL validation lets attacker input reach ShellExecuteExW, enabling code execution outside the browser sandbox. Researchers reproduced the flaw using MSHTML components and identified an exploit sample, document.doc.LnK.download, uploaded in January 2026 and linked to APT28 infrastructure.
“By correlating the vulnerable code path with public threat intelligence, we identified a sample that was leveraging this functionality: document.doc.LnK.download.” reads the report published by Akamai. “The sample was first submitted to VirusTotal on January 30, 2026, shortly before February’s Patch Tuesday, and is associated with infrastructure linked to APT28, an active Russian state-sponsored threat actor.”
The payload uses a specially crafted Windows Shortcut (.lnk) that embeds an HTML file directly after the standard LNK structure. When executed, it connects to wellnesscaremed[.]com, a domain attributed to APT28 and widely used in the campaign’s multistage activity. The exploit relies on nested iframes and multiple DOM contexts to manipulate trust boundaries, bypassing Mark of the Web (MotW) and Internet Explorer Enhanced Security Configuration (IE ESC). By downgrading the security context, it triggers the vulnerable navigation flow, allowing attacker-controlled content to invoke ShellExecuteExW and execute code outside the browser sandbox.
“While the observed campaign leverages malicious .LNK files, the vulnerable code path can be triggered through any component embedding MSHTML. Therefore, additional delivery mechanisms beyond LNK-based phishing should be expected.” concludes the report.
Microsoft addressed the issue by tightening hyperlink protocol validation to prevent file://, http://, and https:// links from reaching ShellExecuteExW.
Microsoft today released updates to fix more than 50 security holes in its Windows operating systems and other software, including patches for a whopping six “zero-day” vulnerabilities that attackers are already exploiting in the wild.
Zero-day #1 this month is CVE-2026-21510, a security feature bypass vulnerability in Windows Shell wherein a single click on a malicious link can quietly bypass Windows protections and run attacker-controlled content without warning or consent dialogs. CVE-2026-21510 affects all currently supported versions of Windows.
The zero-day flaw CVE-2026-21513 is a security bypass bug targeting MSHTML, the proprietary engine of the default Web browser in Windows. CVE-2026-21514 is a related security feature bypass in Microsoft Word.
The zero-day CVE-2026-21533 allows local attackers to elevate their user privileges to “SYSTEM” level access in Windows Remote Desktop Services. CVE-2026-21519 is a zero-day elevation of privilege flaw in the Desktop Window Manager (DWM), a key component of Windows that organizes windows on a user’s screen. Microsoft fixed a different zero-day in DWM just last month.
The sixth zero-day is CVE-2026-21525, a potentially disruptive denial-of-service vulnerability in the Windows Remote Access Connection Manager, the service responsible for maintaining VPN connections to corporate networks.
Chris Goettl at Ivanti reminds us Microsoft has issued several out-of-band security updates since January’s Patch Tuesday. On January 17, Microsoft pushed a fix that resolved a credential prompt failure when attempting remote desktop or remote application connections. On January 26, Microsoft patched a zero-day security feature bypass vulnerability (CVE-2026-21509) in Microsoft Office.
Kev Breen at Immersive notes that this month’s Patch Tuesday includes several fixes for remote code execution vulnerabilities affecting GitHub Copilot and multiple integrated development environments (IDEs), including VS Code, Visual Studio, and JetBrains products. The relevant CVEs are CVE-2026-21516, CVE-2026-21523, and CVE-2026-21256.
Breen said the AI vulnerabilities Microsoft patched this month stem from a command injection flaw that can be triggered through prompt injection, or tricking the AI agent into doing something it shouldn’t — like executing malicious code or commands.
“Developers are high-value targets for threat actors, as they often have access to sensitive data such as API keys and secrets that function as keys to critical infrastructure, including privileged AWS or Azure API keys,” Breen said. “When organizations enable developers and automation pipelines to use LLMs and agentic AI, a malicious prompt can have significant impact. This does not mean organizations should stop using AI. It does mean developers should understand the risks, teams should clearly identify which systems and workflows have access to AI agents, and least-privilege principles should be applied to limit the blast radius if developer secrets are compromised.”
The SANS Internet Storm Center has a clickable breakdown of each individual fix this month from Microsoft, indexed by severity and CVSS score. Enterprise Windows admins involved in testing patches before rolling them out should keep an eye on askwoody.com, which often has the skinny on wonky updates. Please don’t neglect to back up your data if it has been a while since you’ve done that, and feel free to sound off in the comments if you experience problems installing any of these fixes.
Triaging security alerts is often very repetitive because false positives are caused by patterns that are obvious to a human auditor but difficult to encode as a formal code pattern. But large language models (LLMs) excel at matching the fuzzy patterns that traditional tools struggle with, so we at the GitHub Security Lab have been experimenting with using them to triage alerts. We are using our recently announced GitHub Security Lab Taskflow Agent AI framework to do this and are finding it to be very effective.
💡 Learn more about it and see how to activate the agent in our previous blog post.
In this blog post, we’ll introduce these triage taskflows, showcase results, and share tips on how you can develop your own—for triage or other security research workflows.
By using the taskflows described in this post, we quickly triaged a large number of code scanning alerts and discovered many (~30) real-world vulnerabilities since August, many of which have already been fixed and published. When triaging the alerts, the LLMs were only given tools to perform basic file fetching and searching. We have not used any static or dynamic code analysis tools other than to generate alerts from CodeQL.
While this blog post showcases how we used LLM taskflows to triage CodeQL queries, the general process creates automation using LLMs and taskflows. Your process will be a good candidate for this if:
You have a task that involves many repetitive steps, and each one has a clear and well-defined goal.
Some of those steps involve looking for logic or semantics in code that are not easy for conventional programming to identify, but are fairly easy for a human auditor to identify. Trying to identify them often results in many monkey patching heuristics, badly written regexp, etc. (These are potential sweet spots for LLM automation!)
If your project meets those criteria, then you can create taskflows to automate these sweet spots using LLMs, and use MCP servers to perform tasks that are well suited for conventional programming.
Both the seclab-taskflow-agent and seclab-taskflows repos are open source, allowing anyone to develop LLM taskflows to perform similar tasks. At the end of this blog post, we’ll also give some development tips that we’ve found useful.
Introduction to taskflows
Taskflows are YAML files that describe a series of tasks that we want to do with an LLM. In this way, we can write prompts to complete different tasks and have tasks that depend on each other. The seclab-taskflow-agent framework takes care of running the tasks one after another and passing the results from one task to the next.
For example, when auditing CodeQL alert results, we first want to fetch the code scanning results. Then, for each result, we may have a list of tasks that we need to check. For example, we may want to check if an alert can be reached by an untrusted attacker and whether there are authentication checks in place. These become a list of tasks we specify in a taskflow file.
We use tasks instead of one big prompt because LLMs have limited context windows, and complex, multi-step tasks often are not completed properly. Some steps are frequently left out, so having a taskflow to organize the task avoids these problems. Even with LLMs that have larger context windows, we find that taskflows are useful to provide a way for us to control and debug the task, as well as to accomplish bigger and more complex tasks.
The seclab-taskflow-agent can also perform a batch “for loop”-style task asynchronously. When we audit alerts, we often want to apply the same prompts and tasks to every alert, but with different alert details. The seclab-taskflow-agent allows us to create templated prompts to iterate through the alerts and replace the details specific to each alert when running the task.
Triaging taskflows from a code scanning alert to a report
The GitHub Security Lab periodically runs a set of CodeQL queries against a selected set of open source repositories. The process of triaging these alerts is usually fairly repetitive, and for some alerts, the causes of false positives are usually fairly similar and can be spotted easily.
For example, when triaging alerts for GitHub Actions, false positives often result from some checks that have been put in place to make sure that only repo maintainers can trigger a vulnerable workflow, or that the vulnerable workflow is disabled in the configuration. These access control checks come in many different forms without an easily identifiable code pattern to match and are thus very difficult for a static analyzer like CodeQL to detect. However, a human auditor with general knowledge of code semantics can often identify them easily, so we expect an LLM to be able to identify these access control checks and remove false positives.
Over the course of a couple of months, we’ve tested our taskflows with a few CodeQL rules using mostly Claude Sonnet 3.5. We have identified a number of real, exploitable vulnerabilities. The taskflows do not perform an “end-to-end” analysis, but rather produce a bug report with all the details and conclusions so that we can quickly verify the results. We did not instruct the LLM to validate the results by creating an exploit nor provide any runtime environment for it to test its conclusion. The results, however, remain fairly accurate even without an automated validation step and we were able to remove false positives in the CodeQL queries quickly.
The rules are chosen based on our own experience of triaging these types of alerts and whether the list of tasks can be formulated into clearly defined instructions for LLMs to consume.
General taskflow design
Taskflows generally consist of tasks that are divided into a few different stages. In the first stage, the tasks collect various bits of information relevant to the alert. This information is then passed to an auditing stage, where the LLM looks for common causes of false positives from our own experience of triaging alerts. After the auditing stage, a bug report is generated using the information gathered. In the actual taskflows, the information gathering and audit stage are sometimes combined into a single task, or they may be separate tasks, depending on how complex the task is.
To ensure that the generated report has sufficient information for a human auditor to make a decision, an extra step checks that the report has the correct formatting and contains the correct information. After that, a GitHub Issue is created, ready to be reviewed.
Creating a GitHub Issue not only makes it easy for us to review the results, but also provides a way to extend the analysis. After reviewing and checking the issues, we often find that there are causes for false positives that we missed during the auditing process. Also, if the agent determines that the alert is valid, but the human reviewer disagrees and finds that it’s a false positive for a reason that was unknown to the agent so far, the human reviewer can document this as an alert dismissal reason or issue comment. When the agent analyzes similar cases in the future, it will be aware of all the past analysis stored in those issues and alert dismissal reasons, incorporate this new intelligence in its knowledge base, and be more effective at detecting false positives.
Information collection
During this stage, we instruct the LLM (examples are provided in the Triage examples section below) to collect relevant information about the alert, which takes into account the threat model and human knowledge of the alert in general. For example, in the case of GitHub Actions alerts, it will look at what permissions are set in the GitHub workflow file, what are the events that trigger the GitHub workflow, whether the workflow is disabled, etc. These generally involve independent tasks that follow simple, well-defined instructions to ensure the information collected is consistent. For example, checking whether a GitHub workflow is disabled involves making a GitHub API call via an MCP server.
To ensure that the information collected is accurate and to reduce hallucination, we instruct the LLM to include precise references to the source code that includes both file and line number to back up the information it collected:
You should include the line number where the untrusted code is invoked, as well as the untrusted code or package manager that is invoked in the notes.
Each task then stores the information it collected in audit notes, which are kind of a running commentary of an alert. Once the task is completed, the notes are serialized to a database which the next task can then append their notes to when it is done.
In general, each of the information gathering tasks is independent of each other and does not need to read each other’s notes. This helps each task to focus on its own scope without being distracted by previously collected information.
The end result is a “bag of information” in the form of notes associated with an alert that is then passed to the auditing tasks.
Audit issue
At this stage, the LLM goes through the information gathered and performs a list of specific checks to reject alert results that turned out to be false positives. For example, when triaging a GitHub Actions alert, we may have collected information about the events that trigger the vulnerable workflow. In the audit stage, we’ll check if these events can be triggered by an attacker or if they run in a privileged context. After this stage, a lot of the false positives that are obvious to a human auditor will be removed.
Decision-making and report generation
For alerts that have made it through the auditing stage, the next step is to create a bug report using the information gathered, as well as the reasoning for the decision at the audit stage. Again, in our prompt, we are being very precise about the format of the report and what information we need. In particular, we want it to be concise but also include information that makes it easy for us to verify the results, with precise code references and code blocks.
The report generated uses the information gathered from the notes in previous stages and only looks at the source code to fetch code snippets that are needed in the report. No further analysis is done at this stage. Again, the very strict and precise nature of the tasks reduces the amount of hallucination.
Report validation and issue creation
After the report is written, we instruct the LLM to check the report to ensure that all the relevant information is contained in the report, as well as the consistency of the information:
Check that the report contains all the necessary information:
- This criteria only applies if the workflow containing the alert is a reusable action AND has no high privileged trigger.
You should check it with the relevant tools in the gh_actions toolbox.
If that's not the case, ignore this criteria.
In this case, check that the report contains a section that lists the vulnerable action users.
If there isn't any vulnerable action users and there is no high privileged trigger, then mark the alert as invalid and using the alert_id and repo, then remove the memcache entry with the key {{ RESULT_key }}.
Missing or inconsistent information often indicates hallucinations or other causes of false positives (for example, not being able to track down an attacker controlled input). In either case, we dismiss the report.
If the report contains all the information and is consistent, then we open a GitHub Issue to track the alert.
Issue review and repo-specific knowledge
The GitHub Issue created in the previous step contains all the information needed to verify the issue, with code snippets and references to lines and files. This provides a kind of “checkpoint” and a summary of the information that we have, so that we can easily extend the analysis.
In fact, after creating the issue, we often find that there are repo-specific permission checks or sanitizers that render the issue a false positive. We are able to incorporate these problems by creating taskflows that review these issues with repo-specific knowledge added in the prompts. One approach that we’ve experimented with is to collect dismissal reasons for alerts in a repo and instruct the LLM to take into account these dismissal reasons and review the GitHub issue. This allows us to remove false positives due to reasons specific to a repo.
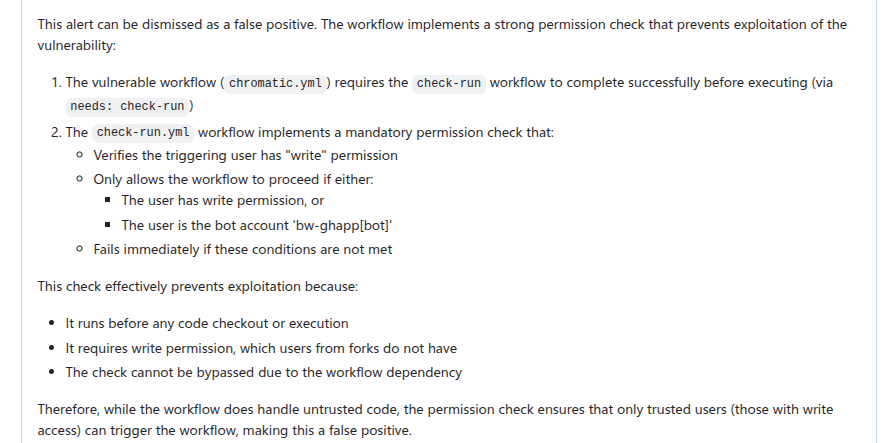
In this case, the LLM is able to identify the alert as false positive after taking into account a custom check-run permission check that was recorded in the alert dismissal reasons.
Triage examples and results
In this section we’ll give some examples of what these taskflows look like in practice. In particular, we’ll show taskflows for triaging some GitHub actions and JavaScript alerts.
The triaging of these queries shares a lot of similarities. For example, both involve checking the workflow triggering events, permissions of the vulnerable workflow, and tracking workflow callers. In fact, the main differences involve local analysis of specific details of the vulnerabilities. For code injection, this involves whether the injected code has been sanitized, how the expression is evaluated and whether the input is truly arbitrary (for example, pull request ID is unlikely to cause code injection issue). For untrusted checkout, this involves whether there is a valid code execution point after the checkout.
Since many elements in these taskflows are the same, we’ll use the code injection triage taskflow as an example. Note that because these taskflows have a lot in common, we made heavy use of reusable features in the seclab-taskflow-agent, such as prompts and reusable tasks.
When manually triaging GitHub Actions alerts for these rules, we commonly run into false positives because of:
Vulnerable workflow doesn’t run in a privileged context. This is determined by the events that trigger the vulnerable workflow. For example, a workflow triggered by the pull_request_target runs in a privileged context, while a workflow triggered by the pull_request event does not. This can usually be determined by simply looking at the workflow file.
Vulnerable workflow disabled explicitly in the repo. This can be checked easily by checking the workflow settings in the repo.
Vulnerable workflow explicitly restricts permissions and does not use any secrets. In which case, there is little privilege to gain.
Vulnerability specific issues, such as invalid user input or sanitizer in the case of code injection and the absence of a valid code execution point in the case of untrusted checkout.
Vulnerable workflow is a reusable workflow but not reachable from any workflow that runs in privileged context.
Very often, triaging these alerts involves many simple but tedious checks like the ones listed above, and an alert can be determined to be a false positive very quickly by one of the above criteria. We therefore model our triage taskflows based on these criteria.
So, our action-triage taskflows consist of the following tasks during information gathering and the auditing stage:
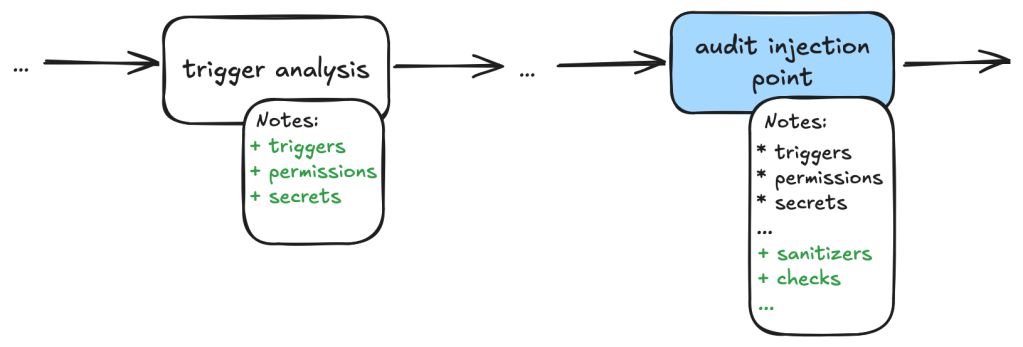
Workflow trigger analysis: This stage performs both information gathering and auditing. It first collects events that trigger the vulnerable workflow, as well as permission and secrets that are used in the vulnerable workflow. It also checks whether the vulnerable workflow is disabled in the repo. All information is local to the vulnerable workflow itself. This information is stored in running notes which are then serialized to a database entry. As the task is simple and involves only looking at the vulnerable workflow, preliminary auditing based on the workflow trigger is also performed to remove some obvious false positives.
Code injection point analysis: This is another task that only analyzes the vulnerable workflow and combines information gathering and audit in a single task. This task collects information about the location of the code injection point, and the user input that is injected. It also performs local auditing to check whether a user input is a valid injection risk and whether it has a sanitizer.
Workflow user analysis: This performs a simple caller analysis that looks for the caller of the vulnerable workflow. As it can potentially retrieve and analyze a large number of files, this step is divided into two main tasks that perform information gathering and auditing separately. In the information gathering task, callers of the vulnerable workflow are retrieved and their trigger events, permissions, use of secrets are recorded in the notes. This information is then used in the auditing task to determine whether the vulnerable workflow is reachable by an attacker.
Each of these tasks is applied to the alert and at each step, false positives are filtered out according to the criteria in the task.
After the information gathering and audit stage, our notes will generally include information such as the events that trigger the vulnerable workflow, permissions and secrets involved, and (in case of a reusable workflow) other workflows that use the vulnerable workflow as well as their trigger events, permissions, and secrets. This information will form the basis for the bug report. As a sanity check to ensure that the information collected so far is complete and consistent, the review_report task is used to check for missing or inconsistent information before a report is created.
After that, the create_report task is used to create a bug report which will form the basis of a GitHub Issue. Before creating an issue, we double check that the report contains the necessary information and conforms to the format that we required. Missing information or inconsistencies are likely the results of some failed steps or hallucinations and we reject those cases.
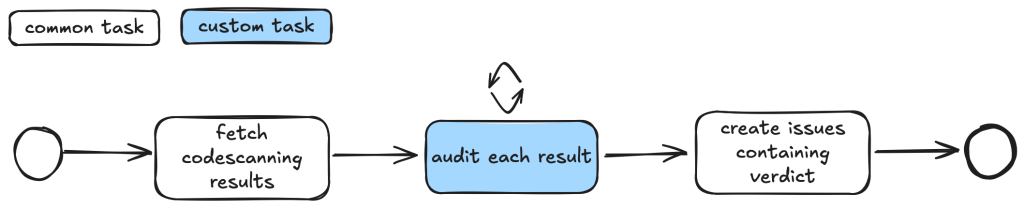
The following diagram illustrates the main components of the triage_actions_code_injection taskflow:
We then create GitHub Issues using the create_issue_actions taskflow. As mentioned before, the GitHub Issues created contain sufficient information and code references to verify the vulnerability quickly, as well as serving as a summary for the analysis so far, allowing us to continue further analysis using the issue. The following shows an example of an issue that is created:
In particular, we can use GitHub Issues and alert dismissal reasons as a means to incorporate repo-specific security measures and to further the analysis. To do so, we use the review_actions_injection_issues taskflow to first collect alert dismissal reasons from the repo. These dismissal reasons are then checked against the alert stated in the GitHub Issue. In this case, we simply use the issue as the starting point and instruct the LLM to audit the issue and check whether any of the alert dismissal reasons applies to the current issue. Since the issue contains all the relevant information and code references for the alert, the LLM is able to use the issue and the alert dismissal reasons to further the analysis and discover more false positives. The following shows an alert that is rejected based on the dismissal reasons:
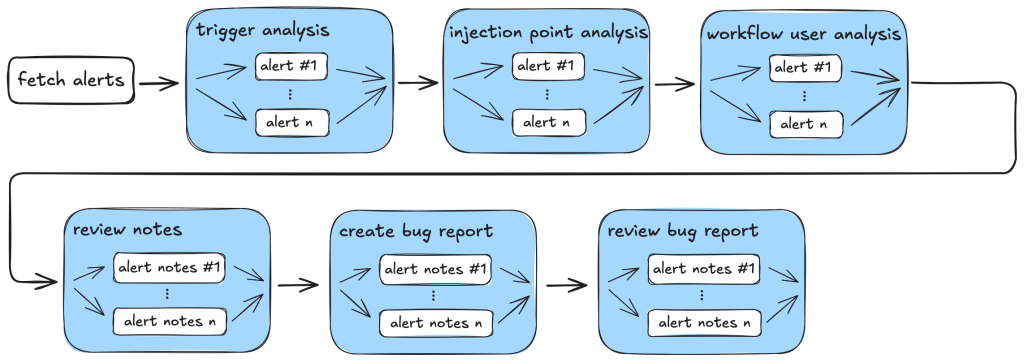
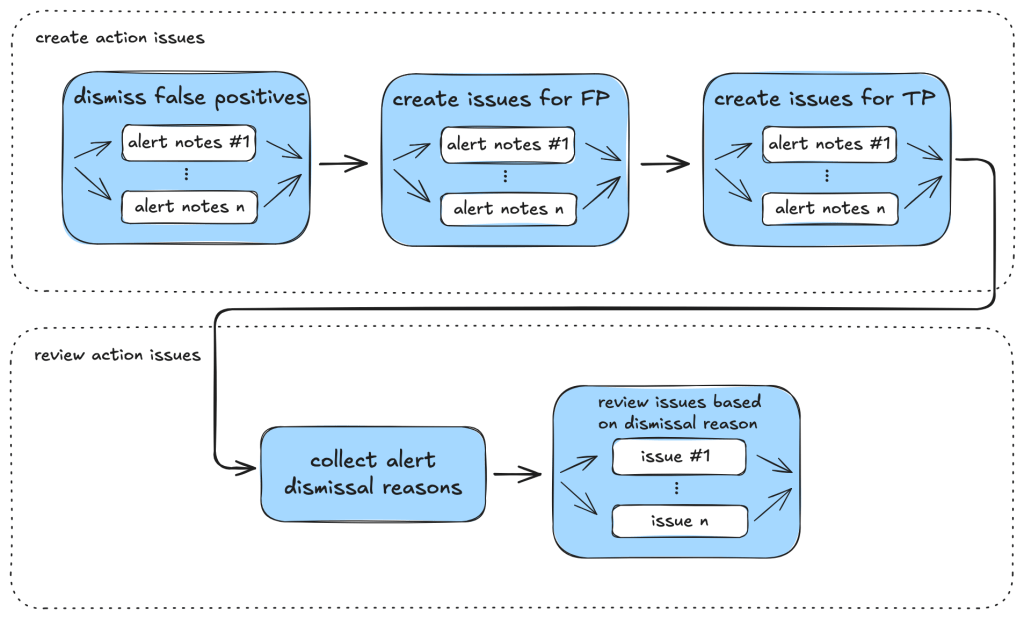
The following diagram illustrates the main components of the issue creation and review taskflows:
JavaScript alerts
Similarly to triaging action alerts, we also triaged code scanning alerts for the JavaScript/TypeScript languages to a lesser extent. In the JavaScript world, we triaged code scanning alerts for the client-side cross-site-scripting CodeQL rule. (js/xss)
The client-side cross-site scripting alerts have more variety with regards to their sources, sinks, and data flows when compared to the GitHub Actions alerts.
The prompts for analyzing those XSS vulnerabilities are focused on helping the person responsible for triage make an educated decision, not making the decision for them. This is done by highlighting the aspects that seem to make a given alert exploitable by an attacker and, more importantly, what likely prevents the exploitation of a given potential issue. Other than that, the taskflows follow a similar scheme as described in the GitHub Actions alerts section.
While triaging XSS alerts manually, we’ve often identified false positives due to these reasons:
Custom or unrecognized sanitization functions (e.g. using regex) that the SAST-tool cannot verify.
Reported sources that are likely unreachable in practice (e.g., would require an attacker to send a message directly from the webserver).
Untrusted data flowing into potentially dangerous sinks, whose output then is only used in an non-exploitable way.
The SAST-tool not knowing the full context where the given untrusted data ends up.
Based on these false positives, the prompts in the relevant taskflow or even in the active personality were extended and adjusted. If you encounter certain false positives in a project, auditing it makes sense to extend the prompt so that false positives are correctly marked (and also if alerts for certain sources/sinks are not considered a vulnerability).
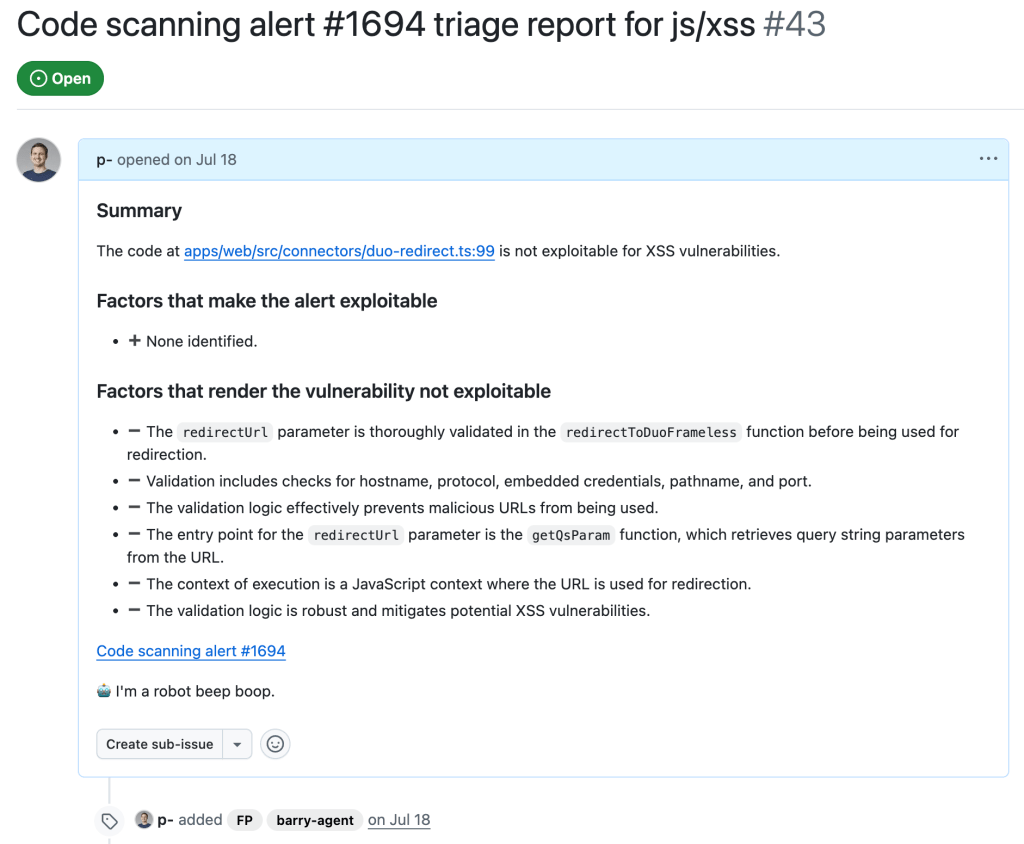
In the end, after executing the taskflows triage_js_ts_client_side_xss and create_issues_js_ts, the alert would result in GitHub issues such as:
While this is a sample for an alert worthy of following up (which turned out to be a true positive, being exploitable by using a javascript: URL), alerts that the taskflow agent decided were false positive get their issue labelled with “FP” (for false positive):
Taskflows development tips
In this section we share some of our experiences when working on these taskflows, and what we think are useful in the development of taskflows. We hope that these will help others create their own taskflows.
Use of database to store intermediate state
While developing a taskflow with multiple tasks, we sometimes encounter problems in tasks that run at a later stage. These can be simple software problems, such as API call failures, MCP server bugs, prompt-related problems, token problems, or quota problems.
By keeping tasks small and storing results of each task in a database, we avoided rerunning lengthy tasks when failure happens. When a task in a taskflow fails, we simply rerun the taskflow from the failed task and reuse the results from earlier tasks that are stored in the database. Apart from saving us time when a task failed, it also helped us to isolate effects of each task and tweak each task using the database created from the previous task as a starting point.
Breaking down complex tasks into smaller tasks
When we were developing the triage taskflows, the models that we used did not handle large context and complex tasks very well. When trying to perform complex and multiple tasks within the same context, we often ran into problems such as tasks being skipped or instructions not being followed.
To counter that, we divided tasks into smaller, independent tasks. Each started with a fresh new context. This helped reduce the context window size and alleviated many of the problems that we had.
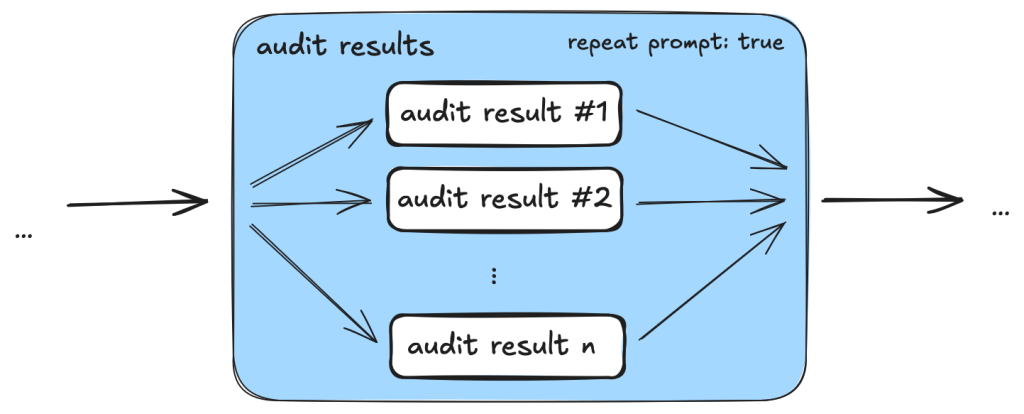
One particular example is the use of templated repeat_prompt tasks, which loop over a list of tasks and start a new context for each of them. By doing this, instead of going through a list in the same prompt, we ensured that every single task was performed, while the context of each task was kept to a minimum.
An added benefit is that we are able to tweak and debug the taskflows with more granularity. By having small tasks and storing results of each task in a database, we can easily separate out part of a taskflow and run it separately.
Delegate to MCP server whenever possible
Initially, when checking and gathering information, such as workflow triggers, from the source code, we simply incorporated instructions in prompts because we thought the LLM should be able to gather the information from the source code. While this worked most of the time, we also noticed some inconsistencies due to the non-deterministic nature of the LLM. For example, the LLM sometimes would only record a subset of the events that trigger the workflow, or it would sometimes make inconsistent conclusions about whether the trigger runs the workflow in a privileged context or not.
Since these information and checks can easily be performed programmatically, we ended up creating tools in the MCP servers to gather the information and perform these checks. This led to a much more consistent outcome.
By moving most of the tasks that can easily be done programmatically to MCP server tools while leaving the more complex logical reasoning tasks, such as finding permission checks for the LLM, we were able to leverage the power of LLM while keeping the results consistent.
Reusable taskflow to apply tweaks across taskflows
As we were developing the triage taskflows, we realized that many tasks can be shared between different triage taskflows. To make sure that tweaks in one taskflow can be applied to the rest and to reduce the amount of copy and paste, we needed to have some ways to refactor the taskflows and extract reusable components.
We added features like reusable tasks and prompts. Using these features allowed us to reuse and apply changes consistently across different taskflows.
Configuring models across taskflows
As LLMs are constantly developing and new versions are released frequently, it soon became apparent that we need a way to update model version numbers across taskflows. So, we added the model configuration feature that allows us to change models across taskflows, which is useful when the model version needs updating or we just want to experiment and rerun the taskflows with a different model.
Closing
In this post we’ve shown how we created taskflows for the seclab-taskflow-agent to triage code scanning alerts.
By breaking down the triage into precise and specific tasks, we were able to automate many of the more repetitive tasks using LLM. By setting out clear and precise criteria in the prompts and asking for precise answers from the LLM to include code references, the LLM was able to perform the tasks as instructed while keeping the amount of hallucination to a minimum. This allows us to leverage the power of LLM to triage alerts and reduces the amount of false positives greatly without the need to validate the alert dynamically.
As a result, we were able to discover ~30 real world vulnerabilities from CodeQL alerts after running the triaging taskflows.
The discussed taskflows are published in our repo and we’re looking forward to seeing what you’re going to build using them! More recently, we’ve also done some further experiments in the area of AI assisted code auditing and vulnerability hunting, so stay tuned for what’s to come!
When we use these taskflows to report vulnerabilities, our researchers review carefully all generated output before sending the report. We strongly recommend you do the same.
Note that running the taskflows can result in many tool calls, which can easily consume a large amount of quota.
The taskflows may create GitHub Issues. Please be considerate and seek the repo owner’s consent before running them on somebody else’s repo.
Since its founding in 2019, GitHub Security Lab has had one primary goal: community-powered security. We believe that the best way to improve software security is by sharing knowledge and tools, and by using open source software so that everybody is empowered to audit the code and report any vulnerabilities that they find.
Six years later, a new opportunity has emerged to take community-powered security to the next level. Thanks to AI, we can now use natural language to encode, share, and scale our security knowledge, which will make it even easier to build and share new security tools. And under the hood, we can use Model Context Protocol (MCP) interfaces to build on existing security tools like CodeQL.
As a community, we can eliminate software vulnerabilities far more quickly if we share our knowledge of how to find them. With that goal in mind, our team has been experimenting with an agentic framework called the GitHub Security Lab Taskflow Agent. We’ve been using it internally for a while, and we also recently shared it with the participants of the GitHub Secure Open Source Fund. Although it’s still experimental, it’s ready for others to use.
Demo: Variant analysis
It takes only a few steps to get started with seclab-taskflow-agent:
Create a personal access token.
Add codespace secrets.
Start a codespace.
Run a taskflow with a one-line command.
Please follow along and give it a try!
Note: This demo will use some of your token quota, and it’s possible that you’ll hit rate limits, particularly if you’re using a free GitHub account. But I’ve tried to design the demo so that it will work on a free account. The quotas will refresh after one day if you do hit the rate limits.
For security reasons, it’s not a good idea to save the PAT that you just created in a file on disk. Instead, I recommend saving it as a “codespace secret,” which means it’ll be available as an environment variable when you start a codespace in the next step.
Now go back to your codespaces settings and create a second secret named AI_API_TOKEN. You can use the same PAT for both secrets.
We want to use two secrets so that GH_TOKEN is used to access GitHub’s API and do things like read the code, whereas AI_API_TOKEN can access the AI API. Only one PAT is needed for this demo because it uses the GitHub Models API, but the framework also supports using other (not GitHub) APIs for the AI requests.
Answer “yes” when it asks for permission to run memcache_clear_cache; this is the first run so the cache is already empty. The demo downloads and analyzes a security advisory from the repository (in this example, GHSA-c944-cv5f-hpvr from cmark-gfm). It tries to identify the source code file that caused the vulnerability, then it downloads that source code file and audits it for other similar bugs. It’s not a sophisticated demo, and (thankfully) it has not found any new bugs in cmark-gfm 🫣. But it’s short and simple, and I’ll use it later to explain what a taskflow is. You can also try it out on a different repository, maybe one of your own, by changing the repo name at the end of the command.
Other ways to run
I recommend using a codespace because it’s a quick, reliable way to get started. It’s also a sandboxed environment, which is good for security. But there are other ways to run the framework if you prefer.
Running in a Linux terminal
These are the commands to install and run the demo locally on a Linux system:
These commands download our latest release from PyPI. Note that some of the toolboxes included with the framework may not work out-of-the-box with this approach because they depend on other software being installed. For example, the CodeQL toolbox depends on CodeQL being installed. You can copy the installation instructions from the devcontainer configuration that we use to build our codespaces environment.
Running in docker
We publish a docker image with tools like CodeQL pre-installed. You can run it with this script. Be aware that this docker image only includes seclab-taskflow-agent. We are planning to publish a second “batteries included” image that also includes seclab-taskflows in the future. Note: I’ll explain the relationship between seclab-taskflow-agent and seclab-taskflows in the section about the collaboration model.
Taskflows
A taskflow is a YAML file containing a list of tasks for the framework to execute. Let’s look at the taskflow for my demo (source):
seclab-taskflow-agent:
  filetype: taskflow
  version: 1

globals:
  repo:
  ghsa:

taskflow:
  - task:
      must_complete: true
      agents:
        - seclab_taskflow_agent.personalities.assistant
      toolboxes:
        - seclab_taskflow_agent.toolboxes.memcache
      user_prompt: |
        Clear the memory cache.

  - task:
      must_complete: true
      agents:
        - seclab_taskflow_agent.personalities.assistant
      toolboxes:
        - seclab_taskflows.toolboxes.ghsa
        - seclab_taskflows.toolboxes.gh_file_viewer
        - seclab_taskflow_agent.toolboxes.memcache
      user_prompt: |
        Fetch the details of the GHSA {{ GLOBALS_ghsa }} of the repo {{ GLOBALS_repo }}.

        Analyze the description to understand what type of bug caused
        the vulnerability. DO NOT perform a code audit at this stage, just
        look at the GHSA details.

        Check if any source file is mentioned as the cause of the GHSA.
        If so, identify the precise file path and line number.

        If no file path is mentioned, then report back to the user that
        you cannot find any file path and end the task here.

        The GHSA may not specify the full path name of the source
        file, or it may mention the name of a function or method
        instead, so if you have difficulty finding the file, try
        searching for the most likely match.

        Only identify the file path for now, do not look at the code or
        fetch the file contents yet.

        Store a summary of your findings in the memcache with the GHSA
        ID as the key. That should include the file path and the function that
        the file is in.

  - task:
      must_complete: true
      agents:
        - seclab_taskflow_agent.personalities.assistant
      toolboxes:
        - seclab_taskflows.toolboxes.gh_file_viewer
        - seclab_taskflow_agent.toolboxes.memcache
      user_prompt: |
        Fetch the GHSA ID and summary that were stored in the memcache
        by the previous task.

        Look at the file path and function that were identified. Use the
        get_file_lines_from_gh tool to fetch a small portion of the file instead of
        fetching the entire file.

        Fetch the source file that was identified as the cause of the
        GHSA in repo {{ GLOBALS_repo }}.

        Do a security audit of the code in the source file, focusing
        particularly on the type of bug that was identified as the
        cause of the GHSA.
You can see that it’s quite similar in structure to a GitHub Actions workflow. There’s a header at the top, followed by the body, which contains a series of tasks. The tasks are completed one by one by the agent framework. Let’s go through the sections one by one, focusing on the most important bits:
Header
The first part of the header defines the file type. The most frequently used file types are:
taskflow: Describes a sequence of tasks for the framework to execute.
personality: It’s often useful to ask to assume a particular personality while executing a task. For example, we have an action_expert personality that is useful for auditing actions workflows.
toolbox: Contains instructions for running an MCP server. For example, the demo uses the gh_file_viewer toolbox for downloading source code files from GitHub.
The globals section defines global variables named “repo” and “ghsa,” which we initialized with the command-line arguments -g repo=github/cmark-gfm and -g ghsa=GHSA-c944-cv5f-hpvr. It’s a crude way to parameterize a taskflow.
Task 1
Tasks always specify a “personality” to use. For non-specialized tasks, we often just use the assistant personality.
Each task starts with a fresh context, so the only way to communicate a result from one task to the next is by using a toolbox as an intermediary. In this demo, I’ve used the memcache toolbox, which is a simple key-value store. We find that this approach is better for debugging, because it means that you can rerun an individual task with consistent inputs when you’re testing it.
This task also demonstrates that toolboxes can ask for confirmation before doing something potentially destructive, which is an important protection against prompt injection attacks.
Task 2
This task uses the ghsa toolbox to download the security advisory from the repository and the gh_file_viewer toolbox to find the source file that’s mentioned in the advisory. It creates a summary and uses the memcache toolbox to pass it to the next task.
Task 3
This task uses the memcache toolbox to fetch the results from the previous task and the gh_file_viewer toolbox to download the source code and audit it.
Often, the wording of a prompt is more subtle than it looks, and this third task is an example of that. Previous versions of this task tried to analyze the entire source file in one go, which used too many tokens. So the second paragraph, which asks to analyze a “small portion of the file,” is very important to make this task work successfully.
Taskflows summary
I hope this demo has given you a sense of what a taskflow is. You can find more detailed documentation in README.md and GRAMMAR.md. You can also find more examples in this subdirectory of seclab-taskflow-agent and this subdirectory of seclab-taskflows.
Collaboration model
We would love for members of the community to publish their own suites of taskflows. To make collaboration easy, we have built on top of Python’s packaging ecosystem. Our own two repositories are published as packages on PyPI:
The reason why we have two repositories is that we want to separate the “engine” from the suites of taskflows that use it. Also, seclab-taskflows is intended to be an easy-to-copy template for anybody who would like to publish their own suite of taskflows. To get started on your package, we recommend using the hatch new command to create the initial project structure. It will generate things like the pyproject.toml file, which you’ll need for uploading to PyPI. Next we recommend creating a directory structure like ours, with sub-directories for taskflows, toolboxes, etc. Feel free to also copy other parts of seclab-taskflows, such as our publish-to-pypi.yaml workflow, which automatically uploads your package to PyPI when you push a tag with a name like “v1.0.0.”
An important feature of the collaboration model is that it is also easy to share MCP servers. For example, check out the MCP servers that are included with the seclab-taskflows package. Each MCP server has a corresponding toolbox YAML file (in the toolboxes directory) which contains the instructions for running it.
The import system
Taskflows often need to refer to other files, like personalities or toolboxes. And for the collaboration model to work well, we want you to be able to reuse personalities and toolboxes from other packages. We are leveraging Python’s importlib to make it easy to reference a file from a different package. To illustrate how it works, here’s an example in which seclab-taskflows is using a toolbox from seclab-taskflow-agent:
The implementation splits the name seclab_taskflow_agent.toolboxes.memcache into a directory (seclab_taskflow_agent.toolboxes) and a filename (memcache). Then it uses Python’s importlib.resources.files to locate the directory and loads the file named memcache.yaml from that directory. The only quirk of this system is that names always need to have at least two parts, which means that your files always need to be stored at least one directory deep. But apart from that, we’re using Python’s import system as is, which means that there’s plenty of documentation and advice available online.
Project vision
We have two main goals with this project. First is to encourage community-powered security. Many of the agentic security tools that are currently popping up are closed-source black boxes, which is the antithesis of what we stand for as a team. We want people to be able to look under the hood and see how the taskflows work. And we want people to be able to easily create and share their own taskflows. As a community, we can eliminate software vulnerabilities far more quickly if we share our knowledge of how to find them. We’re hoping that taskflows can be an effective tool for that.
Second is to create a tool that we want to use ourselves. As a research team, we want a tool that’s good for rapid experimentation. We need to be able to quickly create a new security rule and try it out. With that in mind, we’re not trying to create the world’s most polished or efficient tool, but rather something that’s easy to modify.
For a deeper technical dive into how we’re using the framework for security research, explore a blog post by my colleagues Peter Stöckli and Man Yue Mo, where they share how they’re using the framework for triaging CodeQL alerts.
For over a decade, GitHub has offered enterprise authentication using SAML (Security Assertion Markup Language), starting with our 2.0.0 release of GitHub Enterprise Server in November 2014. SAML single sign-on (SSO) allows enterprises to integrate their existing identity providers with a broad range of GitHub products, extend conditional access policies, and bring enterprise organization management to GitHub.
To ship this feature, we had to build and maintain support for the SAML 2.0 specification, which defines how to perform authentication and establish trust between an identity provider and our products, the service provider. This involves generating SAML metadata for identity providers, generating SAML authentication requests as part of the service provider–initiated SSO flow, and most importantly, processing and validating SAML responses from an identity provider in order to authenticate users.
These code paths are critical from a security perspective. Here’s why:
Any bug in how authentication is established and validated between the service and identity providers can lead to a bypass of authentication or impersonation of other users.
These areas of the codebase involve XML parsing and cryptography, and are dependent on complex specifications, such as the XML Signature, XML Encryption, and XML Schema standards.
The attack surface of SAML code is very broad, so the data that is validated for authentication and passed through users’ (and potential attackers’) browsers could be manipulated.
This combination of security criticality, complexity, and attack surface puts the implementation of SAML at a higher level of risk than most of the code we build and maintain.
Background
When we launched SAML support in 2014, there were few libraries available for implementing it. After experimenting initially with ruby-saml, we decided to create our own implementation to better suit our needs.
Over the years since, we have continually invested in hardening these authentication flows, including working with security researchers both internally and through our Security Bug Bounty to identify and fix vulnerabilities impacting our implementation.
However, for each vulnerability addressed, there remained lingering concerns given the breadth and complexity of root causes we identified. This is why we decided to take a step back and rethink how we could move forward in a more sustainable and holistic manner to secure our implementation.
So, how do you build trust in a technology as complex and risky as SAML?
Last year, this is exactly the question our engineering team set out to answer. We took a hard look at our homegrown implementation and decided it was time for change. We spent time evaluating the previous bounties we’d faced and brainstormed new ideas on how to improve our SAML strategy. During this process, we identified several promising changes we could make to regain our confidence in SAML.
In this article, we’ll describe the four key steps we took to get there:
Rethinking our library: Evaluating the ruby-saml library and auditing its implementation
Validating the new library with A/B testing: Building a system where we could safely evaluate and observe changes to our SAML processing logic
Schema validations and minimizing our attack surface: Reducing the complexity of input processing by tightening schema validation
Limiting our vulnerability impact: Using multiple parsers to decrease risk
Rethinking our library
When we reviewed our internal implementation, we recognized the advantages of transitioning to a library with strong community support that we could contribute to alongside a broader set of developers.
After reviewing a number of ruby SAML libraries, we decided to focus again on utilizing the ruby-saml library maintained by Sixto Martín for a few reasons:
This library is used by a number of critical SaaS products, including broad adoption through its usage in omniauth-saml.
Recent bugs and vulnerabilities were being reported and fixed in the library, showing active maintenance and security response.
This support and automation is something we wouldn’t be able to benefit from with our own internal implementation.
But moving away from our internal implementation wasn’t a simple decision. We had grown familiar with it, and had invested significant time and effort into identifying and addressing vulnerabilities. We didn’t want to have to retread the same vulnerabilities and issues we had with our own code.
With that concern, we set out to see what work across our security and engineering teams we could do to gain more confidence in this new library before making a potential switch.
In collaboration with our bug bounty team and researchers, our product security team, and the GitHub Security Lab, we laid out a gauntlet of validation and testing activities. We spun up a number of security auditing activities, worked with our VIP bug bounty researchers (aka Hacktocats) who had expertise in this area (thanks @ahacker1) and researchers on the GitHub Security Lab team (thanks @p-) to perform in-depth code analysis and application security testing.
This work resulted in the identification of critical vulnerabilities in the ruby-saml library and highlighted areas for overall hardening that could be applied to the library to remove the possibility of classes of vulnerabilities in the code.
But is security testing and auditing enough to confidently move to this new library? Even with this focus on testing, assessment, and vulnerability remediation, we knew from experience that we couldn’t just rely on this point-in-time analysis.
The underlying code paths are just too complex to hang our hat on any amount of time-bound code review. With that decision, we shifted our focus toward engineering efforts to validate the new library, identify edge cases, and limit the attack surface of our SAML code.
Validating the new library with A/B testing
GitHub.com processes around one million SAML payloads per business day, making it the most widely used form of external authentication that we support. Because this code is the front door for so many enterprise customers, any changes require a high degree of scrutiny and testing.
In order to preserve the stability of our SAML processing code while evaluating ruby-saml, we needed an abstraction that would give us the safety margins to experiment and iterate quickly.
There are several solutions for this type of problem, but at GitHub, we use a tool we have open sourced called Scientist. At its core, Scientist is a library that allows you to execute an experiment and compare two pieces of code: a control and a candidate. The result of the comparison is recorded so that you can monitor and debug differences between the two sources.
The beauty of Scientist is it always honors the result of the control, and isolates failures in your candidate, freeing you to truly experiment with your code in a safe way. This is useful for tasks like query performance optimization—or in our case, gaining confidence in and validating a new library.
Applying Scientist to SAML
GitHub supports configuring SAML against both organizations and enterprises. Each of these configurations is handled by a separate controller that implements support for SAML metadata, initiation of SAML authentication requests, and SAML response validation.
For the sake of building confidence, our primary focus was the code responsible for handling SAML response validation, also known as the Assertion Consumer Service (ACS) URL. This is the endpoint that does the heavy lifting to process the SAML response coming from the identity provider, represented in the SAML sequence diagram below as “Validate SAML Response.” Most importantly, this is where most vulnerabilities occur.
In order to gain confidence in ruby-saml, we needed to validate that we could get the library to handle our existing traffic correctly.
To accomplish this, we applied Scientist experiments to the controller code responsible for consuming the SAML response and worked on the following three critical capabilities:
Granular rollout gating: Scientist provides a percent-based control for enabling traffic on an experiment. Given the nature of this code path, we wanted an additional layer of feature flagging to ensure that we could send our own test accounts through the path before actual customer traffic
Observability: GitHub has custom instrumentation for experiments, which sends metrics to Datadog. We leaned heavily on this for monitoring our progress, but also added supplemental logging to generate more granular validation data to help debug differences between libraries.
Idempotency: There are pieces of state that are tracked during a SAML flow, such as tokens for CSRF, and we needed to ensure that our experiment did not modify them. Any changes must be clear of these code paths to prevent overwriting state.
When all was said and done, our experiment looked something like the following:
# gate the experiment by business, allowing us to run test account traffic through first
if business.feature_enabled?(:run_consume_experiment)
  # auth_result is the result of `e.use` below
  auth_result = science "consume_experiment" do |e|

    # ensure that we isolate the raw response ahead of time, and scope the experiment to
    # just the validation portion of response processing
    e.use { consume_control_validation(raw_saml_response) }
    e.try { consume_candidate_validation(raw_saml_response) }

    # compare results and perform logging
    e.compare { |control, candidate| compare_and_log_results(control, candidate) }
  end
end

# deal with auth_result below...
So, how did our experiments help us build confidence in ruby-saml?
For starters, we used them to identify configuration differences between implementations. This guided our integration with the library, ensuring it could handle traffic in a way that was behaviorally consistent.
As an example, in September 2024 we noticed in our logs that approximately 3% of mismatches were caused by SAML issuer validation discrepancies. Searching the logs, we found that ruby-saml validated the issuer against an empty string. This helped us identify that some SAML configurations had an issuer set to an empty string, rather than null in the database.
Given that GitHub has not historically required an issuer for all SAML configurations, if the value is blank or unset, we skip issuer validation in our implementation. To handle this legacy invariant, we shipped a change that prevented configuring ruby-saml with blank or null issuer values, allowing the validation to be skipped in the library.
The impact of this change can be seen in graph below:
Once we set ruby-saml up correctly, our experiments allowed us to run all of our traffic through the library to observe how it would perform over an extended period of time. This was critical for building confidence that we had covered all edge cases. Most importantly, by identifying edge cases where the implementations handled certain inputs differently, we could investigate if any of these had security-relevant consequences.
By reviewing these exceptions, we were able to proactively identify incorrect behavior in either the new or old implementation. We also noticed during testing that ruby-saml rejected responses with multiple SAML assertions, while ours was more lenient.
While not completely wrong, we realized our implementation was trying to do too much. The information gained during this testing allowed us to safely augment our candidate code with new ideas and identify further areas of hardening like our next topic.
Schema validations and minimizing our attack surface
Before looking into stricter input validation, we first have to dive into what makes up the inputs we need to validate. Through our review of industry vulnerabilities, our implementation, and related research, we identified two critical factors that make parsing and validating this input particularly challenging:
The relationship between enveloped XML signatures and the document structure
The SAML schema flexibility
Enveloped XML Signatures
A key component of SAML is the XML signatures specification, which provides a way to sign and verify the integrity of SAML data. There are multiple ways to use XML signatures to sign data, but SAML relies primarily on enveloped XML signatures, where the signature itself is embedded within the element it covers.
Here’s an example of a <Response> element with an enveloped XML signature:
In order to verify this signature, we performed some version of the following high-level process:
Find the signature: Locate the <Signature> element in the <Response> element.
Extract values: Get the <SignatureValue> and <SignedInfo> from the <Signature>.
Extract reference and digest: From <SignedInfo>, extract the <Reference> (a pointer to the signed part of the document—note the URI attribute and the associated ID attribute on <Response>) and <DigestValue> (a hashed version of <Response>, minus the <Signature>).
Verify the digest: Apply the transformation instructions in the signature to the <Response> element and compare the results to the <DigestValue>.
Validate integrity: If the digest is valid, hash and encode <SignedInfo> using another algorithm, then use the configured public key (exchanged during SAML set up) to verify it against the <SignatureValue>.
If we get through this list of steps and the signature is valid, we assume that the <Response> element has not been tampered with. The interesting part about this is that to process the signature that legitimizes the <Response> element’s contents, we had to parse the <Response> element’s contents!
Put another way, the integrity of the SAML data is tied to its document structure, but that same document structure plays a critical role in how it is validated. Herein lies the crux of many SAML validation vulnerabilities.
This troubling relationship between structure and integrity can be exploited, and has been many times. One of the more common classes of vulnerability is the XML signature wrapping attack, which involves tricking the library into trusting the wrong data.
SAML libraries typically deal with this by querying the document and rejecting unexpected or ambiguous input shapes. This strategy isn’t ideal because it still requires trusting the document before verifying its authenticity, so any small blunders can be targeted.
Lax SAML schema definitions
SAML responses must be valid against the SAML 2.0 XML schema definition (XSD). XSD files are used to define the structure of XML, creating a contract between the sender and receiver about the sequence of elements, data types, and attributes.
This is exactly what we would look for in creating a clear set of inputs that we can easily limit parsing and validation around! Unfortunately, the SAML schema is quite flexible in what it allows, providing many opportunities for a document structure that would never appear in typical SAML responses.
For example, take a look at the SAML response below and notice the <StatusDetail> element. <StatusDetail> is one example in the spec that allows arbitrary data of any type and namespace to be added to the document. Consequently, including the elements <Foo>, <Bar>, and <Baz> into <StatusDetail> below would be completely valid given the SAML 2.0 schema.
Knowing that the signature verification process is sensitive to the document structure, this is problematic. These schema possibilities leave gaps that your code must check.
Consider an implementation that does not correctly associate signatures with signed data, only validating the first signature it finds because it assumes that the signature should always be in the <Response> element (which encompasses the <Assertion> element), or in the <Assertion> element directly. This is where the signatures are located in the schema, after all.
To exploit this, replace the contents of our previous example with a piece of correctly signed SAML data from the identity provider (remember that the schema allows any type of data in <StatusDetail>). Since the library only cares about the first signature it finds, it never verifies the <Assertion> signature in the example below, allowing an attacker to modify its contents to gain system access.
There are so manydifferent permutations of vulnerabilities like this that depend on the loose SAML schema, including many that we have protected against in our internal implementation.
Limiting the attack surface
While we can’t change how SAML works or the schema that defines it, what if we change the schema we validate it against? By making a stricter schema, we could enforce exactly the structure we expect to process, thereby reducing the likelihood of signature processing mistakes. Doing this would allow us to rule out bad data shapes before ever querying the document.
But in order to build a stricter schema, we first needed to confirm that the full SAML 2.0 schema wasn’t necessary. Our process began with bootstrapping: we gathered SAML responses from test accounts provided by our most widely integrated identity providers.
Starting small, we focused on Entra and Okta, which together accounted for nearly 85% of our SSO traffic volume. Using these responses, we crafted an initial schema based on real-world usage.
Next, we used Scientist to validate the schemas against our vast amount of production traffic. We first A/B tested with the very restrictive “bootstrapped” schema and gradually added back in the parts of the schema that we saw in anonymized traffic.
This allowed us to define a minimal schema that only contained the structures we saw in real-world requests. The same tooling we used for A/B testing allowed us to craft a minimal schema by iterating on the failures we saw across millions of requests.
How did the “strict” schema turn out based on our real-world validation from identity providers? Below are some of the key takeaways and schema restrictions we now enforce:
Ensure Signature elements are only where you expect them
We expect at most two elements to be signed: the Response, and the Assertion, but we know the schema is more lenient. For example, we don’t expect the SubjectConfirmationData or Advice elements to contain a signature, yet the following is a valid structure:
These are ambiguous situations that we can prevent. By removing <any> type elements, we can prevent additional signatures from being added to the document, and reduce the risk of attacks targeting flaws in signature selection logic.
It’s safe to enforce a single assertion in your response
The SAML spec allows for an unbounded number of assertions:
We expect exactly one assertion, and most SAML libraries account for this invariant by querying and rejecting documents with multiple assertions. By removing the minOccurs and maxOccurs attributes from the schema’s assertion choice, we can reject responses containing multiple assertions ahead of time.
This matters because multiple assertions in the document lead to structures that are vulnerable to XML signature wrapping attacks. Enforcing a single assertion removes structural ambiguity around the most important part of the document.
Remove additional elements and attributes that are unused in practice by your implementation
This is probably the least specific piece of advice, but important: Removing what you don’t support from the existing schema will reduce the risk of your application code handling that input incorrectly. For example, if you don’t support EncryptedAssertions, you should probably omit those definitions from your schema all together to prevent your code from touching data it doesn’t expect.
It is safe to reject document type definitions (DTDs)
While not strictly XSD related, we felt this was an important callout. DTDs are an older and more limited alternative to XSDs that add an unnecessary attack vector. Given that SAML 2.0 relies on schema definition files for validation, DTDs are both outdated and unnecessary, so we felt it best to disallow them altogether. In the wild, we never saw DTDs being used by identity providers.
The goal of a stricter SAML schema is to simplify working with SAML signatures and documents by removing ambiguity. By enforcing precise rules about where signatures should appear and their relationship to the data, validation becomes more straightforward and reliable.
While stricter schemas don’t eliminate all risks—since signature processing also depends on implementation—they significantly reduce the attack surface, enhancing overall security and minimizing the complex parsing we need to reason about for validation.
Limiting our vulnerability impact
At this point, we had made significant progress in addressing the risks associated with integrating ruby-saml and had restricted our critical inputs to a much smaller portion of the SAML schema.
By implementing safeguards, validating critical code paths, and taking a deliberate approach to testing, we mitigated many of the uncertainties inherent in adopting a new library and of SAML in general.
However, one fundamental truth remained: implementation vulnerabilities are inevitable, and we wanted to see what additional hardening we could apply to limit their impact.
Considering a compromise
Migrating to ruby-saml fully would mean embracing a more modern, actively maintained codebase that addresses known vulnerabilities. It would also position us for better long-term maintainability with broad community support: one of the primary motivators for this initiative.
However, replacing a core component like a SAML library isn’t without trade-offs. The risk of new vulnerabilities that weren’t surfaced during our work would always exist. With this in mind, we considered an alternative path: Instead of relying entirely on one library, why not use both?
We took this idea and ran with it by implementing a dual-parsing strategy and running both libraries independently and in parallel, requiring them to agree on validation before accepting a result. It might sound redundant and inefficient, but here’s why it worked to harden our implementation:
Defense in depth: The two libraries parse SAML differently. Exploiting both would require two independent vulnerabilities that work in unison—a much taller order than compromising just one.
Built-in feedback: When they disagree, we are notified. This gives us the opportunity to identify and investigate potential security critical edge cases. We can then feed stricter validation logic from one library back into the other.
No pressure to rush: Our original library is battle-tested and hardened. Using both together allows us to leverage its reliability while adopting the benefits of ruby-saml. We can always revisit this decision as we learn more about this strategy and its performance over time.
With this approach, we recognize that keeping something that works—when paired with something new—can be more powerful than replacing it outright. Of course, there are still risks involved. But by having two parsers, we increase our exposure of implementation vulnerabilities in our XML parsing code: things like memory corruption or XML external entity vulnerabilities. We also increase the burden of having to maintain two libraries.
Despite this, we decided that this risk and time investment is worth the increased resilience to the complex validation logic that is the core to the historical and critical vulnerabilities we’ve seen.
Learn from our blueprint
While our original goal was to “just” move to a new SAML library, we ended up taking the opportunity to reduce the risk profile of our entire SAML implementation.
By investing in upfront code review, security testing, and A/B testing and validation, we’ve gained confidence in the implementation of this new library. We then decreased the complexity of these code paths by restricting our allowed schema to one that is minimized using real world data. Finally, we’ve limited the impact of a single vulnerability found in either library by combining the strengths of both ruby-saml and our internal implementation.
As this code continues to parse almost a million SAML responses per day, our robust logging and exception handling will provide us with the observability needed to adjust our strategy or identify new hardening opportunities.
This experience should provide any team with a great blueprint on how to approach other complex or dangerous parts of a codebase they may be tasked with maintaining or hardening—and a reminder that incremental, data-driven experiments and compromises can sometimes lead to unexpected outcomes.
Critical authentication bypass vulnerabilities (CVE-2025-25291 + CVE-2025-25292) were discovered in ruby-saml up to version 1.17.0. Attackers who are in possession of a single valid signature that was created with the key used to validate SAML responses or assertions of the targeted organization can use it to construct SAML assertions themselves and are in turn able to log in as any user. In other words, it could be used for an account takeover attack. Users of ruby-saml should update to version 1.18.0. References to libraries making use of ruby-saml (such as omniauth-saml) need also be updated to a version that reference a fixed version of ruby-saml.
In this blog post, we detail newly discovered authentication bypass vulnerabilities in the ruby-saml library used for single sign-on (SSO) via SAML on the service provider (application) side. GitHub doesn’t currently use ruby-saml for authentication, but began evaluating the use of the library with the intention of using an open source library for SAML authentication once more. This library is, however, used in other popular projects and products. We discovered an exploitable instance of this vulnerability in GitLab, and have notified their security team so they can take necessary actions to protect their users against potential attacks.
GitHub previously used the ruby-saml library up to 2014, but moved to our own SAML implementation due to missing features in ruby-saml at that time. Following bug bounty reports around vulnerabilities in our own implementation (such as CVE-2024-9487, related to encrypted assertions), GitHub recently decided to explore the use of ruby-saml again. Then in October 2024, a blockbuster vulnerability dropped: an authentication bypass in ruby-saml (CVE-2024-45409) by ahacker1. With tangible evidence of exploitable attack surface, GitHub’s switch to ruby-saml had to be evaluated more thoroughly now. As such, GitHub started a private bug bounty engagement to evaluate the security of the ruby-saml library. We gave selected bug bounty researchers access to GitHub test environments using ruby-saml for SAML authentication. In tandem, the GitHub Security Lab also reviewed the attack surface of the ruby-saml library.
As is not uncommon when multiple researchers are looking at the same code, both ahacker1, a participant in the GitHub bug bounty program, and I noticed the same thing during code review: ruby-saml was using two different XML parsers during the code path of signature verification. Namely, REXML and Nokogiri. While REXML is an XML parser implemented in pure Ruby, Nokogiri provides an easy-to-use wrapper API around different libraries like libxml2, libgumbo and Xerces (used for JRuby). Nokogiri supports parsing of XML and HTML. It looks like Nokogiri was added to ruby-saml to support canonicalization and potentially other things REXML didn’t support at that time.
We both inspected the same code path in the validate_signature of xml_security.rb and found that the signature element to be verified is first read via REXML, and then also with Nokogiri’s XML parser. So, if REXML and Nokogiri could be tricked into retrieving different signature elements for the same XPath query it might be possible to trick ruby-saml into verifying the wrong signature. It looked like there could be a potential authentication bypass due to a parser differential!
The reality was actually more complicated than this.
Roughly speaking, four stages were involved in the discovery of this authentication bypass:
Discovering that two different XML parsers are used during code review.
Establishing if and how a parser differential could be exploited.
Finding an actual parser differential for the parsers in use.
Leveraging the parser differential to create a full-blown exploit.
To prove the security impact of this vulnerability, it was necessary to complete all four stages and create a full-blown authentication bypass exploit.
Security assertion markup language (SAML) responses are used to transport information about a signed-in user from the identity provider (IdP) to the service provider (SP) in XML format. Often the only important information transported is a username or an email address. When the HTTP POST binding is used, the SAML response travels from the IdP to the SP via the browser of the end user. This makes it obvious why there has to be some sort of signature verification in play to prevent the user from tampering with the message.
Let’s have a quick look at what a simplified SAML response looks like:
Note: in the response above the XML namespaces were removed for better readability.
As you might have noticed: the main part of a simple SAML response is its assertion element (A), whereas the main information contained in the assertion is the information contained in the Subject element (B) (here the NameID containing the username: admin). A real assertion typically contains more information (e.g. NotBefore and NotOnOrAfter dates as part of a Conditions element.)
Normally, the Assertion (A) (without the whole Signature part) is canonicalized and then compared against the DigestValue (C) and the SignedInfo (D) is canonicalized and verified against the SignatureValue (E). In this sample, the assertion of the SAML response is signed, and in other cases the whole SAML response is signed.
We learned that ruby-saml used two different XML parsers (REXML and Nokogiri) for validating the SAML response. Now let’s have a look at the verification of the signature and the digest comparison.
The focus of the following explanation lies on the validate_signature method inside of xml_security.rb.
Inside that method, there’s a broad XPath query with REXML for the first signature element inside the SAML document:
Hint: When reading the code snippets, you can tell the difference between queries for REXML and Nokogiri by looking at how they are called. REXML methods are prefixed with REXML::, whereas Nokogiri methods are called on document.
Later, the actual SignatureValue is read from this element:
Note: the name of the Signature element might be a bit confusing. While it contains the actual signature in the SignatureValue node it also contains the part that is actually signed in the SignedInfo node. Most importantly the DigestValue element contains the digest (hash) of the assertion and information about the used key.
So, an actual Signature element could look like this (removed namespace information for better readability):
The method extract_signed_element_idextracts the signed element id with help of REXML. From the previous authentication bypass (CVE-2024-45409), there’s now a check that only one element with the same ID can exist.
The first of the reference_nodes is taken and canonicalized:
The assertion is extracted and canonicalized with Nokogiri, and then hashed. In contrast, the hash against which it will be compared is extracted with REXML.
The SignedInfo element is extracted and canonicalized with Nokogiri - it is then verified against the SignatureValue, which was extracted with REXML.
The question is: is it possible to create an XML document where REXML sees one signature and Nokogiri sees another?
It turns out, yes.
Ahacker1, participating in the bug bounty, was faster to produce a working exploit using a parser differential. Among other things, ahacker1 was inspired by the XML roundtrips vulnerabilities published by Mattermost’s Juho Forsén in 2021.
Not much later, I produced an exploit using a different parser differential with the help of Trail of Bits’ Ruby fuzzer called ruzzy.
Both exploits result in an authentication bypass. Meaning that an attacker, who is in possession of a single valid signature that was created with the key used to validate SAML responses or assertions of the targeted organization, can use it to construct assertions for any users which will be accepted by ruby-saml. Such a signature can either come from a signed assertion or response from another (unprivileged) user or in certain cases, it can even come from signed metadata of a SAML identity provider (which can be publicly accessible).
An exploit could look like this. Here, an additional Signature was added as part of the StatusDetail element that is only visible to Nokogiri:
In summary:
The SignedInfo element (A) from the signature that is visible to Nokogiri is canonicalized and verified against the SignatureValue (B) that was extracted from the signature seen by REXML.
The assertion is retrieved via Nokogiri by looking for its ID. This assertion is then canonicalized and hashed (C). The hash is then compared to the hash contained in the DigestValue (D). This DigestValue was retrieved via REXML. This DigestValue has no corresponding signature.
So, two things take place:
A valid SignedInfo with DigestValue is verified against a valid signature. (which checks out)
A fabricated canonicalized assertion is compared against its calculated digest. (which checks out as well)
This allows an attacker, who is in possession of a valid signed assertion for any (unprivileged) user, to fabricate assertions and as such impersonate any other user.
Parts of the currently known, undisclosed exploits can be stopped by checking for Nokogiri parsing errors on SAML responses. Sadly, those errors do not result in exceptions, but need to be checked on the errors member of the parsed document:
doc = Nokogiri::XML(xml) do |config|
  config.options = Nokogiri::XML::ParseOptions::STRICT | Nokogiri::XML::ParseOptions::NONET
end

raise "XML errors when parsing: " + doc.errors.to_s if doc.errors.any?
While this is far from a perfect fix for the issues at hand, it renders at least one exploit infeasible.
We are not aware of any reliable indicators of compromise. While we’ve found a potential indicator of compromise, it only works in debug-like environments and to publish it, we would have to reveal too many details about how to implement a working exploit so we’ve decided that it’s better not to publish it. Instead, our best recommendation is to look for suspicious logins via SAML on the service provider side from IP addresses that do not align with the user’s expected location.
Some might say it’s hard to integrate systems with SAML. That might be true. However, it’s even harder to write implementations of SAML using XML signatures in a secure way. As others have stated before: it’s probably best to disregard the specifications, as following them doesn’t help build secure implementations.
To rehash how the validation works if the SAML assertion is signed, let’s have a look at the graphic below, depicting a simplified SAML response. The assertion, which transports the protected information, contains a signature. Confusing, right?
To complicate it even more: What is even signed here? The whole assertion? No!
What’s signed is the SignedInfo element and the SignedInfo element contains a DigestValue. This DigestValue is the hash of the canonicalized assertion with the signature element removed before the canonicalization. This two-stage verification process can lead to implementations that have a disconnect between the verification of the hash and the verification of the signature. This is the case for these Ruby-SAML parser differentials: while the hash and the signature check out on their own, they have no connection. The hash is actually a hash of the assertion, but the signature is a signature of a different SignedInfo element containing another hash. What you actually want is a direct connection between the hashed content, the hash, and the signature. (And once the verification is done you only want to retrieve information from the exact part that was actually verified.) Or, alternatively, use a less complicated standard to transport a cryptographically signed username between two systems - but here we are.
In this case, the library already extracted the SignedInfo and used it to verify the signature of its canonicalized string,canon_string. However, it did not use it to obtain the digest value. If the library had used the content of the already extracted SignedInfo to obtain the digest value, it would have been secure in this case even with two XML parsers in use.
As shown once again: relying on two different parsers in a security context can be tricky and error-prone. That being said: exploitability is not automatically guaranteed in such cases. As we have seen in this case, checking for Nokogiri errors could not have prevented the parser differential, but could have stopped at least one practical exploitation of it.
The initial fix for the authentication bypasses does not remove one of the XML parsers to prevent API compatibility problems. As noted, the more fundamental issue was the disconnect between verification of the hash and verification of the signature, which was exploitable via parser differentials. The removal of one of the XML parsers was already planned for other reasons, and will likely come as part of a major release in combination with additional improvements to strengthen the library. If your company relies on open source software for business-critical functionality, consider sponsoring them to help fund their future development and bug fix releases.
If you’re a user of ruby-saml library, make sure to update to the latest version, 1.18.0, containing fixes for CVE-2025-25291 and CVE-2025-25292. References to libraries making use of ruby-saml (such as omniauth-saml) need also be updated to a version that reference a fixed version of ruby-saml. We will publish a proof of concept exploit at a later date in the GitHub Security Lab repository.
Special thanks to Sixto Martín, maintainer of ruby-saml, and Jeff Guerra from the GitHub Bug Bounty program.
Special thanks also to ahacker1 for giving inputs to this blog post.
2024-11-04: Bug bounty report demonstrating an authentication bypass was reported against a GitHub test environment evaluating ruby-saml for SAML authentication.
2024-11-04: Work started to identify and test potential mitigations.
2024-11-12: A second authentication bypass was found by Peter that renders the planned mitigations for the first useless.
2024-11-13: Initial contact with Sixto Martín, maintainer of ruby-saml.
2024-11-14: Both parser differentials are reported to ruby-saml, the maintainer responds immediately.
2024-11-14: The work on potential patches by the maintainer and ahacker1 begins. (One of the initial ideas was to remove one of the XML parsers, but this was not feasible without breaking backwards compatibility).
2025-02-04: ahacker1 proposes a non-backwards compatible fix.
2025-02-06: ahacker1 also proposes a backwards compatible fix.
2025-02-12: The 90 days deadline of GitHub Security Lab advisories ends.
2025-02-16: The maintainer starts working on a fix with the idea to be backwards-compatible and easier to understand.
2025-02-17: Initial contact with GitLab to coordinate a release of their on-prem product with the release of the ruby-saml library.
2025-03-12: A fixed version of ruby-saml was released.